Tekxon Technology V5200i Manuel utilisateur

i
Preface
Congratulations on your purchase of this advanced digital camera, with
capabilities of a video recorder. Ensure that you read this manual carefully and
keep it in a safe place for future reference.
About this manual
Every effort has been made to ensure that the contents of this manual are
correct and up-to-date. However, no guarantee is made regarding the
accuracy of the contents, and the manufacturer reserves the right to make
changes without notice.
Copyright
© Copyright 2007.
All rights reserved. No part of this publication may be reproduced, transmitted,
transcribed, stored in a retrieval system or translated into any language or
computer language, in any form or by any means, electronic, mechanical,
magnetic, optical, chemical, manual or otherwise, without the prior written
permission of the manufacturer.

ii
Safety
Do not use or store the product in dusty, dirty, or sandy areas, as its
components may be damaged.
Do not store the product in hot areas. High temperatures can shorten
the life of electronic devices, and warp or melt certain plastics.
Do not store the product in cold areas. When the product warms up to
its normal temperature, moisture can form inside, possible damaging
the electronic circuits.
Do not attempt to open the casing.
Do not drop or knock the product. Rough handling may damage the
internal components.
Do not use harsh chemicals, cleaning solvents or strong detergents to
clean the product. Wipe the product with a soft cloth slightly
dampened.
If the product or any of its accessories are not working properly, take
them to your nearest qualified service center. The personnel there will
assist you, and if necessary, arrange for the product to be repaired.

Table of contents
Preface.....................................................................................................i
About this manual.....................................................................................i
Copyright ..................................................................................................i
Safety ......................................................................................................ii
Getting started............................................................................1
Checking the accessories supplied......................................................... 1
1 Camera parts....................................................................................... 2
2 Rotating the LCD monitor .................................................................... 5
3 Inserting the battery............................................................................. 5
4 Inserting an SD card (not supplied)...................................................... 6
5 Turning on/off the camera .................................................................... 7
6 Charging.............................................................................................. 8
Basic settings.............................................................................9
1 Language preference setting ............................................................... 9
2 Date and time setting........................................................................... 9
3 Formatting internal memory / SD Card ................................................ 9
Image shooting.........................................................................10
1 Basic shooting ....................................................................................10
2 Using the zoom...................................................................................10
3 Using the self-timer.............................................................................10
4 Basic function buttons.........................................................................11
Image viewing/deleting............................................................13
1 To view images ...................................................................................13
2 To view an enlarged image (playback zoom) ......................................13
3 To delete images.................................................................................13
When shooting still images.....................................................14
1 Indicators on the screen (Preview mode)............................................14
2 Photo setting menu.............................................................................15
When shooting a video............................................................18
1 Indicators on the screen (Video recording mode)................................18
2 Video setting menu .............................................................................19
How to use mode function ......................................................20

Mode table.............................................................................................20
Picture mode ............................................................................21
1 Indicators on the screen (Picture mode) .............................................21
2 When viewing an image......................................................................21
3 Picture mode setting menu .................................................................22
Video mode ...............................................................................25
1 Indicators on the screen (Video mode) ...............................................25
2 When viewing a video.........................................................................25
3 Video mode setting menu ...................................................................26
Audio mode ..............................................................................27
1 Indicators on the screen (Audio mode) ...............................................27
2 When listening to an audio clip ...........................................................27
3 Audio mode setting menu ...................................................................28
Voice recorder mode................................................................29
1 Indicators on the screen (Voice recorder mode) .................................29
2 How to record a voice clip...................................................................29
E-book mode ............................................................................30
1 How to import E-book files into the camera.........................................30
2 When reading an E-book ....................................................................30
3 E-book mode setting menu.................................................................30
Setting mode ............................................................................32
Connecting to your computer.................................................35
1 Installing software ...............................................................................35
2 Connecting through USB ....................................................................35
Viewing images on TV screen.................................................37
Precaution.................................................................................38
Appendix...................................................................................39
LED Status ............................................................................................39
Specifications ........................................................................................40

1
Getting started
Checking the accessories supplied
Pouch Strap Battery
Quick Guide Composite Video
Cable
Remote controller
User Manual Camera CD-ROM(Includes
User Manual)

2
1 Camera parts
Power button
Lens
Self-timer LED
Flash
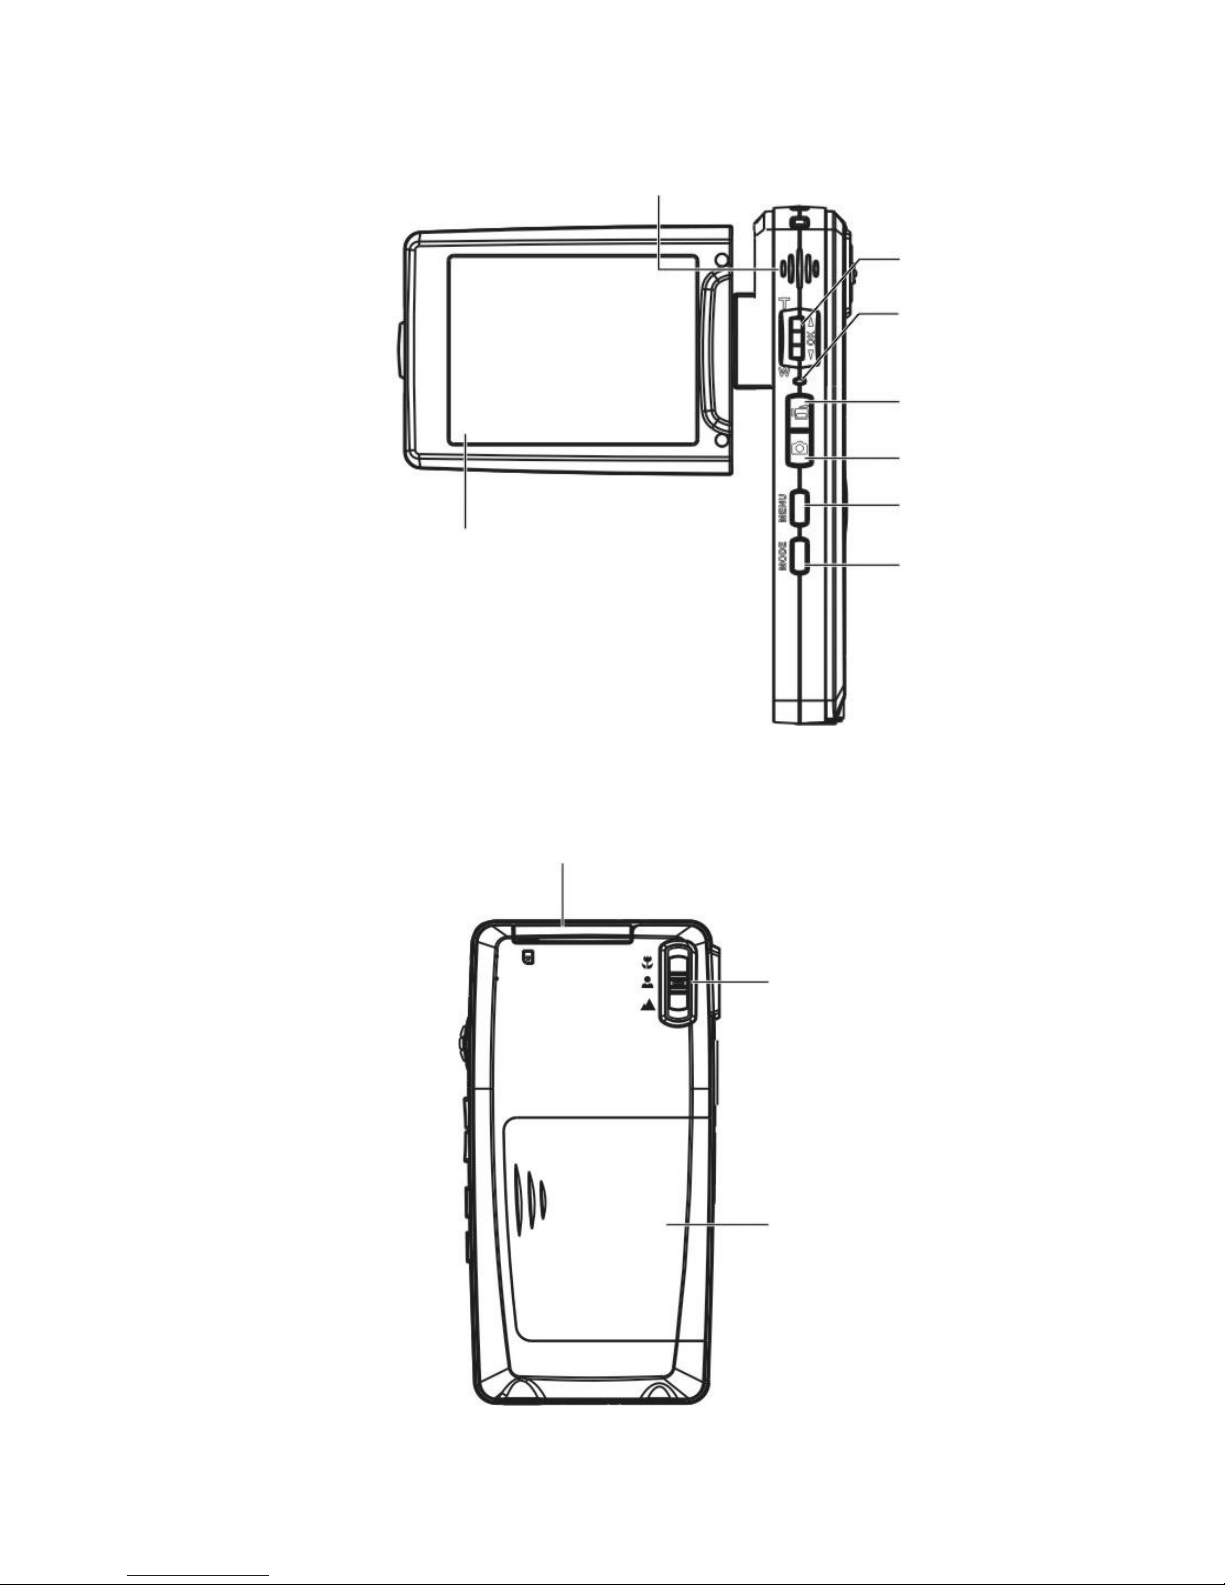
3
Zoom lever/OK
button
V
ideo button
Speaker
LCD
Focus button
Battery door
SD card doo
r
Ca
p
ture button
Menu button
Status LED
Mode button

4
Hand Strap buckle
Tripod nut
Microphone
USB/TV-out jack

5
2 Rotating the LCD monitor
Open the LCD monitor carefully.
The directions and lock position of the LCD monitor is shown as follows:
3 Inserting the battery
1. Open the battery door.
2. Load the included battery into the battery compartment.
3. Close the battery door.

6
4 Inserting an SD card (not supplied)
1. Open the SD card door.
2. Insert the SD card (not supplied) all the way until it clicks.
3. Close the SD card door.
CAUTION!
Use only the specified battery for this camera. Other power sources may cause a fire.
The battery should be inserted in the battery compartment with the ends orientated correctly.
NOTE:
1. Upon loading a new battery, users will need to reset their Basic Settings.
2. Do not open the battery door or remove the battery when the camera is in the ON state.
Only remove the battery and SD card when the camera is not in use, or in its OFF state.
3. If you do not plan to use the camera for a long period of time, please remove the battery
and SD card.
4. In order for the Li-Ion battery to achieve optimum performance it is highly recommended
to charge the battery at least 8 hours before first use or after storage for more than 3
months.
Table des matières


