Technaxx TX-108 Manuel utilisateur

1
Technaxx®* User Manual
IP-Security Camera 180° TX-108
Important Hint regarding the User Manuals:
All languages of the user manual are on the CD enclosed. The
English and German version is also as printed version enclosed.
Introduction
The manufacturer Technaxx Deutschland GmbH & Co.KG hereby declares
that this device, to which this user manual belongs, complies with the essential
requirements of the standards referred to the Directive RED 2014/53/EU. The
Declaration of Conformity you find here: www.technaxx.de/ (in bar at the
bottom “Konformitätserklärung”). Before using the device the first time, read
the user manual carefully.
Service phone No. for technical support: 01805 012643 (14 cent/minute from
German fixed-line and 42 cent/minute from mobile networks).
Free Email: support@technaxx.de
If you drill a hole in the wall, please make sure that power cables, electrical
cords and/or pipelines are not damaged. When using the supplied mounting
material, we do not take the liability for a professional installation. You are
entirely responsible to ensure that the mounting material is suitable for the
particular masonry, and that the installation is done properly. When working at
higher altitudes, there is danger of falling! Therefore, use suitable safeguards.
Keep this user manual for future reference or product sharing carefully. Do the
same with the original accessories for this product. In case of warranty, please
contact the dealer or the store where you bought this product.
Warranty 2 years
Enjoy your product * Share your experience and opinion on one of the
well-known internet portals.

2
Contents
Introduction.................................................................................................... 1
1. Features .................................................................................................... 3
2. Product overview....................................................................................... 3
3. Quick operation guide................................................................................ 5
4. How to start (Login/Registration)................................................................ 6
4.1 Local mode & Users mode................................................................ 6
4.2 Registration ...................................................................................... 6
4.3 Forget Password............................................................................... 7
5. How to add a device .................................................................................. 7
5.1 Add Device....................................................................................... 7
5.2 Add device when already connected to network............................... 9
5.3 Adding device from the same network............................................ 10
5.4 IP/DDNS adding ............................................................................. 11
6. How to navigate through the App............................................................. 12
6.1 My device ....................................................................................... 12
6.1.1 Live view.................................................................................. 12
6.1.2 Playback.................................................................................. 16
6.2 My center (personal area)............................................................... 17
7. How to use PC Software Windows (& MAC)............................................ 18
7.1 Installation ...................................................................................... 18
7.2 Login and add device...................................................................... 19
7.3 Open live view ................................................................................ 21
7.4 Playback recordings ....................................................................... 21
8. FAQs....................................................................................................... 22
9. Technical Specifications .......................................................................... 23
Hints for Environment Protection: Packages
materials are raw materials and can be recycled. Do
not disposal old devices or batteries into the domestic
waste. Cleaning: Protect the device from
contamination and pollution (use a clean drapery).
Avoid using rough, coarse-grained materials or
solvents/aggressive cleaner. Wipe the cleaned device
accurately. Distributor: Technaxx Deutschland
GmbH & Co.KG, Kruppstr. 105, 60388 Frankfurt a.M.,
Germany

3
1. Features
Huge panorama viewing angle (180° horizontal & 90° vertical)
HD video resolution 1280 x 720 with 12fps
Brilliant 1/4" CMOS colour sensor (1MP)
Motion detection up to ~10m with automatically recording
4x IR LED up to ~10m for optimal night vision
Rapid installation, only via Android & iOS APP
Free “Security Premium” APP for worldwide access [available on
Google Play & APP Store]
Alarm function (push message) on your Smartphone & Tablet PC
Built-in microphone & speaker for 2-way communication
Tilting base mount (~170°) also suitable for installation on walls or
ceilings
Supports MicroSD(HC/XC) cards up to 128GB
H.264 video compression (for space-saving recordings of high
quality)
Supports 2.4GHz wireless network (WiFi / IEEE 802.11/b/g/n)
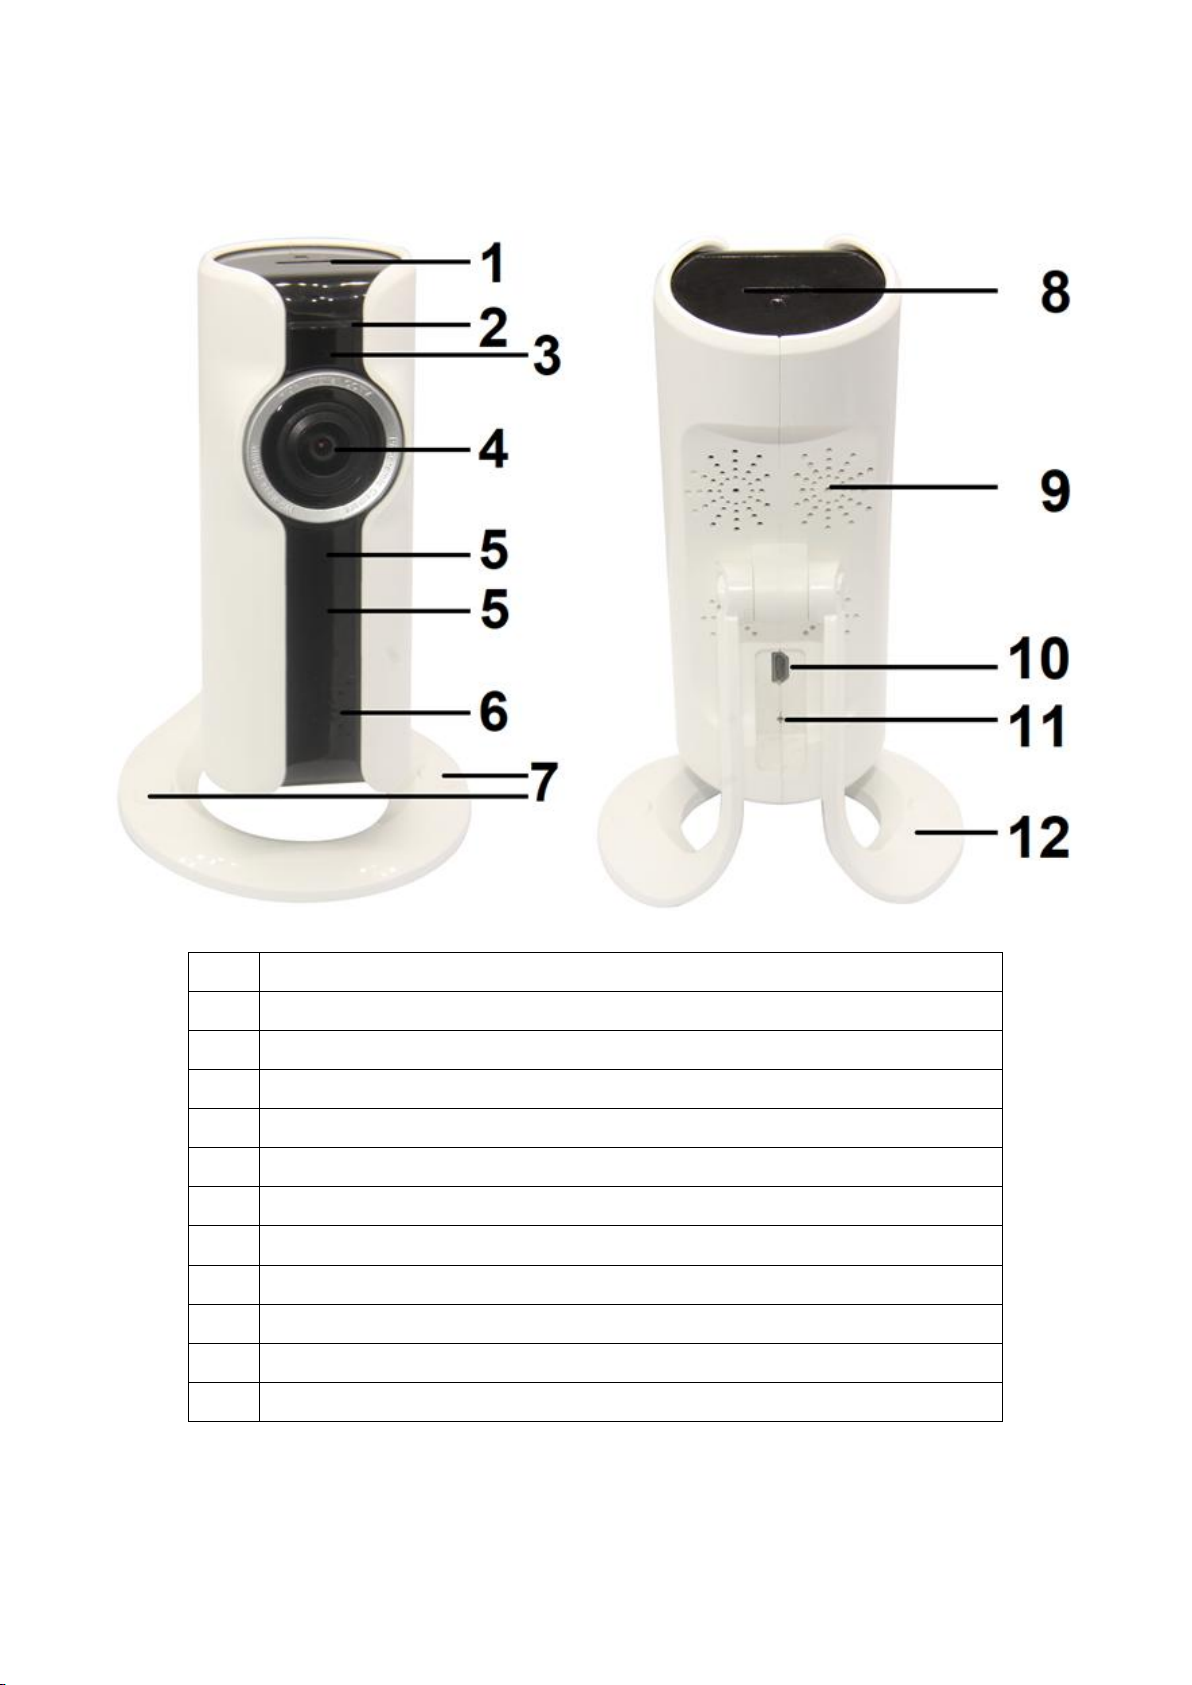
2. Product overview
IR LED:
The device activates the infrared light automatically as soon as low
illumination prevails.
MicroSD card slot:
Support MicroSD card for local storage (max. 128GB). To guarantee the
normal use of MicroSD card, before insert the MicroSD card, make sure its file
system is FAT32 and there is more than 256MB space available. When you
use a size 64-128GB MicroSD card. Format the MicroSD card after inserting
and configuration via the App. To work properly, the App must show the
following status under device memory: Normal.

4
RESET Button:
Using a paper clip to press the reset button for 5 seconds to reset the device.
1
MicroSD(HC/XC) card slot
2
Indicator light (green)
3
Microphone
4
Lens
5
IR LED
6
Speaker
7
Mounting holes hidden under cap
8
MicroSD(HC/XC) card slot
9
Ventilation holes
10
MicroUSB power supply (5V/1A)
11
Reset button
12
Holder / Feet

5
3. Quick operation guide
TX-108 camera can only be configured by iOS or
Android APP!
Start TX-108
Connect the device with the MicroUSB power adapter to a socket, TX-108
starts automatically. Wait until the green indicator light is flashing. The prompt
voice will tell you when ready to start with the configuration via App.
To download the App Security Premium from the Appstore or the Playstore
search for “Technaxx Security Premium” or scan the QR-code below.
[iOS 8.0 or above; Android 4.4 or above / EN, DE (07-2018)]
APP icon
iOS
Android
Open the Security Premium App on your device.
Register for user mode your data will be saved and can be restored. For
testing the App you can simply press App testing.
After entering the App press the plus + symbol on the top right corner and
choose Add device
Select the typ of camera for TX-108 it is WiFi camera.
For the WiFi configuration of the TX-108 follow the shown steps in the App.
After finishing the configuration the device is connected to your WiFi router
and is ready to use. The green indicator light is permanently enabled.
Note: For Android phone users, in order to facilitate the configuration, App will
obtain the WIFI information surrounding. So the Smartphone will ask whether
to allow the application to obtain relevant permission. Click “Allow”.
Indicator light (if the device is connected to power):
LED flashes every 0.5s = STA Pairing mode
LED flashes slowly every 2s = AP (Hotspot) mode
LED is permanently on = WiFi configuration successfully

6
App pictures of chapter 4, 5 and 6 are based on Security Premium for iOS and
Android in version 3.0.3.
4. How to start (Login/Registration)
4.1 Local mode & Users mode
There are Local mode and User mode on the App. Users without a
registered account can click “Local”and try this App.
Data in Local mode will be stored at local only and cannot be restored.
User mode: Data added or grouped by user (e.g. the device), is managed
by server, which won’t be lost even to delete all data on the Smartphone. As
long as users re-install the App and log in the old account, all data will be
restored for some auxiliary functions such as device status notification and
alarm notification.
4.1 Register or Local
4.2 Enter Email
4.2 Enter verification
code and password
4.2 Registration
Users without accounts have to take several seconds to register. Click
“Register”, enter the email address, and bind the email address (system will
send an email to this email address). Login to your email account, copy the
verification code and enter a password to complete registration (follow this
step, otherwise users cannot use forget password function).

7
4.3 Forget Password
If you forget the password and needs to get it back, click „Forget password”.
Enter the Email address into the user interface and press Confirm. The system
sends a confirmation Email, which the user can check via his Email account).
5. How to add a device
5.1 Add Device
Login to the App if not already done and go to “My device”interface.
Note: Due to the limitation of iOS system, some functions on Android version
cannot be reached on iOS version. For WiFi configuration this camera uses
the Access Point (Hotspot) method.
iOS and Android:
1
2
3
Click “+” on top right
corner to add the
TX-108.
Choose WiFi camera
from the four device
groups.
Confirm if the indicator
light on TX-108 is
flashing or not.
iOS WiFi configuration:
Press on Choose WiFi
and the WiFi settings of
your Smartphone open.
Connect with the WLAN
beginning IPC…. The
WiFi password/key is
11111111 (8x1), wait
until IPC…. WiFi is
connected and go back
to Security Premium.
Choose the WiFi you
want to connect with
and enter the WiFi
password /key.

8
4
5
6
Press on Choose WiFi
and the WiFi settings of
your Smartphone open.
Connect with the WLAN
beginning IPC…. The
WiFi password/key is
11111111 (8x1), wait
until IPC…. WiFi is
connected and go back
to Security Premium.
Choose the WiFi you
want to connect with
and enter the WiFi
password /key.
Android WiFi configuration:
4
5
6
Choose the Device-ID of
TX-108 you want to
connect by clicking on it.
Be connected with your
WiFi and enter your WiFi
password/key. Note:
WiFi configuration does
not work when you are
connected to your mobile
network 3G,4G,LTE!
Skip this step. Just for
iOS user.

9
iOS and Android:
7
8
9
The TX-108 is
configuring the WiFi
connection.
Enter a customized
password for the
TX-108. You are not
allowed to use number
series like e.g. “123” or
the words “none” or
“admin”.
WiFi connection is
successful and you can
name the device.
5.2 Add device when already connected to network
This mode is to add the device which is already configured and connected to a
network. You just need to add to App no new WiFi configuration. After adding
you are able to view the video, etc. (see picture 5.2).
Note: Adding the device by Device ID can be done from everywhere when
you know username and password. It also allows you to view the video from
everywhere when you have an internet connection with your Smartphone.
Device ID adding: On the bottom of the TX-108 you will find a sticker with ID
number (and bar code). This ID number is the Device ID. Users can add the
device by entering ID manually (or scanning the bar code).

10
Fill in the device name, username and password for the camera. The
password was customized by you while WiFi configuration. The standard
username is admin. Click on complete in the top right corner to save the
settings.
5.2 & 5.3 Choose
Networked devices or
LAN/network scan.
5.2 Manually or with bar
code scanning enter the
Device ID. Fill in device
name, username and
password.
5.3 Choose the found
Device ID, enter a
device name, username
and password.
5.3 Adding device from the same network
This mode is to add the device which is already configured and connected to a
network, to the App and view the live video (see picture 5.3).
Note: Your Smartphone needs to be connected to the same local WiFi as the
TX-108.
LAN/network scan adding: By clicking on LAN/network scan the App will
search the local network for already configured cameras (TX-108). Choose
the Device ID. Fill in a device name, username and password for the camera.
The password was customized by you while WiFi configuration. The
standard username is admin. Click on complete to save the settings.
Table des matières
Autres manuels Technaxx Caméra de sécurité

Technaxx
Technaxx TX-28 Manuel utilisateur

Technaxx
Technaxx TX-44+ Wild Cam Camouflage Manuel utilisateur

Technaxx
Technaxx TX-23 Manuel utilisateur

Technaxx
Technaxx TX-09 Manuel utilisateur

Technaxx
Technaxx TX-83 Manuel utilisateur

Technaxx
Technaxx TX-28 Manuel utilisateur

Technaxx
Technaxx TX-75 Manuel utilisateur

Technaxx
Technaxx TX-44 Wild Cam Manuel utilisateur

Technaxx
Technaxx 4461 Manuel utilisateur

Technaxx
Technaxx TX-128 Manuel utilisateur


