Suaoki PF3S Series Manuel utilisateur

PF3S Series Pulse Laser
Range Finder
User Manual


DE
Product Overview
⑫
⑨
⑩
⑪
② ③
④
⑤
⑥
⑦
⑧
①
1. Mode / Unit switch button
2. Power / Measure button
Short press the button to measure
Press and hold the button to activate continuous
measurement and release the button to stop.
3.Eyepiece knob
4.Eyepiece
5.LCD display
6.Battery compartment
7.Angle switch (When the angle
switch is turned off, angle-related
functions cannot be used)
8.LCD display switch
9.Objective Lens/Laser Emitter
10.Laser receiving lens
11.Wristband hole
12.Tripod screw hole
EN
M

1. Modustaste/ Einheitumschaltstaste
2. Leistungsschalter / Messtaste
Drücken Sie kurz den Knopf, um zu messen
Halten Sie die Taste gedrückt, um die
kontinuierliche Messung zu aktivieren, und lassen
Sie die Taste los, um zu stoppen.
3.Okularknopf
4.Okular
5.LCD-Display
6.Batteriefach
7. Winkelschalter (Wenn der
Winkelschalter ausgeschaltet ist,
können Winkelfunktionen nicht
verwendet werden)
8. LCD-Displayschalter
9. Objektivlinse / Laseremitter
10. Laserempfangslinse
11. Armbandsloch
12. Stativgewindebohrung
DE
1. Bouton Mode/Unité
2. Bouton PWR/Mesure
Appuyez brièvement sur le bouton pour mesurer
Appuyez sur le bouton et maintenez-le enfoncé
pour activer la mesure en continu et relâchez le
bouton pour arrêter.
3.Bouton de l’oculaire
4.Oculaire
5.Écran LCD
6.Compartiment à piles
7.Commutateur d’angle (Lorsque
le commutateur d’angle est
désactivé, les fonctions liées à
l’angle ne peuvent pas être
utilisées)
8.Interrupteur de l’écran LCD
9.Lentille d’objectif/Émetteur laser
10.Lentille de réception laser
11.Trou de bracelet
12.Trou de vis de trépied
FR
1. Pulsante interruttore modalità / unità
2. Pulsante di Alimentazione/Misura
Premere brevemente il pulsante per misurare
Premere e tenere premuto il pulsante per attivare
la misura continua e rilasciare il pulsante per
fermarsi.
3. Manopola dell'oculare
4. Oculare
5. Display LCD
6. Vano batteria
7. Interruttore di angolo (Quando
l'interruttore di angolo è spento,
non è possibile utilizzare le
funzioni relative all'angolo)
8. Interruttore display LCD
9. Obiettivo/Emettitore Laser
10. Obiettivo ricevente il laser
11. Foro per cinturino
12. Foro per vite del treppiede
IT
M
M
M
1. Botón de cambio de modo / unidad
2. Botón de energía/ medición
Presione brevemente el botón para medir
Presione y mantenga presionando el botón para
activar la medición continua y suelte el botón
para detenerlo.
3.Perilla del ocular
4.Ocular
5.LCD pantalla
6.Compartimiento de batería
7.Interruptor angular (Cuando el
interruptor de ángulo está
desactivado, no se pueden usar
funciones relacionadas con el
ángulo)
8.Interruptor de LCD pantalla
9.Lentes Objectivos / Emisor del
Laser
10.Lente que recibe el láser
11.Agujero de la pulsera
12.Agujero del tornillo de trípode
ES
1.モード/単位切替ボタン
2.電源/測定ボタン
短押しで測定します
長押しすると連続測定ができ、放すと測定停止と
なります。
3.接眼レンズのノブ
4.接眼レンズ
5.LCD画面
6.電池室
7.角度スイッチ(角度スイッチがオ
フになると、角度関連機能が利用
不可になります)
8.LCD画面スイッチ
9.対物レンズ/レーザー光投光窓
10.レーザー光受光窓
11.ストラップ取り付け部
12.三脚ネジ穴
JP
M
M

CONTENTS
English·························1-11
Deutsch······················12-23
Français·····················24-35
Español······················48-59
Italiano·······················36-47
日本語······················ 60-70

Thank you for using Suaoki laser rangefinder, please read the instruction carefully
before operation.
Suaoki PF3S series adopts golf trajectory algorithm, TOF (Time of Flight) technologies,
and 3D positioning technologies to achieve golf slope compensation, lock-on function,
etc.
This product can measure distance, height, angle, speed and slope-compensated
distance. It’s a perfect outdoor gadget with amazing features such as high accuracy,
quick response, clear LCD display and low power consumption.
Safety Instructions
Warning
●Do not stare into the laser beam.
●Eyes can be permanently damaged to look into sun with the device.
●Do not aim the device at the sun, it will cause permanent damage to inner
components.
●Keep the eyepiece away from direct sunlight.
●Do not put the device out of the storage temperature of -10~60℃.
●When using this product, pay attention to the surface of the battery whether it’s
damaged. If there are signs of damages, you must replace the new battery
immediately, or it may lead to short circuit, and even battery explosion and severe
personal injuries.
Disposal
●It’s prohibited to dispose used batteries together with household waste, please
collect used batteries to designated waste station. Dispose of the product appropriately
in accordance with the national/local laws and regulations.
EN-1
EN-2
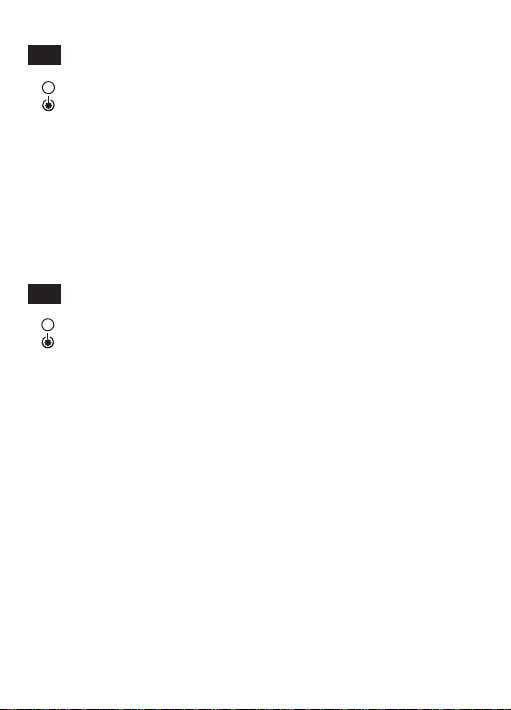
Icons on Lens
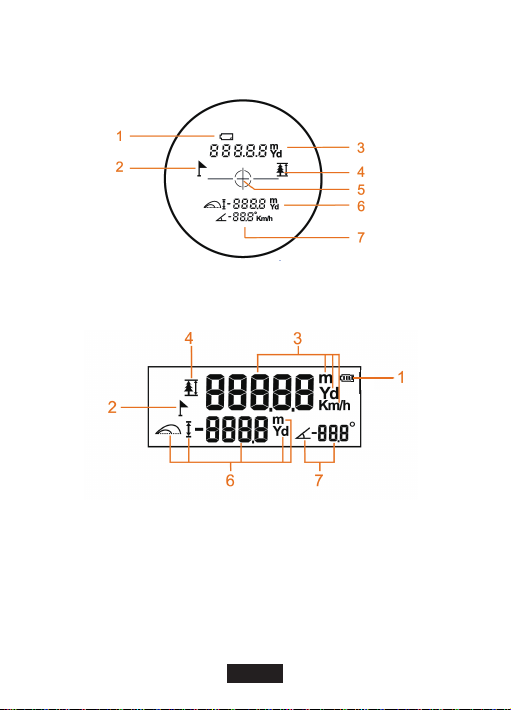
Icons on LCD display
1.Low Battery Indicator
2.Golf Flag Icon
3.From Left To Right: Measured
Distance, Measuring Unit.
4.P2P (Point-to-Point) Vertical
Distance Measurement Icon
5.Target Icon
6.From Left To Right: Golf Slope Compensa-
tion Icon / Height Icon / Golf Slope
Compensation Distance / Height / Unit
7.From Left To Right: Angle Icon / Measured
Angle / Measured Speed / Angle Unit (°) /
Speed Unit (Km/h)

Operation Guidance
Eyepiece
Adjust the eyepiece knob to focus on the target.
Power ON/OFF
1. Press the“ ” to power ON.
2. Automatically switch off after 8s of inactivity.
LCD display
1.Press the LCD display switch to turn ON/OFF the screen.
2.LCD display will switch off automatically after 8s of inactivity.
Angle Calibration
This device is already calibrated before dispatch. If it gives wrong measuring result, the
device should be re-calibrated manually.
1.Power off the device. Press and hold the power button for 5s to enter into Calibration
Interface. “ANGLE CAL” would be shown on screen.
2.Keep the product still for several seconds to complete the calibration. If the calibration
is not completed in a long time, the device will turn off automatically in a minute
3.If the calibration is not completed, the product would restore to factory setting when it
is restarted.
EN-3

EN-4
Change Measuring Unit
Press and hold to switch the unit (m or Yd)
Continuous Measurement
Press and hold for 2 seconds to activate the continuous measurement. Releases the
button to stop the measurement.
Measuring Mode
Note:
* Please adjust the eyepiece to focus on the target before measuring.
* In the course of the measurement, if the target reflection is weak or is beyond the
measuring range, the display will be ”---”.
* The measurement range will be affected by materials of the target, inclined angle of
the target surface, visibility of the weather etc.
In general, the measurement range will be longer when the target has a smooth, large,
bright-colored surface, the beam is perpendicular to the target surface and the weather
is cloudy without fog; and vice versa.
IMPORTANT!
When the angle switch is turned off or moved to the left, angle-related functions would
be disabled. Only two functions would be available: Distance measurement and
flagpole lock-on measurement.
1.P2P (Point to Point) Distance Measurement
Short press to switch to P2P distance measurement mode. In this mode, would
flash on screen. Aim at point A, press to measure the distance to point A. Aim at
point B, press to measure distance to point B. Then, distance between A and B
would be calculated automatically and displayed. The value of angle αwould also be
calculated automatically and displayed.
M
M
M
Table des matières
Langues :
Autres manuels Suaoki Instrument de mesure


