Star Power Pit Pat AS01 Manuel utilisateur

Email: support@starpowergym.comAS01 V4.2
INTELLIGENT TREADMILLMANUAL

Content01.Safety Instructions02.Product Parts03.Packing Details04.Installation steps05.Using The Treadmill06.Maintenance07.General Troubleshooting08.Warranty Terms09.Notes for Exercises02040506111620232401
Expand Size: 56*23.8*42.3 inProduct Weight:80 Pounds Product model:AS01Motor Power:3.0HP Maximum Speed :7.5MPHMaximum load: 300 Pounds Rated Voltage:120VSpecificationCAUTION:Please read the manual carefully before use the treadmill. Keep the manual properly. The treadmill is designed and manufactured taking your safety as the top priority. For your safety, please read through the Manual before operating the treadmill. We shall not be held responsible for any consequences caused by improper operations.

01 Safety Instructions05.The minimum distance (between the treadmill and walls and furniture) required for the treadmill when it is fully unfolded should be no less than 3fts at front, left and right sides and 6fts at rear side.06.Do not use the treadmill if the power cord is damaged.07.Do not use the treadmill if the treadmill is damaged or broken. Contact your local distributor for repair immediately. 08.Do not touch any moving parts with your hands. Do not press against or stuff any objects into the treadmill.09.The treadmill is for indoor use only. Avoid using it outdoor or in a gym.10.Place the treadmill on clean and flat ground, keep the treadmill well ventilated, make sure there’s no sharp object nearby, and do not use the treadmill near water and heat sources.11.Use the handrail when getting on and off the treadmill. Do not get off before the treadmill stops completely. For any emergency when you need to jump off, remove the safety lock to stop the treadmill immediately.12.Do not use the treadmill while using respiratory equipment or sprays near the treadmill.13.In order to maintain the proper operation of the treadmill, do not install or attach any accessories or parts that are not provided by the manufacturer of the treadmill.14.All parts of the treadmill must be properly and firmly assembled.15.Turn off the power and unplug the treadmill immediately after using it. 02 03
01 Safety Instructions01. Before using the treadmill, make sure it is properly grounded to avoid any accidents or dangers. 02.While using the treadmill, attach the safety lock (red) clip your cloth properly, so that in case of emergency, the safety lock can be pulled off immediately to stop the treadmill for your safety. 03.(1).Consult your healthcare provider before exercising. (2).Wear suitable workout clothes for exercise (no running with soft-soled shoes, as the soft soles might get drawn into the motor and control system, causing the treadmill to malfunction). (3).Keep the room clean and tidy to avoid clumps being brought into the treadmill by electrostatic adsorption, resulting in malfunction of the treadmill. (4).The maximum weight capacity of the treadmill is 300lbs.04.The treadmill is designed for the use of one person. When the treadmill is operating, keep away little children or pets to avoid any accident.Do not use heart rate testing device or any other wireless heart rate devices at the same time. It may cause electrical interference to the treadmill.Danger:Please follow the instructions below to avoid harm or injuries to you or other people.Warning:
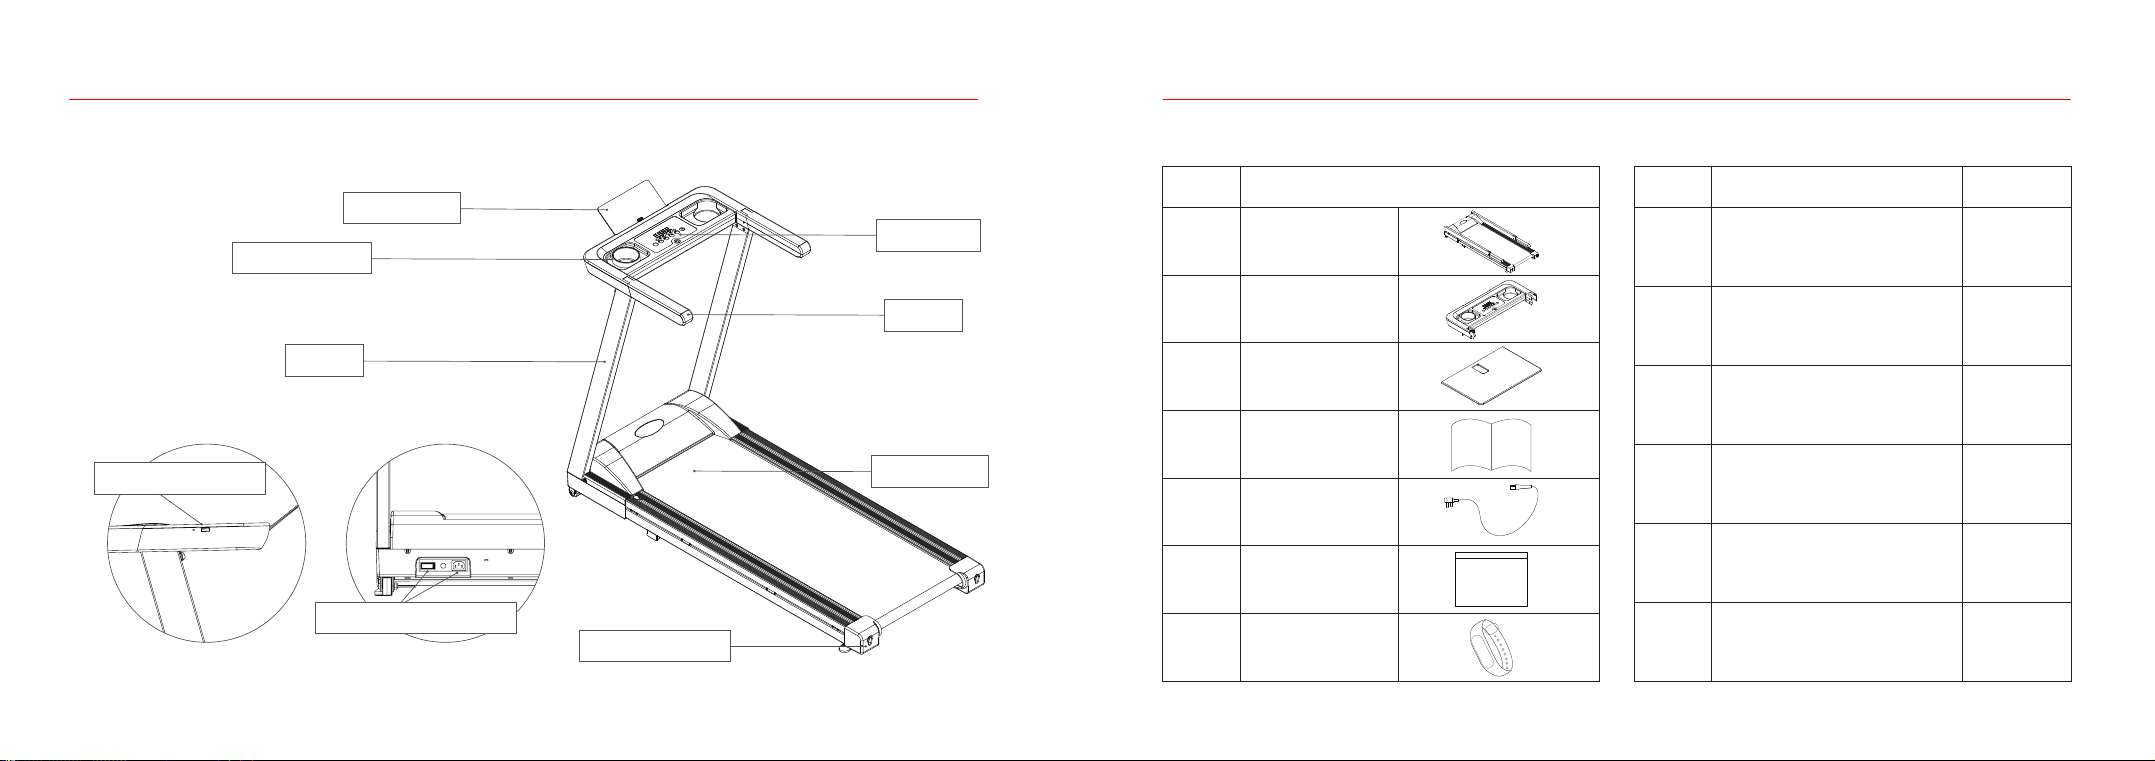
Packing DetailsAccessories03 Packing DetailsABCDEFSafety Lock T-shaped Allen Key WrenchLubricantM8*16 Hex Socket Cap ScrewM8 Flat WashersMobile Phone Silicone Sticker 1 piece 1 piece1 bottle6 piece 6 piece1 piece No.Parts Quantity No.1234567Main FrameElectronic PanelPhone StandManualPower CordScrew PackageSmart BraceletParts02 Product Parts04 05
USB charging portPhone StandSwitch & Power InterfaceElectronic PanelColumnBelt AdjustmentArmrest Safety lockRunning Belt

06 07
04 Installation stepsStep 2“LETTER B it will be a T-shaped Allen Key Wretch” After finding part you must fasten the bolts on the main frame in the same direction as the blue arrows shown. (In the example image shown to the right turn Clock-Wise.Unfolding the frame: follow the demonstration below, hold the column with your hands and pull up slowly in the direction of the arrows, and use B# (T-shaped Allen Key Wretch) to fasten the bolts in the main frame in the direction of the arrows (clockwise).04 Installation stepsStep 1Take the main frame, electronic panel, phone stand, and smart bracelet out of the carton, and open the cable ties binding the frames(note: the foot pad is adjustable).

08 09
04 Installation stepsFigure 1Figure 2E
D
D
E
D
3
D
EE
2
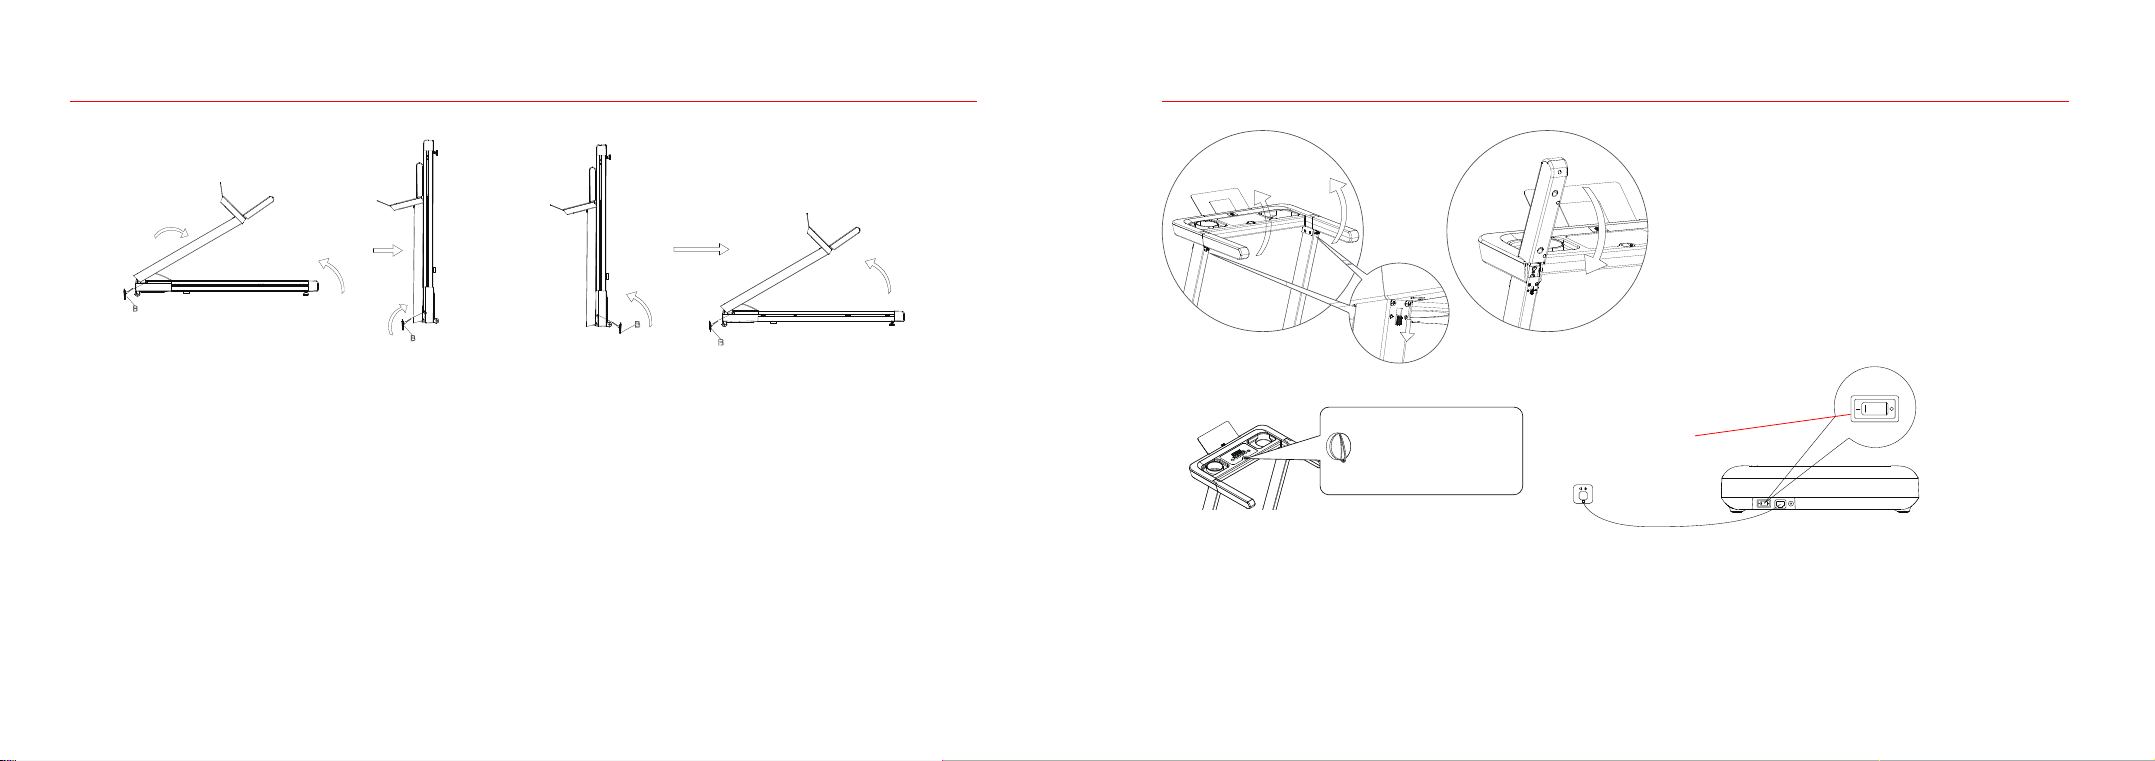
Step 3Rotate the armrest in the direction of the arrows to the corresponding position of the column (as shown in Figure 1); Connect the 4-core wire in 2# (electronic panel) and the 4-core wire in the column (as shown in Figure 2); push the electronic panel horizontally in the direction of the arrow, clamp and fix it on the column with D# (8*16, hex socket head bolts) and E# (flat washer); and insert 3# (Phone Stand) into 2# (electronic panel) (as shown in Figure 2), and then paste F# (mobile phone silicone sticker) onto it.04 Installation stepsSafety lock: Place the end of the magnet on top of this label.Step 4Product usage: when the power is on, wait till the light in the electronic panel to turn on. The treadmill is ready for use with a single press of the START button!Emergency stop: After the safety lock is pulled off, the power supply is disconnected, but the weak current remains. The operation is not controlled by the software associated with the treadmill. For your safety: When exercising, be sure to use the safety lock!Note: Upon confirming the assembly is completed strictly following above-mentioned requirements, lock all the screws and double check to ensure there is nothing missing before turning on the power.(Note: The safety lock must be placed on the yellow sticker in the middle under the meters to start the treadmill. If the electronic panel displays "SAFE", it means the safety lock is not placed or not in the right position.)
10 11
2. Plug on the treadmill and turn on the switch (red). (1) Wait for the screen to light up and enter the start interface.3.Safety lock(1).Put the safety lock in the designated area on the electronic panel to start the treadmill; attach the safety lock clip onto your clothes. In case of any emergency, pull off the safety lock to stop the motor of the treadmill immediately. To continue using the treadmill, just put the safety lock back. In any case, you can stop the treadmill by pulling off the safety lock. 04 Installation stepsStep 5Folding: fold the treadmill as shown in the figure below if it is not used for a long time. First, loosen the special bolt in the column with a T-shaped Hex Allen Wrench in the direction of the arrows and unplug the power cord (5) in the direction of the arrow, place the column back to the main frame in the direction of the arrow, hold the rear end of the treadmill with your hands, lift the treadmill slowly in the direction of the arrow, and lean it against a wall. Unfolding: lay the treadmill flat on the floor as shown in the figure below, lift the column slowly in the direction of the arrow, and use the T-shaped Hex Allen Wrench to tighten the special bolt in the column in the direction of the arrow, and plug the power cord (5).05 Using The Treadmill(1)Open the armrest Open the armrest limit lock in the direction shown in the figure and lift the armrest up(2)Close the armrest Press down the armrest directly in the direction shown in the figure0102Power On/OffSafety lock: Place the end of the magnet on top of this label.1.

En cualquier estado de daño o peligro sentido mientras el motor de bloqueo de seguridad dejará de funcionar inmediatamente y la ventana de tiempo del reloj electrónico mostrará "SAFE"05 Using The Treadmill4.Keys and Functions01.Start/Pause button:In the standby state of the treadmill, press the Start button to activate the treadmill, and press the button again to start the treadmill. In the operating state of the treadmill, press the Start button to pause the treadmill while keeping the existing data of the exercises, and press the button again to continue exercising.02.Stop Button:In the operating state of the treadmill, press the Stop button to stop the treadmill and clear out the data of exercises.03.Speed Increase and Speed Decrease buttons:• In the operating state of the treadmill, there are three interactions with the Speed Increase and Speed Decrease buttons.(1).Short press the button in 1 second to increase/decrease the speed by 0.1 mile/h each time;(2).Long press and hold the button over 1 second to increase/decrease the speed by 0.5 mile/h each time;04.Speed Shortcuts:Touch the Speed Shortcut key 3 to set the speed to 3.0 mile/h and key 6 to 6.0mile/h, and jump back to the Speed Display.Normal operating functionIn the standby state, touch the screen to bring the screen back to the display state. and press the button again to start the treadmill. 05 Using The Treadmill3 mph6 mph6
3WIFI indicatorBluetooth indicatorSpeed DisplayTime DisplayDistance Display Calorie Display12 13
Start/Pause buttonSpeed Shortcuts: 6MPHStop Button Speed Increase buttonsSpeed Decrease buttonsSpeed Shortcuts: 3MPH

14 15
05 Using The Treadmill05 Using The TreadmillTreadmill supports connection to mobile phone via Bluetooth1.Download PitPat app on your phone and install it Search for “PitPat”in the app store or scan the following QR code to download and install the app. 2. Configure PitPat app account Open PitPatt app and follow the app instructions to log in or register account information3. Connect the treadmill(1) Turn on the Bluetooth function of the mobile phone (the android mobile phone also needs to turn on the positioning function)(2) Open the PitPat app (if the app prompts for authorization, please grant the app related permissions)(3) Enter the app home page, click the treadmill icon in the upper left corner of the home page to enter the search interface, your phone will automatically search for nearby devices. Tap your treadmill (devices starting with PitPat-T are your treadmills) to connect. After the treadmill makes a beep, the connection is successful, and the Bluetooth icon on the treadmill panel lights up.Note: Please make sure your phone is connected to the Internet when connecting the treadmill via BluetoothPlease refer to the APP description for detailed networking configurationNote:System requirements:ios13 or above ; android 6.0 or above.Treadmill WIFI network configurationAfter the treadmill is successfully connected to the mobile app, it will enter the treadmill WIFI configuration interface.Note: The treadmill only supports 2.4GHZ WIFI (the app also only displays the 2.4GHZ WIFI signal that the treadmill can search for), please make sure that your network device can provide 2.4GHZ WIFI signal(1) Find the network you need to connect to(2) Enter your WIFI password according to the prompt. After the treadmill successfully connects to the network, the WIFI icon on the treadmill panel lights up and the app will return to the home page.Note: If the WIFI connection fails, after the WIFI returns to normal, please restart the treadmill so that it can reconnect to the Internet5.Connect the bracelet to the treadmillTurn on the treadmill, put the screen of the bracelet on the NFC logo of the treadmill, the treadmill make a sound of “bleep”, and the bracelet is connected with the treadmill.Once the bracelet is successfully bound, it will recording your running information immediately.After registration,click the treadmill icon in the upper right corner01 Waiting for the treadmill to connectDisplay“Green”to complete the connectionLink bracelet02 Searching for WifiNote:If the treadmill is not connected to the mobile app, the Bluetooth icon of the treadmill is off; if the treadmill is successfully connected to the mobile app, the Bluetooth icon of the treadmill is on5.6.

06 MaintenanceA. Belt adjustment.If the running belt becomes too loose, insert the hex Allen Wrench provided with the treadmill into the adjustment hole at the left foot guard of the treadmill, turn it by 1/4 of the cycle clockwise, and repeat the same process with the right foot guard. Keep in mind to adjust both sides synchronously to tighten the belt while avoiding its deviation from the center. If the running belt is too tight, adjust the both sides synchronously counterclockwise.Note: The running belt cannot be too tight, which may cause damage to the running belt or the roller bearings due to increased pressure on the front/rear rollers, or result in abnormal noises or other problems. Adjust the running belt to the appropriate tightness only to make sure there’s no slipping.16 17
06 MaintenanceProper maintenance helps keep the treadmill in the best condition while improper mainte-nance may damage or shorten the life span of the treadmill. 1.Dedust the treadmill on regular basis to keep the parts clean.2.After using the treadmill each time, wipe the meters and other parts with a clean towel or cloth to remove the sweat and debris. Be careful to keep the electrical components and running belt away from water.3.Keep the treadmill in a clean and dry environment and make sure the power is off and the treadmill is unplugged.4.To facilitate the moving of the treadmill, it is equipped with wheels. Before moving the treadmill, make sure to disconnect the power supply and fold the treadmill properly.5.Check all parts of the treadmill frequently and lock them properly, and replace the damaged part immediately if any.6.To better maintain and extend the life span of the treadmill, it is highly recommended to limit the exercising within 30 minutes each time and let the treadmill cool down for 10 minutes before restart.7.The running belt has been properly adjusted at ex-work stage, but after using, the running belt may be stretched more or less, which may cause damage to the belt due to its deviation from the center and rubbing against the side bars and the rear cover. It is common to see the running belt stretched after using for a while. If the running belt becomes slippery or stuck when using the treadmill, you may adjust the tightness of the running belt to improve the condition. Warning:Before cleaning or performing the maintenance of the treadmill, make sure to turn off and unplug the treadmill.
Table des matières
Langues :
Manuels tapis roulant populaires d'autres marques


Smooth Fitness
Smooth Fitness EVO 3i Manuel utilisateur

NordicTrack
NordicTrack NETL81810.0 Manuel utilisateur

Schwinn
Schwinn 830/Journey 8.0 Manuel utilisateur

Keys Fitness
Keys Fitness HealthTrainer HT-740T Manuel utilisateur

Spirit
Spirit XT8 Manuel utilisateur

NordicTrack
NordicTrack T 14.0 Treadmill Manuel utilisateur