Stanley PK602 Manuel utilisateur

Model/Modelo/Modèle# PK602/SK262
Customer Service / Servicio al Cliente / Service à la clientèle
1-800-730-3707 • 10AM - 6PM, EST
Monday to Friday / Lunes a Viernes / Lundi au Vendredi
QUICK START GUIDE
GUÍA DE INICIO RÁPIDO
GUIDE DE DÉMARRAGE RAPIDE
Outdoor Remote Control Twin
Control
Remoto
Doble para
Exteriores
Télécommande
double
exterieure

1
Our Stanley remote control
units include a unique pairing
feature that allows you to
control multiple receivers
(indoor or outdoor) from
the same transmitter.
Nuestras unidades Stanley
de control remoto incluyen
una característica exclusiva
de emparejamiento que le
permite controlar múltiples
receptores (en interiores o
exteriores) desde el mismo
transmisor.
Nos télécommandes Stanley
comprennent une fonction
unique de pairage qui vous
permet de contrôler de
multiples récepteurs
(à l’intérieur et à l’extérieur)
avec le même transmetteur.
Plug in your reciever
Conecte su receptor
Branchez votre récepteur
Installation & Pairing / Instalación & Conexión /
Installation & pairage

Press and hold the power button
on the receiver for 5 seconds.The
LED indicator will begin to flash
slowly indicating pairing mode has
been activated.
Presione y sostenga el botón de
encendido en el receptor durante
5 segundos. El indicador LED
comenzará a parpadear lentam-
ente indicando que se ha activado
el modo de emparejamiento.
Appuyez sur le bouton de mise en
marche du récepteur et gardez-le
enfoncé pendant cinq secondes.
L’indicateur DEL commencera à
clignoter lentement, indiquant que
le mode de pairage a été activé.
2
3
POWER
Installation & Pairing / Instalación & Conexión /
Installation & pairage

Press the ‘ON’ button followed by the ‘OFF’
button on your transmitter to complete the
pairing process.
Presione el botón ‘ENCENDER’ seguido por
el botón ‘APAGAR’ en su transmisor para
completar el proceso de emparejamiento.
Appuyez sur le bouton de mise en marche («
ON »), puis sur le bouton d’arrêt (« OFF ») de
votre transmetteur pour terminer le pairage.
3
PHOTOCELL
ON OFF
Installation & Pairing / Instalación & Conexión /
Installation & pairage

3
POWER
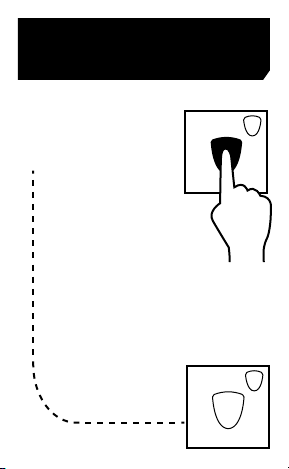
Press and hold the power
button for 5 seconds.The
LED indicator located on
the power button will
begin to flash slowly.
Presione y sostenga el
botón de encendido
durante 5 segundos. El
indicador LED que se
encuentra en el botón de
encendido comenzará a
parpadear lentamente.
Appuyez sur le bouton
de mise en marche et
gardez-le enfoncé pendant
cinq secondes. L’indicateur
DEL sur le bouton de mise
en marche commencera à
clignoter lentement.
1
To remove all paired transmitters from your receiver /
Para eliminar todos los transmisores emparejados
de su receptor / Pour enlever tous les transmetteurs
couplés à votre récepteur

3
POWER
While the indicator is flashing, press and hold the
power button for an additional 5 seconds. The
LED indicator will now begin to flash rapidly.
Mientras el indicador está parpadeando, presione
y sostenga el botón de encendido durante 5
segundos más.Ahora el indicador LED comenzará
a parpadear rápidamente.
Pendant que l’indicateur clignote, appuyez sur le
bouton de mise en marche et gardez-le enfoncé
pendant cinq secondes de plus. L’indicateur DEL
commencera alors à clignoter rapidement.
2
To remove all paired transmitters from your receiver /
Para eliminar todos los transmisores emparejados
de su receptor / Pour enlever tous les transmetteurs
couplés à votre récepteur
While the indicator is
flashing rapidly, press the
power button once to
confirm the reset.
Mientras el indicador
parpadea rápidamente,
presione el botón de
encendido una vez
para confirmar el
restablecimiento.
Pendant que l’indicateur
clignote rapidement,
appuyez sur le bouton de
mise en marche une autre
fois pour confirmer la
réinitialisation.
3
3
POWER
3
POWER
To remove all paired transmitters from your receiver /
Para eliminar todos los transmisores emparejados
de su receptor / Pour enlever tous les transmetteurs
couplés à votre récepteur

INSTRUCTIONS
Insert the Receiver Base’s 3-prong plug into a grounded
outlet. If using outdoors, be sure to plug into a GFCI
approved outlet. Plug your devices into the outlets
located on bottom of Receiver Base. Using the Wireless
Transmitter, press the ON button to activate device.
OPERATING INSTRUCTIONS
MANUAL OVERRIDE
You can power the unit ON and OFF manually by
pressing the ON/OFF override button located on the
front of the Receiver. (Do not hold the button down for
manual ON/OFF operation as this will cause the unit to
enter pairing mode.)
PHOTOCELL MODE:
Photocell Mode turns OFF your device automatically at
dawn even when you forget.
1. Make sure the sliding mode switch on the
transmitter is in the photocell position.
2. Press the ON button to turn the power on. All
connected devices will turn on instantly and will
turn off automatically at dawn.
3. To cancel Photocell Mode, slide the Photocell
switch into the manual position and press either
the ON or OFF button to initiate. (Note: Sliding the
photocell switch without pressing a corresponding
function button (ON/OFF) will not initiate or cancel
the photocell function.
Item/Articulo/Article # W31184/31184/56326/56322

BATTERY INFORMATION AND REPLACEMENT:
The Transmitter uses a 3 volt CR2032 lithium battery.
To replace, slide open the battery tray on the bottom of
the transmitter. Insert a new CR2032 lithium battery,
making sure to match up the + and - polarity markings.
To test, press the ON or OFF buttons to make sure the
LED lights up. Slide the tray back in. Do not dispose of
batteries in fire. Batteries may explode or leak.
INSTRUCCIONES:
Inserte el enchufe de 3 clavijas de la base del receptor
a un tomacorriente. Si se utiliza al aire libre, asegúrese
de conectarlo a una toma de corriente GFCI aprobado.
Conecte los dispositivos a los enchufes situadas en
la parte inferior de la base. Usando el transmisor
inalámbrico, pulse el botón de encendido para activar
el dispositivo
INSTRUCCIONES DE USO
ANULACIÓN MANUAL
Se puede encender y apagar la unidad manualmente
pulsando el botón ON / OFF de anulación se encuentra
en la parte frontal del receptor. (No mantenga botón
presionado para operación manual ON / OFF, ya que
esto hará que la unidad entre en modo de sincroni-
zación.)
MODO FOTOCÉLULA:
Modo Fotocélula apaga el dispositivo automáticamente
en la madrugada, incluso cuando se le olvida.

1. Asegúrese de que el interruptor deslizante en el
transmisor esté en la posición de la fotocélula.
2. Pulse el botón ON para activar la alimentación.
Todos los dispositivos conectados se encienden
al instante y se apagan automáticamente al
amanecer.
3. Para cancelar el Modo Fotocélula, deslice el
interruptor de la fotocélula en la posición manual
y pulse el botón de encendido o apagado para
iniciar. (Nota: Deslizar el interruptor de fotocélula
sin presionar un botón de función correspondiente
(ON / OFF) no iniciará o cancelará la función de
fotocélula.
INFORMACIÓN Y REEMPLAZO DE BATERÍA:
El transmisor remoto usa una batería de litio CR2032 de
3 voltios. para reemplazar, deslice para abrir la bandeja
de la batería en la parte inferior del transmisor. Inserte
nueva batería de litio CR2032, asegurándose de hacer
coincidir los polos + y - marcas de polaridad indicadas.
Para probar, presione los botones de encendido o
apagado para asegurarse de que el LED se ilumina. No
tire las pilas al fuego. Las baterías pueden explotar o
tener fugas.
INSTRUCTIONS:
Insérez la fiche de base à distance dans une prise
norme. Brancher l ‘appareil dans la prise située au
Ce manuel convient aux modèles suivants
5
Table des matières
Autres manuels Stanley Télécommande

Stanley
Stanley 51180 Manuel utilisateur

Stanley
Stanley 51192 Manuel utilisateur

Stanley
Stanley DR-1263 Manuel utilisateur

Stanley
Stanley POWERMAX RT901 Manuel utilisateur

Stanley
Stanley PK303 Manuel utilisateur

Stanley
Stanley BNC-60/U116R Manuel utilisateur

Stanley
Stanley PK305 Manuel utilisateur

Stanley
Stanley PK612 Manuel utilisateur
Manuels Télécommande populaires d'autres marques

Panasonic
Panasonic EUR7622KB0 Manuel utilisateur

Bang & Olufsen
Bang & Olufsen Beo4 Manuel utilisateur

Sunwave Tech.
Sunwave Tech. RemoteComm SRC-7000 Manuel utilisateur

Multiplex
Multiplex PROFI TX 9 Manuel utilisateur

One Remote
One Remote RMB4 Manuel utilisateur

FUTABA
FUTABA 9ZAP - PART2 Manuel utilisateur


