Solution FIres eTronic 560 Slimline Manuel utilisateur
Instruction Manual
eTronic 560 Slimline
This product is only suitable for well insulated spaces or occasional use.
To be left with the customer after demonstrating the features of the Solution electric re.
The complete installation must be carried out in accordance with current Standards and Local
Codes. The instructions in this manual must be followed to ensure safe operation of the appliance.
It should be noted that the requirements and this publication may be superseded during the life of
the Fireplace - please refer to www.solutionres.co.uk for up-to-date instructions.
June 2022 V1
The product complies with the European Safety Standards EN60335-2-30 and the European
Standard Electromagnetic Compatibility (EMC) EN55014, EN60555-2 and EN60555-3. These cover
the essential requirements of EEC Directives 2006/95/EC and 2004/108/EC

02
Contents
Important Safety Advice....................................................................................................................................
Technical Parameters........................................................................................................................................
Installation & Operating Instructions.................................................................................................................
Powering the Fireplace......................................................................................................................................
Temperature Setting..........................................................................................................................................
Heater Operation...............................................................................................................................................
Flame Operation................................................................................................................................................
Fuel Bed Colours.................................................................................................................................................
Brightness Operation..........................................................................................................................................
Setting the Time and Day (24 Hour Clock)........................................................................................................
Setting the Weekly Timer....................................................................................................................................
Thermal Safety Cut-Out......................................................................................................................................
Light Emitting Diode............................................................................................................................................
Cleaning, Servicing and Maintenance.............................................................................................................
Correct Disposal of this Product........................................................................................................................
Battery Replacement Remote Control..............................................................................................................
Troubleshooting..................................................................................................................................................
Solution Fires Warranty.......................................................................................................................................
Exploded View...................................................................................................................................................
Replaceable Parts.............................................................................................................................................
Wiring Diagram...................................................................................................................................................
3-4
5-6
7-10
11
11
11
12
12
12
12
13
14
14
14
14
15
16
17
18
18
19

03
Important Safety Advice
When using electrical appliances, basic precautions should be followed to reduce the risk of re, electric
shock, and injury to persons, including the following:
• WARNING: If the appliance is damaged, check immediately with your retailer before installation
and operation. The heater must not be used if any part of it is damaged.
• Do not use outdoors.
• WARNING: In order to avoid overheating, do not cover the heater.
• The appliance carries the Warning Symbol indicating that it must not be covered or has a
do not cover label. Do not cover or obstruct in any way the heat outlet grille located above
the window of the appliance.
• Do not place material or garments over the front of the appliance as this could cause overheating and
a re risk.
• In the event of a fault unplug the heater.
• Unplug the appliance when not required for long periods.
• This appliance can be used by persons if they have been given instruction concerning use of the
appliance in a safe way or are supervised and understand the hazards involved.
• This appliance can be used by children aged from 8 years and above and persons with reduced
physical, sensory or mental capabilities or lack of experience or knowledge if they have been given
instruction or supervision concerning use of the appliance in a safe way and understand the hazards
involved.
• Children shall not play with the appliance. Cleaning and user maintenance shall not be carried out by
children without adequate supervision.
• Children of less than 3 years should be kept away from the appliance unless continuously supervised.
• Children aged from 3 years and less than 8 years shall only switch on/off the appliance provided that it
has been placed or installed in its intended normal operating position and they have been given
instruction or supervision concerning use of the appliance in a safe way and understand the hazards
involved.
• Children aged from 3 years and less than 8 years shall not plug in, regulate or clean the appliance or
perform user maintenance on the appliance.
• If the supply cord is damaged, switch off the mains power at the wall socket immediately.
• WARNING: The heater must not be located immediately below, above or in front of a xed socket outlet
or electrical connection box.
• WARNING: Do not use this heater in small rooms when they are occupied by persons not capable of
leaving the room on their own, unless constant supervision is provided.
• CAUTION: In order to avoid a hazard due to inadvertent resetting of the thermal cut-out, this appliance
must not be supplied through an external switching device, such as a timer, or connected to a circuit
that is regularly switched on and off by the utility.
• CAUTION: Some parts of this appliance around the heater grill can become very hot and cause burns.
Particular attention has to be given where children and vulnerable people are present.
• The heater must not be positioned or used where it may come into contact with water, for example but
not exclusively, in wet rooms, bathrooms, swimming pools, laundries or used to dry clothes.
• Do not use the appliance in rooms with explosive gas (e.g. petrol) or while using inammable glue or
solvent (e.g. when gluing or varnishing parquet oors, PVC etc.)
• Do not insert any objects into the appliance.
• This appliance must be connected to a 220-240VAC 50-60Hz supply.
• If the supply cord is damaged, it must be replaced by the manufacturer, its agent or a similarly qualied
person in order to avoid a hazard.
• This appliance is supplied with a power lead complete with a moulded 13 Amp UK three-pin plug
to connect into a standard UK socket outlet. This appliance must be earthed. The plug must be easily
accessible after siting the appliance. Should a new fuse be required, consult a competent person
to establish the reason for the fuse operating. Only once the fault is rectied should a new 13A fuse be
inserted into the plug.

04
• Use only a dry duster or vacuum cleaner with brush attachment to clean the appliance. Never use
abrasive cleaners, water, steam cleaners or aerosols on or near the appliance.
• Only control the appliance using the manual operations or the supplied remote control described in this
manual. Do not use this heater with a programmer, timer, separate remote control system or any other
device that switches the heater on automatically.
Remote Control Battery Warning
Only adults should handle the batteries. Do not allow a child to use the remote control unless the
battery cover is securely attached to the battery compartment. All batteries must be disposed of
at your local recycling point.
05
Technical Parameters
Information requirements for electric local space heaters
Model identier(s): eTronic 560 Slimline
Item Symbol Value Unit Item Unit
Heat output Type of heat input, for electric storage local
space heaters only (select one)
Nominal heat output Pnom 2.0 kW manual heat charge control, with
integrated thermostat
[no]
Minimum heat output
(indicative)
Pmin 1.0 kW manual heat charge control with
room and/or outdoor temperature
feedback
[no]
Maximum continuous
heat output
Pmax,c 2.0 kW electronic heat charge control with
room and/or outdoor temperature
feedback
[no]
Auxiliary electricity
consumption
fan assisted heat output [no]
At nominal heat output elmax N/A kW Type of heat output/room temperature control
(select one)
At minimum heat output elmin N/A kW single stage heat output and no room
temperature control
[no]
In standby mode elSB 0.45 WTwo or more manual stages, no room
temperature control
[no]
with mechanic thermostat room
temperature control
[no]
with electronic room temperature
control
[no]
electronic room temperature control
plus day timer
[no]
electronic room temperature control
plus week timer
[yes]
Other control options (multiple selections
possible)
room temperature control, with
presence detection
[no]
room temperature control, with open
window detection
[yes]
with distance control option [no]
with adaptive start control [no]
with working time limitation [no]
with black bulb sensor [no]
Contact details: Capital Fireplaces Ltd, Units 12-17 Henlow Trading Est, Henlow, Bedfordshire
SG16 6DS
06
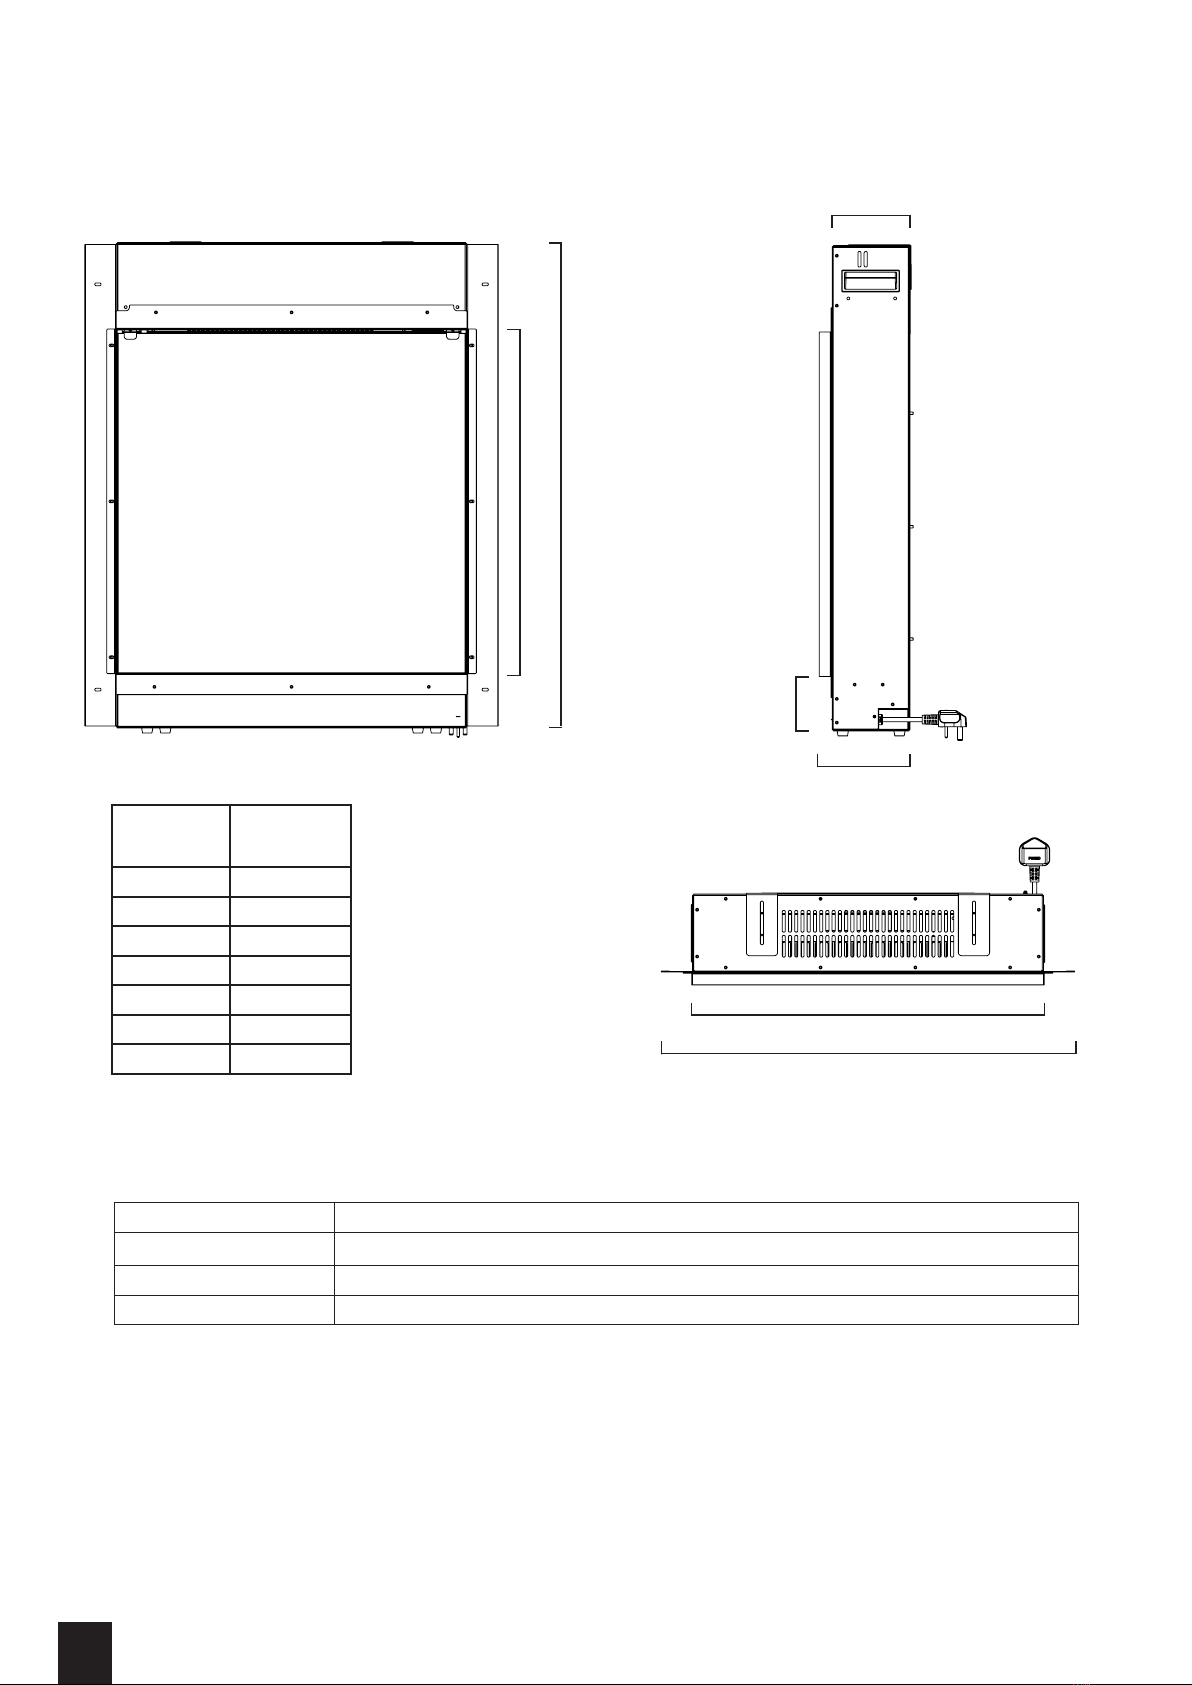
Technical Parameters
C
Note: Dimensions
stated are in
millimetres unless
otherwise stated and
may be subject to a
slight +/- variation.
Dimension
(mm)
A566
B662
C553
D787
E129
F147
G95
Commissioning and Handover
On completion of the installation:
• Ensure that the operating instructions for the unit are left with the customer.
• Ensure to advise the customer on the correct use of the appliance and how to isolate the unit when
required.
• Advise the user what to do should smoke or fumes be emitted from the unit.
Voltage 220-240V AC ~50-60 Hz
Max Power 1700-2000W
Gross Weight (kgs) 25.8kg
Efciency Rating A
Technical Data
A
B
D
E
F
G
07
Installation and Operating Instructions
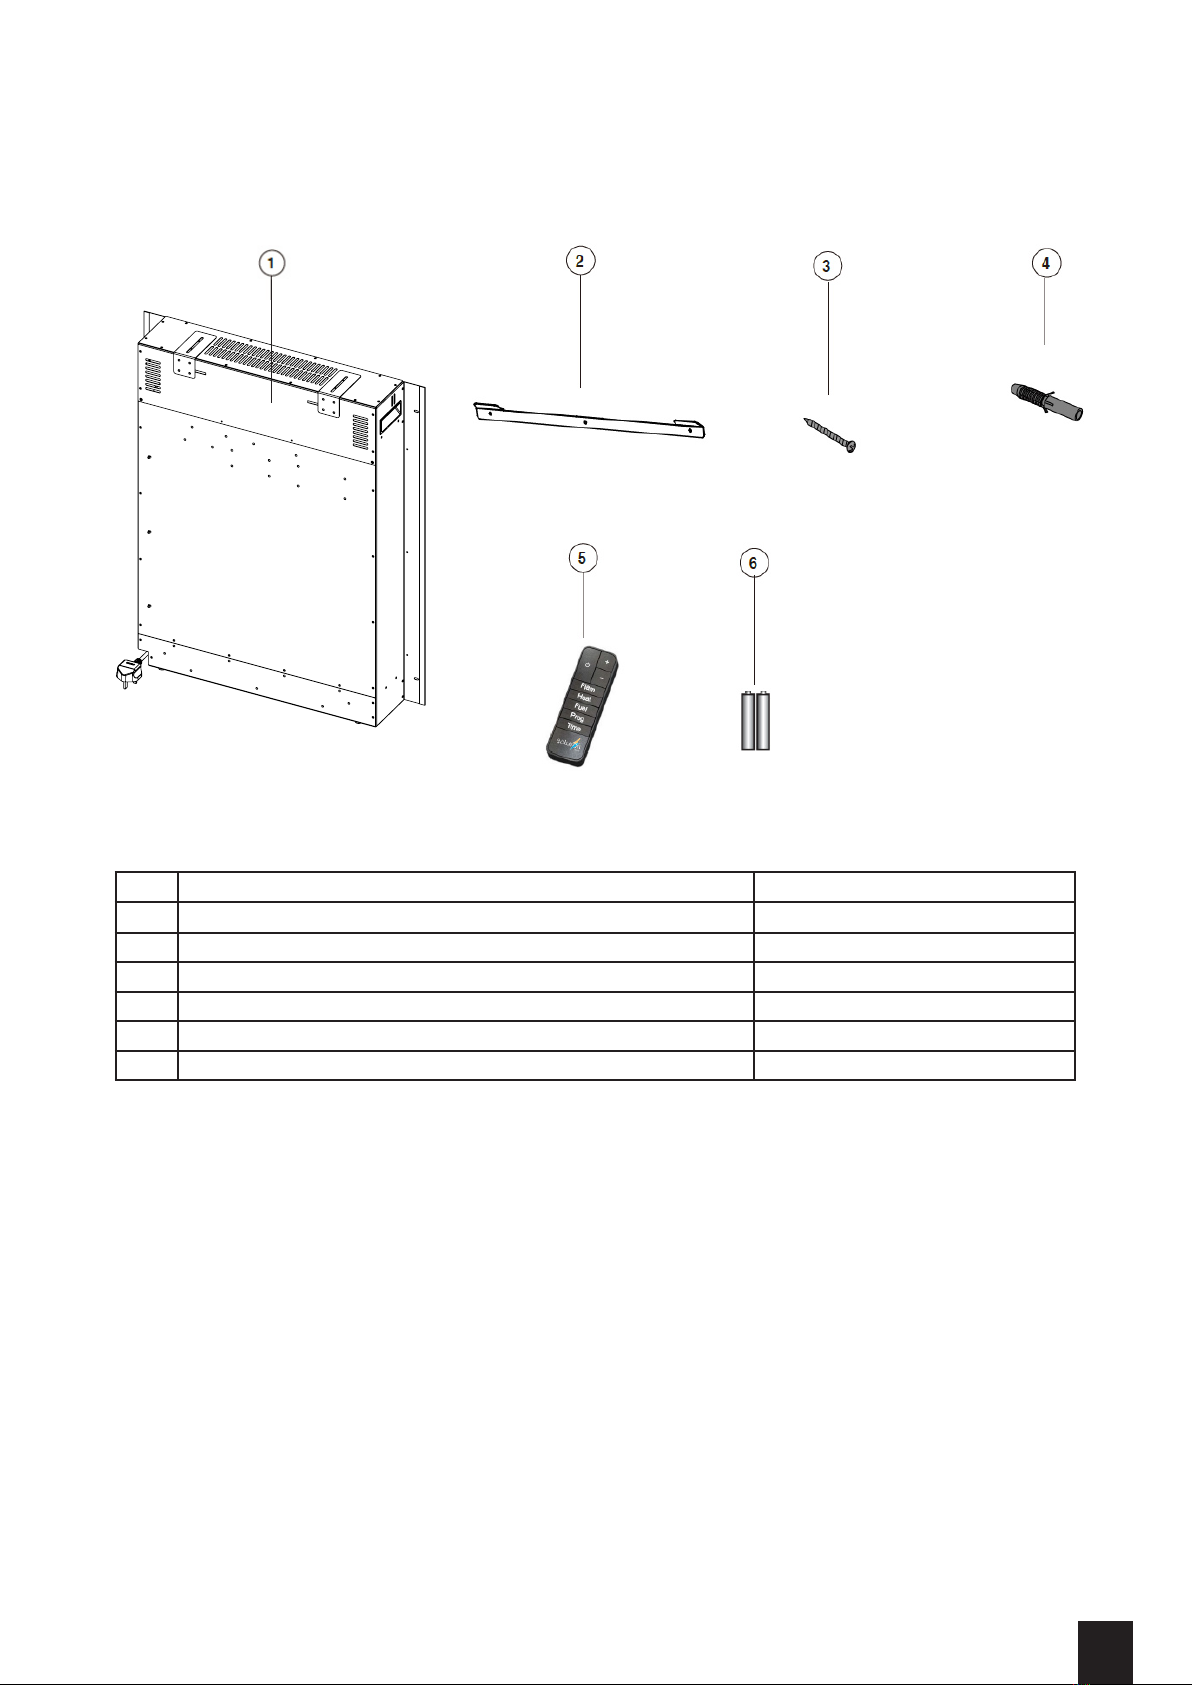
Box Contents:
NOTE: Hardware not shown to actual size.
Ref. Description Quantity
1Fireplace 1pc
2Top Wall bracket (A) Various
3 Long Screw (CC) Various
4 Wall Anchors (EE) Various
5 Remote control 1pc
6 AAA Batteries 1set (2pcs)
Planning Assembly
Before beginning assembly of product, make sure all parts are present. Compare parts with package
contents lists. If any part is missing or damaged, do not attempt to assemble, install or operate the
product. Contact customer service for replacement parts.
Estimated Assembly Time: 30 minutes
08
Installation and Operating Instructions
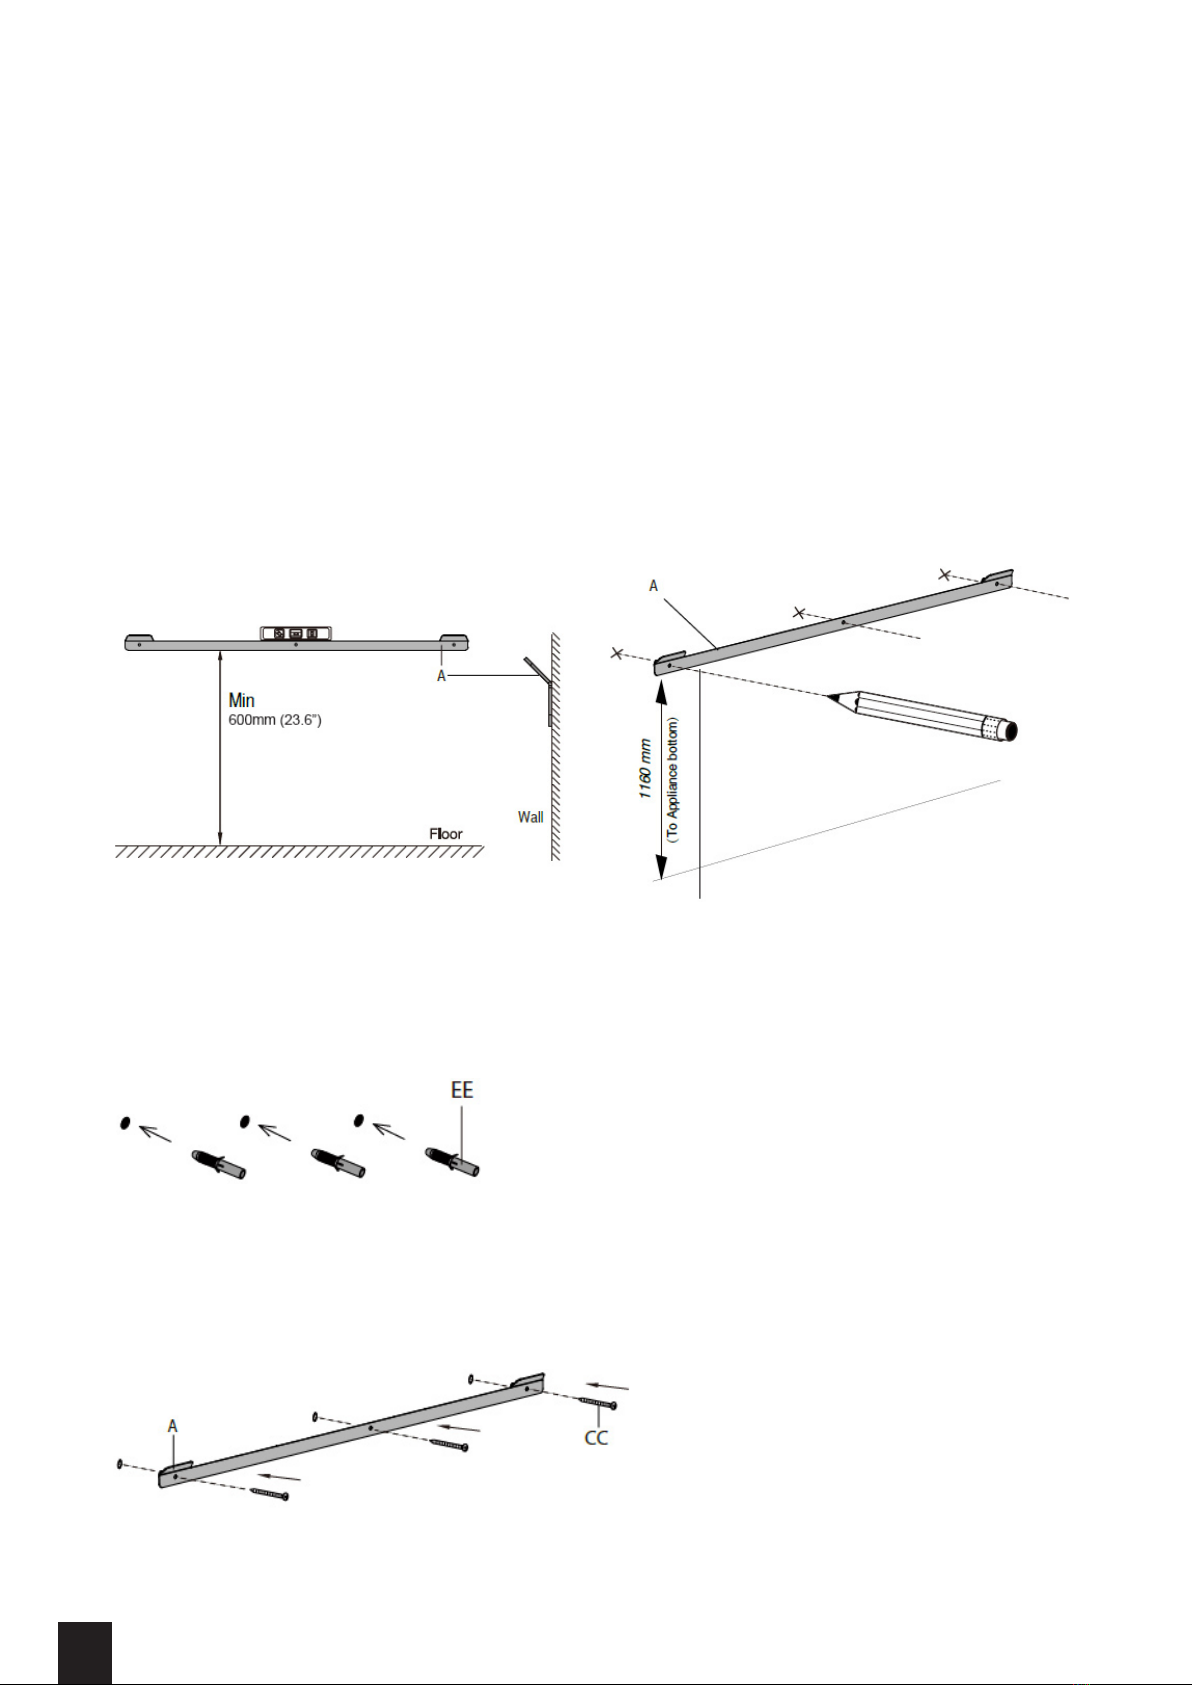
Installation
IMPORTANT: Do not connect the appliance until it is properly xed to the wall and the instruction have
been read fully. Ensure the minimum distances are observed.
1. Choosing a Wall Location
• Choose a wall location to attach the Top Wall Bracket (A). Position the Top Wall Bracket (A) in the
desired location.
• Use a level to align the bracket and mark the three holes with a pencil.
The re is designed to be permanently xed to a wall at a suitable height. The wall bracket must be tted
horizontally and the cable routed to the bottom right of the re. A height of 60cm (23.6in) from the oor to
the bottom of the re is recommended for optimum viewing of the fuel bed.
2. Drilling the Holes
• Put the bracket aside and Drill four holes in the wall to a depth of 35mm (1 3/8in) using a a 7mm (7/25in)
drill bit.
• Insert the Wall Anchors (EE) into the holes by using a hammer.
3. Securing the Top Wall Bracket
• Secure the Top Wall Bracket (A) to the wall by fastening provided Long Screws (CC) into the wall
anchors. Included wall anchors may not be suitable for every wall type. Use alternative wall anchors,
according to the structure being xed to.
09
Installation and Operating Instructions
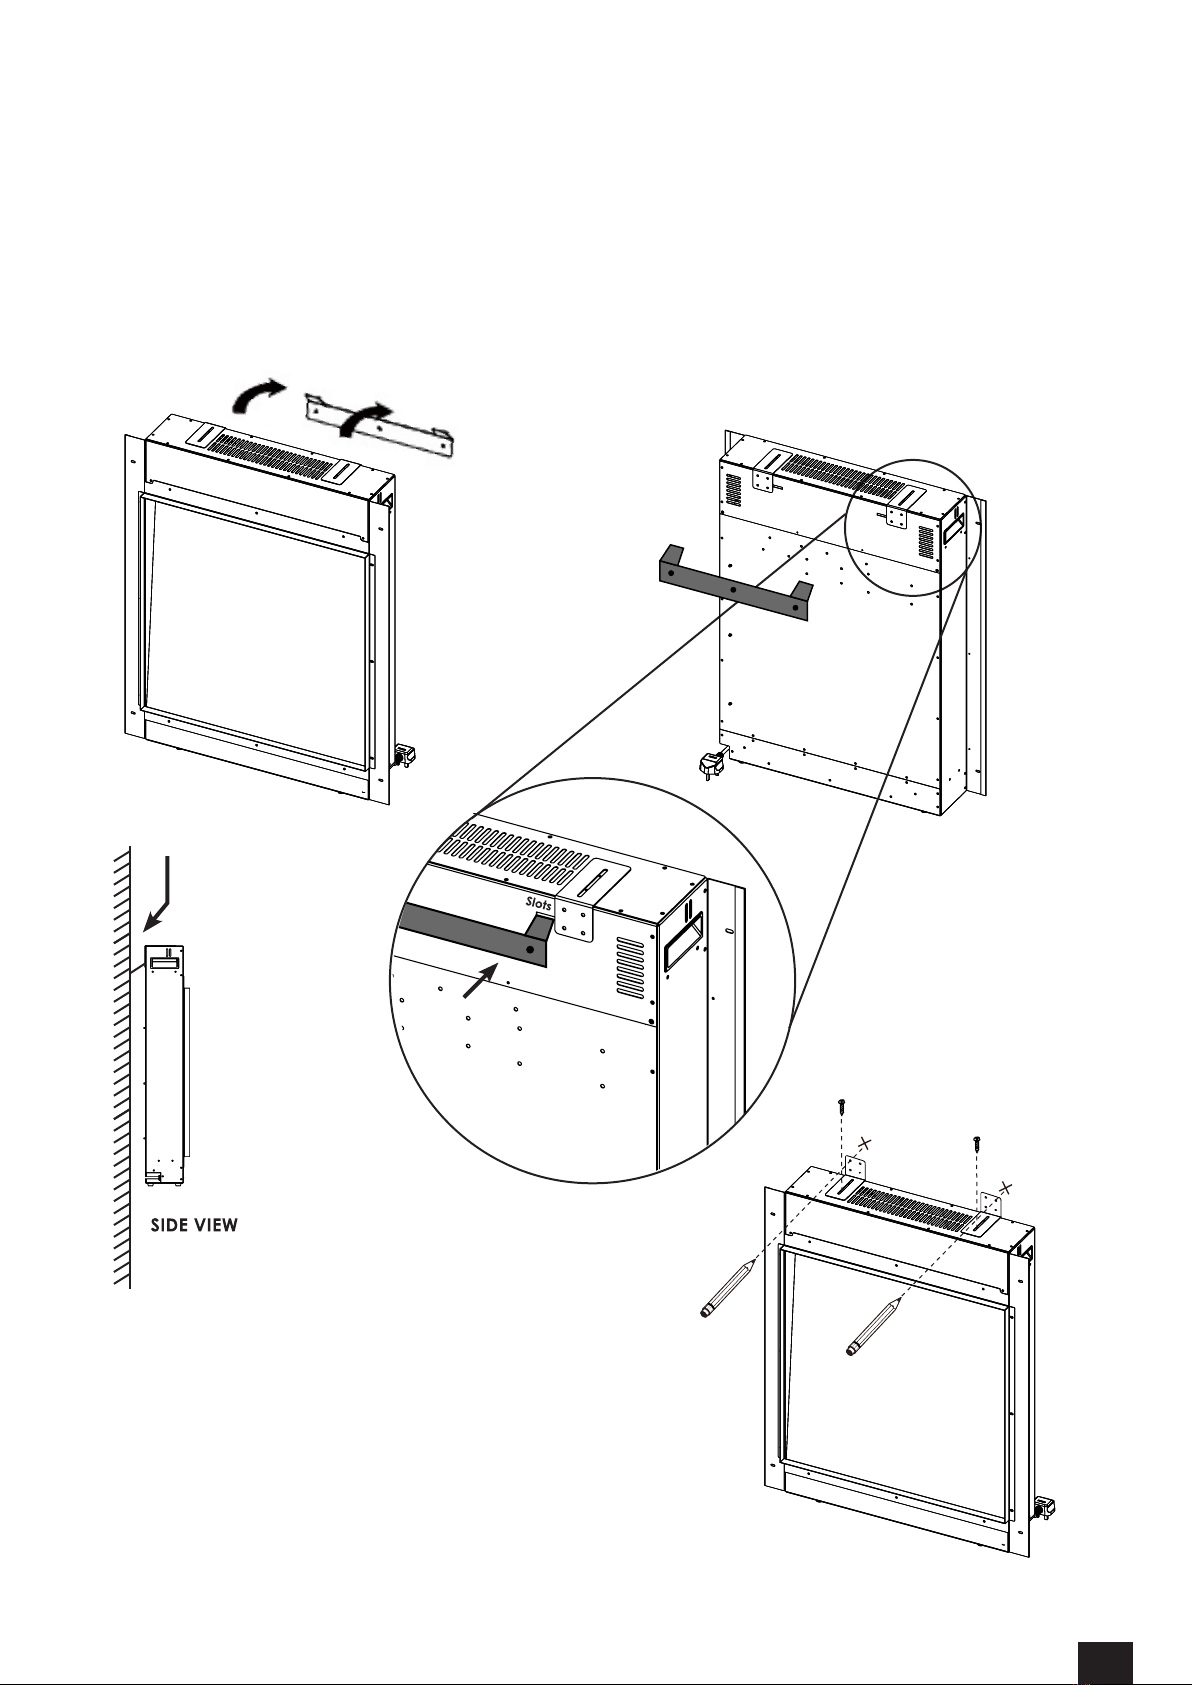
4. Hanging the Fireplace
• Ensure the Top Wall Bracket (A) is secured into the Wall Anchors.
• Lift the Fireplace (a second person may be required), and align the slots on back panel with the hooks
on Wall Bracket (A).
• Make sure the Top Bracket is inserted into the slots on back panel, release the replace and let it sit
on the bracket freely.
5. Attaching L Brackets
• Put the L brackets on the top panel.
• Align hole positions, with the back of the bracket
against the wall.
• Repeat Steps 1-3, and secure the screws.
10
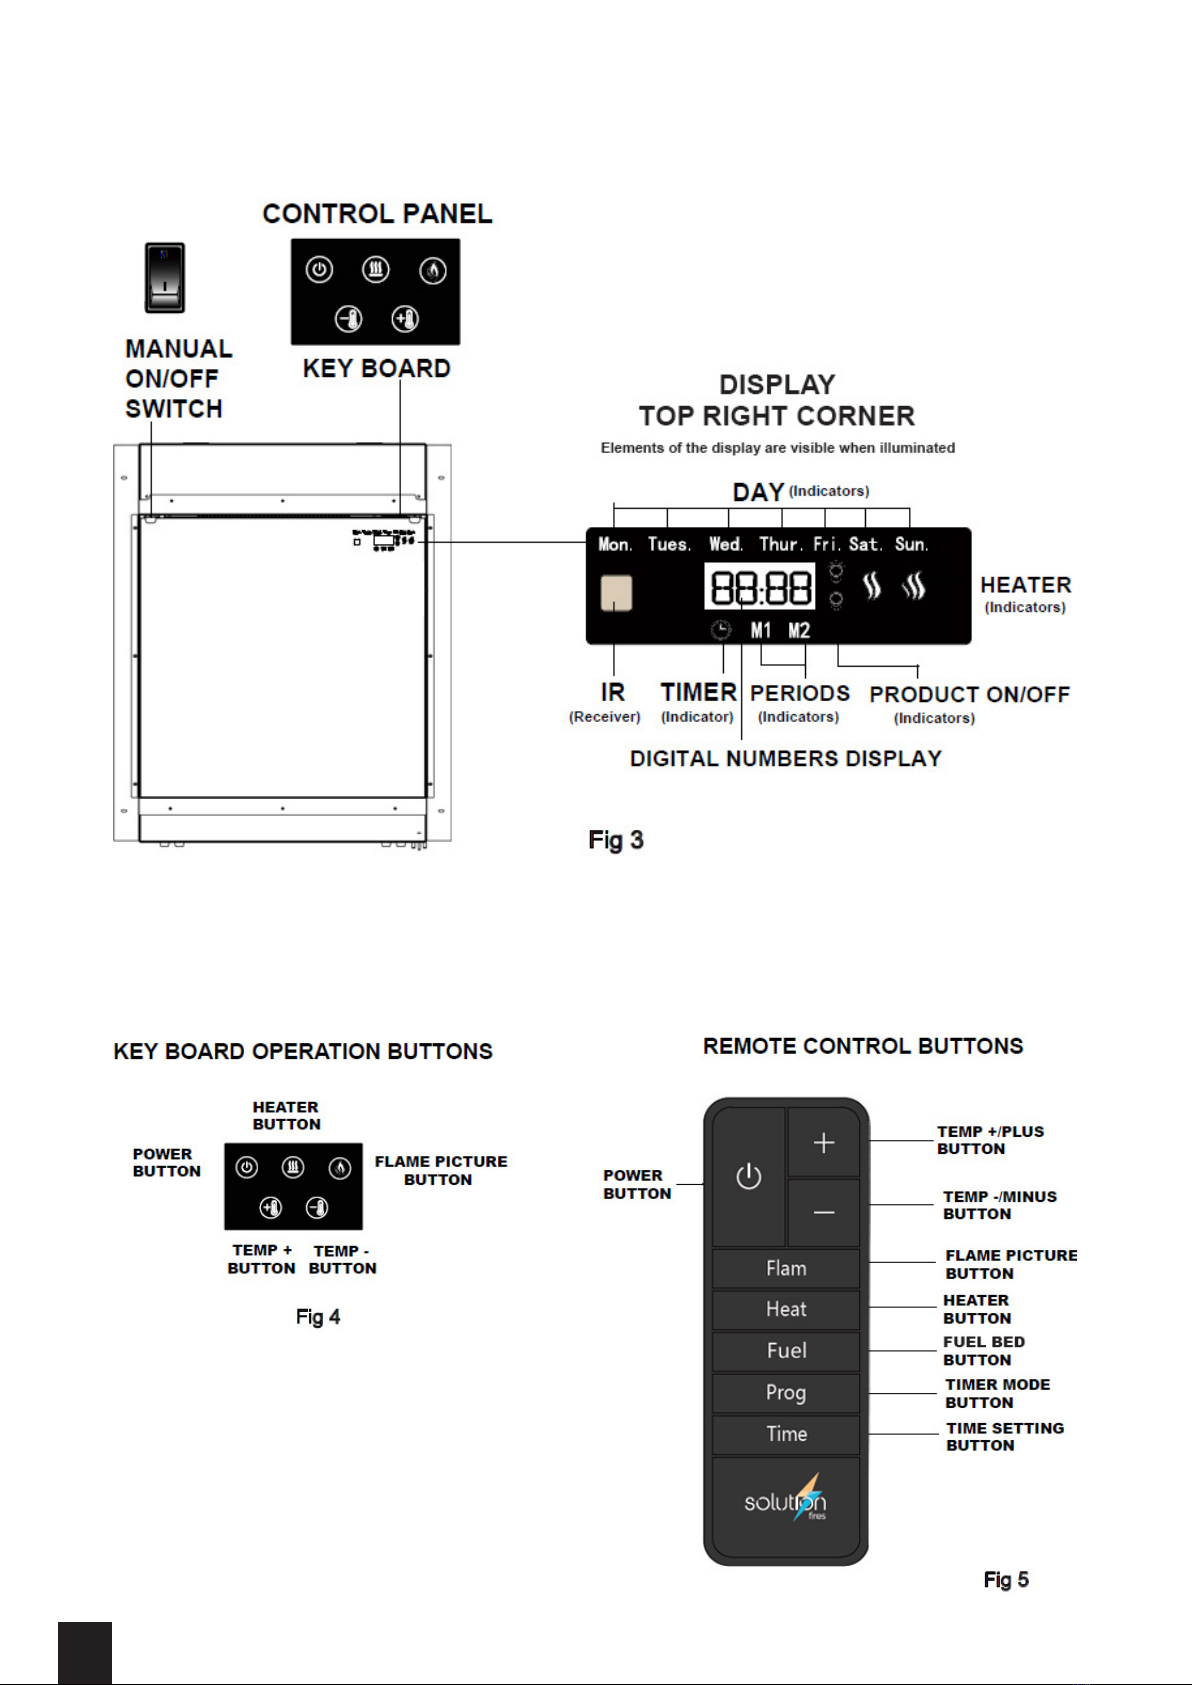
Installation and Operating Instructions
The unit can be operated either by the key board (located just above the ame screen, on the right side),
or using the remote control supplied. For the unit to operate, the manual ON/OFF switch, located on the
left side of the grille panel must be switched to the “I” position.
! NOTE: Before attempting any operation with the remote,
press and slide the battery door (on the back of remote)
open and insert two AAA batteries, checking that the
+and - sides of the battery match inside the battery
compartment, close the battery door.
Table des matières
Autres manuels Solution FIres Cheminée intérieure

Solution FIres
Solution FIres LUX75 Manuel utilisateur

Solution FIres
Solution FIres eTronic 800 Slimline Manuel utilisateur

Solution FIres
Solution FIres SLE75 Manuel utilisateur

Solution FIres
Solution FIres SLE55i Manuel utilisateur

Solution FIres
Solution FIres SLE40i Manuel utilisateur

Solution FIres
Solution FIres eTronic S52 Manuel utilisateur

Solution FIres
Solution FIres SLE125t Manuel utilisateur

Solution FIres
Solution FIres Tamarin Manuel utilisateur


