SNEED-JET Titan Series Titan 21 Manuel utilisateur

User
Guide
Sneed Coding Solutions, Inc.
22315 Gosling Rd.
Spring, TX 77389
833-926-3464
www.sneedcoding.com
SNEED-JET Titan Series
Models: Titan, Titan 21/22, Titan 41/44

OUR MISSION:
Sneed Coding Solutions was founded with the belief that coding and
marking should be simple. Our team of experts is focused on making the
complex coding and marking process easy so that you can focus on the
things important to you. We are here and available to speak with you
whenever the need arises.
WARNINGS:
•DO NOT remove the Ink cartridge or make any setting changes when
the printer is in “print mode” or printing.
•ENSURE that all cables are secure before operation.
•Always remove the ink cartridge when not in use and cap it with the
provided plastic clip to ensure cartridge longevity.
(https://www.youtube.com/watch?v=cwe6e7RaP2Q)
•It is necessary to deactivate “Print mode” when making any setting
change or message edit.
•Please ensure that you use the “SHUT DOWN” button and follow the
instructions on the screen when powering off the printer.
•DO NOT use any liquids or chemicals to clean your printer or
cartridge without consulting technical services first.

Table of Contents
1. Diagram……………………………………………….….....5
2. Printer Specs………………………………………….…….6
3. Main Menu………………………………………….…….....7
4. The Settings Menu……………………………….………....8
- 4.1 The Style Tab………………………………………..8
- Speed & Interval………………………………....9
- 4.2 Spray Settings………………………………………11
- 4.3 Advanced Settings………………………………….11
- 4.4 UV Lamp…………………………………………….12
- 4.5 System Settings…………………………………….12
- 4.6 Counter Settings…………………………………….13
5. The Message Editor………………………….……………..14
- 5.1. Programming Text………………………………….14
- 5.2. Date Codes………………………………………….16
- 5.3. Sequential Counters…………………………….....17
- 5.4. Logos and Images……………………………….....18
- 5.5. QR Codes……………………………………………19
- 5.5.1. Data Matrix Codes……………………......20
-5.6. Barcodes…………………………………………….20
- 5.7 Loading a Message …………………………………21
6. Print Stitching ………………………………………………….22

1.Diagram
1.Power Button
2. Power adapter Input
3.Encoder Input
4. product detector
5.Print head port
6.USB
7.RS232 Input
8. RS232 Input
2
3
1
4
5
6
7
8

2.Printer Specifications
Printer
SNEED-JET Titan series
Model
Titan
DPI
600 max
Screen size
7 inch
Language
English, Chinese, Arabic, Korean, Italian
,
Russian, Spanish,
Portuguese, Turkish
Shape features
Aluminum alloy
Printing height
25mm
Printing distance
2-5mm
Print content
Text, time and date, batch number, serial number, logo, QR
code, barcode
Storage
more than 1000 messages
Printing length
2000 characters for each message with no limitation to physical
length
Printing speed
70m/min
Working
environment
Temperature:0 - 45℃
(
best 20-30℃
)
Humidity: 40% - 60% Rh
Printing material
paper, cardboard, wood, concrete, fabrics, fiber glass plastic
(PET, HDPE, PVC, LDPE, other), glass, aluminum, stainless,
carbon steel, and many others

3.Main Menu
Edit - Allows the creation and full customization of printed messages. You will
also choose the messages you want to print from this menu.
Settings - General printer settings.
Print - Activate and deactivate “print mode”
Shut Down - Starts the printer shut down process.
Note:
①Please use the correct shut down procedure when powering off:select “Shut Down”
and follow the directions on the screen.
②Please ensure that print mode is deactivated before making setting changes or
removing the ink cartridge.

4.The Settings Menu
In this section of the user guide, we will discuss the individual functions in the
printer’s settings menu to better help you set up your printer.
TIP: Remember to deactivate “print mode” before making any adjustments to
the settings in this menu
4.1. The Style Tab
a. Print Mode: Allows you to choose from multiple print trigger options. For
example, you can choose to use the external product sensor or set the printer
to print in automatic mode. (Auto mode uses the printer delay or “Interval” to
trigger prints every set value).
b. Speed: this setting is one of your most important and allows you to set the
speed at which the printer ejects ink to match the speed of your conveyor.
This can require some trial and error.
c. Interval (Print Delay):The Interval value allows you set when the print
begins following the print trigger. This allows you to move the print to the left
or right on the product you are printing to precisely position the message. You
will also use the Interval value to determine the distance between prints when
using automatic print mode,
d. Direction: allows you to reverse or mirror the print over the X and Y axis
e. Print Width: Print width is a setting only relevant when using an encoder
wheel. It is equivalent to the speed setting.
- Your encoder wheel is activated or disable from the check box labeled
“Sync Encoder”

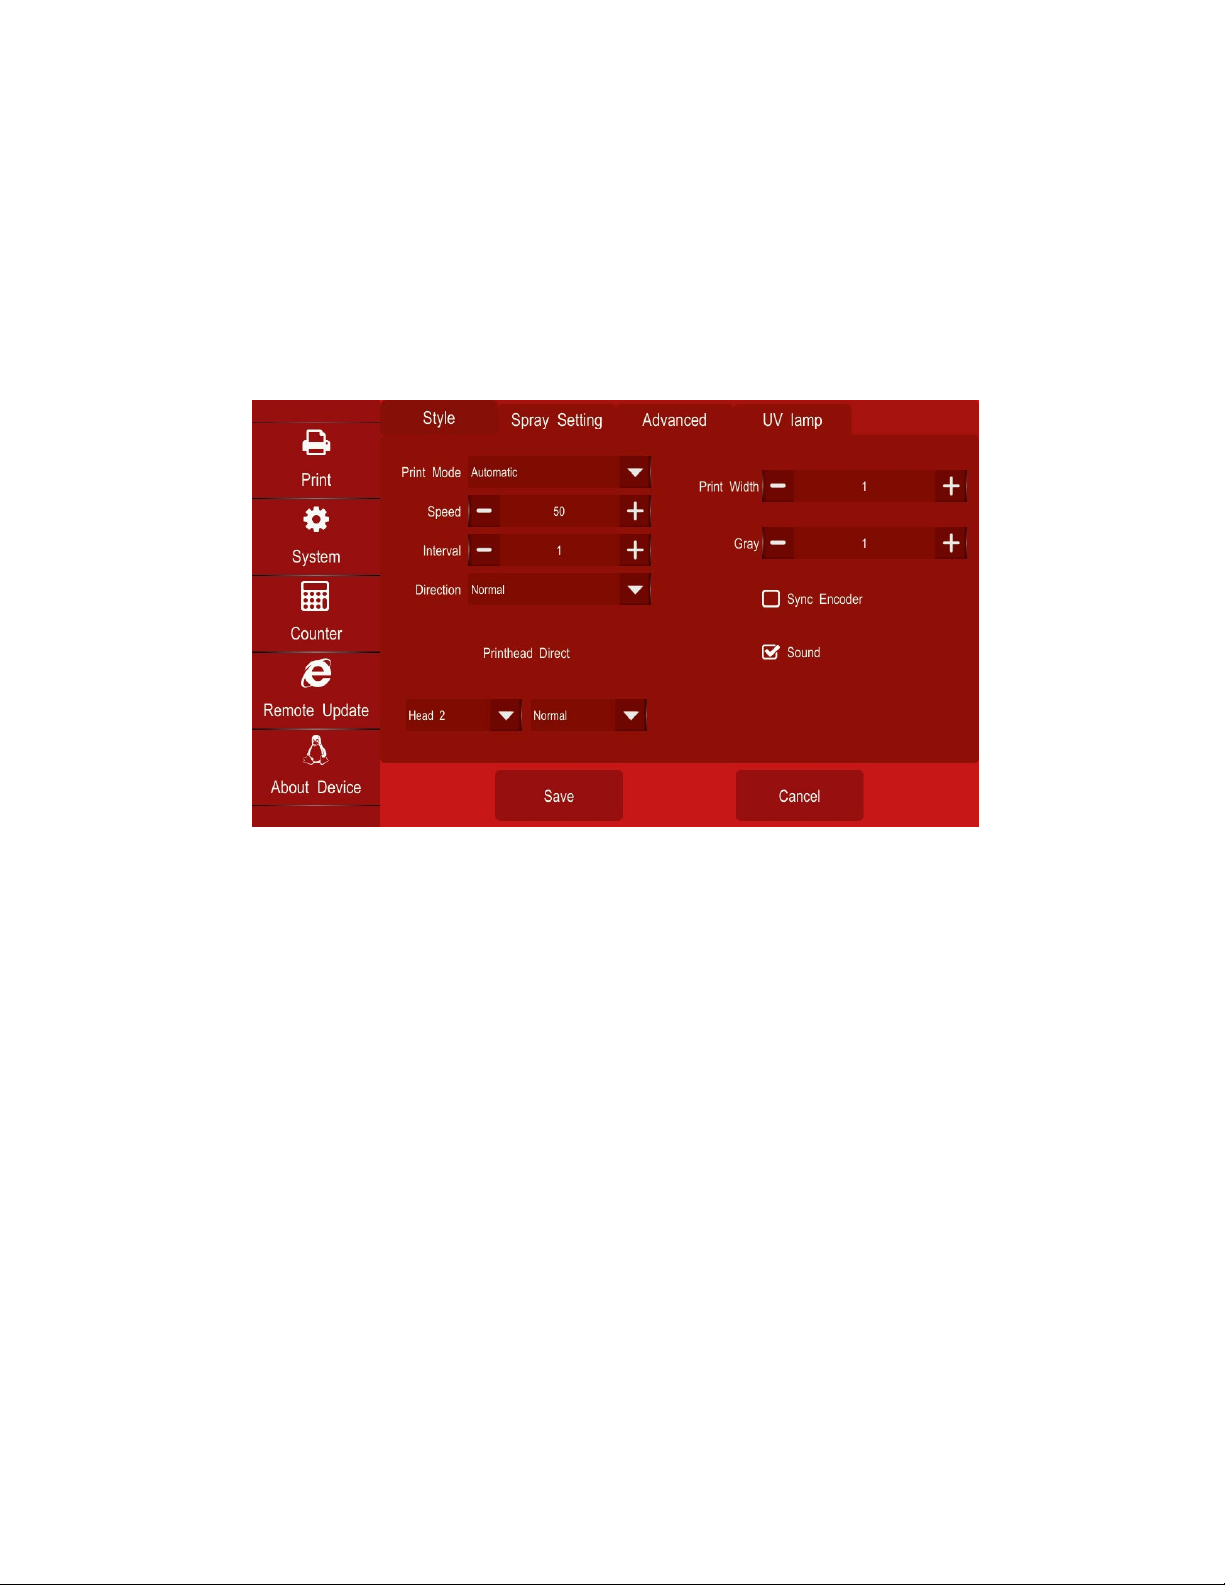
f. Gray: Greyscale value (do not increase gray past 3 without consulting
technical services. This will cause higher than average wear on your cartridge
nozzles)
Using “Speed” and “Interval” to Position your Print
In this section we will give you some of the personal insights to adjusting your
speed and delay from the author.
If you have ever used a thermal inkjet coder before then you know that outside of
your ink parameters, your speed and delay values are the most important and regularly
adjusted settings on your printer. In this case we will swap the word “delay” for
“interval”. To ensure you have to adjust these settings as little as possible make sure
that you have installed all parts of your printer level and securely. The installation of
your photo eye will have the largest effect in this case, make sure it is secure.
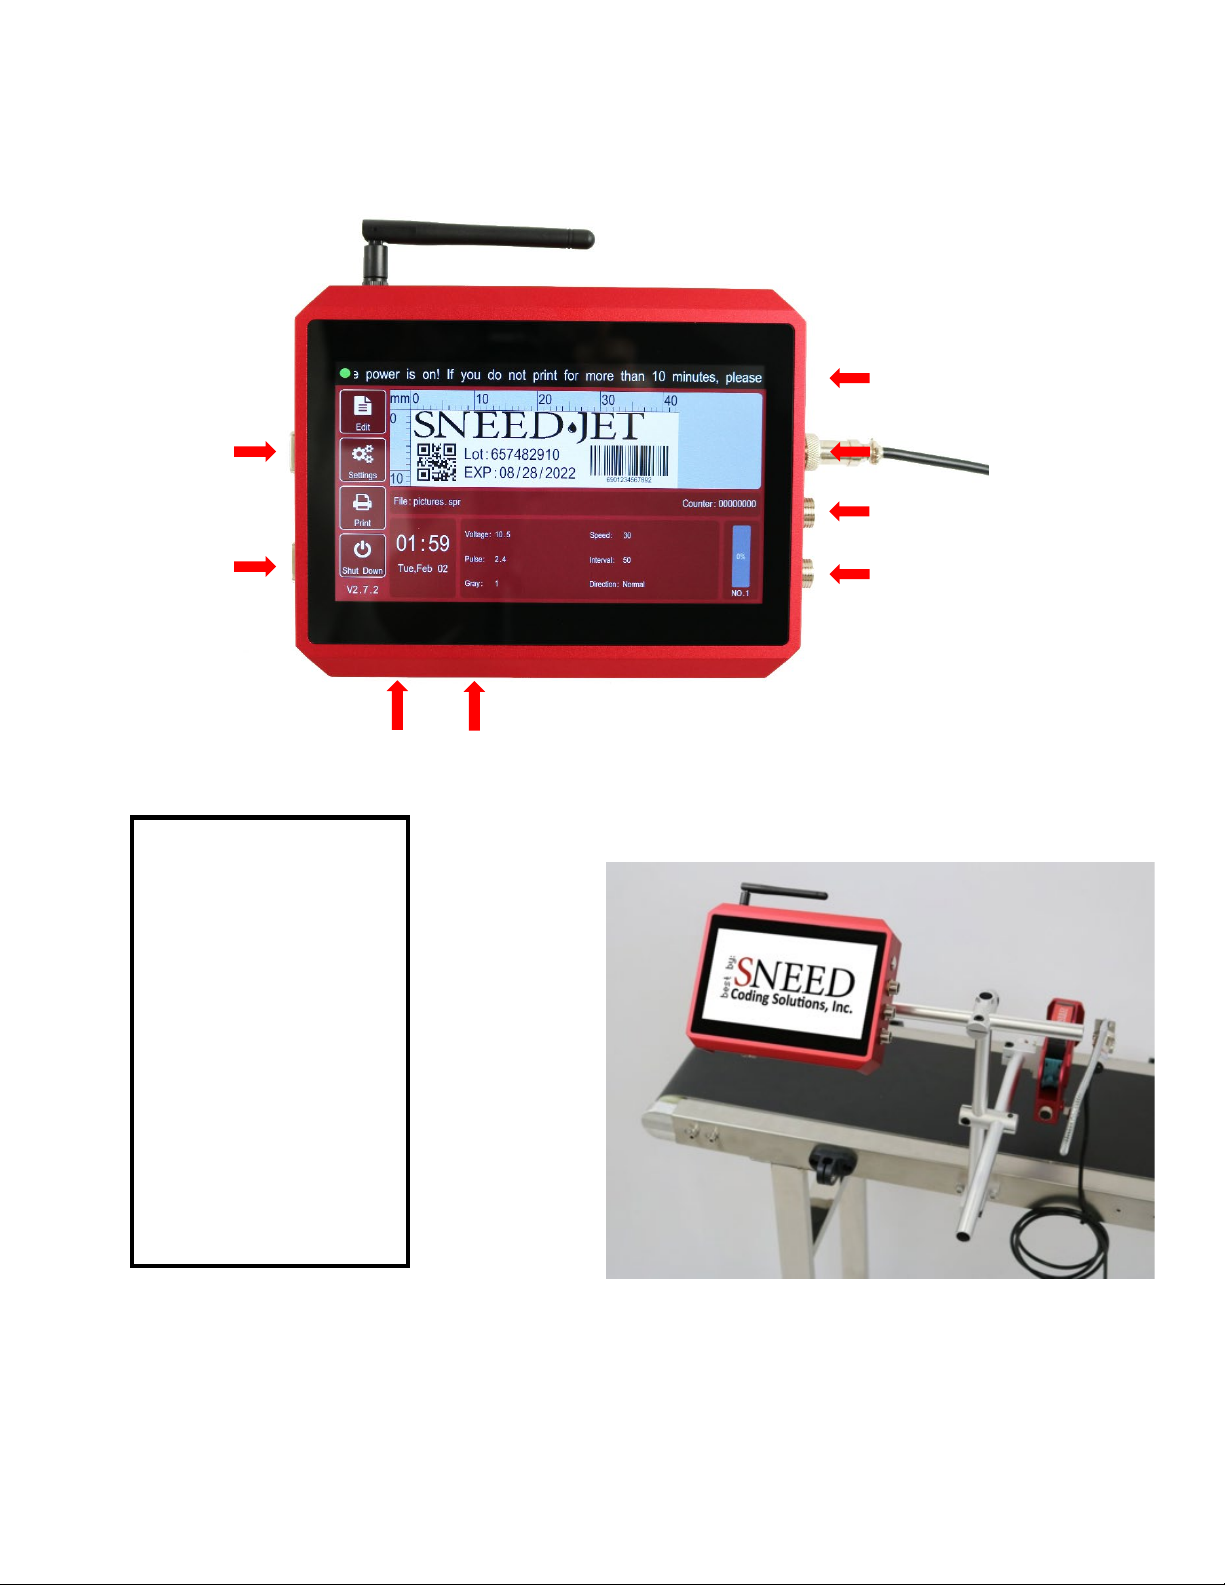
Your printhead vs. your photo eye
- The distance between your photo eye and print head will be a large factor in
adjusting your Interval value the closer they are to each other the less trial and
error is involved. If you can, try and position the photo eye directly in line with
your print cartridge. (This is not always possible or necessary).
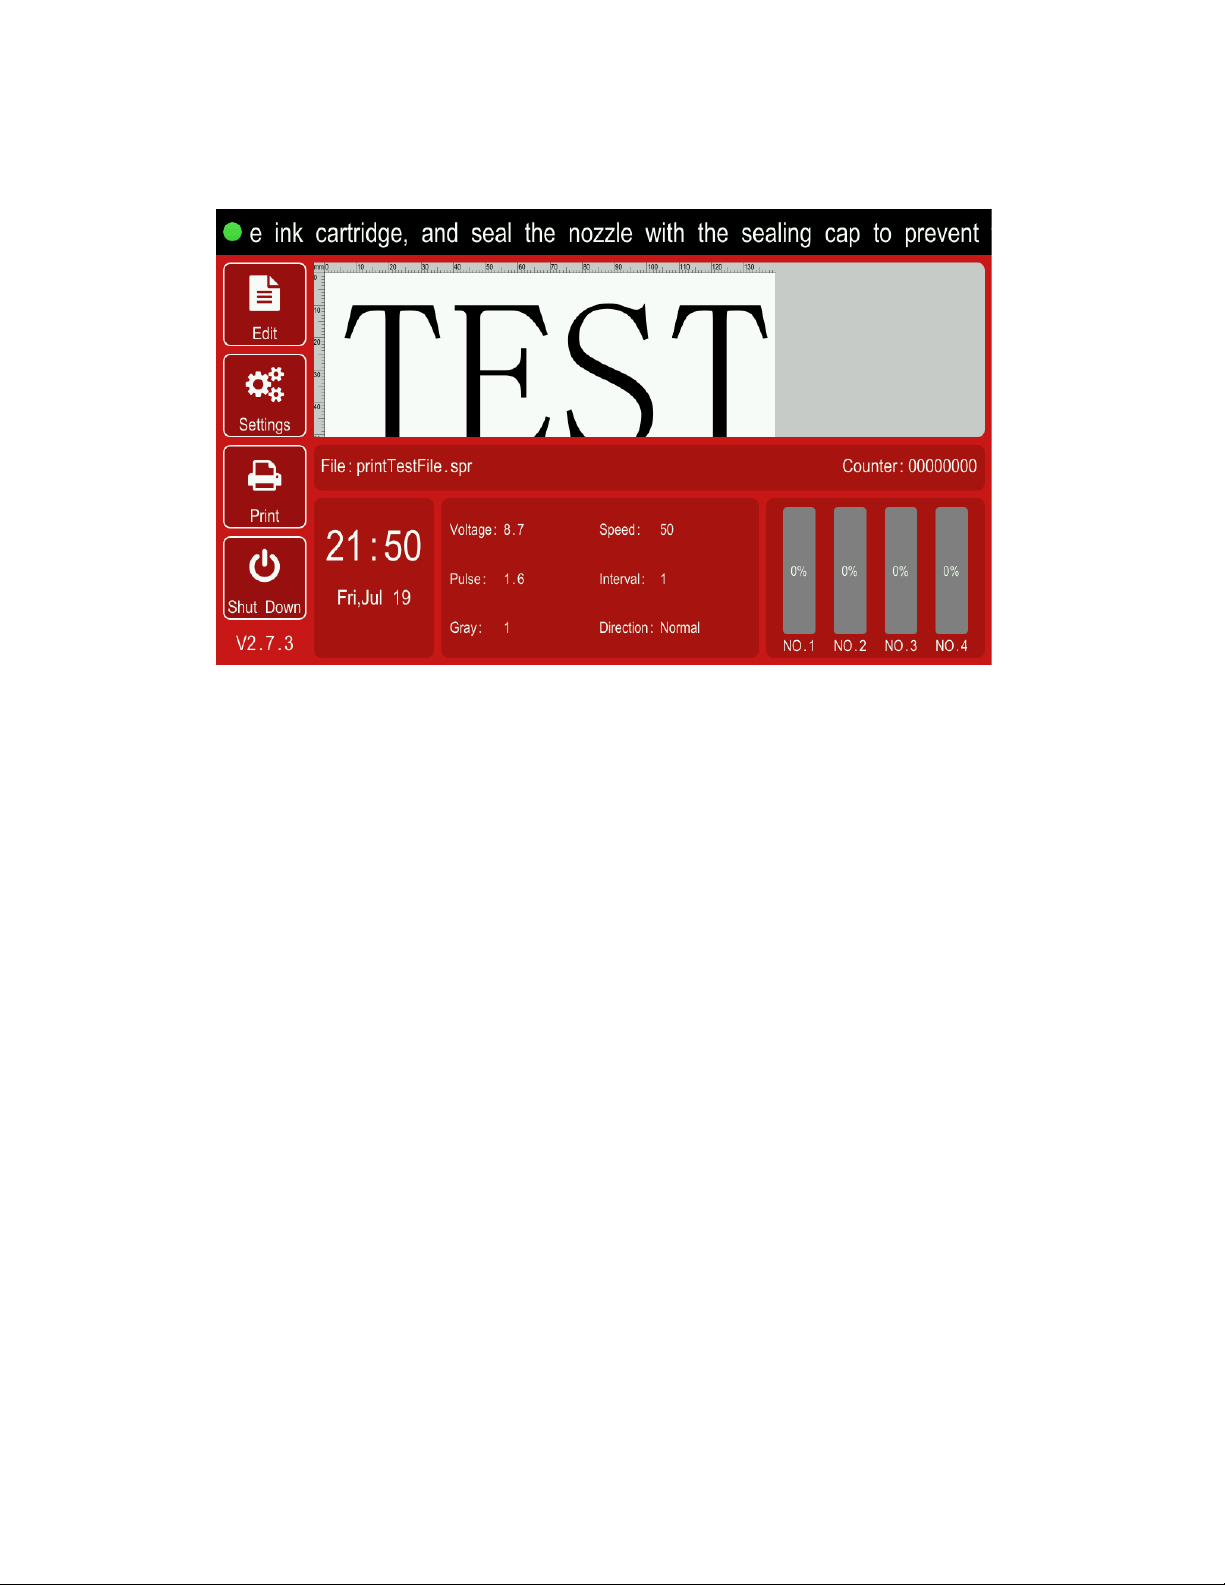
Setting your speed value
- On the SNEED-JET Titan the smaller the speed value the faster the printer
ejects ink. for example, 10 would be considered a fast print speed and 300
would be very slow.
- Adjusting the speed is straight forward. It will affect the overall length of your
printed code. If you notice that your prints appear condensed together or
squished, then increasing the speed value will slow the printer down and stretch
the code out. The same works for a code that is stretched to far, by decreasing
the speed value. Keep in mind that an increment change of 1 would have an
almost negligible effect in most situations.
- Your DPI value will play a large role in setting the speed value. If you find that
you need to lower or raise DPI at any point you will need to adjust Speed. You
will need to lower or raise the speed value by approximately half for every level
of DPI you move.
oThe printer will allow you to choose 150,200,300,and 600 DPI. If you
decided that you wanted to change your DPI from 600 to 300 and your
“speed” was set at 60 you would need to lower to 30 to produce the same

size prints you were at 600 DPI. This principal also applies to the encoder
and the print width setting.
Setting the Interval
- The Interval Value is a delay between the print trigger and the physical printing.
The Interval value will allow you to move your print to the left or the right in
relation to the product you are printing on.
oIncreasing the Interval value will move the print to the right with every
adjustment.
oI recommend starting with large incremental changes at first to get a feel
for the print movement and then slowly adjust down the increment of
change until you achieve the desired position.
oJust as with the Speed setting, a small change like from 10 – 20 often
yields negligible results
- Remember that the relationship between your print head and
photo eye have a drastic effect on Interval. If your photo eye
is ever re-positioned, you will have to adjust the interval to
account for the change.
- The same applies for changes in line speed and the print
speed setting. You can avoid this by using an encoder wheel
Ce manuel convient aux modèles suivants
3
Table des matières


