Snap Appliance Snap Server 4400 Manuel utilisateur
QuickStartGuide and User CD
Kurzanleitung und Benutzer-CD
Guía de iniciación rápida y CD del usuario
Guide de mise en route rapide et CD de l'utilisateur
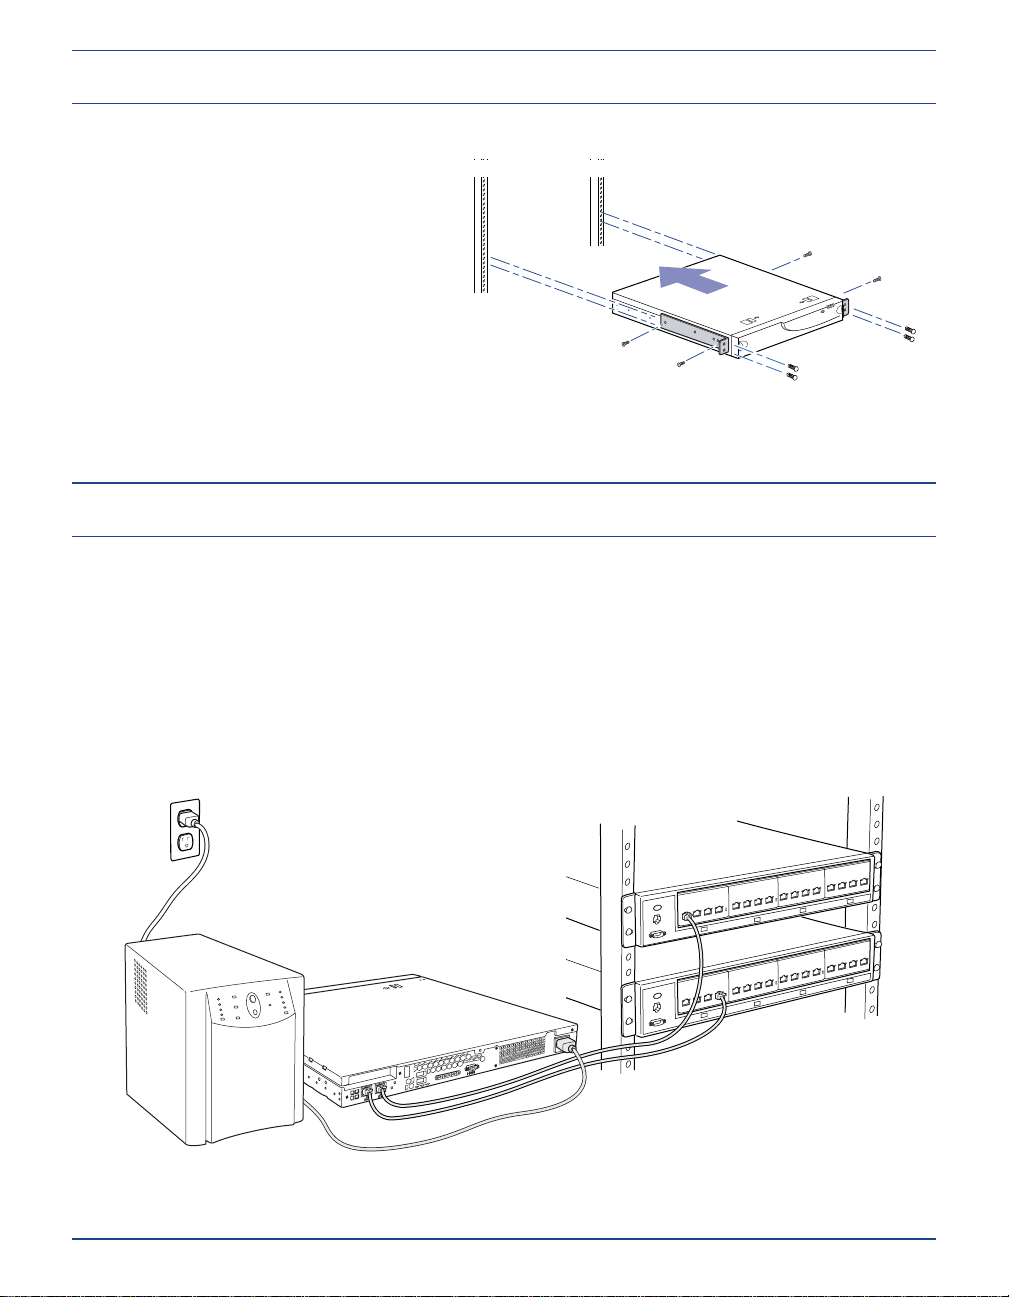
Installing the Snap Server 4400 in a Rack
Install the Snap Server 4400 in a rack using the rack mounting kit provided.
1.
Attach the two front bracket assemblies
to the sides of the server using the four
screws provided.
2.
With the help of an assistant, align the
holes in the brackets to the holes
on the rack and secure using the
four screws provided.
For more information, refer to the
Administrator Guide.
1.
Plug the power cord provided into the server’s power connector.
2.
Plug the other end of the power cord into a properly grounded electrical outlet.
Note:
For the greatest protection from power failures, connect the power cord to an
uninterruptible power supply (UPS).
Connecting the Power Cord
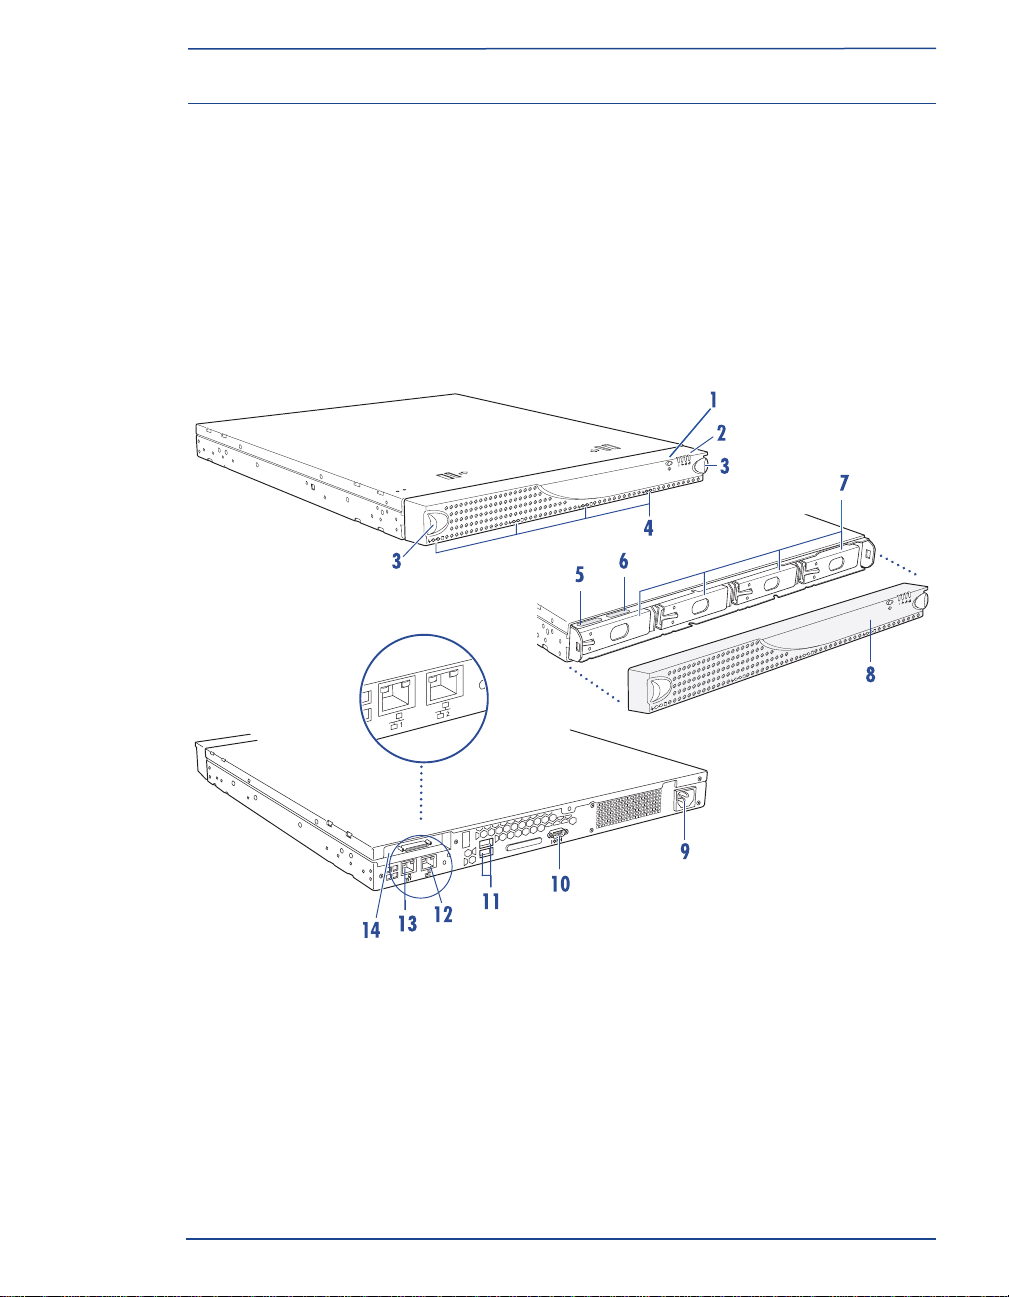
Hardware Features
13 12
1.
Power button
2.
System status lights
3.
Release latches (two)
4.
Disk drive status lights
5.
Server number label
6.
Serial number label
7.
Hot swappable disk drives (four)
8.
Front bezel
9.
Power connector
10.
Service connector
11.
USB connectors (disabled)
12.
Secondary Ethernet connector
13.
Primary Ethernet connector
14.
SCSI connector (optional on some models)
Connecting to Your Network
Powering On the Server
Connect the server to a 10BaseT, 100BaseTX, or 1000BaseT network. Use one or both of the
Ethernet cables provided starting with the primary Ethernet connector. Using both connectors
offers advantages such as load balancing and failover.
Note:
If you use only one network connector, use the primary Ethernet connector marked '1' on
the back of the server as shown in the section, “Hardware Features.”
Press the power button on the front of the server and hold it down
until one or both network lights come on, and the power light is
solid green.
Acquiring an IP Address
1.
Install NASManager from the User CD onto a client computer.
2.
Launch NASManager.
3.
In the NASManager window,
locate the server by name
(The default server name is
SNAP
nnnnnn
, where
nnnnnn
is the
server number of your server.)
Note:
If you do not have a DHCP server on your network, you must assign an IP address manually. In
the NASManager window, select your server, then select Tools > Set IP Address. Enter a unique IP
address, and click OK. When prompted, enter admin for the user name and admin for the password.
Initializing the Server
1.
Launch your browser and enter the Snap Server's
name or IP address.
2. Log in with default User Name admin and
Password admin.
3. Complete setup with the Initial Configuration Wizard.
Note:
To learn more about configuring the server, see
the Administrator Guide and the online help.

User CD
Obtaining Service for Your
Snap Server 4400
To obtain service or technical support for your Snap Server 4400,
please visit our Web site at www.snapappliance.com, or call 1-888-338-SNAP.
For immediate response to a service inquiry, you can submit a question to our Technical
Support department using our Expert Knowledge Base System
http://www.snapappliance.com/support
Service für Ihren
Snap Server 4400
Sie finden den technischen Service oder Kundendienst für Ihren Snap Server 4400 auf unserer Website unter
www.snapappliance.com. Wenn Kunden sofortige Antworten auf eine Serviceanfrage wünschen, können sie mit Hilfe
unseres Expert Knowledge Base System http://www.snapappliance.com/support
Obtención de servicio de asistencia técnica para su
Snap Server 4400
Para obtener servicio o asistencia técnica para su Snap Server 4400, visite nuestro sitio Web
www.snapappliance.com. Para obtener respuesta inmediata a su solicitud de asistencia, envíelas en la forma de
preguntas a nuestro Sistema experto de base de conocimiento en http://www.snapappliance.com/support
Obtention d‘un entretien pour votre
Snap Server 4400
Pour un entretien ou une assistance technique concernant votre Snap Server 4400, vérifiez
notre site web sur www.snapappliance.com. Pour obtenir une réponse immédiate à une
demande de service, vous pouvez envoyer une question à notre service
d‘assistance technique en utilisant notre système de base de connaissances
experte http://www.snapappliance.com/support
Warranty
Garantie
Garntía
Garantie

Usingthe Snap Server 4400
Once installed, the Snap Server 4400 appears as a server with a shared folder. Use the server to
organize and store files as you do with folders on your local hard disk. The default server name is
SNAP
nnnnnn
, where
nnnnnn
is the server number of your server. For example, a server with the
server number 130020 would show the default server name SNAP130020.
If your network does not have a DHCP server, you can use NASManager or the Administration
Tool to assign static IP addresses. For detailed instructions, refer to the Administrator Guide
(available as a PDF on the User CD) or use the online help.
70990569-001 Rev. A
Copyright © 2003 Snap Appliance, Inc. All rights reserved worldwide.
All other product names or company names are the property of their
respective owners.
Copyright © 2003 Snap Appliance, Inc. Alle Rechte weltweit
vorbehalten. Alle anderen Produktnamen und Firmennamen sind
Eigentum der jeweiligen Unternehmen.
Copyright © 2003 Snap Appliance, Inc. Reservados todos los derechos
en el ámbito internacional. Todos los otros nombres de productos o de
compañías son propiedad de susrespectivos propietarios.
Copyright © 2003 Snap Appliance, Inc. Tous droits réservés dans le
monde entier. Tous les autres noms de produit ou de société
appartiennent à leurs détenteurs respectifs.
Snap Appliance
2001 Logic Drive
San Jose, CA 95124 USA
888.310.SNAP (7627)
www.snapappliance.com
Table des matières
Autres manuels Snap Appliance Serveur

Snap Appliance
Snap Appliance 4200 Manuel de l'opérateur

Snap Appliance
Snap Appliance Snap Server 4200 Manuel utilisateur

Snap Appliance
Snap Appliance Snap Server 510 Manuel utilisateur

Snap Appliance
Snap Appliance Snap Server 4500 Manuel utilisateur

Snap Appliance
Snap Appliance Snap Disk 10 Manuel utilisateur

Snap Appliance
Snap Appliance Snap Server 4200 Manuel utilisateur


