SMARTPOINT SPMINIDASH Manuel utilisateur

Model: SPMINIDASH
Viewing Angle: 170°
Video Format: AVI
Photo Format:JPG
Standard Voltage: DC 5V
LCD: 1.6”
Memory Card: Max 32GB
Video Specifications: AVI
Internal battery: 80mAh
Languages supported: Simplified Chinese, Traditional Chinese,
English, Russian, Korean, Japanese, Spanish, Turkish, Thai,
Czech, Polish, French, Italian, Portuguese, Hebrew & German

One Year Limited Warranty.
©Smartpoint LLC,
250 Liberty Street, Suite 1A
Metuchen, NJ 08840
Manufactured, marketed and distributed by Smartpoint LLC, under license.
All trademarks and registered trademarks are property of their respective owners.
Made in China
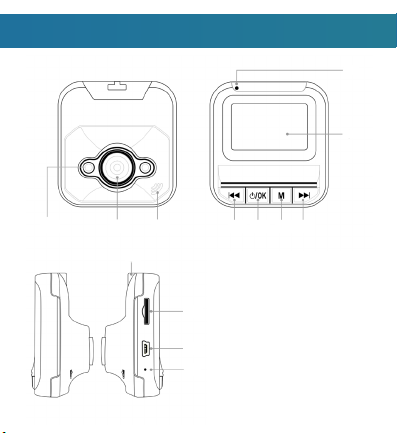
1. Infrared light
2. Lens
3. Speaker
4. USB port
5. Micro SD slot
6. Up
7. On/O Conrm/Play/Pause/REC
8. LCD Screen
9. Mode/Menu
10. Down
11. Reset
12. Bracket
13. Working indicator light
2. 3. 6. 7. 9. 10.1.
5.
4.
11.
12.
13.
8.
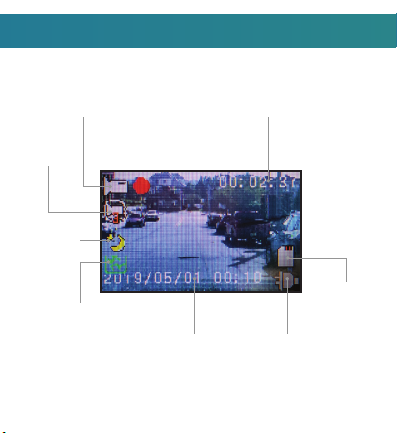
Recording Status
Cycle Record
Setting
Infrared Light
Status
Motion Detection
Status
Time/Date Stamp Charging/Battery
Status
Micro SD Card
Recording Duration

I. To charge camera, connect provided car charger to camera or connect
camera with a USB cable to a computer.
2. When the camera is not plugged into anything you can power off the
camera by holding the ON/OFF button.
(When in a car, only use the provided 5V car charger with this camera)
(Computer USB charging cable not included)
I. When the car is started and power is connected to the camera, it will
automatically turn on and start recording.
2. When the car is shut off and the power to the camera is turned off, the
camera will automatically turn off as well.
3. To stop/start recording while camera is on, press the OK button.
4. The blinking red circle in the top left corner indicates that camera is
recording.
(Camera can only record when a Micro SD Card is inserted into camera)

I. To charge camera, connect provided car charger to camera or connect
camera with a USB cable to a computer.
2. When the camera is not plugged into anything you can power off the
camera by holding the ON/OFF button.
(When in a car, only use the provided 5V car charger with this camera)
(Computer USB charging cable not included)
The camera can be switched between the following modes:
DVR Mode: Lets you record while driving
Photo Mode: Lets you take pictures
Playback Mode: Lets you view your videos/photos and delete them
1. The device automatically starts recording video once it automatically
turns on when plugged into your car.
2. To stop/start recording, press the OK button.
1. Long press the Menu/Mode button once to enter photo mode.
(When in photo mode, the top left of the screen will show a camera icon)
2. Press the OK button to take a picture.
1. Long press the Menu/Mode button again to enter playback mode.
2. When in playback mode, use the arrow buttons to navigate through
recorded videos.
3. Press the OK button to view recordings and photos.
4. To go back to DVR mode, long press the Menu/Mode button again.
I. When the car is started and power is connected to the camera, it will
automatically turn on and start recording.
2. When the car is shut off and the power to the camera is turned off, the
camera will automatically turn off as well.
3. To stop/start recording while camera is on, press the OK button.
4. The blinking red circle in the top left corner indicates that camera is
recording.
(Camera can only record when a Micro SD Card is inserted into camera)

1. The device automatically starts recording video once it automatically
turns on when plugged into your car.
2. To stop/start recording, press the OK button.
1. Long press the Menu/Mode button once to enter photo mode.
(When in photo mode, the top left of the screen will show a camera icon)
2. Press the OK button to take a picture.
1. Long press the Menu/Mode button again to enter playback mode.
2. When in playback mode, use the arrow buttons to navigate through
recorded videos.
3. Press the OK button to view recordings and photos.
4. To go back to DVR mode, long press the Menu/Mode button again.
1. To access the menu you can press the Menu/Mode button.
(To access the menu, the camera cannot be recording. If motion
detection is on, then camera automatically records. To access menu
when motion detection is on, press OK to stop recording and then
press the Menu/Mode button immediately after. Motion detection is
turned off by default)
2.
To navigate through sections on the menu use the Menu/Mode button.
3. To navigate through settings in the menu you can use the
(UP) and (DOWN) buttons.
4. To confirm a setting press the (OK) button.
In the menu you can access the settings for:
1. Video resolution
2. Turn ON/OFF time and date tag on screen
3. Motion Detection
4. Cycle Recording time
5. Audio
6. EV (Exposure Values)
7. SD Card Formatting
8. Change Language
9. Auto power off setting
10. Screen saver
11. Reset to factory settings
12. Frequency of Infrared Light
13. Set Time and date
14. Video rotate setting
15. Infrared Lamp Status
(Note: If screen on camera turns off
while driving, the screen saver is
turned on. To have screen constantly
on, make sure to have screen saver
turned off)
(Note: If when viewing night files, the
light looks like it flickers on the video,
change frequency of infreared light)

1. To access the menu you can press the Menu/Mode button.
(To access the menu, the camera cannot be recording. If motion
detection is on, then camera automatically records. To access menu
when motion detection is on, press OK to stop recording and then
press the Menu/Mode button immediately after. Motion detection is
turned off by default)
2.
To navigate through sections on the menu use the Menu/Mode button.
3. To navigate through settings in the menu you can use the
(UP) and (DOWN) buttons.
4. To confirm a setting press the (OK) button.
When the SD card’s memory is full the camera will automatically start
recording again overwriting the oldest video files.
To view video files/photos on your computer, connect your camera to
your computer using a USB cable. You will then be able to view and
download the video files/photos onto your computer.

If you the camera does not seem to be working, unplug from power or
turn off camera. Then use a small pin to hit the reset button on the side
of the camera.
Autres manuels SMARTPOINT Caméra embarquée


