SkylinkHome TD-318 Manuel utilisateur

Model: TD-318 User’s Instructions
LCD Deluxe Remote

1
TABLE OF CONTENT
INTRODUCTION...................................................................................................
INSERTING THE BATTERIES......................................................................
SET THE CLOCK......................................................................................
PROGRAMMING THE LCD DELUXE REMOTE TO
RECEIVER MODULE ........................................................................................
PROGRAMMING FOR INDIVIDUAL OPERATION........................................
PROGRAMMING FOR ZONE OPERATION.............................................
PROGRAMMING FOR SCENE OPERATION................................................
PROGRAMMING FOR TIMER OPERATION..............................................
BATTERY............................................................................................................
FCC ......................................................................................................................
WARRANTY ....................................................................................................
CUSTOMER SERVICE ....................................................................................
2
3
3
4-5
5-6
6-7
7-9
9-12
12
13
13
13
2
INTRODUCTION
SkylinkHomeTM LCD Deluxe Remote allows you to wirelessly operate
SkylinkHomeTM wireless receiver controls. This LCD Deluxe Remote provides
features such as:
- Zone Operation
- Scene Operation
- Timer Operation
You can control various home appliances or lights with this remote control and
different receiver units. Features include lighting ON/OFF and dimming, gate or
garage door control, arm and disarm your security system, controlling a fan etc.
The following items are included in this package:
- One LCD Deluxe Remote
- Two AAA batteries
- User’s Instructions
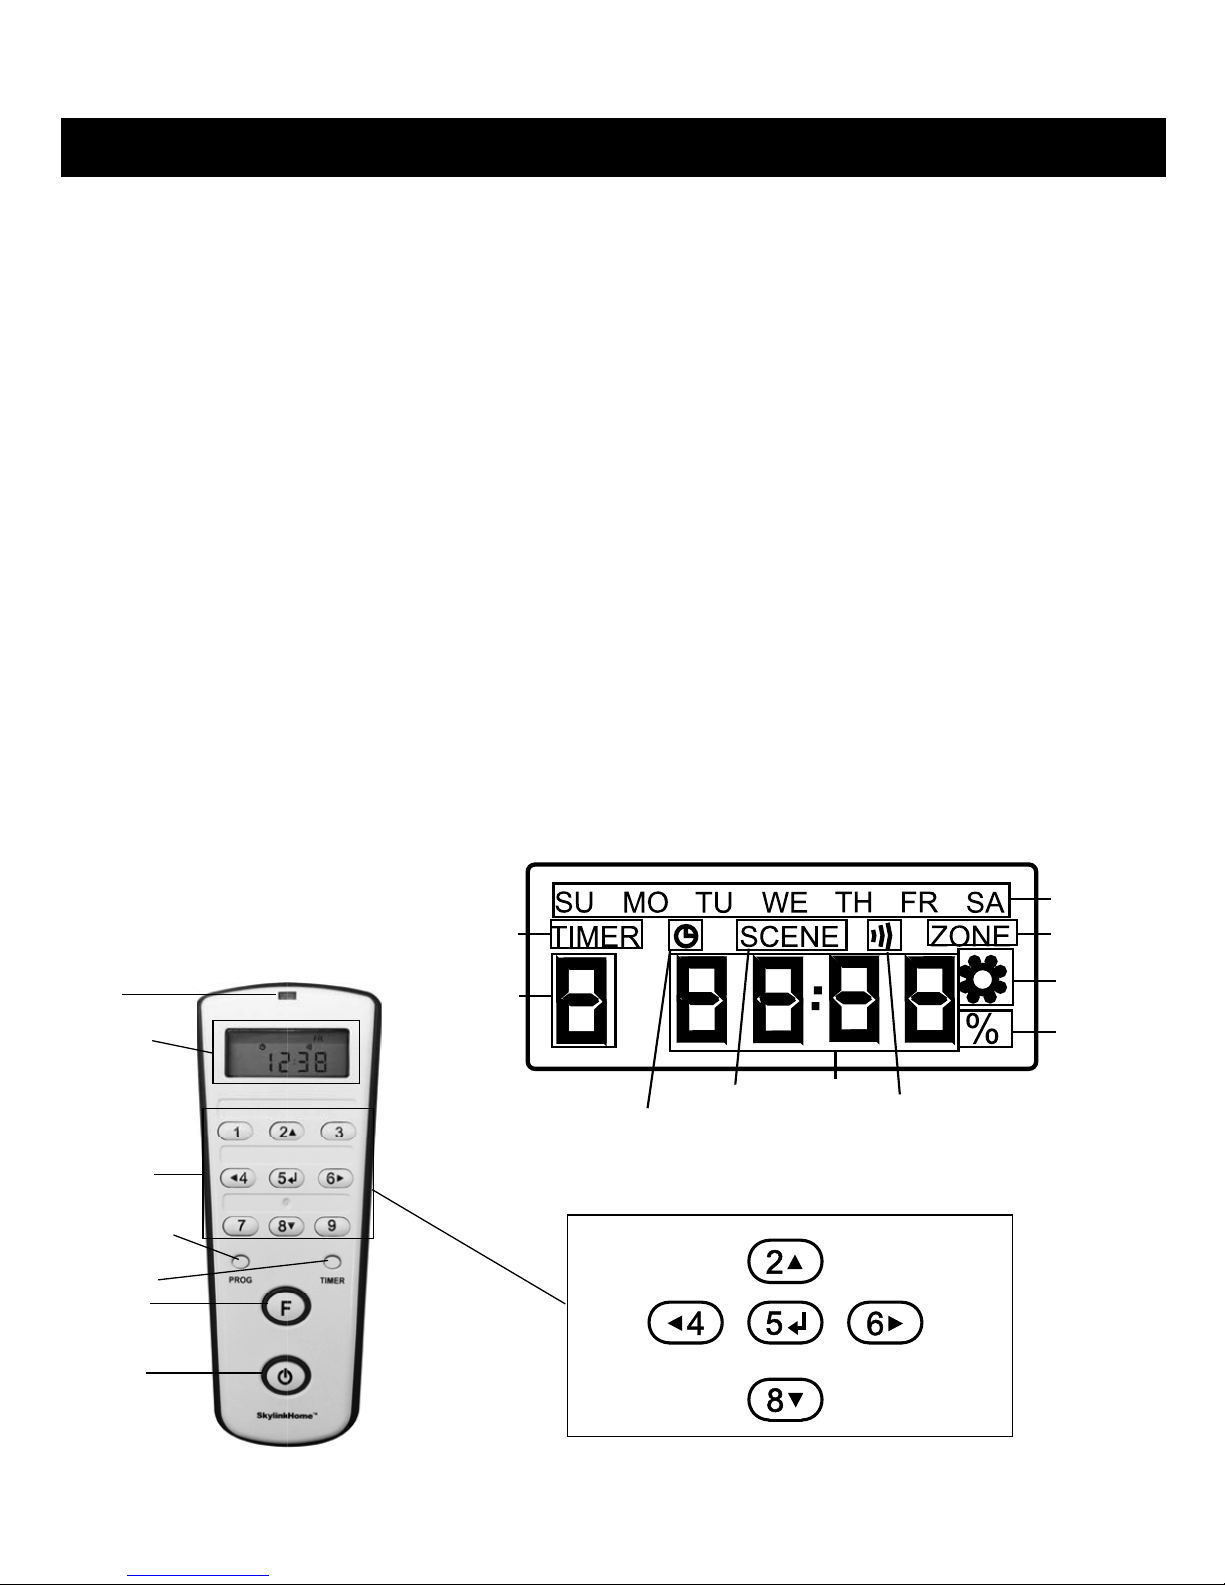
LCD Deluxe Remote Layout
Day of
week
Brightness
Timer icon Zone icon
Settings
icon
Timer/
Scene
Number
Timer
Settings
icon
Scene
icon
Clock Signal
icon
LCD Layout
LED
Keyboard
PROG
Timer
Function
All off
LCD
display
Keypad Layout
UP
DOWN
LEFT RIGHT
ENTER

3
INSERTING THE BATTERIES
Insert 2 AAA batteries to the remote (with the correct polarity as shown), its LCD
display will turn on and red LED will ash once. Press any numeric button on the
remote, the red LED should ash. The remote is now powered properly. If the LCD
display does not turn on or red LED does not ash when button is pressed, refer to
Section “Battery” of this manual for details.
Follow the rest of the steps to setup the LCD Deluxe Remote so it can work with the
receivers that you have.
SET THE CLOCK
During the standby mode, the LCD display will
show the day of the week and the time.
The time is in 24 hours format.
To set the clock:
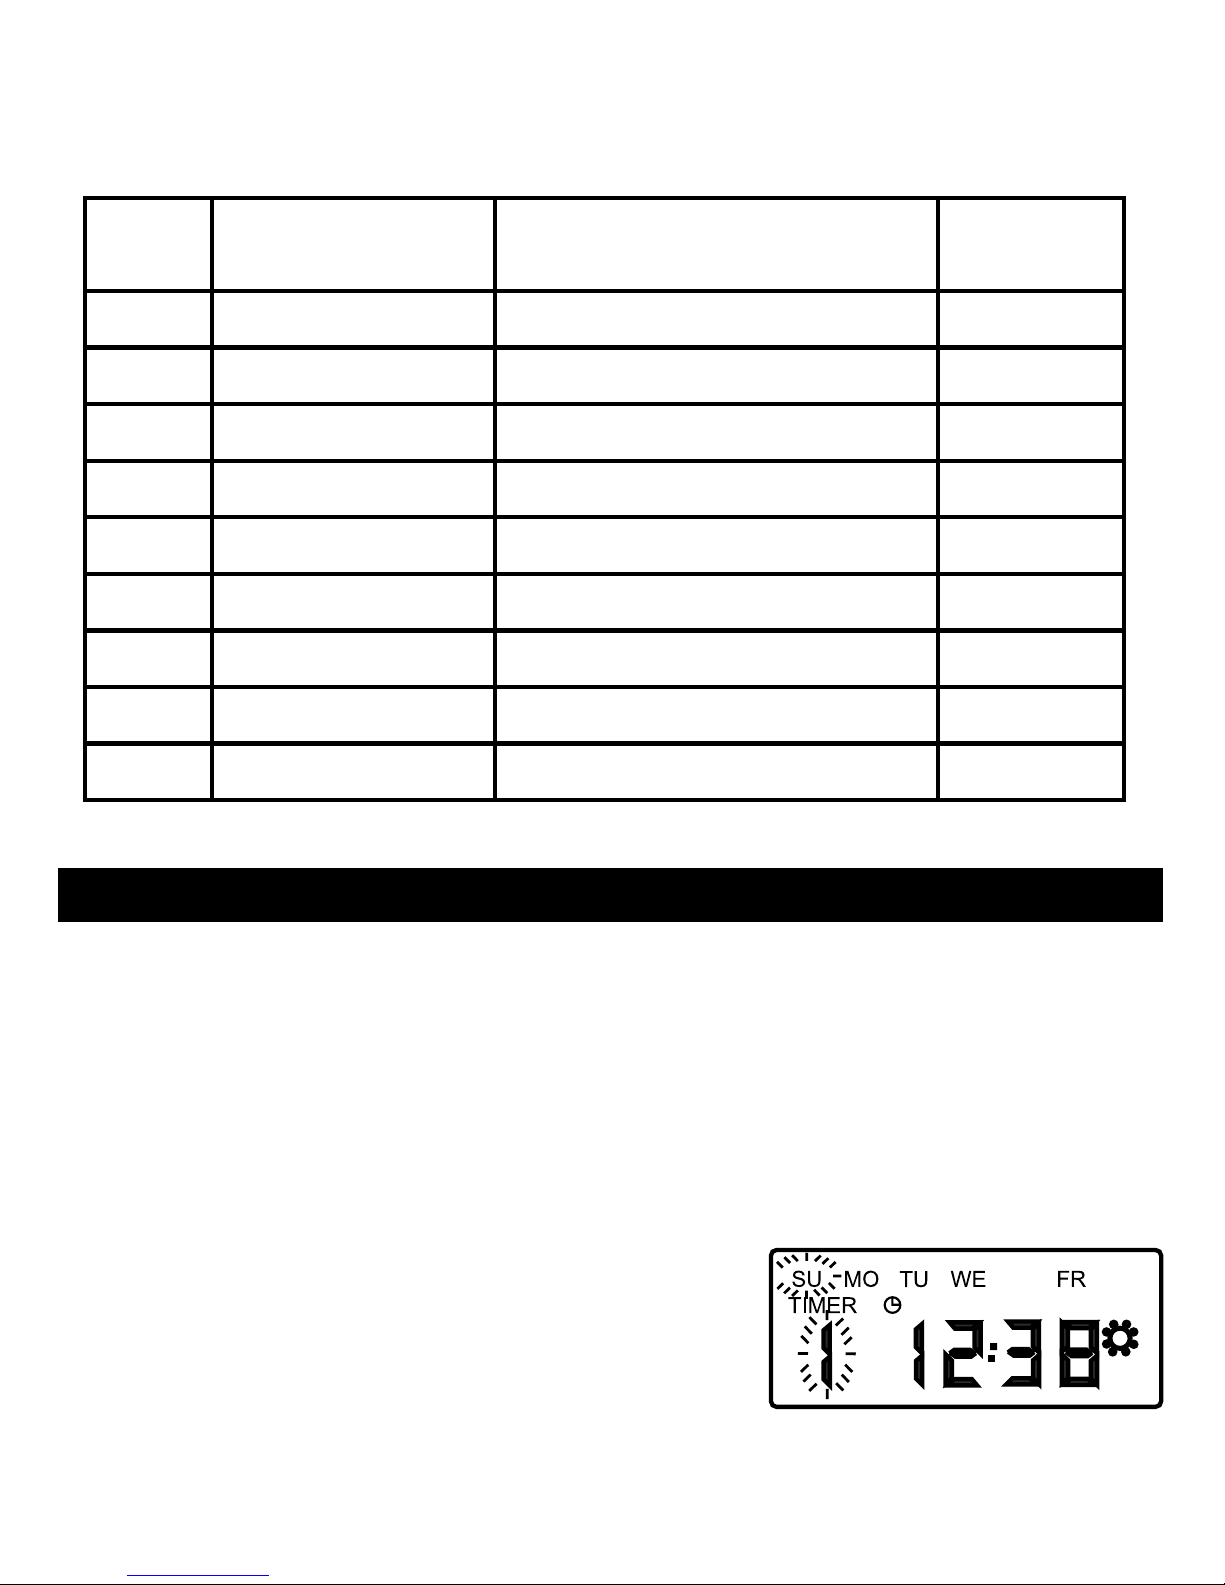
1. Press the [PROG] button twice, until you
see the “Settings” icon and the day of
the week ashing.
2. Use the Up [▲], Down [▼] buttons to select
the day of the week.
3. Use the Left [◄] or Right [►] button to select
the hour and minute and use Up [▲],
Down [▼] buttons to set the time.
4. You can cycle between day of the week, hour and minute with the Left [◄] and
Right [►] button.
5. Press [ ] to conrm the settings.
The time is 12:38 PM, Friday
Flashing Week Day
Settings icon

4
PROGRAMMING THE LCD DELUXE REMOTE TO RECEIVER
MODULE
In order to operate the receiver modules with this LCD Deluxe Remote, the remote
must be programmed to the receiver modules. The LCD Deluxe Remote can trans-
mit 4 types of commands:
1) Individual Operation – Control one light only, i.e. the ceiling light in the
family room.
2) Zone Operation – Controls one specic zone or area, which consists of
multiple lights, i.e. all lights in the kitchen.
3) Scene Operation – Allows you to set a specic atmosphere, where each light
has a preset brightness and the scene may consist of multiple lights
(i.e. morning scene, evening scene, movie scene, etc.).
4) Timer Operation – Allows you to set a timer to turn on or off specic lights,
zones, or scenes
You may assign the buttons to specic lights and zones.
Number
Button Lights Zone
1 Family Room Floor Light Zone 1
2 Family Room Ceiling Light Zone 1
3 Kitchen Floor Light Zone 2
4 Kitchen Ceiling Light Zone 2
5 Bedroom Floor Light Zone 3
6 Bedroom Ceiling Light Zone 3
7 Master Bedroom Floor Light Zone 4
8 Master Bedroom Ceiling Light Zone 4
9 Front Yard Light Zone 5
10 Back Yard Light Zone 5

5
PROGRAMMING FOR INDIVIDUAL OPERATION
Individual operation allows you to use one of the buttons from 1 to 9 to control one
specic light or appliance. To program a remote to the receiver module, a “Learn”
code must be transmitted. Follow the instructions below to transmit a “Learn” code
to the receiver module.
You may use the following table to ll in the lights or small appliances you would
like to control and their related zones. This will give you a clear direction during the
programming process.
Number
Button Lights Zone
1. Put the receiver module that you plan to program into programming mode.
Refer to the User’s Instructions of that receiver module.
2. During the standby mode, the LCD display
will show the current time. Press the
[PROG] button once to enter the Individual
Programmingmode. The Signal icon [ ]
and red LED stays on for 15 seconds.
Signal icon
6
PROGRAMMING FOR ZONE OPERATION
In the above table, both the Family Room Ceiling Light and Family Room Floor
Light are in zone 1. You need to assign the zone 1 signal to both receivers in these
2 locations.
That means for Light 1 receiver in the example, you need to program the following
signals:
- Button 1 to Light 1 based on Programming for Individual Operation
- Zone 1 Command to Light 1 based on Programming Zone Operation
For Light 2 in the example, you need to program the following signals:
- Button 2 to Light 2 based on Programming for Individual Operation
- Zone 1 Command to Light 2 based on Programming Zone Operation
To assign a zone to a receiver module, follow the instructions below:
1. Put the receiver module that you plan to program into programming mode.
Refer to the User’s Instructions of that receiver module.
2. When in standby mode, the LCD display will show the current time. Press
the [PROG] button 3 times to enter the Zone Programming mode. The
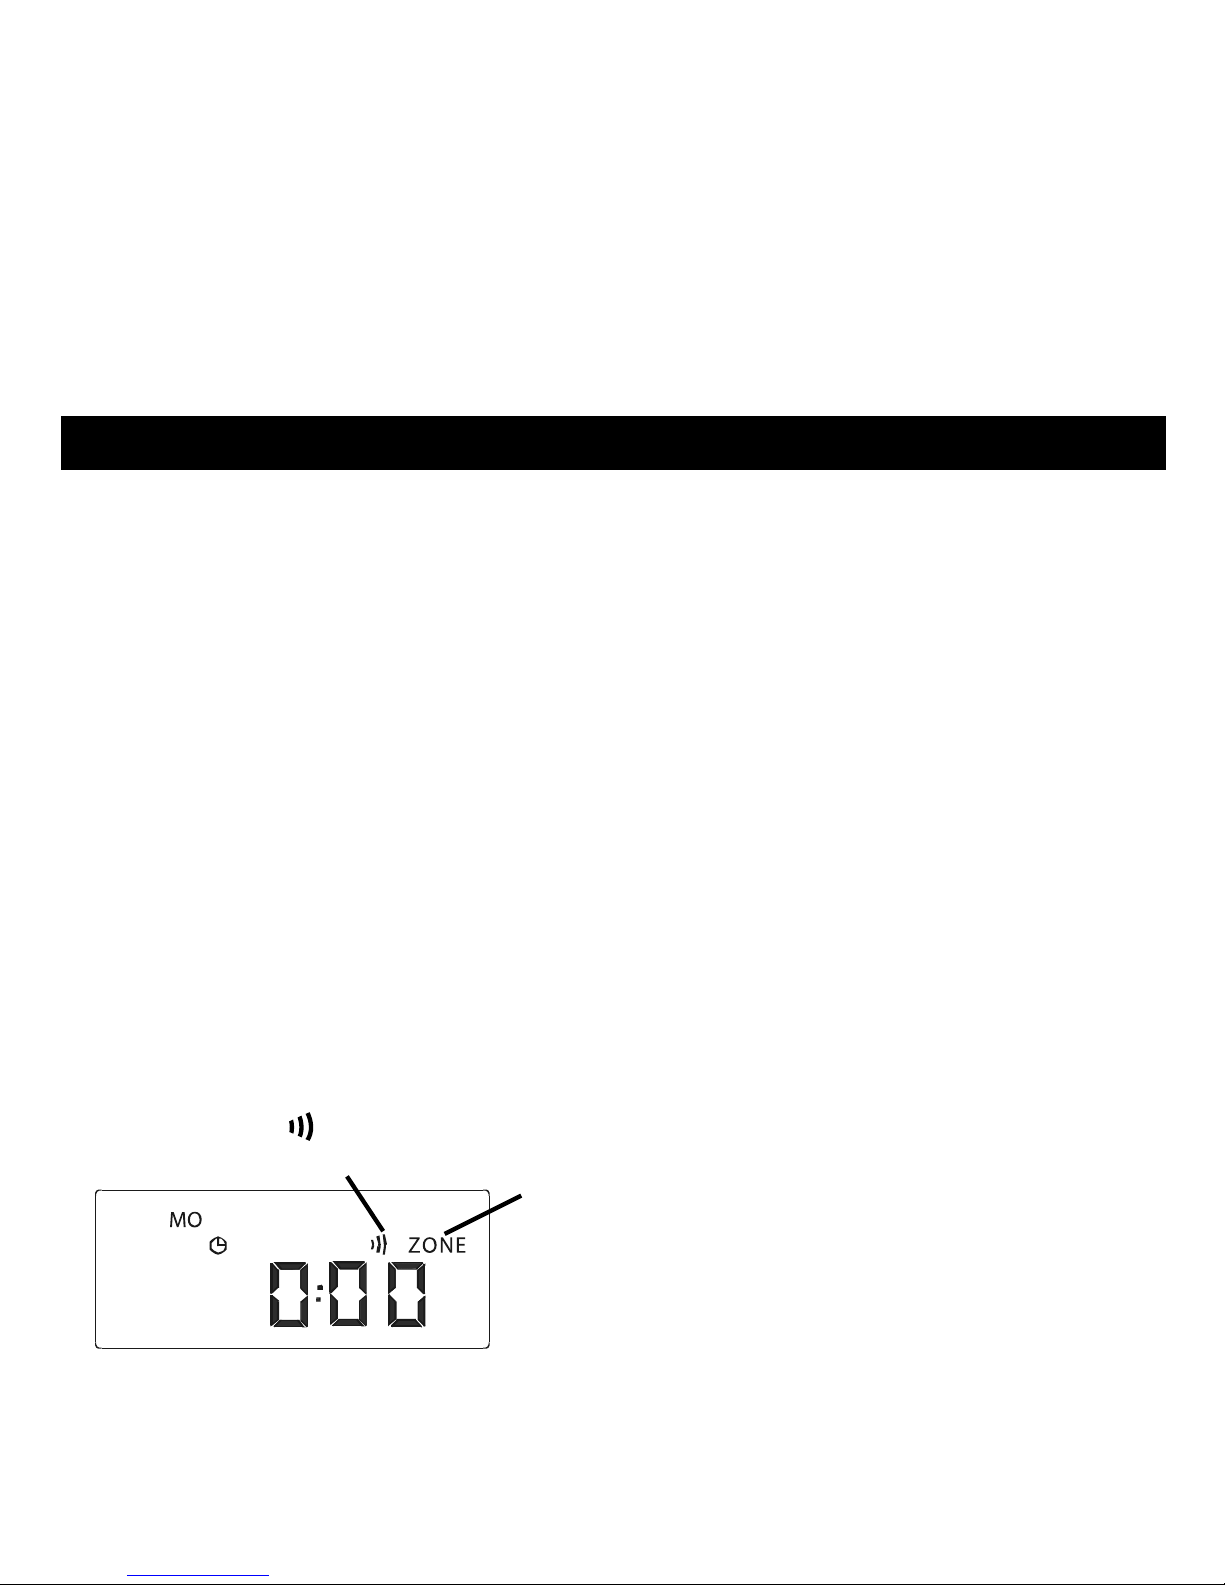
Signal icon [ ] and ZONE icon and red LED stay on for 15 seconds.
3. Press the zone number button, i.e. [1] for zone 1. Red LED light will ash then
go off. The signal icon will disappear indicating the “Learn” code has been
sent.
3. Once the receiver module is in programming mode, press the button [1 – 9]
on the remote that you plan to use to transmit the “Learn” code. Red LED
will ash and then off. The signal icon will disappear indicating the “Learn”
code is sent.
4. Once the remote is programmed, the receiver module will quit from
programming mode and the programmed remote is ready to be used now.
Signal icon Zone icon

7
PROGRAMMING FOR SCENE OPERATION
Scene can provide specic brightness of multiple lights with a press of a button. This
can create specic atmosphere. The remote provides 9 different scene settings,
brightness of light control from 0% [off] to 100% [brightest], (i.e. common scenes are
morning scene, evening scene, movie scene and etc.)
To setup a scene:
1. Press the [PROG] button 4 times to
enter the Scene Programming mode.
2. Press [1 – 9] to select the scene number
you would like to program.
3. Use the Up [▲] and Down [▼] button to increase
or decrease the brightness from 0% to 100%.
For instant, select 60% brightness for your setting.
Once you selected the setting, Press [ ] to conrm.
4. Once the remote is programmed, the receiver module will quit from
programming mode and the programmed remote is now ready to be used.
Follow the same instructions above to program the zone number into various re-
ceiver modules to form a zone with multiple lights (i.e. Zone 1 signal programmed
to both Family Room Ceiling Light receiver module and Family Room Floor Light
receiver module).
Zone Operation:
To turn on a zone:
1. Press the Function button “ ” until you see
“on zone”.
2. Press [1 – 9] to select the desired zone. (i.e.
Enter [1] for Zone 1 and all the lights in Zone 1
will be on.)
To turn off a zone:
1. Press the Function button “ ” until you see
“off zone”.
2. Press [1 – 9] to turn off the zone. i.e. Enter [1]
to turn off all the lights in Zone.

8
4. The red LED light will be on. The Scene icon, Signal icon and Settings icon will
stay on for 15 seconds, allowing you to program this scene to the receiver
module.
5. Put the receiver module that you plan to program into programming mode.
Refer to the User’s Instructions of that receiver module.
6. Once the receiver module is in programming mode, press the Scene number
button on the remote, i.e. [1] for Scene 1. The Red LED will ash light then
off. You have now programmed a Scene 1 signal with 60% brightness to
the receiver module. The LCD display will continue to show the setting for
Scene 1 with the brightness setting ashing.
7. As most scene settings involve multiple lights with different brightness, you
may change the brightness again and program the same scene to another
receiver module.
8. After programming all the scenes, you may press the [PROG] button
twice to return to clock mode.
Scene Operation:
To turn on a scene:
1. Press the Function button “ ” until you see
“scene on”.
The SCENE icon and ON icon will stay on
in the LCD display.
2. Press [1 – 9] to select the desired scene, i.e.
Enter [1] for Scene 1 and all the lights in
Scene 1 will be on at the preset brightness.
To turn off a scene:
1. Press the Function button “ ” until you see
“scene off”.
The SCENE icon and OFF icon will stay
on in the LCD display.
2. Press [1 – 9] to turn off the scene,
i.e. Enter [1] to turn off all the lights in
Scene 1.
9
You may assign a scene to specic receivers with preset brightness to create a
different atmosphere. Please see examples below.
Scene
No. Scene Name Receiver Control Brightness
1 Evening Family Room Floor Light 30%
1 Evening Family Room Ceiling Light 40%
1 Evening Kitchen Floor Light 30%
2 Movie Kitchen Ceiling Light 30%
2 Movie Family Room Ceiling Light 0%
2 Movie Family Room Floor Light 10%
3 Garden Evening Front Door Light 80%
3 Garden Evening Front Yard Light 60%
3 Garden Evening Back Yard Light 40%
PROGRAMMING FOR TIMER OPERATION
The remote provides 9 timer settings so it will send signals to control the desired
devices at the preset time. You need to set the time, day of the week and the action
in advance. You can set the following actions to control different devices:
1. An individual light on / off
2. A scene on / off
3. A zone on / off
To setup a timer (Time and day or the week)
1. Press the [PROG] button until the “TIMER” icon
appears. The Setting icon and the TIMER icon
will stay on and the Timer number will ash in
the LCD display.
Table des matières
Autres manuels SkylinkHome Télécommande

Manuels Télécommande populaires d'autres marques

Panasonic
Panasonic EUR7622KB0 Manuel utilisateur

Bang & Olufsen
Bang & Olufsen Beo4 Manuel utilisateur

Sunwave Tech.
Sunwave Tech. RemoteComm SRC-7000 Manuel utilisateur

Multiplex
Multiplex PROFI TX 9 Manuel utilisateur

One Remote
One Remote RMB4 Manuel utilisateur

FUTABA
FUTABA 9ZAP - PART2 Manuel utilisateur


