SKILLQUBE qubeAVgo V2 Manuel utilisateur
1
User Guide
qubeAVgo V2

2
Date: 10/2022
Allgemeines 3
Lieferumfang 3
Aufbau des qubeAVgo V2 Systems 3
Übersicht des Aufbaus 5
Starten der Applikation 5
Öffnen der Applikation 5
Icons und Einstellungen (Allgemein) 6
Icons und Einstellungen im Aufnahmemodus 8
Icons und Einstellungen des Markers 8
Icons und Einstellungen im Wiedergabe-Modus 9
Impressum 11

3
General
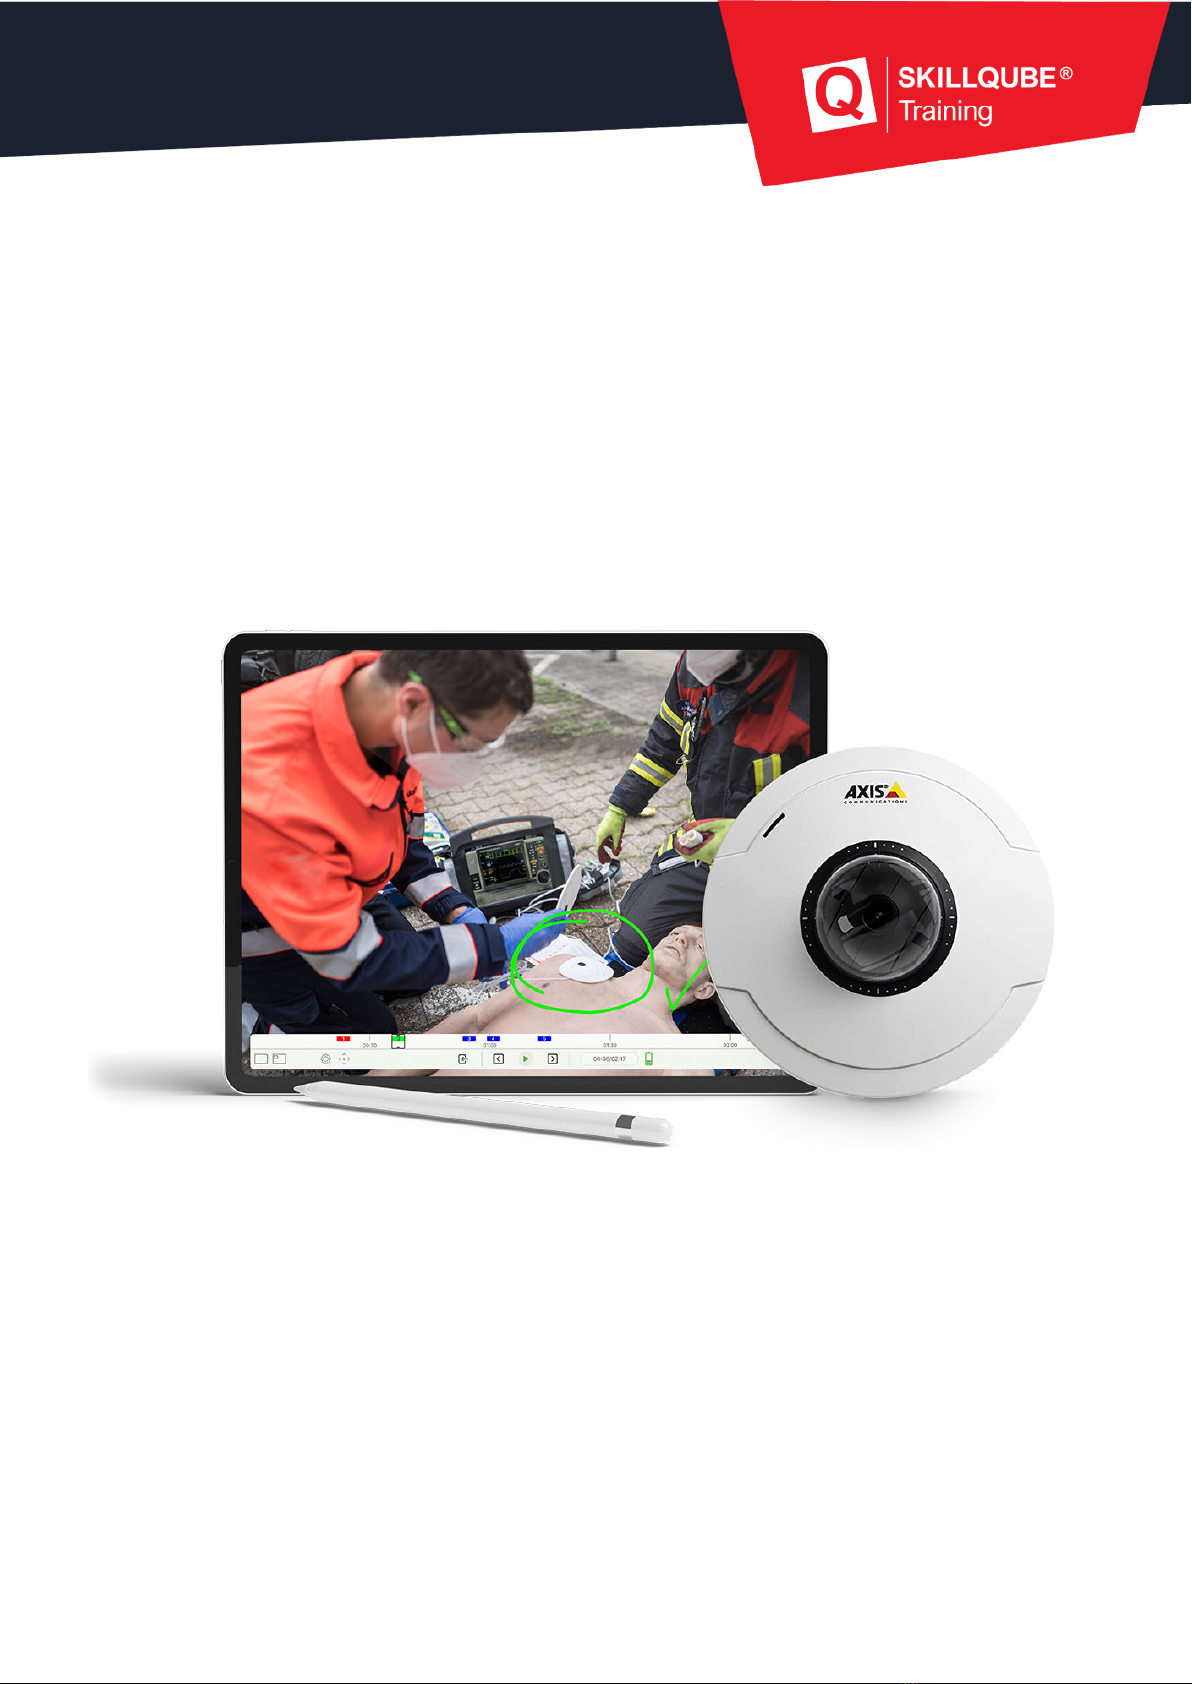
Thank you for choosing the qubeAVgo V2 audio-video system. As
developers and manufacturers of simulation technology, it is vital that we
provide everyone who uses are solutions with a real training experience
to create added value throughout many areas of the learning cycle.
Do not just think of yourself as the user of an existing solution, but as part
of a development process. Please do inform us about your needs and
optimizations so that we can continue developing the existing product with
your support. Thanks in advance for your support – we wish you every
success in your training and hope you enjoy it.
Items supplied
The qubeAVgo V2 system was delivered to you with the following
components:
● qubeAVgo V2 bag
● Preconfigured iPad
● Apple Pencil
● IP camera, configured
● LAN cable
● POE injector with power supply
● Router, configured, with power supply
● Microphone (boundary)
● Preamplifier
Initial setup of the qubeAVgo V2 system
Your qubeAVgo V2 system is delivered preconfigured. You only have to
perform a few steps for the initial setup.
qubeCloud credentials
As a qubeSERIES customer, you receive an e-mail containing your
personal credentials for accessing the qubeCloud when you set up your
qube system. You are prompted to provide a password at that point.
4
Setting up the software on your device
1. Go to the iPad settings and sign in with your Apple ID. If you do not
have an Apple ID yet, you can create a new one in the same step. An
Apple ID is required to load the software onto the iPad.
Video guide:
2. Once you have connected your device to your Apple ID,
go to the App Store and search for SKILLQUBE.
Download the qubeAVgo app. (Fig.: qubeAVgo app
icon)
3. When you first open the app, you are prompted to sign in to activate
your license. Use your qubeCloud access credentials to do so.
Setting up the qubeAVgo V2 system
It takes just a few steps to start working with your new AV system.
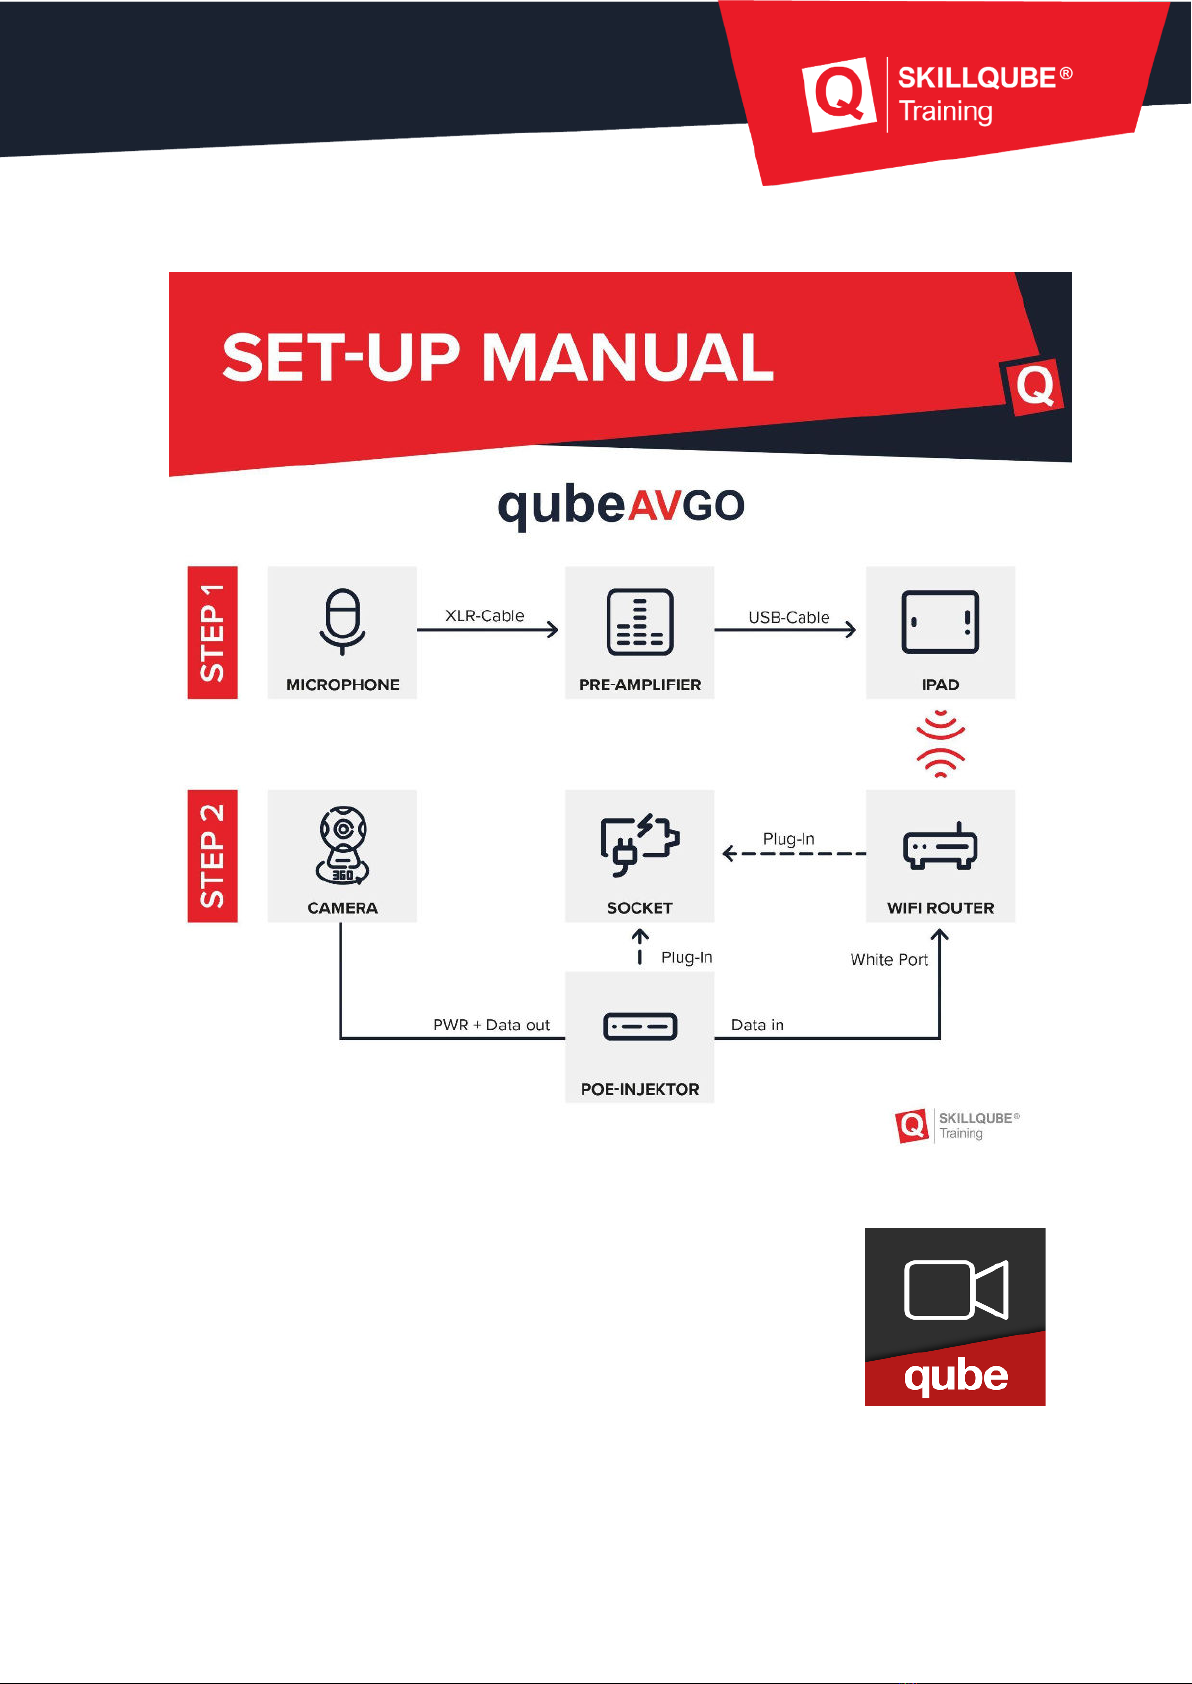
1. Connect the supplied WLAN router to a power source (power outlet).
2. Connect the supplied POE injector to a power source (power outlet).
3. Use a LAN cable to connect the POE injector and WLAN router. To do
so, use the white LAN socket on the router and the socket labeled
“Data” on the POE injector.
4. Use another LAN cable to connect the IP camera and the POE injector.
To do so, use the socket labeled “Data + Pwr out” on the POE injector.
5. Start the iPad and ensure that it is on the network of the supplied
router. If this is not the case, go to your iPad settings, click “Wi-Fi” and
select the preconfigured network (see the sticker on the router for the
network name and password).
6. If all the components are on the network, you can start.
7. Optional: the supplied camera has a built-in microphone. To improve

5
the sound quality, you can connect the boundary microphone:
a. Connect the boundary microphone to the preamplifier using
the XLR cable. For greater flexibility, you can insert the yellow
XLR extension between them.
b. Connect the preamplifier to the iPad using the USB-C to micro
USB cable.
c. Set the “48V” switch on the preamplifier to “ON”. You adjust
the gain using the “Gain” knob. The bottom LED on the
preamplifier indicates the audio level. The LED should switch
between green and orange while someone is speaking in the
room. If the LED is permanently blue or green, increase the
gain. If the LED jumps briefly to red or is permanently red, you
should reduce the gain.
Please note: The software automatically selects which
microphone serves as the audio source. The preamplifier is
given the highest priority. As soon as it is connected to the iPad
via USB-C, the preamplifier is used as the audio source. The
microphone of the supplied IP camera has the second highest
priority. If neither the preamplifier nor the IP camera are
connected, the internal microphone on the iPad is used.
6
Setup overview
Launching the application
If all the components are on the same network,
open the application on the iPad by pressing the app icon.
Opening the application
After you tap the qubeAVgo icon, the application opens and starts
loading. This takes about seven seconds.

7
Icons and settings (general)
1. Select the main view:
If you select the camera included in the delivery, you can rotate
the image. That is, the camera image can be rotated by 180
degrees. This is useful for ceiling mounting.
2. Select “Picture in Picture (PiP)”:
Where necessary, you can set a “Picture in Picture” (PiP) image.
You can use a stream to connect to the SKILLQUBE patient
monitor without any cables. When doing so, make sure that the
monitor is on the same network as the qubeAVgo. In the main
view and PiP view, you can choose between the IP camera, iPad
camera, and patient monitor.
3. Audio level:
The audio level indicates whether the transmitted audio signal is
overamplified. Please see our note on page 5 for more
information.
4. Settings:
Preroll: sets the number of seconds earlier to set the marker.
Range of one to five seconds.
FAQ: navigates directly to the FAQ page on skillqube.com. An
Internet connection is always required to do so.
About: displays the version number of the application and
information about the open frameworks used.
8
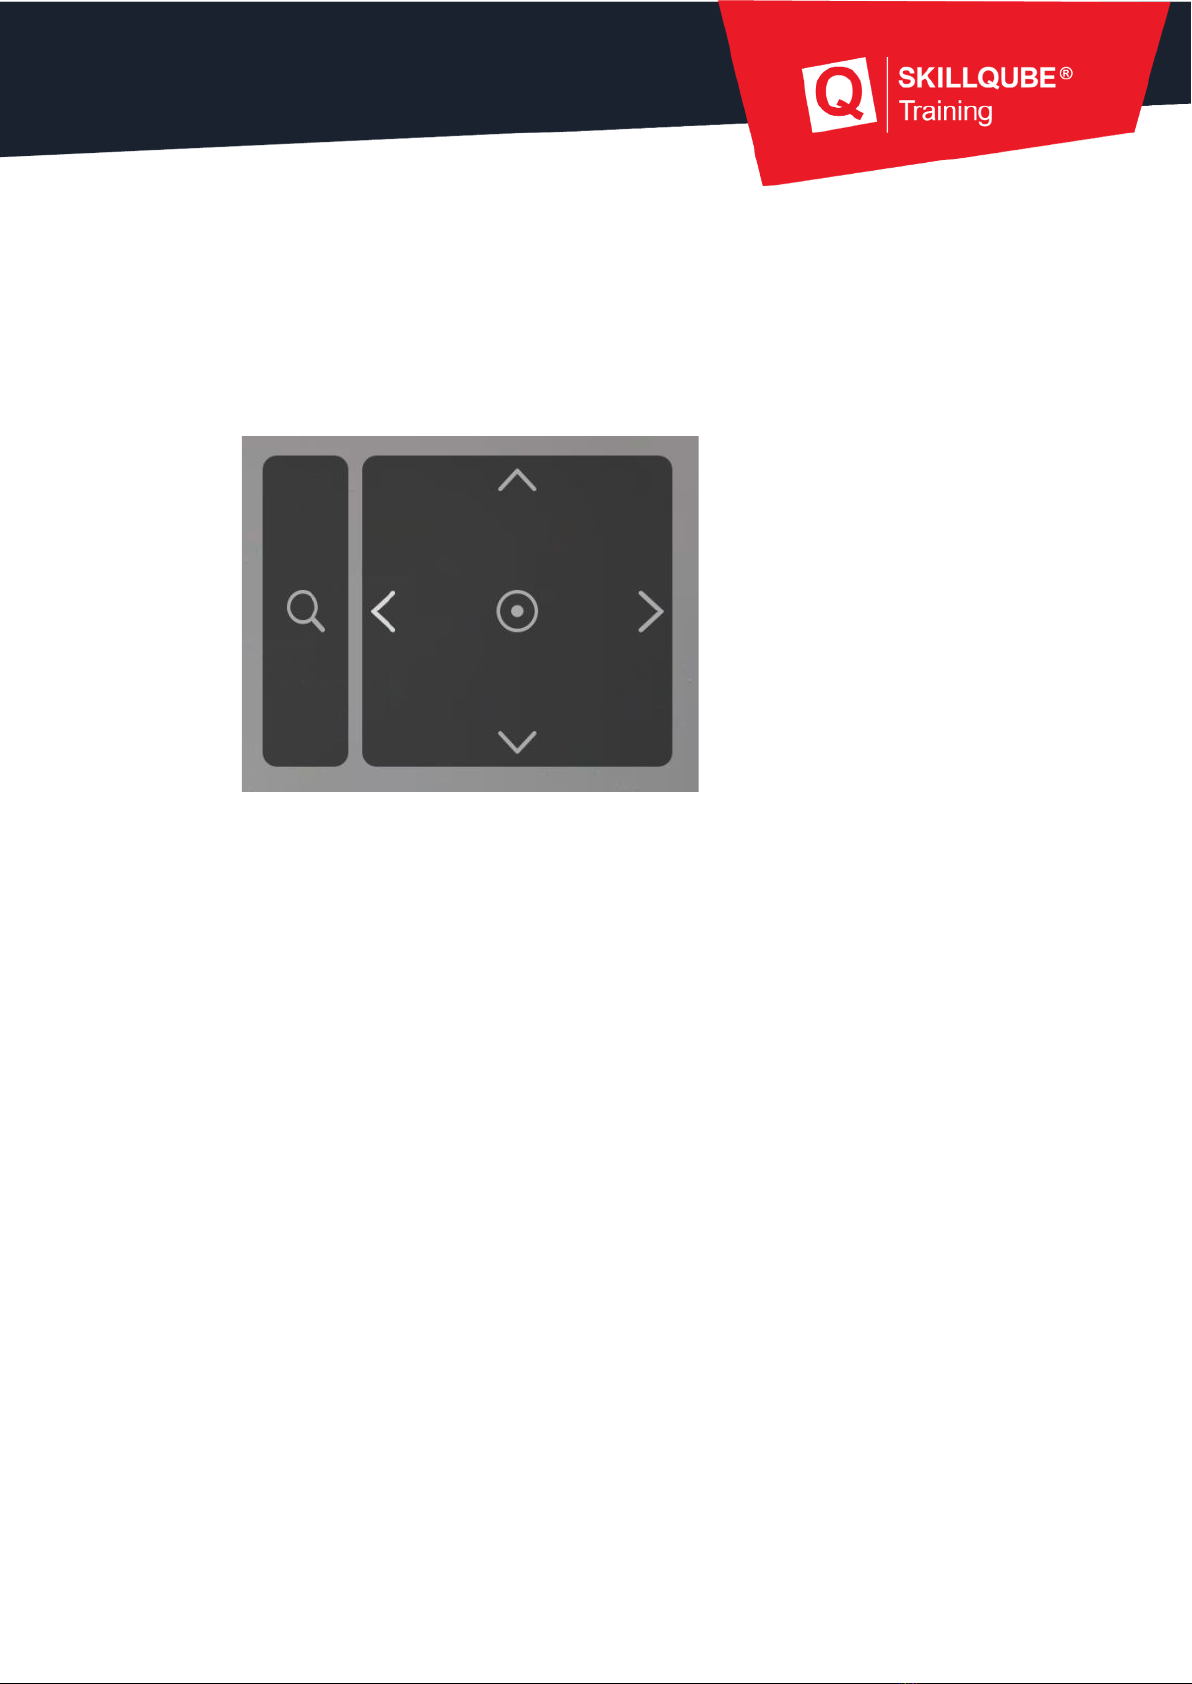
5. Camera control:
when using the supplied external camera, you can adjust the
image as required; you can control the viewing direction and
viewing angle. Drag the digital joystick (dot) to the left, right, top or
bottom to get the desired image setting. The magnifying glass icon
on the left lets you zoom in or out. Strike up from the middle of the
controller to zoom in and strike down to zoom out. The camera
can also be controlled during recording.
6. Record:
Press the record button to start a new recording.
7. Status indicator:
Indicates which mode the application is in (LIVE, REC, REPLAY)
8. Battery status:
Indicates the iPad battery charge level. The status display turns
red if the level is 20% or lower. This indicates that the iPad should
be charged or connected to a power supply.
9. Recordings:
Saved recordings are stored in the archive. Swipe to the left to
delete or share the recording. If you want to share a recording, an
mp4 file is created. This takes about a quarter of the time of the
total recording. To load the recording in the app, you simply tap it.
9
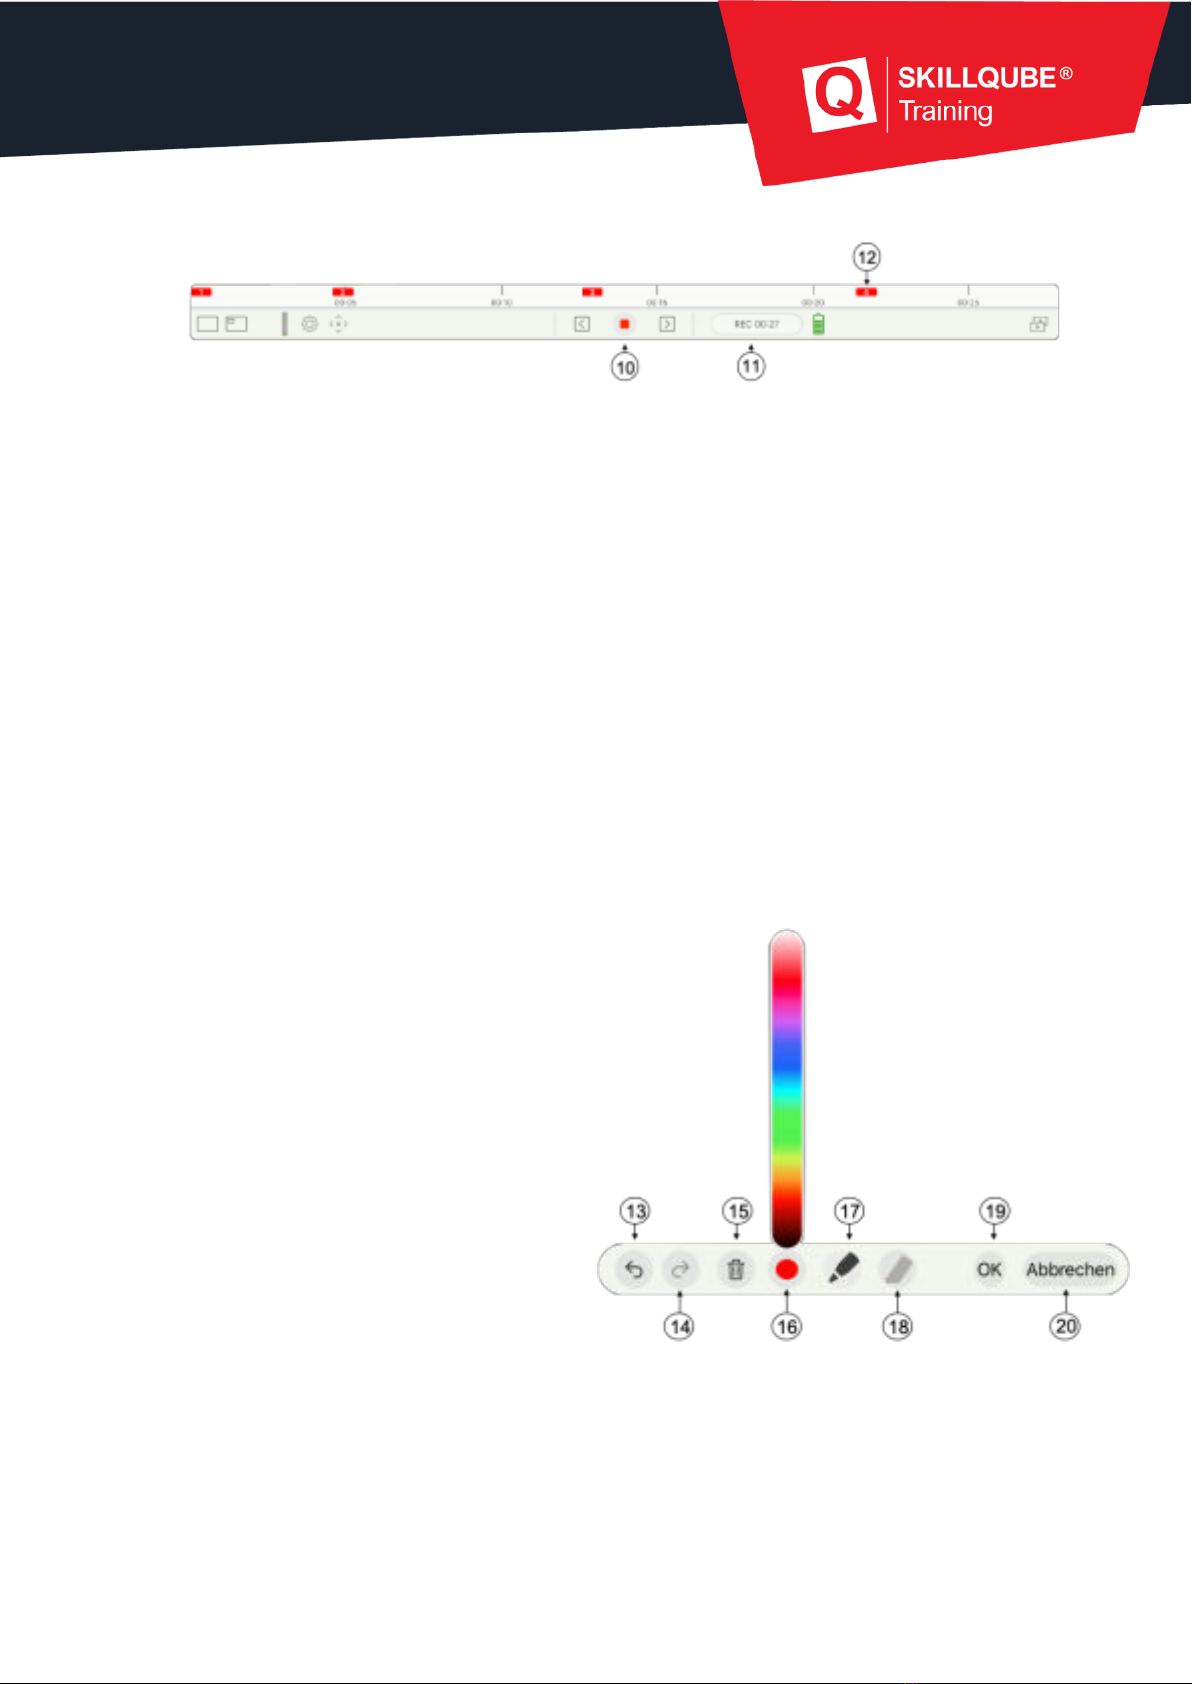
Icons and settings in recording mode
10. Stop:
Pressing the “Stop” button opens a dialog with the following
options
“Continue recording” – the recording continues
“Quit” - the recording is stopped. The application automatically
switches to REPLAY mode
11. Status indicator:
Indicates which mode the application is in (LIVE, REC, REPLAY). In
record mode, the time information is also displayed.
12. Markers:
To set markers, you write in the image currently shown using the
Apple Pencil. The marker appears in the timeline in the color you
select. When you set the marker, the marker settings open
automatically.
Marker icons and settings
13. Delete comments one by one
14. Undo the deletion
15. Delete the whole marker and start
again
16. Select the color of the pen. Move
the slider to select the color
17. Pen is activated in the selected
color
18. Eraser is deactivated (tap to
activate)
19. Confirm and save comments
20. Cancel without comments.

10
Icons and settings in replay mode
Once the recording is complete, the application switches to replay mode.
21. Live mode:
You can press the “Exit” button to stop the debriefing and start
again in live mode. A system prompt asks whether you want to store
the recording in the archive.
22. Previous marker:
Playback jumps to the previous marker.
23. Play:
Starts playing the recording.
24. Next marker:
Playback jumps to the next marker.
25. Timeline marker:
Move the timeline marker to jump to any point in the replay.
Table des matières


