SJOBO TB506V Manuel utilisateur

INSTRUCTION MANUAL For Blender
Model No.: TB506V
230V 50Hz 500W
This appliance is intended to be used in household only.
PLEASE READ AND SAVE THESE INSTRUCTIONS TO ENSURE
THE SAFE USE OF THIS APPLIANCE

2
Safety Precautions
• Read all instructions carefully before you use the appliance.
• Always disconnect the appliance from the power supply if
it is left unattended and before assembling, disassembling
or cleaning.
• This appliance shall not be used by children. Keep the
appliance and its cord out of reach of children.
• This appliance can be used by persons with reduced
physical, sensory or mental capabilities or lack of
experience and knowledge if they have been given
supervision or instruction concerning use of the appliance
in a safe way and if they understand the hazards involved.
• Children shall not play with the appliance.
• If the supply cord is damaged, it must be replaced by the
manufacturer, its service agent or similarly qualied person
in order to avoid a hazard.
• Care shall be taken when handling the sharp cutting
blades, emptying the blender jug and during cleaning.
• Switch o the appliance and disconnect from power supply
before changing accessories or approaching parts that
move in use.
• This appliance is intended to be used in household only.
• Ensure ngers are kept well away from the blades when in
use.
• Do not blend hot ingredients.
• Always operate on a at surface.
• Ensure the control dial is in the off ‘0’ position before
plugging into the power outlet.
• Do not operate for more than 2 minutes at a time.
• Read carefully and save all the instructions provided with
an appliance.

3
• Always turn the power off at the power outlet before you
insert or remove a plug. Remove by grasping the plug,do
not pull on the cord.
• Always use your appliance from a power outlet of the
voltage (A.C. only) marked on the appliance.
• Do not use an appliance for any purpose other than its
intended use.
• Unplug from outlet when it is not in use, before putting on
or taking o parts, before moving the appliance or adding
the food, and before cleaning.
• Do not place an appliance on or near a hot gas flame,
electric element or on a heated oven. Do not place on top
of any other appliance.
• Do not let the power cord of an appliance hang over the
edge of a table or bench top or touch any hot surface.
• Do not operate any electrical appliance with a damaged
cord or after the appliance has been dropped or damaged
in any manner.
• Do not immerse the appliance in water.
• Never touch the blades while the machine is plugged in.
• Take special care when emptying and cleaning the blender
jug, as the blades are extremely sharp.
• Regarding the instructions for cleaning surfaces in contact
with food, please refer to the section “Care and Cleaning”.
• Regarding the operating times, please refer to the section “A
Guide to Your Blender ”
4
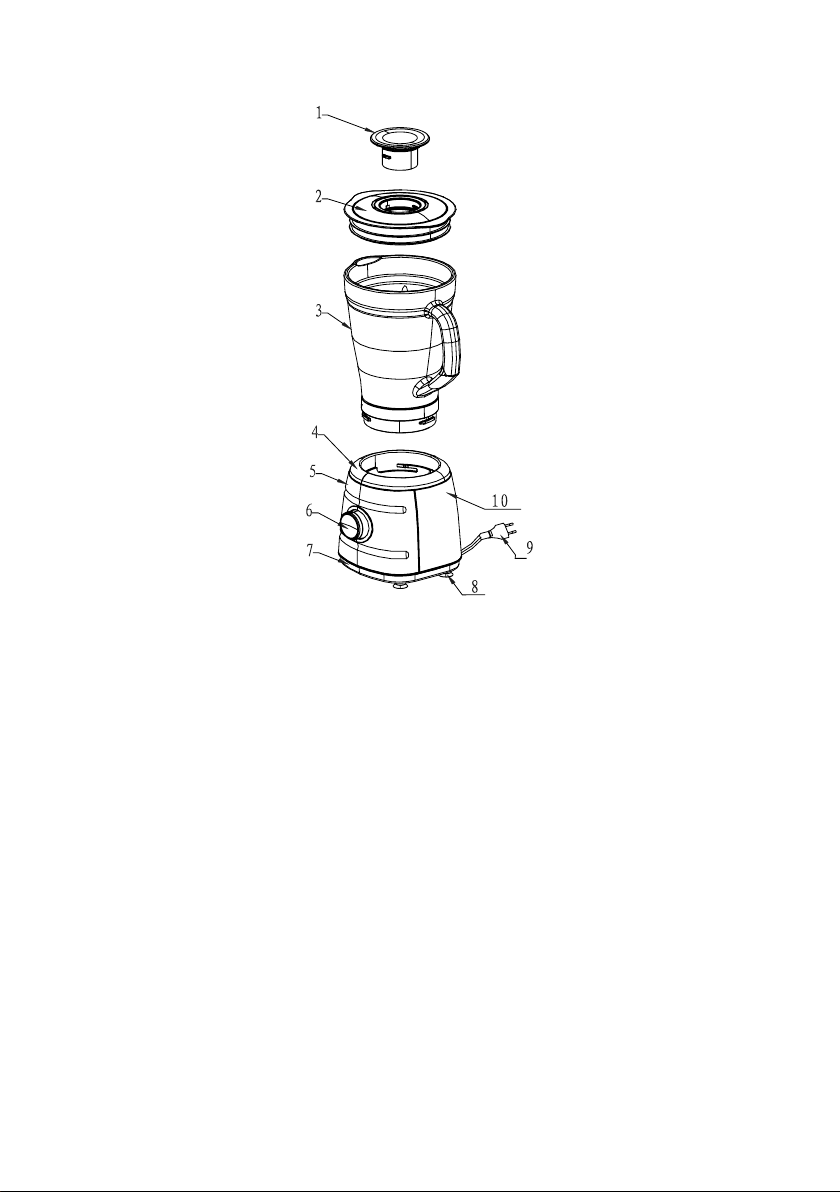
Identication of parts
1. Measuring cup
2. Lid
3. Jug (1500ml)
4. Main body
5. Front cover
6. Knob
7. Base
8. Foot
9. Power cord
10. Back cover
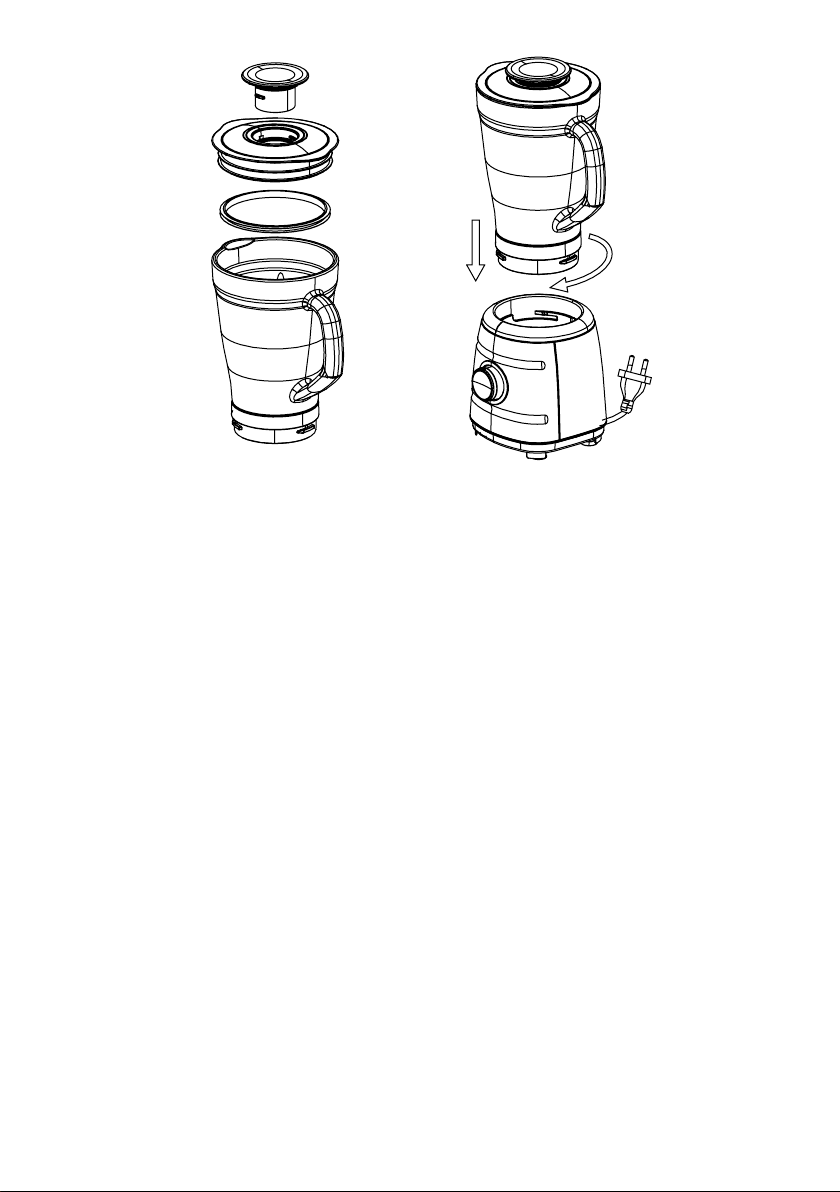
Blender jug assembly
1. Insert the Small measuring cup into the lid. (FIG 1). Rotate the cup
clockwise until the two ribs on the measuring cup slide into the
projecting rib on the lid and you hear a slight click. If this is the case,
the measuring cup is locked correctly.
2. Put the lid assembly on the Glass Jug.
3. Ensure that the Removable Blade assembly is mounted firmly onto
the Glass jug (for the assembling or disassembling, refer to chapter
‘Care and Cleaning’).
4. Place the Glass jug assembly on the main body and rotate clockwise
(FIG 2) in the direction of the arrow to lock firmly. See also chapter
‘Safety locking system’.
5. Now the blender is ready for use.
5
FIG.1 FIG.2
Using Your Blender
1. Remove the lid or the Small measuring cup from the Glass jug and
place ingredients into the jug. Do not exceed the maximum indicated
level.
2. Place the lid with the measuring cup back onto the Glass jug.
3. Use the Speed control knob to select the desired blending speed 1, 2
or Pulse.
4. The Pulse function remains on as long as the Speed control knob is
turned to the position of “Pulse”, for greater control when blending,
e.g. crushing ice.
5. Setting 1 and 2 will provide continuous blending until the Speed
control knob is turned to the ‘0’ position.
6. You can add further ingredients while blending through the hole of
the measuring cup (especially for a small amount of liquid mixture).
7. After you have completed blending, turn the Speed control knob to
the ‘0’ position.

6
Safety Locking System
With safety in mind, unless the blending jug is positioned correctly and
locked in place, the blender will not operate.
For correctly assembling the blender, operate as follows:
1. Place the main body on the table, with the front facing toward you.
2. Place the Glass jug assembly onto the main body, turn the Glass jug
clockwise until the handle of the jug is aligned with the locking mark.
If this is the case, the Glass jug is locked correctly.
3. Now the blender is ready for use.
A Guide to Your Blender
Processing
Task Food Suggested
Setting Suggested Processing Procedure
Aerating Milkshakes,
smoothies 2
Use chilled milk. Blend it until desired
consistency is achieved.
Chopping Nuts, chocolate,
garlic or herbs PULSE, 2 Process 1/2 cup at a time, to ensure
evenly sized pieces.
Creaming Butter or sugar PULSE, 2
Blend butter and sugar until creamed.
It is advisable to top half way through
and scrape the mixture down from
the sides of the blender jug. DO NOT
OVERPROCESS.
Crumbing Bread crumbs,
biscuit crumbs 2,3 Break into pieces and process until
crumbed.
Crushing lce Ice PULSE
Add 100g ice. Press the ‘Pulse’ function
and hold for 2-3 seconds and release.
Repeat 5-6 times.
Emulsifying Salad dressing 1,2
Blend until well combined. Oil may be
added to the mixture during processing
through the pouring hole in the lid.
Making icing
sugar Crystal sugar 2
Process for approximately 20 seconds
for caster sugar and then a further 10
seconds for icing sugar.
Mixing Batters, cakes 2 Process ingredients until just combined.
DO NOT OVERPROCESS.
pureeing Soups,
vegetables, fruits 2 Blend until smooth.
ATTENTION! Times for processing will vary with the quantity in the Glass Jug,
these times are only a guide.

7
Handy Blending Hints
• A brief whirl in the blender will rescue a lumpy gravy, or an eggs-
based sauce that has separated.
• Food items for blending should be cut into cubes (approximately
2-3cm), this will assist in achieving an even result.
• Never ll the Glass jug above the maximum level indicated.
• To ensure efficient mixing when blending dry mixtures, it may be
necessary to stop the blender and push ingredients down the sides
of the jug with a spatula.
• When pureeing fruit or vegetable, cooked or raw, cut into small
pieces to facilitate blending.
• When blending a variety of ingredients together, blend the liquids,
rst, then add dry ingredients.
• Always ensure stones are removed from fruit and bones from meat as
these can harm the blades.
• Do not process hot liquids in your blender. Allows it to cool before
processing.
Always ventilate the Glass jar when pureeing warm ingredients. This is
achieved by lifting the measuring cup out of the lid, after starting the
blender.
Care and Cleaning
Quick cleaning method
1. Half fill the blender with warm water and a small amount of
detergent.
2. Turn to the ‘Pulse’ function and hold for 1-2 seconds and release.
Repeat 3-4 times.
3. Then remove the Glass jug and rinse it under running water.
4. For thorough cleaning, wash the lid, the small measuring cup, and
the Glass jug in warm soapy water.

8
FIG.3 FIG.4
5. The disassembling for the Blade assembly: Place the Glass jug with
the Blade assembly upwards; rotate the blade base counter clockwise
to disassemble the blade assembly and take the blade base out from
the Glass jug.
6. Rinse the disassembled blade base and the sealing ring under
running water.
7. The small measuring cup, the lid and the Glass jug can be washed in
the dishwasher.
8. Allow all the parts to dry o rst; then ret the clean parts according
to the reverse of removal. Don’t forget to reattach the sealing ring.
Be sure to t the blade assembly in place.
9. Caution: Take care when cleaning the blades as they are extremely
sharp.
To clean the motor base
Use a damp, soft sponge with detergent and wipe over the motor base.
Note: Never immerse the motor base in water.
Storage
1. Coil the power cord around the cord storage at the bottom of the
motor base.
2. Store in a cool and dry place.

9
Correct Disposal of this product
This marking indicates that this product should not be
disposed with other household wastes throughout the
EU. To prevent possible harm to the environment or
human health from uncontrolled waste disposal, recycle it
responsibly to promote the sustainable reuse of material
resources. To return your used device, please use the return
and collection systems or contact the retailer where the
product was purchased. They can take this product for
environmental safe recycling.

1
BRUGSANVISNING
til blender
Modelnummer: TB506V 230 V, 50 Hz, 500 W
Før du bruger apparatet, skal du læse denne brugsanvisning grundigt og gemme den til
eventuel senere brug.
Apparatet er udelukkende beregnet til brug i private husholdninger.
Table des matières
Langues :
Autres manuels SJOBO Mixer


