sinmag SM-120T Manuel utilisateur

OWNER’S MANUAL
SM-120T
(Spiral Mixer)

CONTENTS
1
Introduction••••••••••••••••••••••••••••••••••••••••••••••••••••••••••••••••••••••••••(2)
Installation & Commissioning•••••••••••••••••••••••••••••••••••••••••••••••••••(3)
Operation•••••••••••••••••••••••••••••••••••••••••••••••••••••••••••••••••••••••••••••(4)
Caution••••••••••••••••••••••••••••••••••••••••••••••••••••••••••••••••••••••••••••••••(8)
Cleaning & Maintenance••••••••••••••••••••••••••••••••••••••••••••••••••••••••••(9)
Trouble Shooting••••••••••••••••••••••••••••••••••••••••••••••••••••••••••••••••••(10)
Parts List••••••••••••••••••••••••••••••••••••••••••••••••••••••••••••••••••••••••••••(12)
Wiring Diagram••••••••••••••••••••••••••••••••••••••••••••••••••••••••••••••••••••(20)

INTRODUCTION
2
Brief Introduction
SM-120T is Spiral Mixer with Three-Times control panel and two motors,
one motor controls the speed of the hook while the other controls the
rotation direction of the bowl. The hook and bowl are made of best kind of
stainless steel, it can ensure that the dough from the bowl has a good
quality. With the safety guard, it can protect the operator from unnecessary
injury.
Owners and operators should carefully read and familiarize themselves
with this entire manual before attempting to operate or service this machine.
Complying with this manual will ensure years of safe and trouble-free
operation.
All of the information, illustration and specification contained in this manual
are based on the latest product information available at the time of printing.
SINMAG reserves the right to make changes at any time without notice. If
questions arise during the operation or servicing, please contact us before
proceeding.
Specification

INSTALLATION AND COMMISSIONING
3
Installation
The machine is ready for installation. After uncrating your spiral mixer,
inspect the machine for any damage that might have occurred during
shipment. Report any damage to us before proceeding. Never attempt to
operate this mixer with damaged parts.
1).Position the mixer in its appropriate working position, the mixer must be
installed on a horizontal and solid floor.
2).Adjust the mixer feet to ensure that the mixer is level, and seat it firmly
on all four corners.
3).Connect the correct power supply to the machine as indicated on the
machine nameplate.
Commissioning
1).Start the mixer to check the direction of rotation of the kneading spiral
and the bowl. When viewed from above, both kneading spiral and bowl
should rotate clockwise. The arrow on the bowl indicates the correct
direction of the bowl. If the rotation direction is incorrect, swap any two
phases to reverse the rotation direction.
2).Test the function of the safety emergency stop button. The machine
must stop immediately when you press this button.
3).Test the function of the limit switch for the bowl safety guard. When the
guard is lifted, the machine must stop immediately.
OPERATION
4
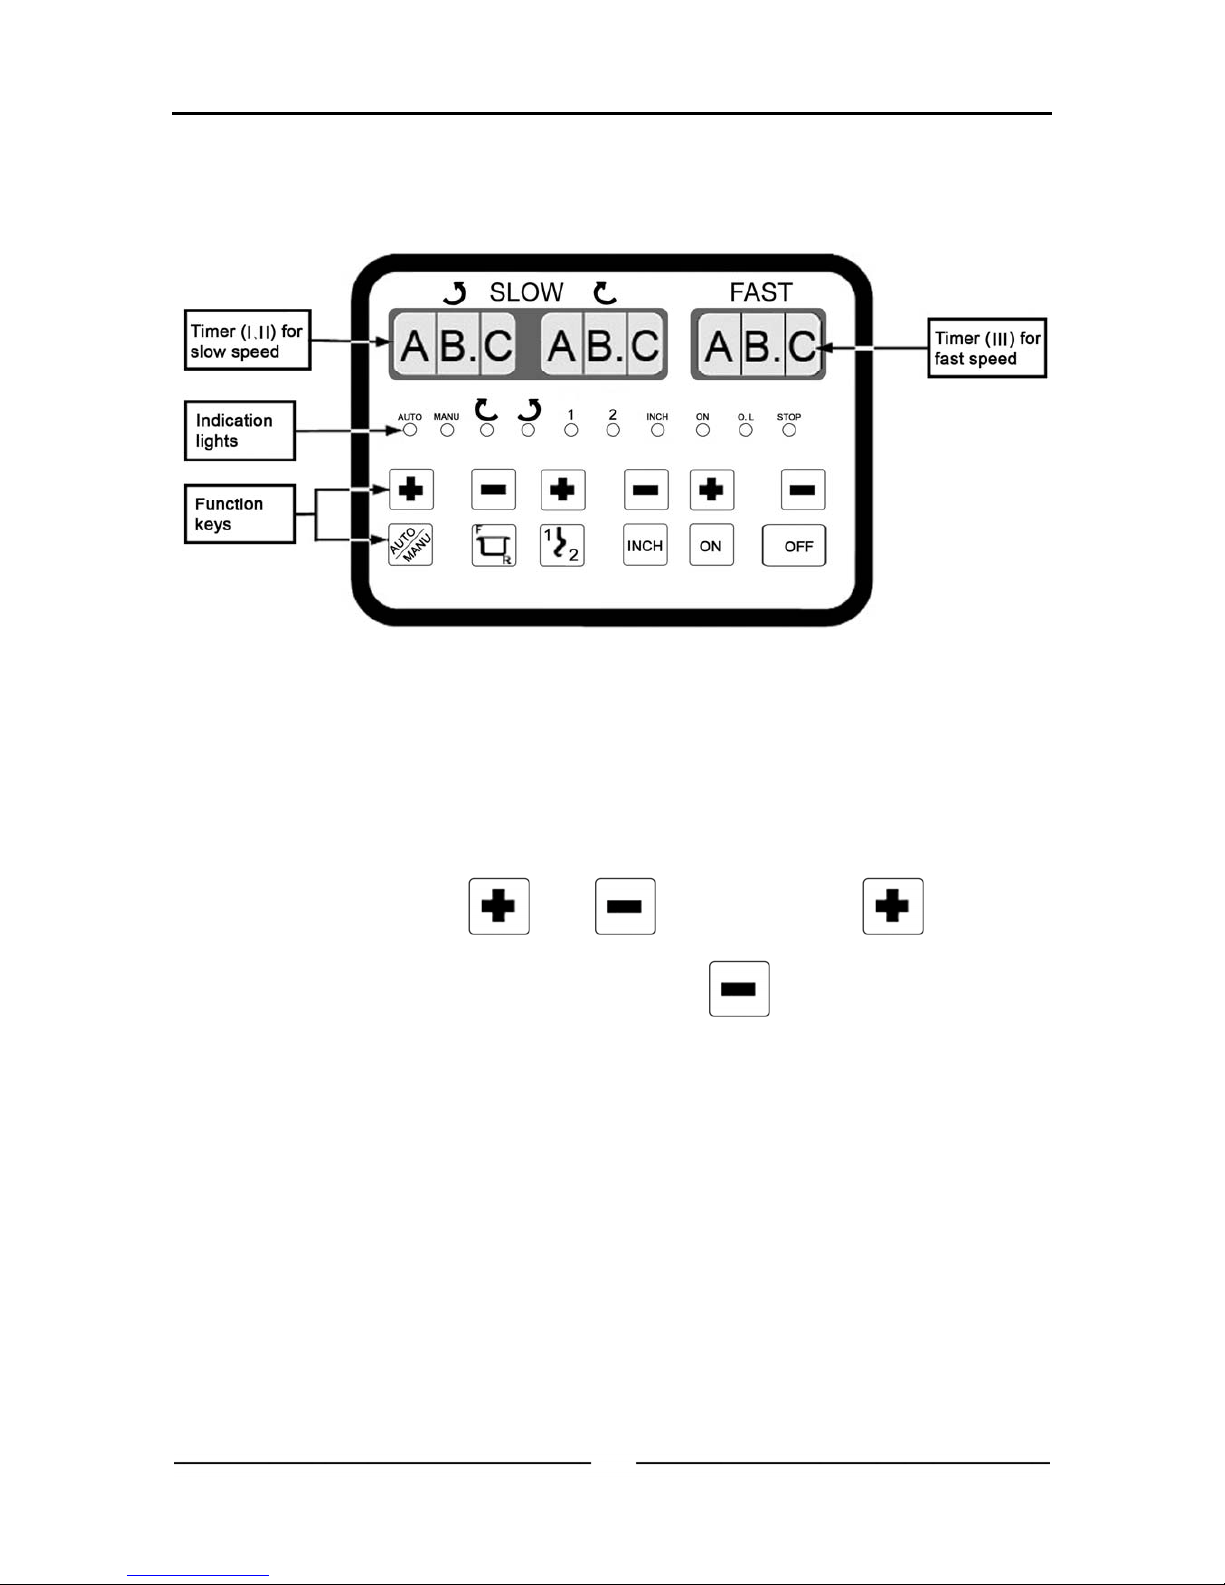
Control Panel
1.Timers
On top of the operation panel, there are three timers: TimerⅠ,Ⅱis for slow
speed; Timer Ⅲis for fast speed. Each Timer has three digits.
The unit of A and B is minute while C is 10 seconds, for example: 0.1 is 10
seconds, 1.2 is 1 minute and 20 seconds.
The timers are set by and buttons. Press button to
increase the value, the maximum set time is 20 minutes. After 20 minutes,
the timer starts from 0 minute again. Press button for the opposite
operation.
When the spiral mixer is switched ON, timers will show the set time. The
timer will only be operative when mixer is in AUTO mode. The timer will
start automatically when the ON button is pressed. The slow speed
timerⅠwill run first and then the slow speed timerⅡ, the fast speed timer
begin to run when the timerⅠ, Ⅱrun to zero. When all the timer value reach
zero, the bowl will stop rotating.
When the spiral mixer safety guard is lifted, the timer will stop with the mixer
and resume when the guard is moved down and the ON button is pressed.
When the OFF button is pressed, the timer will return to the set time.

OPERATION
5
2.Indication lights
Indication lights indicate the running state of the spiral mixer:
A). AUTO/MANUAL lights:
When “AUTO” lamp lights up, spiral mixer is in AUTO operation.
When “MANU” lamp lights up, spiral mixer is in MANUAL operation.
B). Bowl direction lights:
When lamp lights up, the bowl is in forward direction.
When lamp lights up, the bowl is in reverse direction.
C).Mixer speed lights:
When 1 lamp lights up, the hook is in the slow speed state.
When 2 lamp lights up, the hook is in the fast speed state.
D).Bowl inching light:
When “INCH” lamp lights up, spiral mixer is in manual inch mode. This
button is also operative when the safety guard is lifted.
E). On model light:
When “ON” lamp lights up, spiral mixer is in mixing mode.
F). O.L. Light:
When “O.L.” (OVERLOAD) lamp lights up, the overload relay is on. It
inform you that the mixer is overload, please switch off the mixer and
decrease the mixing weight and restart the machine again.
G).Stop mode light:
When “STOP” lamp lights up, safety cover has been raised during
mixing mode.
3.Function keys
AUTO / MANUAL selection Speed selection button
Bowl direction selection Inching button

OPERATION
6
Startbutton Stopbutton
Operation Preparation
Check the machine is clear of all objects, all switches are off and any
danger area should be clear of bystanders.
Check or place the electrical wire in the appropriate socket and turn power
on.
Safety guard should be raised and pushed back fully against stop to avoid
unnecessary injury. The mixer has safety interlocks to prevent mixer
operation when the safety guard is lifted.
Complete ingredient should be checked to ensure accuracy in scale.
Operation Steps
1.Auto operation
A).Press buttons below Ⅰtimer to set the desired time for
reverse slow mixing speed.
B).Press buttons below Ⅱ timer to set the desired time for
forward slow mixing speed.
C).Press buttons below Ⅲ timer to set the desired time for
forward fast mixing speed.
D).Press button until the “AUTO” lamp lights up.
E). Press button until the lamp lights up.
F). Press button to start machine.

OPERATION
7
2.Manual operation
A). Press button until the “MANU” lamp lights up.
B). Press buttons to select the desired direction.
C).Press to start.
D).Press button when you want to stop the machine.
The timer will stop function under manual operation.
The mixer will always start with slow speed even if you have selected fast
speed to start. When the mixer is running at slow speed, you can press
button to let mixer run at fast speed.
3.Control Buttons
When digital panel is damaged, the mixer can be operated by manual
switch located at left side of top cover. You can select slow speed or fast
speed manually without timer.
A). Press “ON” to start the machine
B). “1” means slow speed, “2” means fast speed.
In this state, the bowl can only rotate clockwise. And you can stop the
machine by pressing the emergency button or opening the safety guard.

CAUTION
8
1.Use the machine with great care and never be distracted.
2.Do not wear loose fitting clothes or the clothes with wide or open sleeves.
3.Do not remove, cover or modify the identification plates placed on the
machine body.
4.Work on the products permit and not on other types.
5.Do not use the machine as a working top and do not place any objects on
it. They are not required for normal working operations.
6.Do not use the machine with temporary electrical connections or
non-insulated cables.
7.Periodically check the state of the power cable and the cable clamp on
the machine body, replace it as soon as is necessary by an authorized
personnel.
8.Stop the machine immediately as there is defective or abnormal
operation, a breakage is suspected, there are incorrect movements, or
unusual noises.
9.Before cleaning or carrying out maintenance, isolate the machine from
the power supply first.
10. For all extraordinary maintenance, consult with the manufacturer or
authorized personnel.
11. Never insert hands or other objects into the bowl when the machine is
in operation. And never touch the bowl outside when it is rotating,
maybe it will take your finger into the bowl roller and injure you.

CLEANING AND MAINTENANCE
9
1.Brush off all external surface. Use a brush and work from the top to the
bottom.
2.Remove all old dough and deposits using a plastic scraper.
3.Scrap the mixing bowl, the breaker bar, the dough spiral mixer tool, the
upper inside mixing bowl and behind the mixing bowl.
4.Wipe all surface with warm water.
5.Apply a detergent/sanitizer and leave on all surface.
6.Scrub to loosen and remove residues.
7.Rinse the bowl and dough spiral mixer tool throughly with hot water.
8.Remove excess moisture with clean squeegee or paper towels. Dry all
surface.
9.Re-examine all surfaces to evaluate whether cleaning has been effective.
10. If further cleaning is required, echo from step 3.
Table des matières
Autres manuels sinmag Mixer


