SingTel Pace-5520 Manuel utilisateur

SingNet BroadBand • mio Voice

Contents
STEP 1: Equipment Check
STEP 2: Setting Up Your BroadBand Connection
STEP 4: Logging in to Your SingNet BroadBand
STEP 5: Connecting Wirelessly to SingNet BroadBand (Optional)
STEP 6: Setting Up Your mio Voice
Technical Support Contact Numbers
STEP 3: BroadBand Connection Settings for Fibre (Optional)

3
Dear Customer, this guide has been prepared to help you to install SingNet BroadBand
(ADSL) service.
STEP 1: Equipment Check
The following items are pre-packaged in your Residential Gateway.
Note: Existing SingNet BroadBand, mio Plan or mio Home subscribers should already have these items connected to their
Residential Gateway.
Please proceed to STEP 2
Residential Gateway
Ethernet Cable (RJ45)
FXS Splitter
DSL Microfilter
Ethernet Cable (Blue) Phone Cable (RJ11)
Power Adaptor
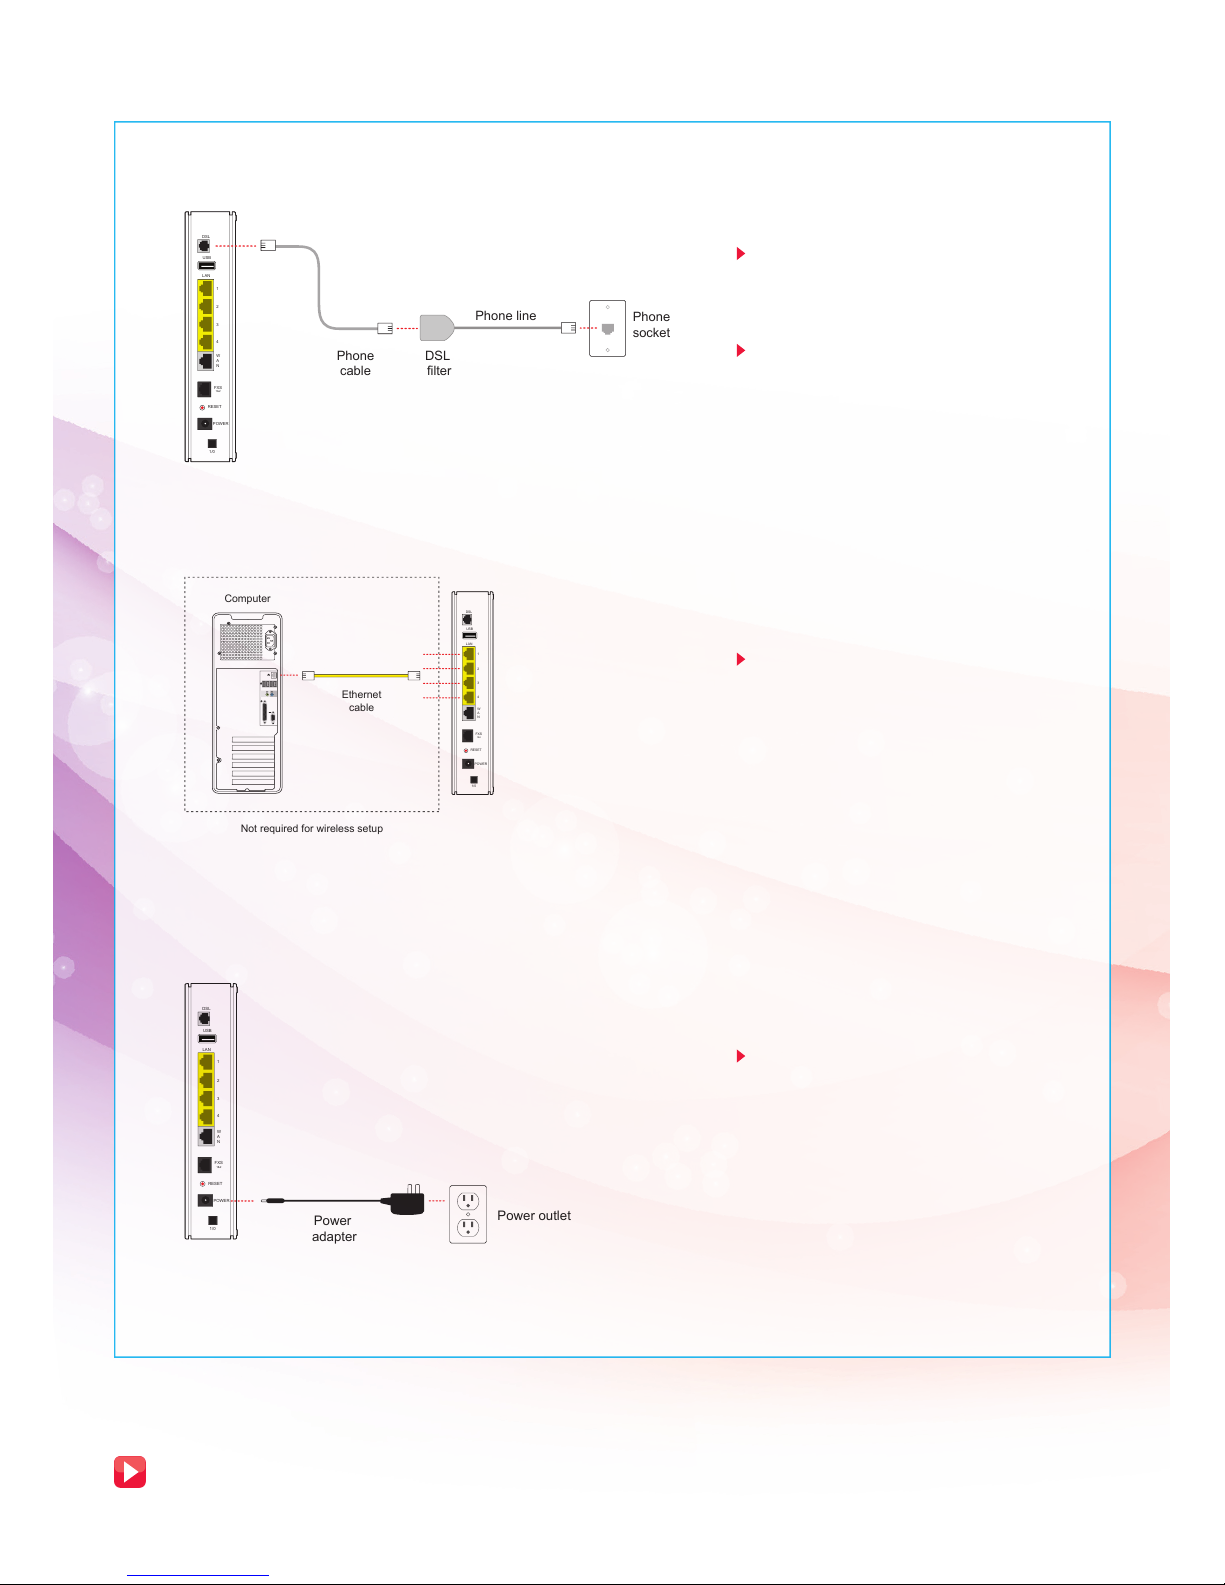
STEP 2: Setting Up Your BroadBand Connection
2.1. Connecting Residential Gateway to Telephone wall socket
2.2 Connecting Residential Gateway to PC
2.3 Connecting Residential Gateway to electrical outlet
Please proceed to STEP 4, if you are a SingNet BroadBand subscriber
STEP 6, if you are a mio Voice subscriber
Using the Telephone Cable (RJ11),
connect the Residential Gateway “DSL”
port to the DSL Microfilter‘s “DSL” port.
Insert the head of the DSL Microfilter
into your telephone wall socket.
Note: You can connect your telephone into the DSL
Microfilter’s “PHONE” port to use your fixed Phoneline.
Using an Ethernet Cable (RJ45),
connect to any of the available
Residential Gateway “LOCAL
ETHERNET” ports to your PC’s
“Ethernet” port.
Connect Power Adapter to your
Residential Gateway “POWER” port and
the nearest electrical outlet. Turn on
the power at the electrical outlet and
the Residential Gateway.
USB
LAN
1
2
3
4
W
A
N
DSL
FXS
1&2
RESET
POWER
1/0
Phone
socket
Phone
cable
DSL
filter
Phone line
USB
LAN
1
2
3
4
W
A
N
DSL
FXS
1&2
RESET
POWER
1/0
Ethernet
cable
Computer
Not required for wireless setup
Power outlet
Power
adapter
USB
LAN
1
2
3
4
W
A
N
DSL
FXS
1&2
RESET
POWER
1/0

5
STEP 3: BroadBand Connection Settings for Fibre
(Optional)
Connect the Residential Gateway
Broadband Port to the ONT LAN 1 Port
highlighted in Yellow using the Ethernet
Cable (RJ45).
Switch off the ONT Power before you do
the set up.
For mio TV Set Top Box, personal
computer or laptop, please connect it to
the Lan Port highlighted in Yellow.
For Mio Voice service, please connect
your phone using a Phone Cable (RJ11)
to the Residential Gateway Voice 1&2
Port.
Once Power is adapter is connected, follow the
power up sequence as below.
1. Power up the Optical Network Terminal (ONT).
Wait for POWER and PON LEDs to turn to
stable green light.
2. Power on the Residential Gateway. Wait
for POWER, ETHERNET, BROADBAND,
INTERNET, IPTV (If applicable) and Voice 1 (If
applicable) to turn to stable green light.
3. Power up your mio TV Set Top Box and your
computer.
Note: For exStream serivce, there is no need to key in user
ID and Password. All services credential will be auto push
down to your Residential Gateway.
Fibre TP
(installed by OpenNet)
Optical Network
Terminal
Residential Gateway (RG)

Please confirm that you have the following item on hand before attempting this section:
SingNet BroadBand Service Letter – this contains your Username and Password which will be used for setting up
the SingNet BroadBand.
Congratulations! You can now use SingNet BroadBand!
STEP 4: Logging in to SingNet BroadBand
Please proceed to STEP 5, for Connecting Wirelessly to SingNet BroadBand (optional)
STEP 6, if you are a mio Voice subscriber
Open your web-browser (e.g. Internet Explorer) and type the URL http://app.singnet.com.sg or
http://192.168.1.254 for changing the WAN mode and configuring PPP.
Click on Internet under the Configuration tab.
Residential Gateway is rebooting. Hold on till
reboot completes & Residential Gateway comes
up. After reboot your Residential Gateway is ready
for use.
The Default WAN mode is Ethernet.
In order to change the WAN mode from Ethernet to
ADSL please follow the below steps:
a. Select ADSL in the physical link. PPPOE protocol will
be selected automatically
b. ADSL Modulation is selected by default- No need to
change it
INTERNET
BROADBAND
IPTV
VOICE 2
ETHERNET
WIRELESS
WPS
VOICE 1
POWER
W
P
S
LED Check:
Please wait for approximately 5 minutes.
The “POWER” and “BROADBAND” LEDs should now be stable GREEN (not blinking),
except the “ETHERNET” LED, it should be GREEN and blinking.
If not, please check connections in STEP 2.
Do NOT proceed to the next section until you have done so.
1. Residential Gateway home page
c. Type your UserID as stated in your Service Letter in
the “Username:” field
Note: The text behind @ maybe different. Please ensure that you have entered
the correct one as stated in your service letter before proceeding.
d. Type in your Default Login Password as stated in
your Service Letter in the “Password:” and “Confirm
Password:” fields
Note: If you have changed your default password, please use the current
password.
e. After setting PPP parameters, click OK to save.
After changing WAN mode from Ethernet to ADSL or
vice versa, Residential Gateway restarts.
2. Internet Access Configuration
3. Box Management
4. Box Management
5. LED
Status

7
Section A: Your Network Name and Key
Please take note of two numerical codes which are your Network Name and Key with this diagram as a guide.
You may fill in these details on the box below for future references.
Note: The default wireless encryption option is WPA/WPA2.
IMPORTANT!
You will need a wireless adapter (wireless PC card or wireless USB adapter) or a wireless-enabled
Notebook before you can proceed to the next section.
Please refer to your operating system’s instructions:
Section B. if you are using Windows XP
Section C. if you are using Windows Vista
Section D. if you are using Windows 7
Section E. if you are using another wireless manager other than Windows
Network Name (SSID):
SINGTEL-_______________
Insert last 4 numbers of your Serial
Number (S/N) here.
Network Key:
_______________________
Write the 10 digit of Wireless Key here.
STEP 5: Connecting Wirelessly to SingNet BroadBand
(Optional)

STEP 5: Connecting Wirelessly to SingNet BroadBand (Continued)
Section B: If you are using Windows XP
1Double Click on the wireless icon on your taskbar.
2You should see the wireless networks
available. If you are prompted to use
another wireless manager, please
refer to Section E.
3Double click on the correct Network
Name of your wireless network (e.g.
SINGTEL-0110) and wait for the
network to be detected.
Note: Please refer to Section A if you are unsure of your
Network Name or try refreshing your Network list if you
do not see it.
4Type the 10-Digit Network Key into
the “Network Key” and “Confirm
Network Key” fields. Click on the
“Connect” button to complete the
setup and wait for the network
address to be acquired.
Note: Please refer to Section A if you are unsure of
your Network Key.
9
STEP 5: Connecting Wirelessly to SingNet BroadBand (Continued)
5You will see the following screen if
you were successful.
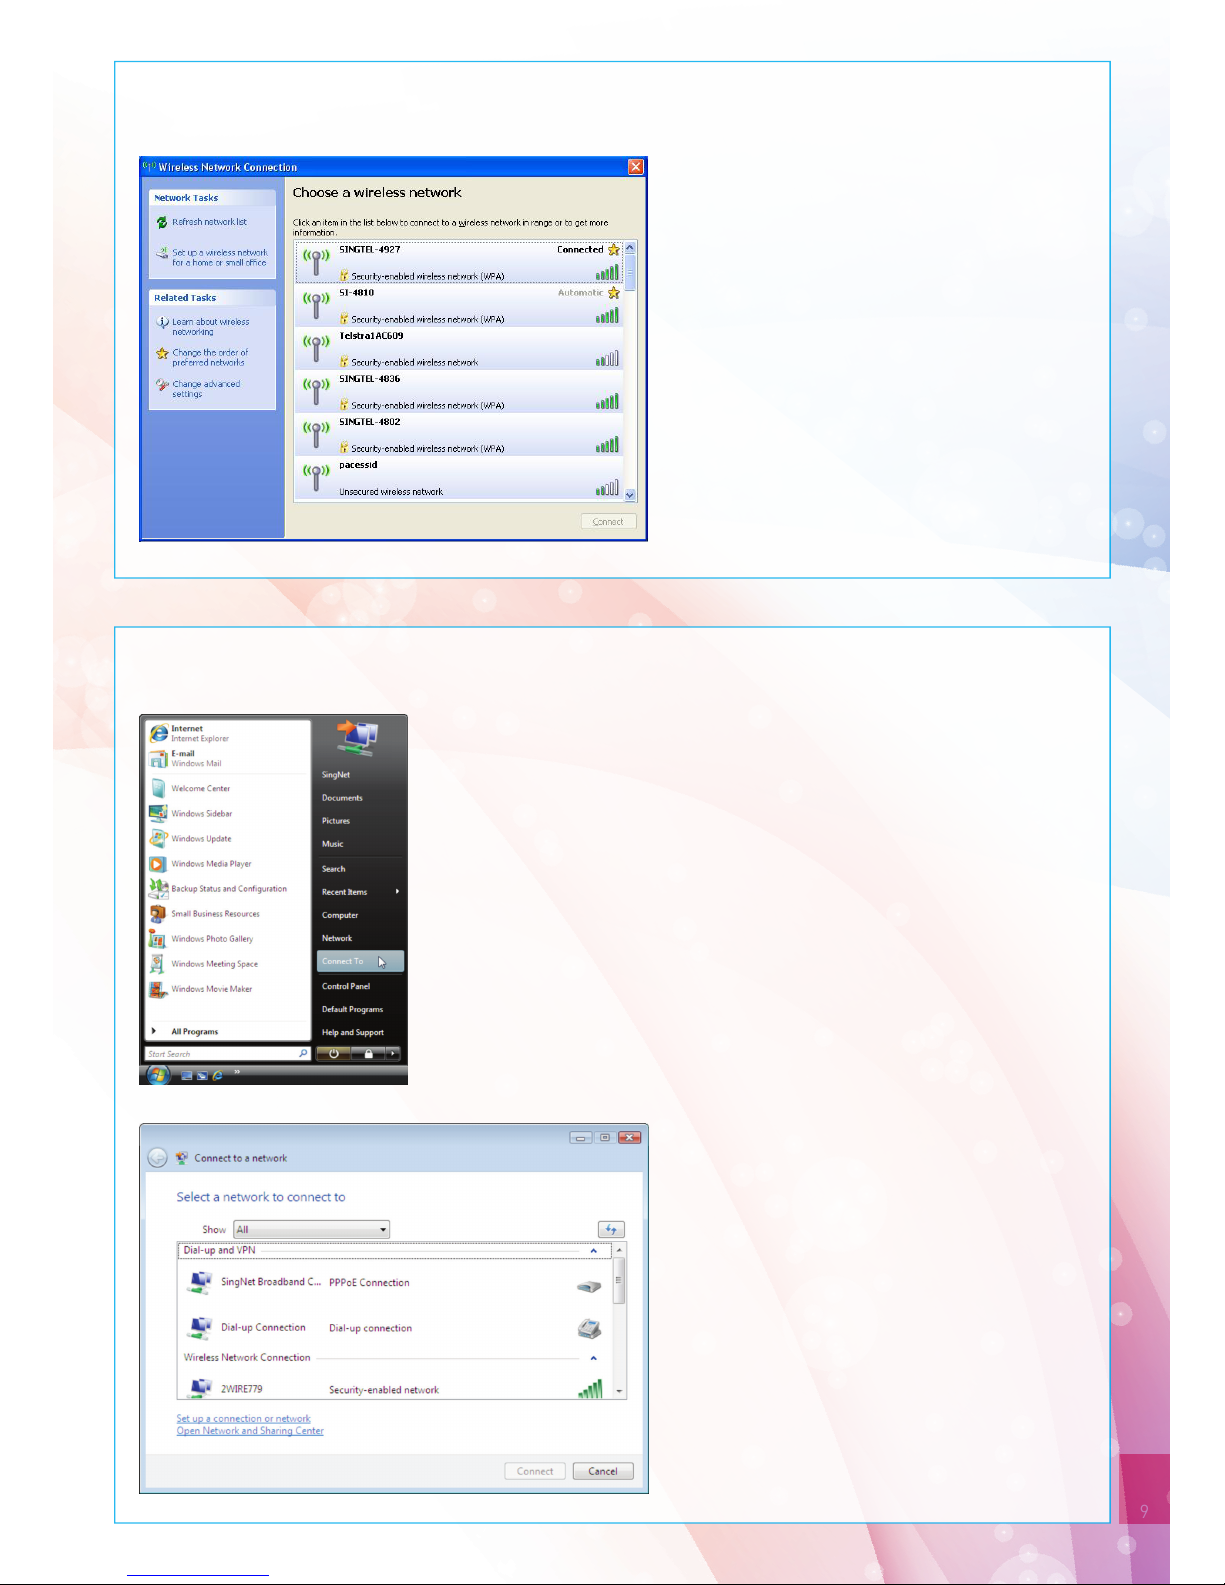
Section C: If you are using Windows Vista
1In Windows Vista, click on the Start button.
2Click on Connect To
3You will see the following screen.

STEP 5: Connecting Wirelessly to SingNet BroadBand (Continued)
4Under Show, select “Wireless”
5Find the correct Network Name
of your wireless network (e.g.
SINGTEL-0110).
Note: Please refer to Section A if you
are unsure of your Network Name or try
refreshing your Network list if you do
not see it.
6Click on the Connect button.
7Please wait while your computer
tries to connect to the Residential
Gateway.
Table des matières
Autres manuels SingTel Routeur réseau


Manuels Routeur réseau populaires d'autres marques


NETGEAR
NETGEAR FS526T - Switch Manuel utilisateur

Korenix
Korenix JetNet 5710G Series Manuel utilisateur

Automated Logic
Automated Logic ZN551 Manuel du propriétaire

Cisco
Cisco ASR 1000 Series Manuel de l'opérateur

EnGenius
EnGenius ESR-9710 Manuel utilisateur

Cisco
Cisco 805 Series Instructions d'utilisation et de sécurité