Simgrade R7 Manuel utilisateur

Spec C
Manual v.2.2
02.02.2022

2
Table of contents
Table of contents 2
1. General 3
1.1 Varoitukset ja ohjeet turvalliselle käytölle 4
1.1.1. Käyttöympäristö ja turvalliset säilytysolosuhteet 4
1.1.2. Takuu 4
1.1.3. CE-Merkintä 4
1.1. Warnings & instructions for safe usage 5
1.1.1. Operating environment and safe storage conditions 5
1.1.2. Warranty 5
1.1.3. CE-Marking 5
1.4. Mounting the pedals 6
1.5. Connecting the pedals to the controller box and to the PC 6
1.6. Grounding 7
1.7. Maintenance 8
2. Mechanical Adjustments 8
2.1. General 8
2.2. Brake 11
2.2.1. Included Elastomer / Spring configurations 14
Soft: 5pcs, L=10mm: 15
Hard: Steel Spring: 16
2.2.6. Brake travel limiter 17
2.3. Throttle 18
2.4. Clutch 19
3. Software 20
3.1. General 20
3.2. Layout 21
3.3. Limiting the maximum braking signal with the software 23

3
1. General
Please read the manual carefully as it contains important information regarding the pedals and safe usage of them.
The latest version o f the manual and software can always be found at: https://simgrade.fi/support/
Contact the manufacturer: [email protected]
Pictures on the manual might not represent your actual pedal configuration exactly.
Thank you for choosing the R7’s, we hope you will enjoy your new pedals.
Best regards,
Team SIMGRADE°

4
1.1 Varoitukset ja ohjeet turvalliselle käytölle
● VAROITUS: TUKEHTUMISVAARA - sisältää pieniä osia, käyttö vain aikuisen valvonnassa! Älä anna lasten käyttää polkimia, tai mitään toimitettua osaa tai työkalua
ilman aikuisen valvontaa.
● Älä koskaan käytä vahingoittunutta tai millään tavalla viallista tuotetta, lopeta käyttö ja ota yhteys jälleenmyyjään tai valmistajaan.
● Sisältää teräviä reunoja ja kulmia sekä sulkeutuvia välejä, älä koske polkimiin käytön aikana.
● Älä käytä maaöljypohjaisia voiteluaineita polkimien kanssa, ne vahingoittavat osia polkimista. Mikäli voitelua tarvitaan, suosittelemme PTFE-kuivavoitelusuihketta.
● Varmista, että kaikki jotka polkimia käyttävät, ovat lukeneet ja ymmärtäneet käyttöohjeen sisällön (ajantasaisen käyttöohjeen löydät: https://simgrade.fi ).
● Varmista aina, että kaikki liitokset ovat kireällä ennen kuin käytät polkimia. Kiristä liitos aina mutterin puolelta kun sellainen on käytössä.
● ÄLÄ avaa ohjausboxia.
● Polkimia tai niiden osia ei saa käyttää kuin siihen tarkoitukseen, johon ne on suunniteltu. SIMGRADE° R7 PEDALS on tarkoitettu käytettäväksi USB-peliohjaimena tietokoneella. Valmistaja
ei vastaa vahingoista, jotka voivat syntyä tuotteen ohjeiden vastaisesta käytöstä.
● Kiinnitä aina polkimet M6-pulteilla (4kpl / poljin) tukevaan alustaan. Käyttäjä vastaa siitä, että alusta kestää polkimien käytön.
● Maksimi kiristysmomentti muovia sisältäviin liitoksiin / muoviosien kiinnittämiseen: 6 Nm.
1.1.1. Käyttöympäristö ja turvalliset säilytysolosuhteet
● 15°C – 35°C lämpötila, tiivistymätön kosteus.
● Älä altista polkimia tai muita sen osia suoralle auringonvalolle tai kosteudelle.
● Vain sisäkäyttöön ja varastointiin.
1.1.2. Takuu
Tuotteella on 2 vuoden takuu, poislukien tilanteet ja tapahtumat joissa:
- Käyttö- tai hoito-ohjeita on laiminlyöty.
- Tuotetta on käytetty väärin tai huolimattomasti.
- Tuotteen luovutuksen jälkeen on sattunut onnettomuus tai muu tapahtuma, jossa tuote on vahingoittunut ulkoisten tekijöiden toimesta.
- Normaali kuluminen käytössä.
1.1.3. CE-Merkintä
Tuote täyttää EU:n terveys-, turvallisuus- ja ympäristönsuojelustandardit.
- Valmistaja: SimGrade Oy
- Valmistajan osoite: Piispanpelto 8, 02200 Espoo
- Tuotteen nimi / tunnus: SIMGRADE° R7 PEDALS

5
1.1. Warnings & instructions for safe usage
● WARNING: CHOKING HAZARD - Small parts, adult supervision required! Never let children use the pedals, or any of the provided parts or tools without supervision by
an adult.
● Never use damaged or in any way defective product, stop using it and contact the reseller or the manufacturer.
● There are sharp edges and corners and closing gaps, keep away from the pedals while they are being used.
● Do not use petroleum based lubricants with the pedals, these will damage some of the parts in the pedals when in contact. If you need to use some lubricant, we recommend dry
PTFE-spray.
● Always make sure everyone using the pedals have read and understood the content of the manual (up-to-date manual can be found: simgrade.fi).
● Always check that all connections are tightened before using the pedals. Always tighten from the nut side when one is used.
● DO NOT open the controller box.
● Pedals or any of their parts may not be used on any other purpose than what they were designed for. SIMGRADE° R7 PEDALS is meant to be used as an USB-input device on a computer.
The manufacturer is not liable for any damage that may result from using the product in violation of the instructions.
● Always fasten the pedals to the support base with M6 bolts (4 pcs / pedal). It is the user's responsibility to ensure that the platform can withstand the use of the pedals.
● Maximum tightening torque for joints / attachment of plastic parts; 6Nm.
1.1.1. Operating environment and safe storage conditions
● 15°C – 35°C temperature, non-condensing humidity.
● Do not expose the pedals or any provided part to direct sunlight or moisture.
● Indoor use and storing only.
1.1.2. Warranty
The product has a 2-year warranty, excluding situations and events where:
- Instructions for use or care have been disregarded.
- The product has been used incorrectly or carelessly.
- An accident or other event has occurred after the product has been handed over, in which the product has been damaged by external factors.
- Normal wear and tear in use.
1.1.3. CE-Marking
Product meets EU standards for health, safety, and environmental protection.
- Manufacturer: SimGrade Oy
- Manufacturer address: Piispanpelto 8, 02200 Espoo
- Product Model name / identification: SIMGRADE° R7 PEDALS

6
1.4. Mounting the pedals
● A proper racing rig with a sturdy mounting platform is required . Aluminium extrusion profile bas e for the pedals is
recommended.
● Always use all 4 mounting bolts (M6) with washers on each pedal. Mounting pattern for one pedal is 80 mm (longitudinal) x 87
mm (lateral).
● Controller box can also be mounted with bolts (M4, DIN912). For aluminium profile, use the provided (M4) L=25 mm bolts.
1.5. Connecting the pedals to the controller box and to the PC
Connect the brake pedal to the middle port, and throttle on the side of the USB-out port. The 3rd port is for the clutch.
It is recommended to connect the pedals directly to the motherboard of the PC (back of the computer), into a USB 2.0 slot (black). We do
not recommend using USB-hubs with the pedals.
7
1.6. Grounding
In case you have some installed hardware (or some other environmental issue) that is creating EMI problems or other electrical
interference (i.e. signal from the pedals is not stable), you might need to ground the pedals by connecting a cable from the controller box
to the throttle pedal. Make sure the pedal end of the cable is directly connected to the frame plate, between the washer and the frame
(red). The controller box end is M3 (ring), and the pedal end is M5 (fork). Tighten the pedal end firmly, but do not use excess force while
tightening the box end.
The signal value will always move around / vary slightly, but if the range of variation is more than 10 units (out of 4096) while having the
pedals stationary, we recommend adding the cable just to be on the safe side.

8
1.7. Maintenance
Pedals do not need any added lubrication in normal conditions. If you add some regardless, only use dry PTFE-spray. Clean the pedals
only with a dry cloth. The provided felt pads for the stoppers should last a considerably long time (years). Replacements are available
from us (contact: [email protected]) but they can also be replaced with any local product, if needed (cut size: ~ 25mm x 12mm).
2. Mechanical Adjustments
2.1. General
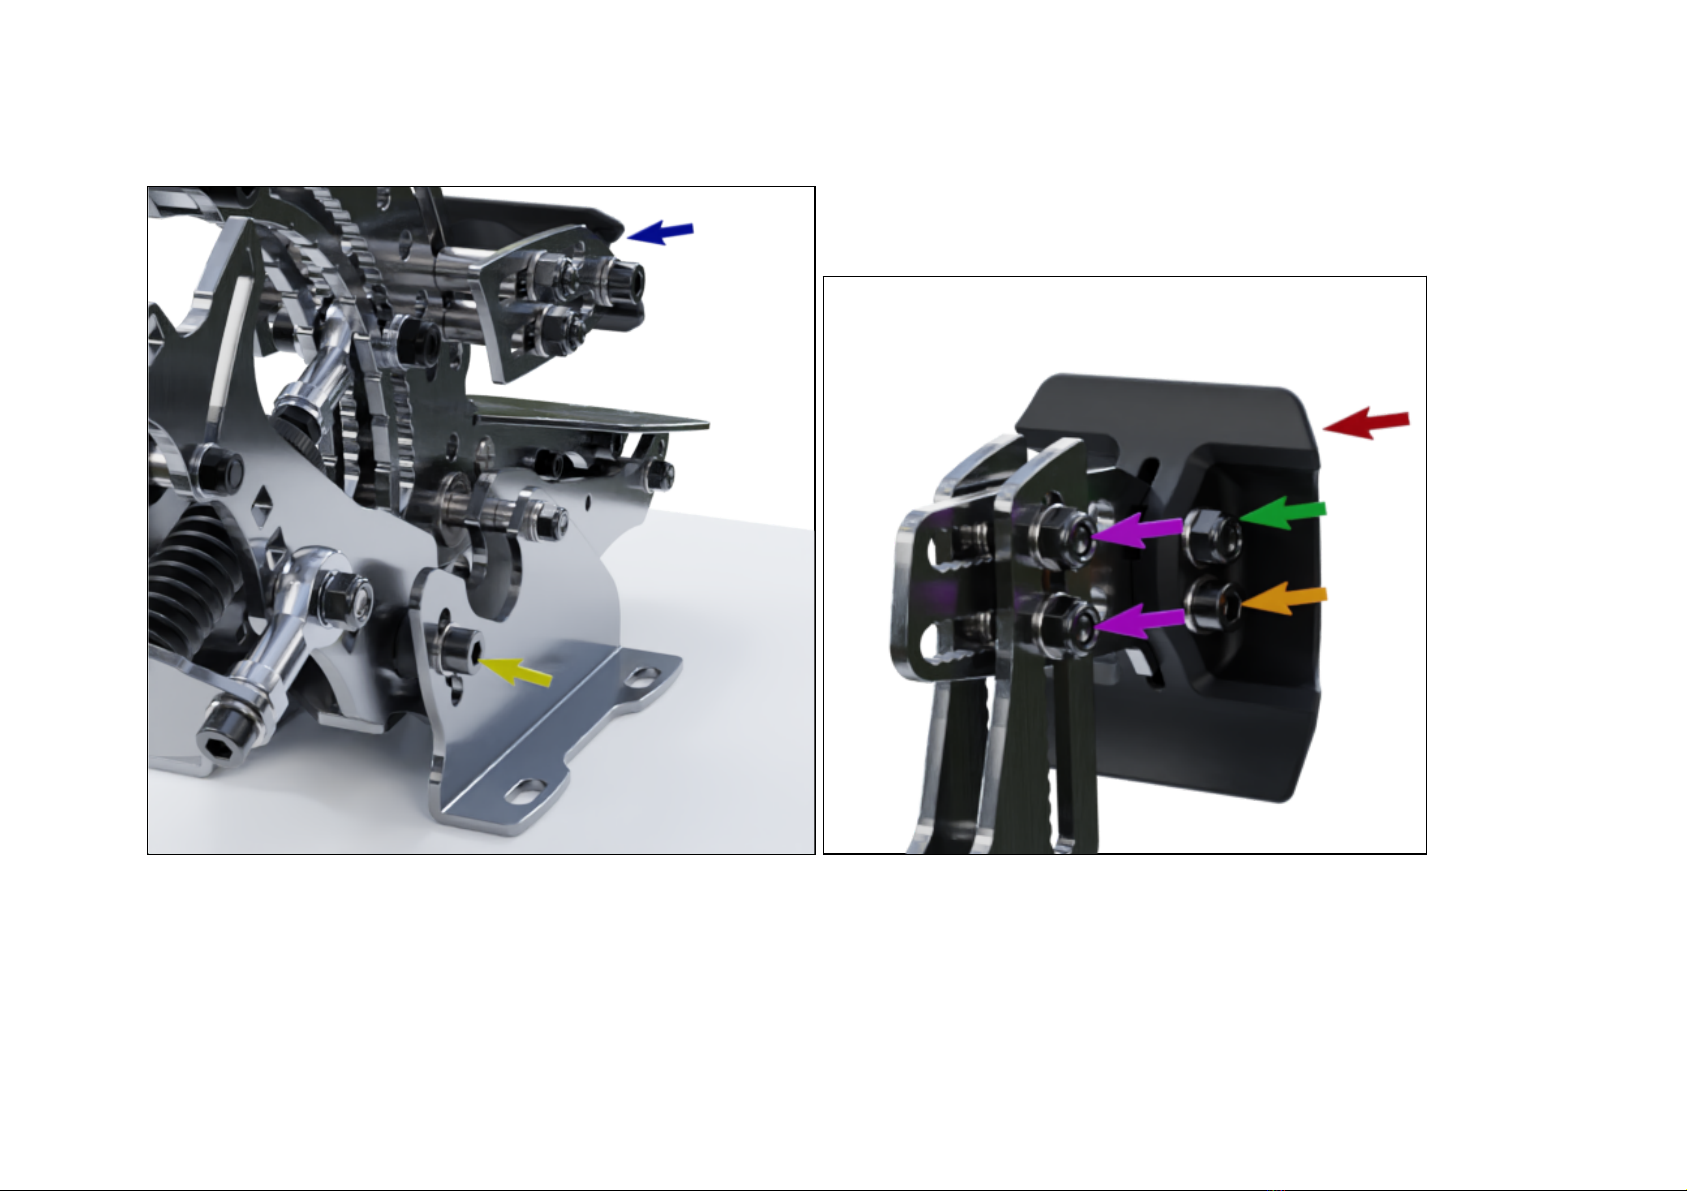
● To achieve a more traditional feel to the pedals, adjust the heel support (blue) closer to the pedal arm. This will reduce the
movement of your heel, which might feel more comfortable at first. It is recommended that you gradually learn to use the heel
supports further away from the pedal arms, as this will increase the control you have on the pedals, as you can basically push the
pedals both ways.
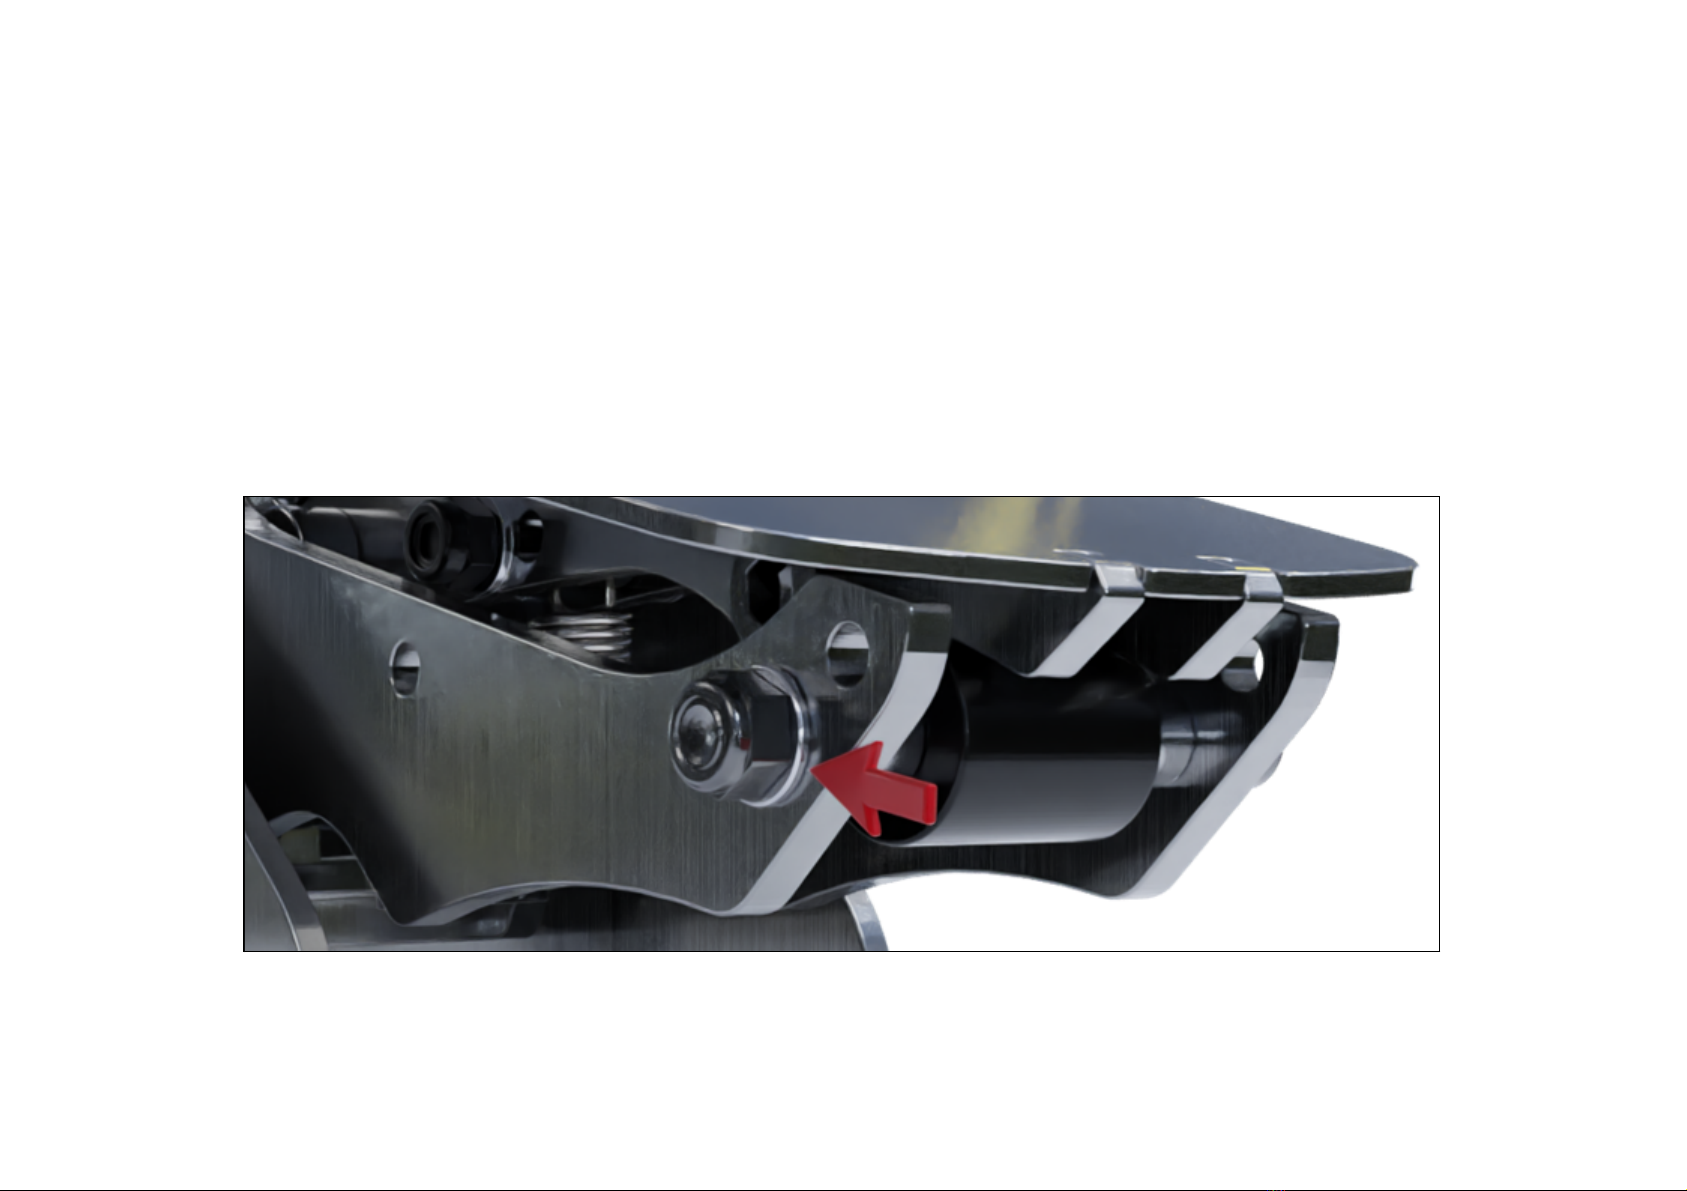
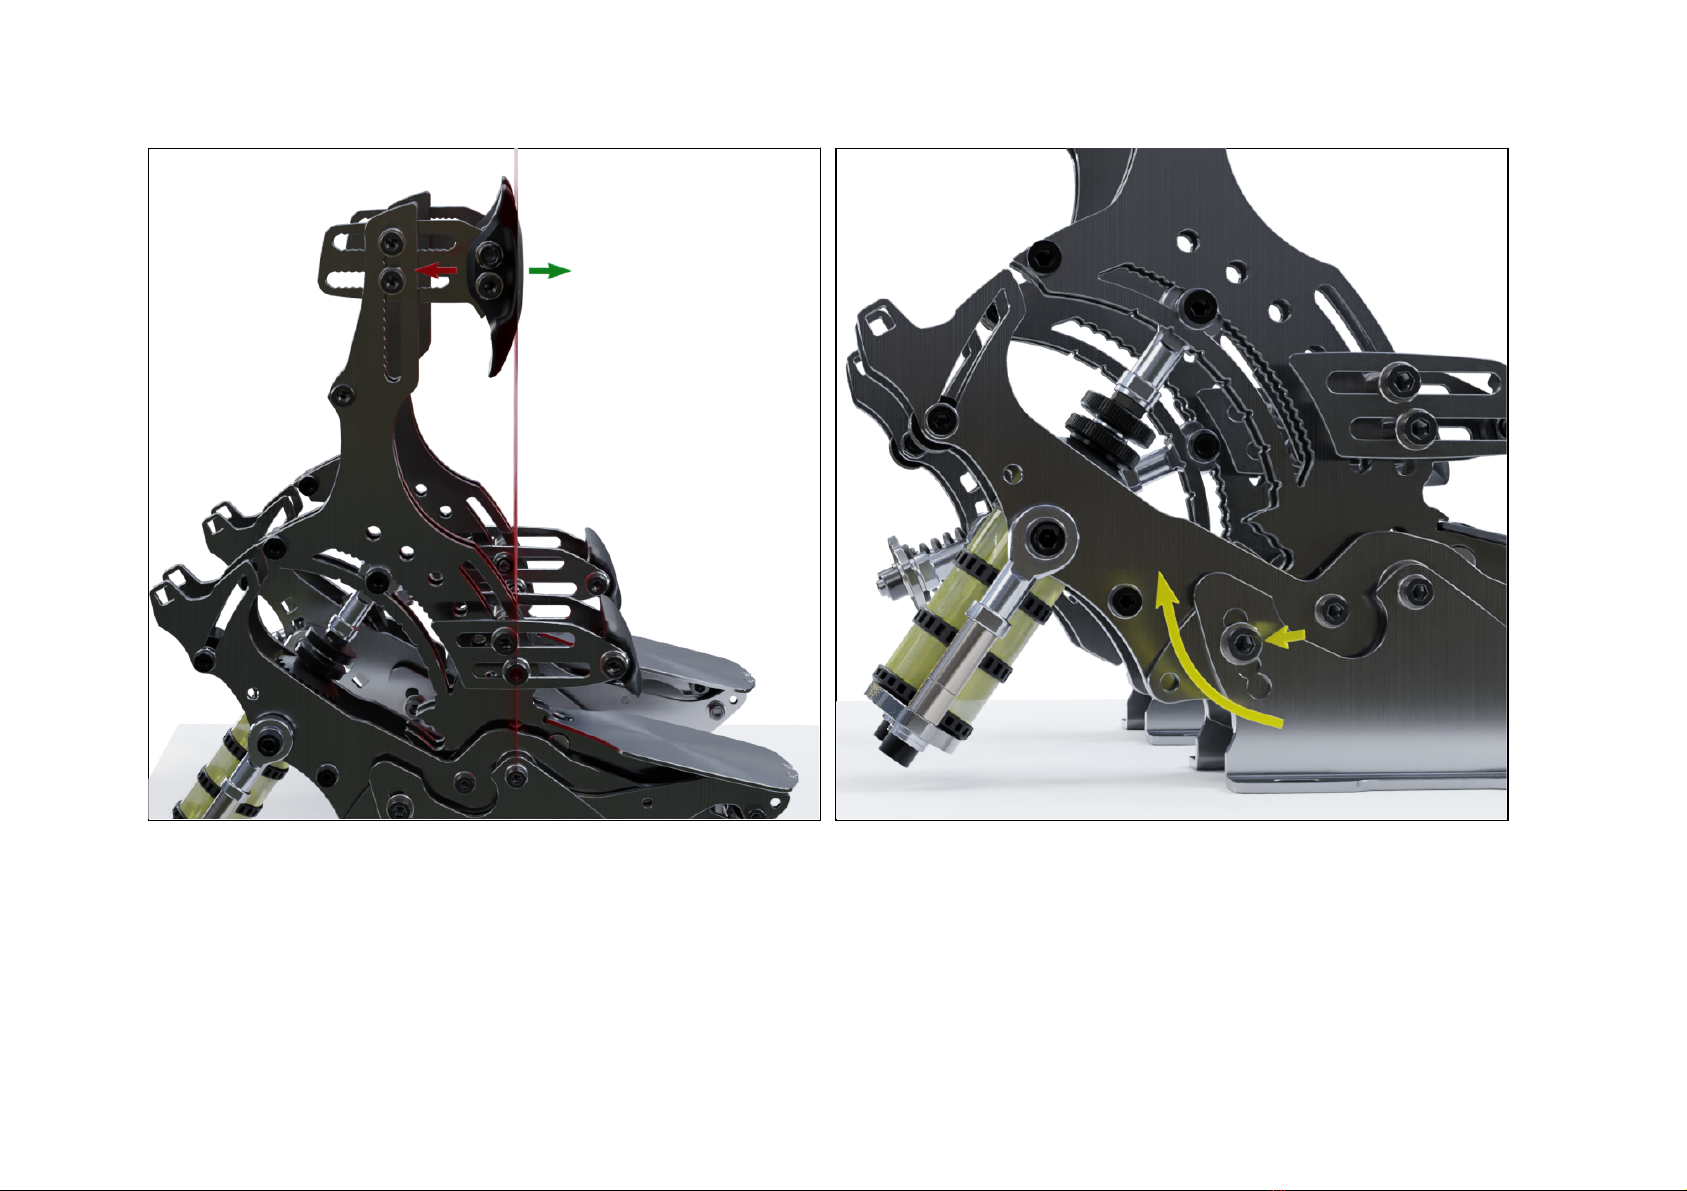
● It is good practice to first adjust the angle of the whole pedal using the bolts on the back (yellow) and then fine tune by adjusting
the pedal face (red) position and orientation with the slotted holes (purple).
● Note the position of the pedal face in relation to the main pivot point: If you draw a vertical line straight up from the ball bearings,
having the pedal face either ahead or behind the line changes how the pedal feels (see page 11). Usually it is beneficial to keep
the pedal face in front of the line (closer to the driver) on the brake, and behind or close to the line on the throttle. For example,
this helps if you feel that your foot is trying to ‘slide over’ the brake pedal face. Keeping the PF behind the line on the throttle
might give you a more comfortable and natural feel. For the brake, it is often a good idea to first adjust the angle of the whole
pedal (yellow) one step higher, and then slide the pedal face back, closer to the pedal arm. This way there is less strain on the
pedal and you should have a better feel for the brake, as your foot can not start to slide over the pedal face so easily.
● If you notice that the plastic part of the pedal face is loose, follow these steps: 1) Loosen the nyloc nuts on both sides (green)
2) Tighten the M6-bolt (orange), as there is another nut inside the PF 3) tighten the nyloc nut while keeping the bolt secured.
Don’t overtighten (plastic starts to deform = too much torque).
9
10
( Vertical line from the pivot point bearing ( Pedal angle adjustment
Autres manuels pour R7
1
Table des matières
Autres manuels Simgrade Pédale musicale

Manuels Pédale musicale populaires d'autres marques


Matthews Effects
Matthews Effects Whaler V2 Manuel utilisateur

Grid 1
Grid 1 Pedal Jeanie Manuel utilisateur

Amptweaker
Amptweaker tightboost Manuel utilisateur

Ibanez
Ibanez TS-808 Tube Screamer Overdrive Pro Manuel utilisateur

PuzzleSounds
PuzzleSounds DR. Q ENVELOPE FILTER Manuel utilisateur

BYOC
BYOC Analog Chorus Manuel


