Shofu EyeSpecial C-IV Guide de configuration
Smart digital camera designed exclusively for dentistry
Advanced Manual
Read carefully through the “Important Safety Instructions”
(included in the package) before using this camera.

For the latest information on the
EyeSpecial C-IV, visit our website at
www.shofu.com

III
Before using your camera
Thank you for purchasing our EyeSpecial C-IV. The following instructions provide necessary information on
successful operation, daily maintenance and safe use of this unit.
Please read this User’s Manual carefully before use to attain maximum benets and ensure durability of
this unit. Kindly keep this manual for your future reference.
Intended use
To take intraoral photos and movies for documentation of dental procedures.
Important precautions
For your safety
● Read through the “Important Safety Instructions” carefully for safe and correct use.
Notice
● No part of this manual may be copied or reproduced in any form by any means.
● Some information in this manual might become inconsistent with the product due to product software
updates.
● The information in this manual is subject to change without prior notice.
● All relevant issues have been considered in the preparation of this manual. However, should you notice an
omission or any questionable item in this manual, please feel free to notify your SHOFU dealer.
● In case of missing pages or disorder, please contact your local dealer for replacement.
Test shooting
● Be sure to take some test shots before taking actual clinical photos to make sure that the camera is
working properly.
Data back-up
● The SD memory card or MultiMedia card can be damaged by dropping or strong static electricity and the
data may be lost. Always back-up all important data in multiple locations, e.g. to your PC, removable HDD
or other back-up media.

IVIV
Copyright
● Any pictures that you take of existing images may be used for personal use only. Any unauthorised
copying, hiring, lending, public performance might violate the copyright of the rightful owner.
● Copyright law prohibits the use of pictures without the permission of the rightful owner.
Privacy policy
● The information, which can identify specic individuals, might belong to the “Personal Information”
stipulated in the “Act on the Protection of Personal Information”. Handle all images properly in accordance
with local laws and regulations.
Indemnity
● In no event shall SHOFU be liable for any infringement of privacy and damages, including, without
limitation, direct, indirect, incidental, special, consequential or punitive damages arising out of the use of
the images taken with this camera.
● SHOFU will repair and replace the camera in case of defect within the warranty period. We do not assume
any responsibility for subsequent damages arising from the failure of the unit beyond the warranty period.
Disposal
● Do not dispose this product together with your household waste!
Please refer to the information of your local community or contact our dealers regarding
the proper handling of end-of-life electric and electronic equipments.
Recycling of this product will help to conserve natural resources and prevent potential
negative consequences for the environment and human health caused by inappropriate
waste handling.
SD, SDHC and SDXC logos are trademarks of SD-3C, LLC.
HDMI logo and High-Denition Multimedia Interface are trademarks or registered trademarks of Administrator, Inc.
CAUTION
The EyeSpecial C-IV conforms to the following standard for interference from radio frequencies:
• Class B of the Voluntary Control Council for Interference by Information Technology Equipment (VCCI)
• Part 15 Class B of Federal Communications Commission (FCC)
This product may cause radio interference during its use. In such cases, users may be required to take
appropriate steps.

V
Before using your camera II
Intended use II
Important precautions II
1 Getting to know your camera 1
Names of parts 1
Front view 1
Bottom view 2
Back and side views 2
Function keys 3
LCD screen indicator 4
Shooting mode 4
Playback mode 7
Operation methods 9
Getting started 10
Attaching the hand strap 10
Attaching the lens cap strap (optional) 11
Installing batteries 12
Inserting SD memory card 13
Removing SD memory card 13
Removing the lens cap 15
Turning the camera on 15
Initial activation and setup 15
2 Basic technique 18
Before you start taking pictures / movies 18
Procedures 18
1 - Input patient information or photograph patient
record (optional) 19
Enter number 19
Scan QR code 20
Photograph patient record 21
Erase patient information 21
Conrm patient information 21
2 - Select shooting mode 22
Preinstalled modes 22
Custom modes 24
Scan QR code 25
3 - Select magnication rate (photo) 28
Selection of optimal magnication rate 28
4 - Set focus distance (photo) 30
5 - Take picture 32
Focus and take picture 32
Special functions of shooting modes 35
• Mirror mode 35
• Face mode 35
• Tele macro mode 36
3 - Record movie 37
Focus and record movie 37
3 Advanced technique (photo) 38
Taking photos without auto cropping function 38
How to take photos without auto cropping function 39
Taking photos with manual focus 42
How to take photos with manual focus 43
Taking photos by adjusting focal length manually
(like general digital cameras) 45
How to take photos with focal length set manually 46
4 Tips for taking photos 48
Tips for holding the camera securely 48
Tips for pressing the shutter button 48
Tips to avoid image blurring 49
Tips for operations 49
Causes of inappropriate focus and
countermeasures 49
Focusing the area outside of the AF frame 50
Take pictures with focus lock 51
Fine-tuning brightness 52
Taking pictures with turning only one side of
the ashes on 52
Focus distance in Face mode 53
Shadows appearing in the Face mode 54
Inside and outside ashes for Tele macro mode 56
Tips to minimise shadows when photographing
stone models and prostheses 57
5 Playback 59
Viewing your image (photo / movie) 59
Single image playback 59
Reviewing other images 60
Thumbnail images 60
Erasing images 61
Erase the displayed image 61
Erase selected multiple images simultaneously 61
• Erase this image 61
• Erase selected images 61
• Erase all images 61
Contents

VI
Protecting images 62
Protect image 62
Protect selected multiple images simultaneously 62
• Protect this image 62
• Protect / unprotect selected images 62
• Protect all images 62
• Unprotect all images 62
Playing movies / viewing photos with HDMI cable 63
Functions while viewing photos 65
Magnify / downsize images 65
Edit images 65
Functions while playing movies 68
4 Transferring images to your computer 69
How to format SD memory cards 69
5 Menus 70
Shooting mode menu 70
Playback mode menu 82
Tab 1 71
Tab 2 73
Tab 3 76
Tab 4 78
Shortcut functions in shooting mode 81
Setup menu 82
Tab 1 84
Tab 2 87
Tab 3 89
Tab 4 91
Tab 5 93
QR codes for optional functions 96
Patient information le (.MIF) 97
6 Notes on use 99
Operating temperature 99
Recording media 99
LCD screen (with touch panel function) 100
Degradation of image quality 100
Water and chemical resistance 100
Others 100
7 Maintenance and storage 101
8 Troubleshooting 102
Camera problems 102
Error messages 103
Frequently asked questions 104
9 Specications 105
10 Accessories 107
11 Warranty 107
238
4
5
6
7
1
1
Getting to know your camera
1
Getting to know your camera
1
Names of parts
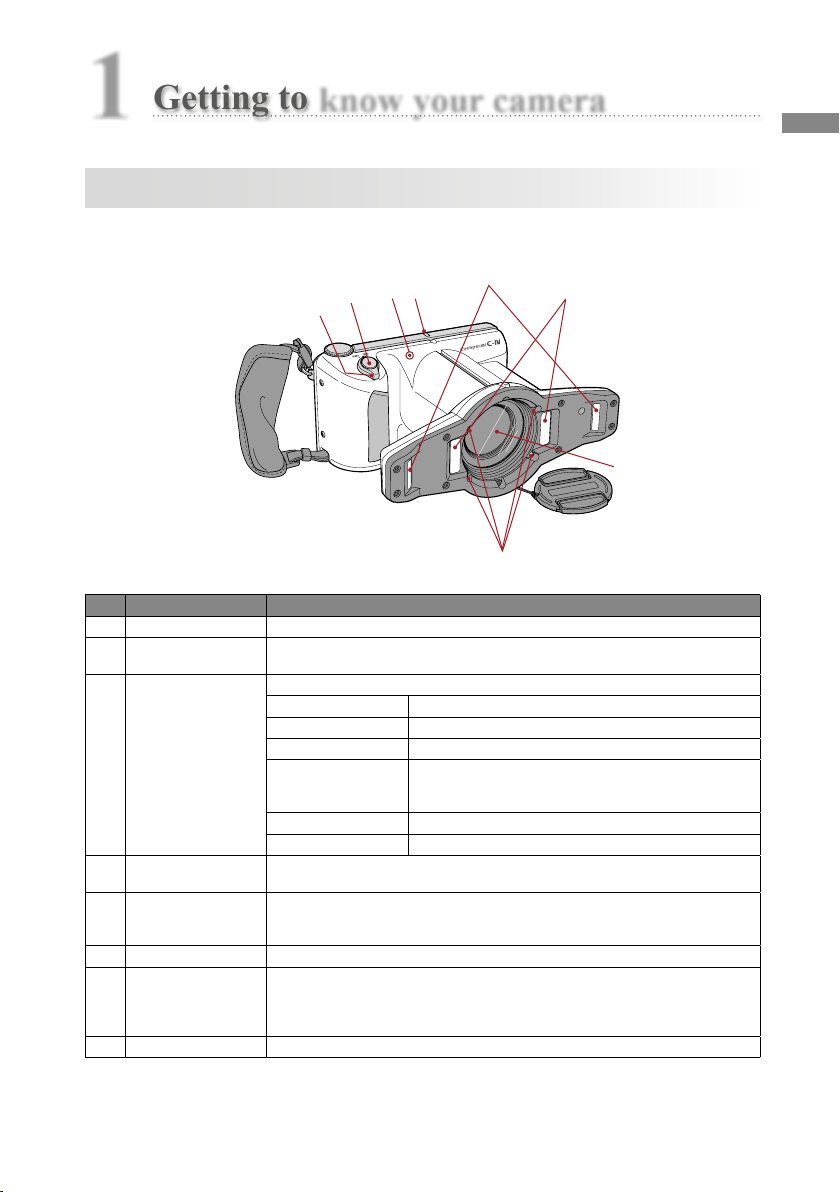
Front view
No. Part name Explanations
1Power switch To turn the camera on or off
2Shutter button When taking photos, half-press to autofocus. Then, press down completely to take the
photo.
3Pilot lamp
Indicates the working state of the camera by colour and status of blinking
Status Working state of the camera
Green light The camera is working properly.
Green light blinking Power save mode is activated.
Orange light
The camera is connecting to the SD memory card. During this
the SD memory card or batteries should not be taken out of the
camera in order to avoid losing the data.
Orange light blinking Malfunction is detected during activation or operation.
Red light Lens error is detected.
4Outside ashes Used in Low glare, Whitening, Tele macro and Isolate shade mode.
It can be selected to use the right, left or both ashes by changing the ash mode.
5Inside ashes
Used in Standard, Surgery, Mirror, Tele macro, and Face mode. It can be selected to use
the right, left or both ashes by changing the ash mode (in Surgery and Face mode both
ashes are always used).
6Lens –
7LED lights
Improve focus capabilities on dark areas of the subject.
Half-press the shutter button. The light remains on for 10 seconds after releasing the button.
The LED lights will then automatically turn off immediately before taking a picture.
The lights can be turned on all the time while recording a movie.
8Microphone –
1
2
3
4
6
5
1d
1c
1b
1a
2
1
3
4
5
6
7
9
10
8
2
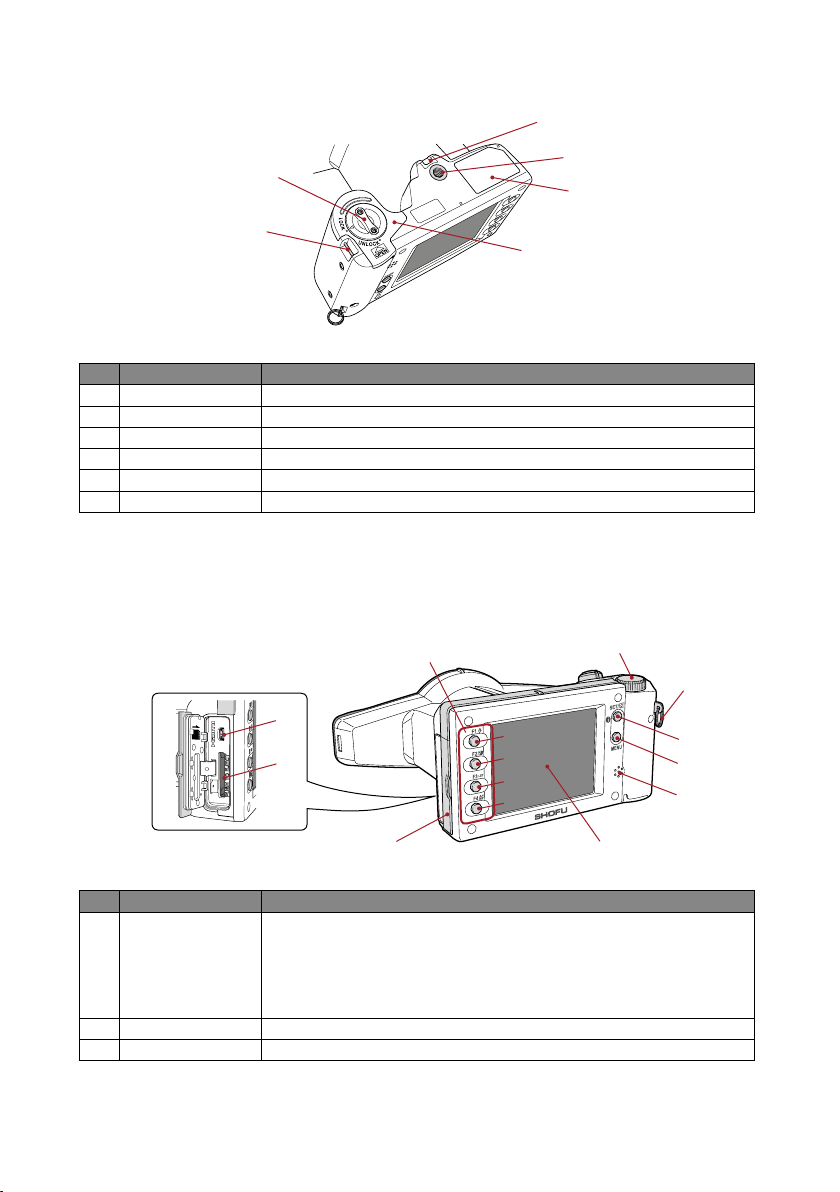
Bottom view
No. Part name Explanations
1Strap eyelet Holds the hand strap
2Lock lever Locks the battery cover shut
3Battery cover Holds batteries in place
4Tripod socket To afx to a tripod
5Name plate The serial number of the camera can be found here
6Strap hole To attach the lens cap strap
No. Part name Explanations
1
Function keys
Function changes depending on the mode you select. The function available is displayed
on the LCD screen.
1a: F1
1b: F2
1c: F3
1d: F4
2Dial key
Changes the magnication rate, scrolls through images taken and through items in menus
3Strap mount Holds the hand strap
Back and side views

Mode
Custom
Standard
Mode
Custom
Standard
3
Getting to know your camera
1
No. Part name Explanations
4SET key
Camera mode Function
Shooting mode Brief press: Change magnication rate of instant playback.
Long press: Picture information turns on and off.
Playback mode
(original size)
Brief press: Display patient information.
Long press: Picture information turns on and off.
Playback mode
(thumbnail images)
Brief press: Select image
Long press: –
Menu Brief press: Conrm the selected item
Long press: –
5MENU key To display the menus
6Speaker Output key sounds and shutter sound
7LCD (Liquid crystal
display) screen
To display images and menus. You can operate the camera by directly touching the keys on
the screen (touch panel function)
8Card slot /
HDMI connector cover Covers the SD memory card slot and HDMI connector
9HDMI connector
(Micro HDMI) To display movies / photos on a TV or other device connected with the HDMI cable
10 SD card slot To insert a SD / SDHC / SDXC memory card
Function keys
F1 – F4 are function keys which will change depending on the mode you select. They are also displayed on
the left of the screen. You can either press the key or directly touch the screen to operate these functions.
You can
also use the colour bars appearing on the right side of the screen. They correspond to the function keys
on the left.
In other words, “Press (F1)” can be achieved by pressing either the physical F1 key, the corresponding
function tab on the left side or the colour bar on the right side of the screen.
Function keys Function tabs Colour bars
4
LCD screen indicator
Information displayed on the LCD screen for shooting mode and playback mode, respectively, is as follows.
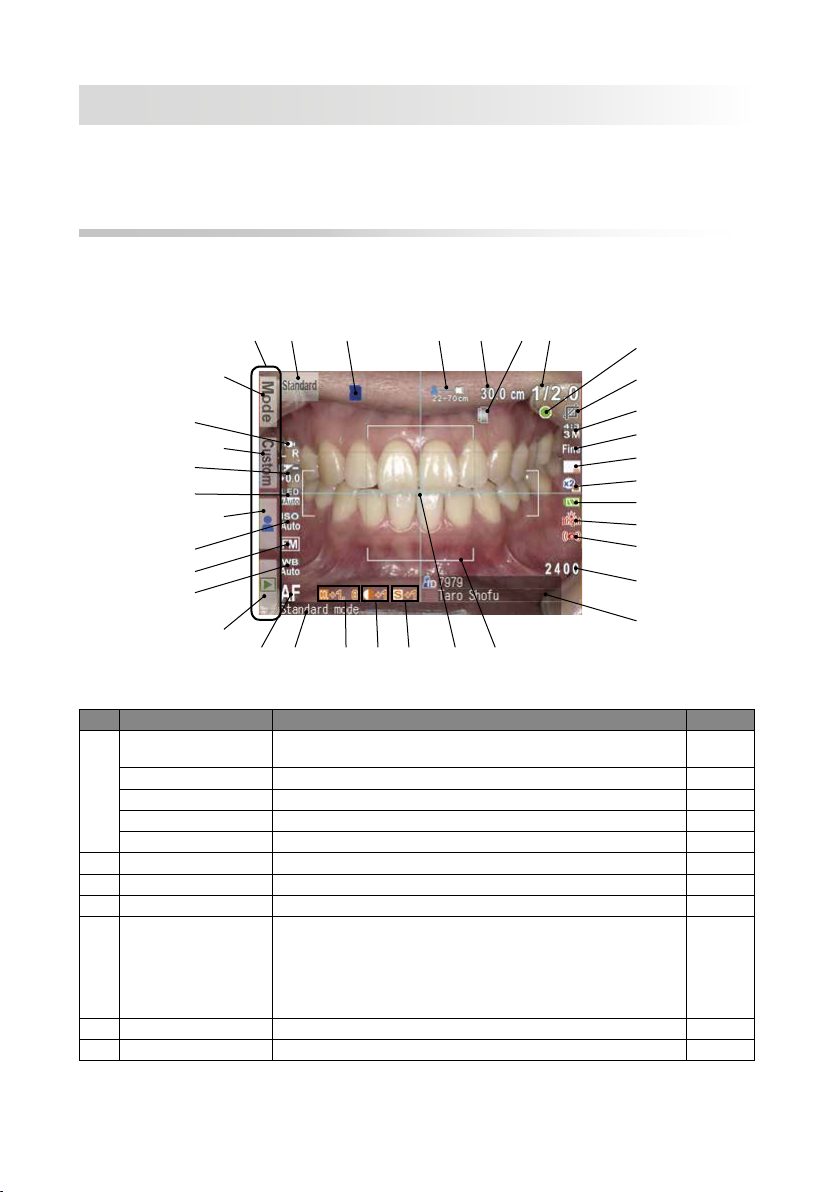
Shooting mode
No. Name Explanations
Reference
1
Function tabs Function changes depending on the mode you select. The functions available
are displayed on the LCD monitor. –
1a: Preinstalled modes Preinstalled modes are displayed p. 22
1b: Custom modes Custom modes are displayed p. 24
1c: Edit patient information Menus to edit the patient information are displayed p. 19
1d: Playback mode Change to playback mode p. 59
2Active shooting mode Currently selected shooting mode p. 23
3Card indicator Appears when the camera recognises the inserted SD memory card –
4Possible distance range Possible distance range to the subject at current magnication rate p. 30-31
5
[before AF]
Optimal focus distance
[after AF]
Actual focus distance
[before AF] Optimal focus distance at the current magnication rate is
displayed
[after AF] Actual focus distance to the object after focusing is displayed
in green or red
Green: Within possible distance range
Red: Outside possible distance range
p. 30, 32
6Close-up lens icon Appears when the close-up lens is required p. 36
7Current magnication rate Magnication rate currently selected p. 28
1a
21
202123 22 192425
3 4 5
8
9
11
12
13
14
15
16
10
17
18
76
1b
1c
26
27
28
29
31
30
1d
PHOTOS
Autres manuels pour EyeSpecial C-IV
3
Table des matières
Autres manuels Shofu Appareil photo numérique


