
SecuLock ND-M560 Manuel utilisateur

Latch locks
ND-M Series
M560, M565, M660
User Manual
A non-key door lock may be partially broken to open the door
when it malfunctions.
Retain this user manual for future reference after reading it
thoroughly.

Safety Precautions 3
Products Specifications / Components 4
Parts Name 5
PIN-codes Activation / Deactivation 6
7
Remote Controllers Activation / Deactivation 8
9
Double Authorization Mode 10
Pre Authentication Mode 11
Opening Door / Locking Door
12
12
13
13
Safety Lock Mode [Indoors] 14
Automatic / Manual Lock Mode 15
Volume Setting 16
Warning Alarms
Fire Detection Alarm 17
Intrusion Alarm 17
1min. Mischief Prevention 17
Latch bolt Warning Alarm 17
Low Battery 18
Trouble Shooting 19
CONTENTS
ㆍ
Card keys Activation / Deactivation
Fingerprints Activation / Deactivation
Opening the Door from Outside
Locking the Door from Outside
Opening the Door from Inside
Locking the Door from Inside
The contents and images of this manual are subject to change without prior
notice to improve the quality of the products.
_ 3
Safety Precautions
ㆍInstallation of the product by an unauthorized person may result in malfunctions
of the product. Installation work must be performed in accordance with the
standards by authorized personnel only.
ㆍThis product was designated for the residential door, if it is used for other
purpose, the performance cannot be warranted for its original purpose.
ㆍMake sure that the door is completely closed when going outside.
ㆍDo not disassemble and assemble the product in person.
ㆍDo not use sharp objects like a drill, a pin and a screwdriver to push the
touch screen, as this can damage the product.
ㆍDo not expose Pin-codes to an unauthorized person and change
them regularly.
ㆍDo not operate the product with wet hands and do not allow water to
enter the product.
ㆍUse the soft dry fabrics to clean the product.
ㆍDo not use the product for other use.
ㆍRead this manual carefully and use the product accordingly.
ㆍLong-term exposure to direct sunlight, to moisture or to salinity may
cause deformation of the product.
ㆍDo not recommend installing in condensation environments.
This may cause problems with product performance.
ㆍDo not insert batteries with the positive and negative polarities
reversed. It may cause leakage, heat generation, explosion or fire.
ㆍReplace all batteries immediately after they run out of power.
(Do not use old and new batteries at the same time.)

_ 4
※ Remote Controller is optional.
Products Specifications/Components
● Products Specifications
Model
Authentication Method
PIN-code
(up to 10)
Card key
(up to 30)
Fingerprint
(up to 100)
Emergency
Key (2ea)
Remote controller
(Optional Features)
M560
M565
M660
DescriptionSpecification
Door Thickness 40~50mm
Rated Voltage
Operating Temperature -20℃ - 50℃
Temperature Sensor Operating Range 60℃ (±5℃)
MaterialAl, Zn, ABS
ㆍIf the door thickness is out of the standard specification, please be advised from an expert
for installation. The screws may differ according to the door thickness.
● Products Components
ㆍOuter body, Inner Body ㆍStrike, Strike box
ㆍAA batteries 4ea ㆍLatch, Latch Shaft
ㆍScrews ㆍCard keys 4ea (only applied model)
ㆍRemote Controller (Optional)ㆍInstallation Instruction / Installation Template
ㆍUser Manual
1.
2.
3.
4.
Registration of New Authentication Measures
DC6V (LR6 1.5V AA Alkaline battery only)
While registering authentication measures such as PIN-codes, Card keys, Fingerprints
and remote controllers, the door has to be open. Before closing the door, test first if the
Latch bolt is operating properly by using [OPEN/CLOSE] button.
Registered authentication measures cannot be individually deleted. When registering
new authentication measures, all previously registered authentication measures will be
automatically deleted. (PIN-code, Card key, Remote Controller)
If there were no inputs for 7 seconds after pressing the button, the touch plate will
be off and the registration process will be cancelled.
The default PIN-code is “1234” to be operated during its initial setup.
up to 5
_ 5
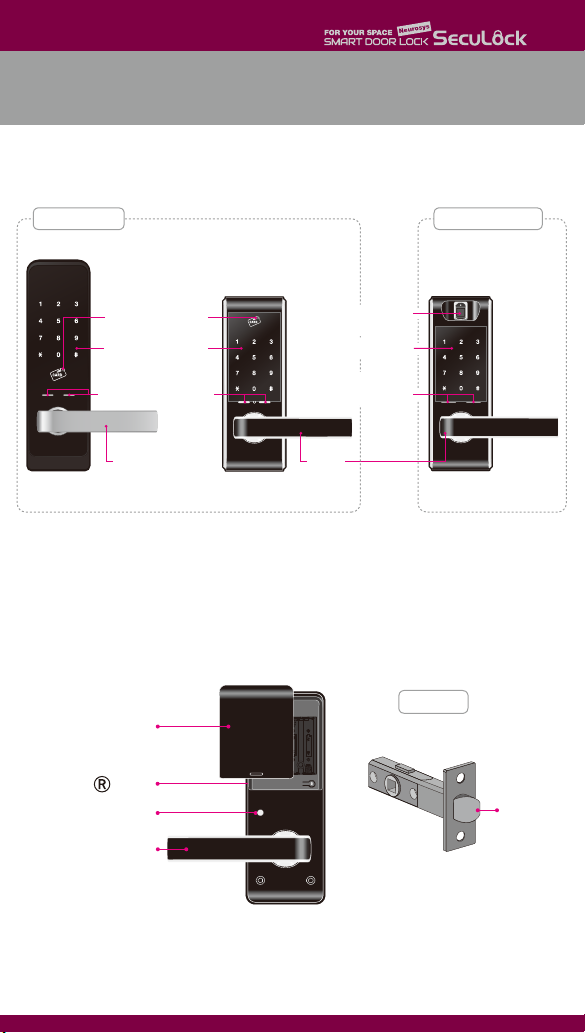
Parts Name
※All images shown are for illustration purposes only.
Their design and colors may differ in accordance with the model.
Battery cover
button
[OPEN/CLOSE] button Latch bolt
Latch
Handle
● Inner body
● Outer body
Emergency
Power Supply Terminal
ND-M660 ND-M560 ND-M565
Card Key Touch Plate
(only for applied models)
Handle Handle
Numeric Touch Plate
General Model Fingerprint Model
Fingerprint Reading Panel
(only for applied models)
Numeric Touch Plate
Emergency
Power Supply Terminal

_ 6
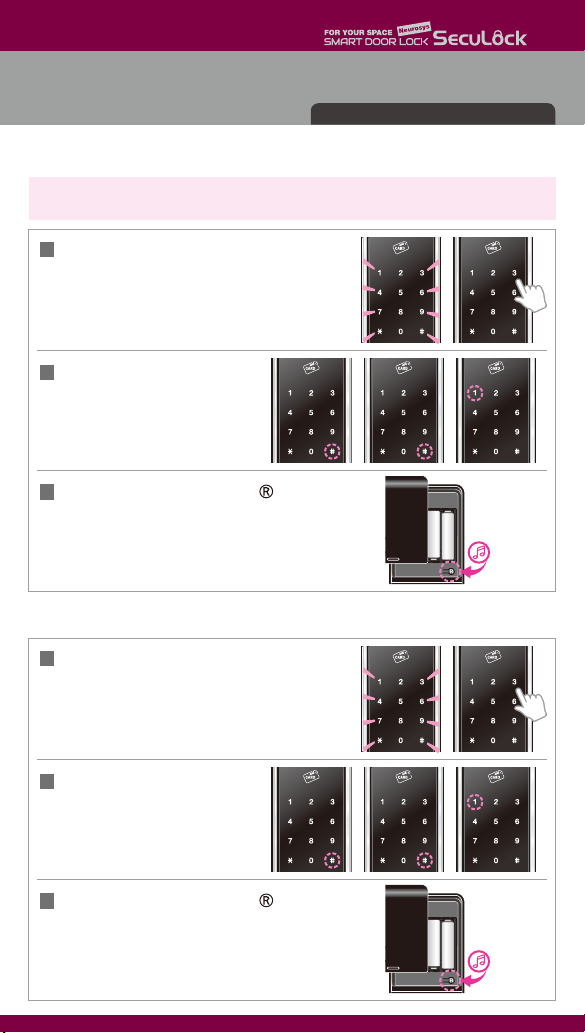
Open the battery cover, press the button shortly.
Open the battery cover,
press the button shortly. When the Numeric touch
plate is on, enter the registered PIN-code with the
[ ] button and press the number [1].
1
● PIN-codes Activation
PIN-codes Activation/Deactivation
● PIN-codes Deactivation
Beep Beep
Open the battery cover, press the
button shortly. When the numeric
touch plate is on, enter the registered
PIN-code with the [ ] button.
1
2
3
4
When the Numeric touch plate is on, enter the registered PIN-code with the [ ] button.
Press the number [6] with the [#] for 3 seconds, then all registered PIN-codes will be deleted.
After deactivating all PIN-codes, the PIN-code reset as the default code “1234”.
Repeat the process and as stated
above to register more PIN-codes.
4 2 3
2
3
Enter new PIN-code (4-12 digits)
on the numeric touch plate and
press the [ ] button.
Press the [ ] button one more time,
the touch plate will be off.
2
3
Beep
only applied M560 model

_ 7
Open the battery cover,
press the button shortly.
When the numeric touch plate is on,
enter the registered PIN-code
with the [ ] button.
Card keys Activation/Deactivation
1
2Place all Card keys to the Card key touch plate.
The sound beeps when registration of each
card has been done. To register more than
a Card key, make sure to place next Card key
before the touch plate is off.
1Open the battery cover, press the button
shortly. When the numeric touch plate is on,
enter the registered PIN-code with the [ ] button.
2Press the number [7] and press
the [#] button for 3 seconds then all
registered Card keys will be deleted
with buzzer sound.
3After registering all Card keys,
Press the [ ] button to finish the process.
● Card Keys Deactivation
only applied model with an Card key
Beep
● Card keys Activation
Beep

_ 8
Open the battery cover,
press the button shortly.
When the numeric touch plate is on,
enter the registered PIN-code
with the [ ] button.
1
2Press the number [8] and
press the [#] button for 3 seconds.
All registered Remote Controllers are
deleted with buzzer sound.
● Remote Controllers Activation
● Remote Controllers Deactivation
Remote Controllers Activation/Deactivation
Remote
Controller
①
[OPEN] button
Remote
Controller
②
[OPEN] button
Remote
Controller
…
[OPEN] button
▶
ㆍRemote controllers are not provided with a standard package.
2Press the [OPEN] button of Remote Controller.
Registering more than a Remote Controller,
press the [OPEN] button of each Remote Controller.
▶
To synchronize the password between the door lock and the remote control, you must
press the button of the remote controller at least 3 times when using it for the first time,
and after that, press once to open the door. When replacing the door lock battery,
the remote control must be synchronized.
When the remote controller is registered newly, all pre-registered remote controllers
are deactivated.
Beep
Open the battery cover,
press the button shortly. When the Numeric touch
plate is on, enter the registered PIN-code with the
[ ] button and press the number [3].
1
Beep Beep
Open the battery cover, press the
button shortly. When the numeric
touch plate is on, enter the registered
PIN-code with the [ ] button.
only applied M560 model

_ 9
Open the battery cover, press the button
shortly. When the numeric touch plate is on,
enter the registered PIN-code with the [ ] button.
Fingerprints Activation/Deactivation
1Open the battery cover,
press the button shortly.
When the numeric touch plate is on,
enter the registered PIN-code
with the [ ] button.
2
Press number [4],
number ‘1 2 3’ will blink.
Press your finger on the panel
3 times, after the registration
the buzzer will sound.
3Press button to finish the process.
only applied model with an Fingerprints (ND-M565)
● Fingerprint Activation
ㆍFingerprint recognition may not be possible if the fingerprint is damaged.
ㆍFingerprint recognition may not be possible if sweat or moisture is on the fingerprint
or the fingerprint reading panel.
ㆍTo raise the recognition rate, we highly recommend you to add same fingerprints
in different conditions.
● Fingerprints Deactivation
Beep
Beep
1 2 Press the number [9] and press
the [#] button for 3 seconds.
All registered Fingerprints will be
deleted with the buzzer sound.
_10
Open the battery cover, press the button to finish
the process, buzzer sound “Bi-ri-ri-rik”.
3
● Double Authorization Mode Activation
● Double Authorization Mode Deactivation
Double Authorization Mode
Bi-ri-ri-rik
ㆍDouble Authorization Mode requires two different authentications registered to activate.
( e.g. [PIN-code] + [Fingerprint], [PIN-code] + [Card Key] )
1Touch the numeric touch plate gently,
then the touch plate turns on.
Enter the registered PIN-code.
2Press the [#] button twice then
press number [1].
Open the battery cover, press the button to
finish the process, buzzer sound “Bi-rik”.
3
Bi-rik
1Touch the numeric touch plate gently,
then the touch plate turns on.
Enter the registered PIN-code.
2Press the [#] button twice and
then number [1] to deactivate
double authorization mode.
Only for models with more than one authorization
Ce manuel convient aux modèles suivants
3
Table des matières
Autres manuels SecuLock Serrure de porte


