
Schon LINDSAY 60 GP Manuel utilisateur
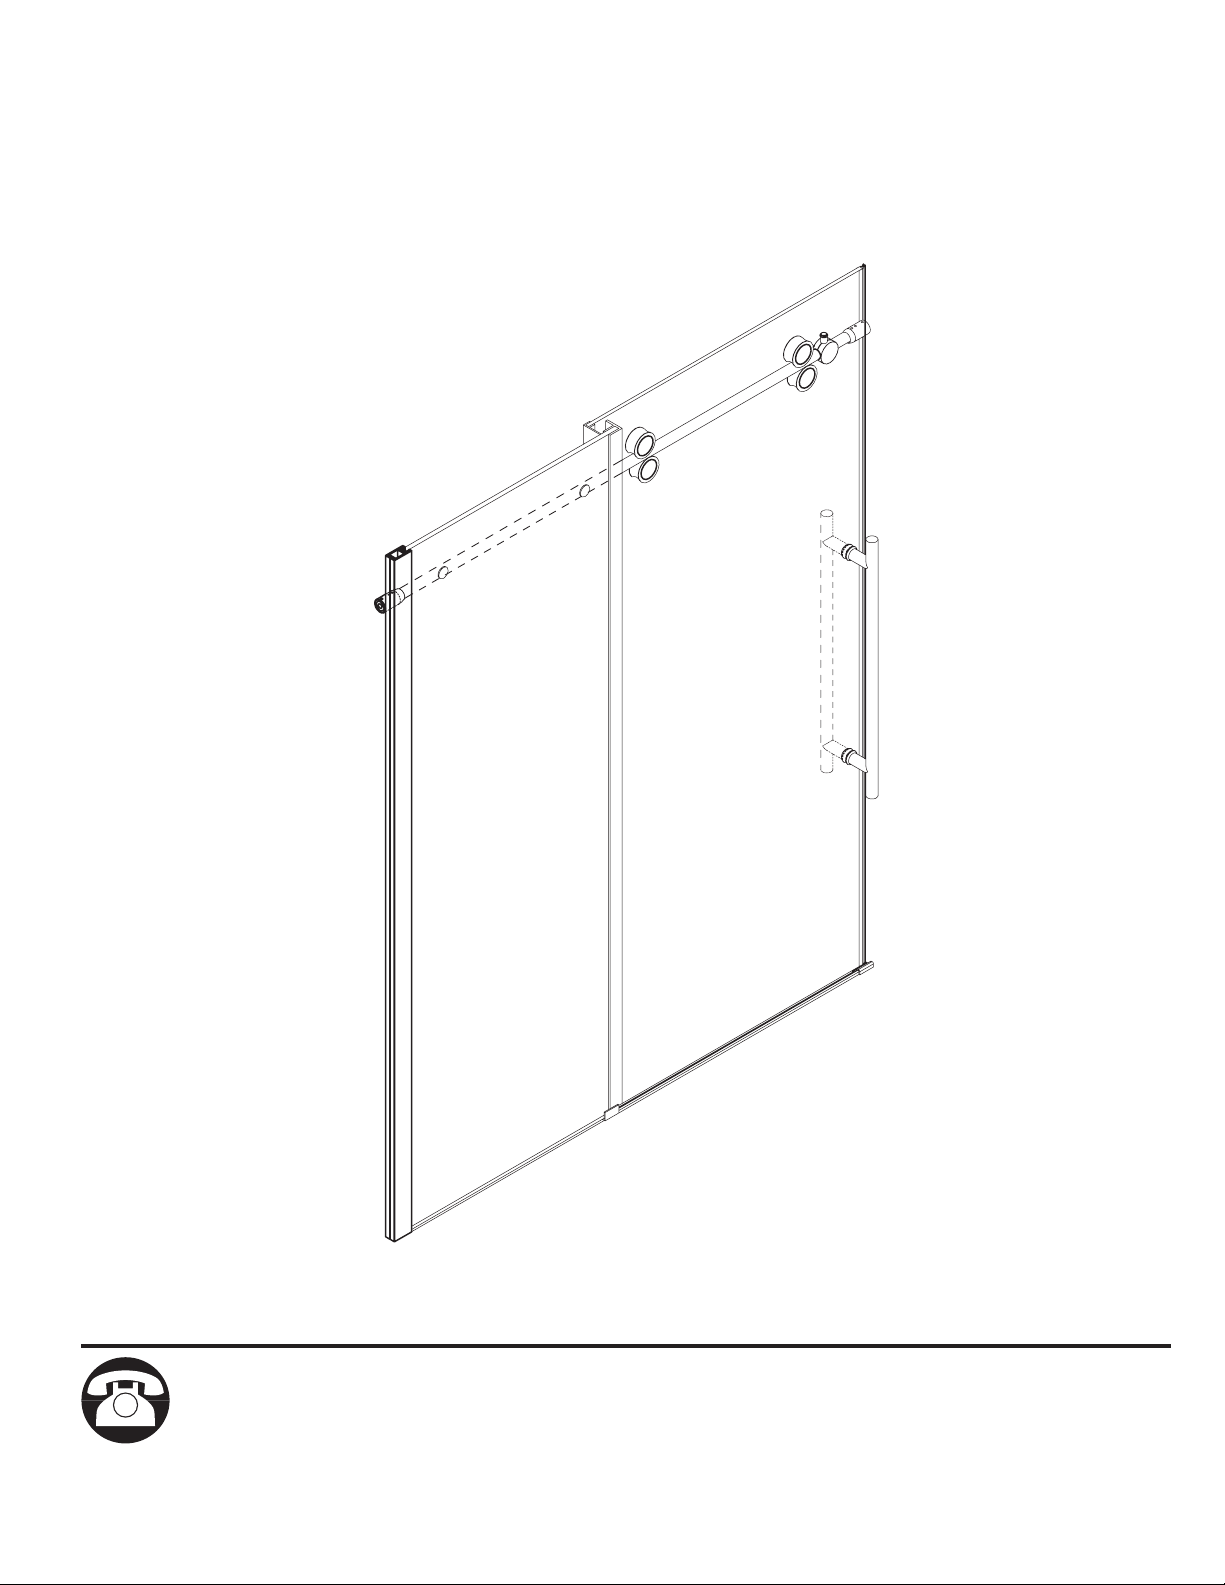
LINDSAY 60 GP
Questions, problems, missing parts? Before returning to your retailer, call our customer
service department at 1-800-880-8164, 9 a.m. – 5 p.m., EST, Monday – Friday.
1
Purchase date : _________________ Product Tracking Reference : _____________________________
2
CAUTION
Please carefully read the following important safety information before handling or installing this shower. There
is a risk of serious injury while handling this product. To minimize these risks, please note:
• Always wear safety glasses and gloves while handling.
• Always read and follow all the steps in the installation instructions.
• Inspect all contents and glass for damage before installation.
• Extreme caution should be taken while handling the glass during installation as the tempered glass may
shatter if in contact with a hard surface.
• Handle the tempered glass with caution! Improperly handling the glass can cause it to break suddenly in
small pieces (never in pointed fragments).
• Always take all precautions not to touch the tempered glass with any tools during the installation, or after
installed.
• Do not cut or modify the tempered glass as it will shatter if cut.
• Carefully remove product from packaging and keep packaging until installation is complete.
• Inspect all parts for damage; if there is damage to the unit prior to installation, please contact customer
service at the number provided in this guide.
• Install the shower on a that is level and able to accommodate the weight of the unit and an occupant.
• Consult local building codes and compliance standards prior to installation and ensure conformity.
• After installation, and from time to time, check the glass for and to ensure that nothing has come
loose since installation.
• Keep this installation manual for future reference.
NOTICE
• Any or alteration from what is in this instruction manual will void any and all warranty
on this product.
• The distributor is not responsible for any damage to the unit or personal property caused by improper
installation. If you disregard instructional warnings, you will void your warranty and possibly deal with water
damage.
• Consult the distributor’s website for any additional information or question on this product’s installation.
PREPARATION
You will need at least two people to install this unit properly.
Before beginning assembly of product, make sure all parts are present. Compare parts with package contents
list and hardware contents list. If any part is missing or damaged, do not attempt to assemble the product.
Estimated Assembly Time: Shower (60 min).
SAFETY INFORMATION

Package Contents........................................................................................................................................4
Hardware Contents......................................................................................................................................6
Preparation...................................................................................................................................................7
Installation Instructions......................................................................................................................................8
Maintenance...............................................................................................................................................15
Warranty.....................................................................................................................................................15
TABLE OF CONTENTS
3
4
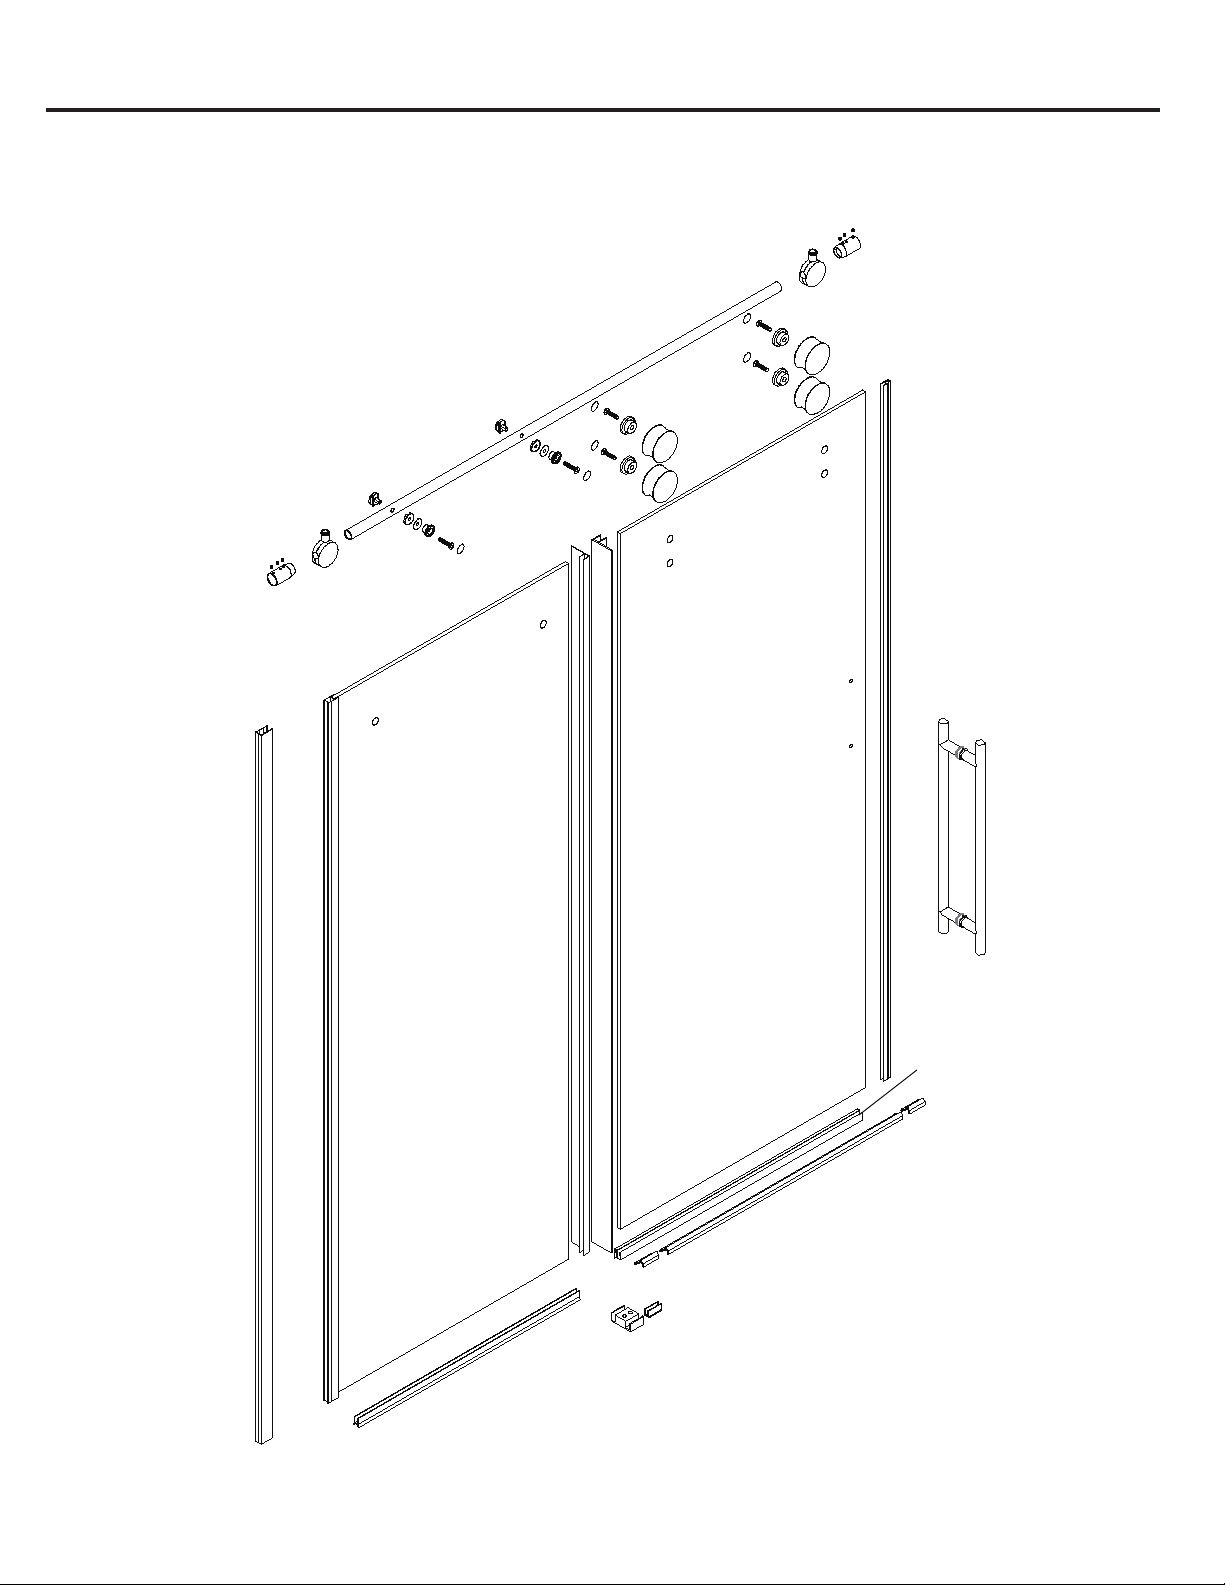
PACKAGE CONTENTS
B
CH
E
E
DG
G
F
FI
J
K
L
M
O
N
P
5
PACKAGE CONTENTS
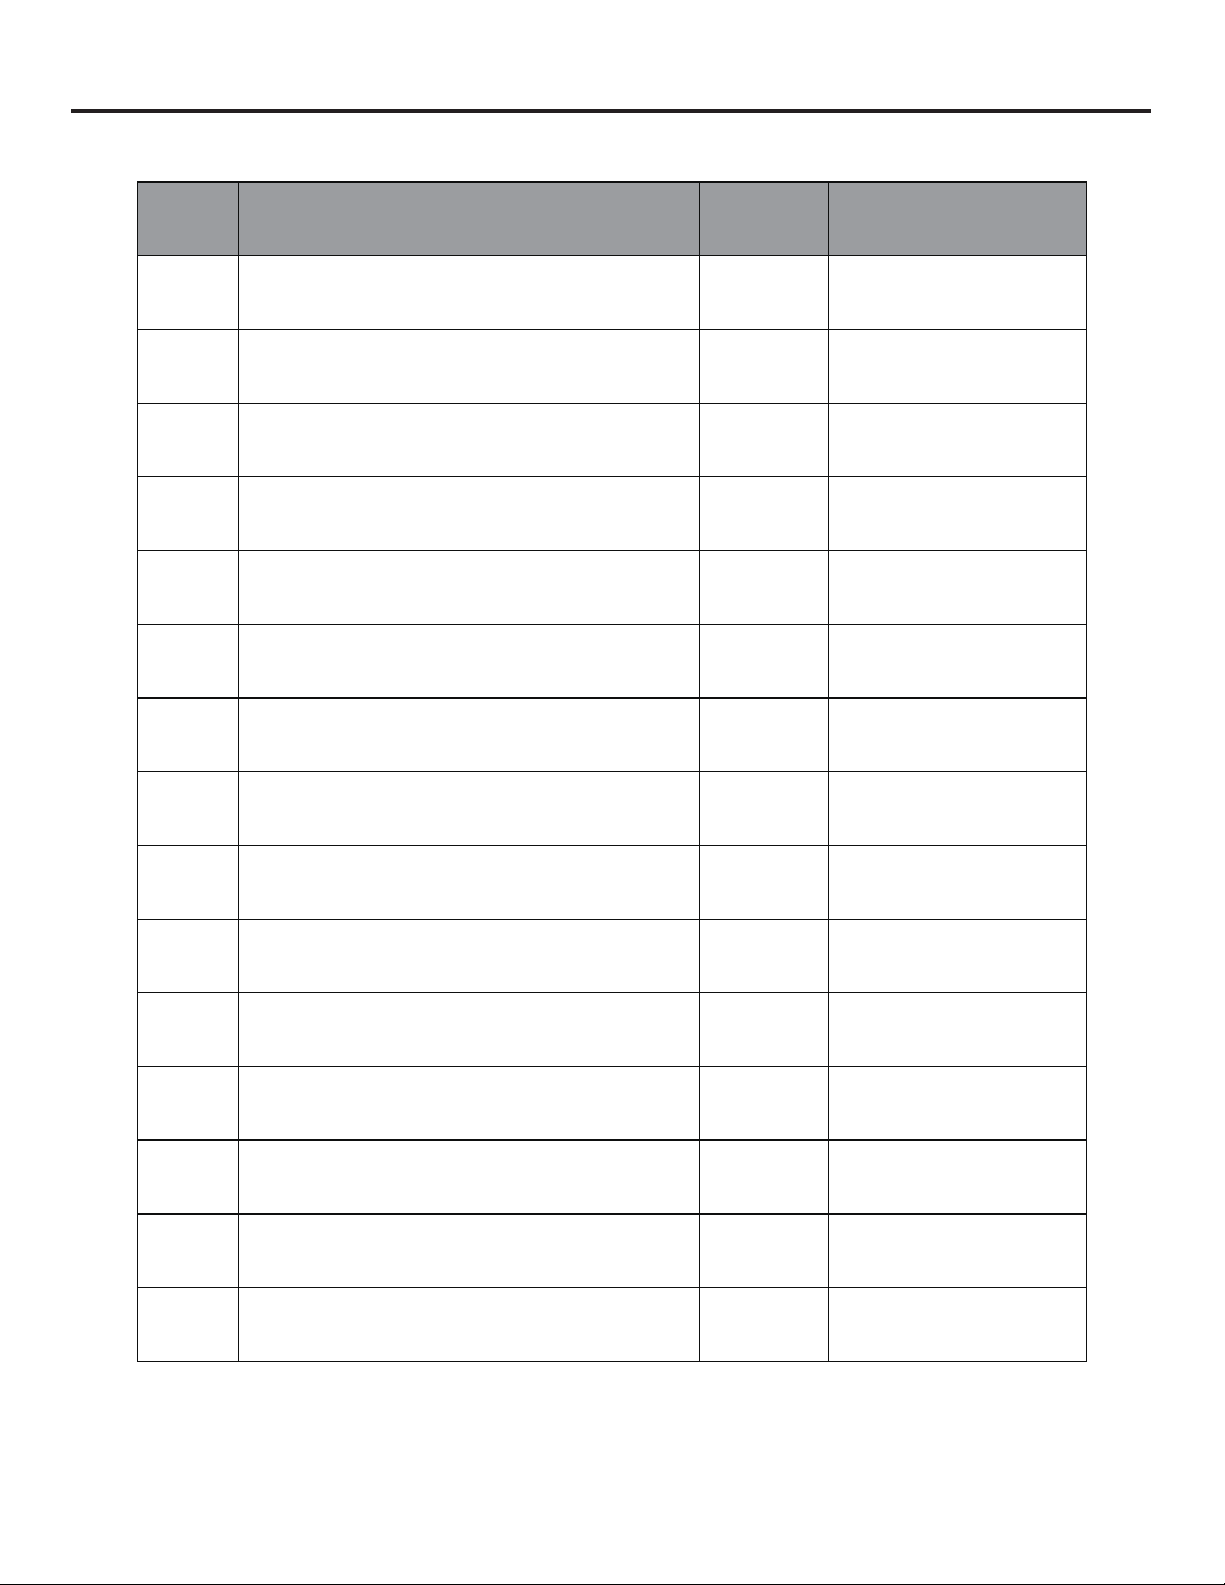
Part # Description Quantity Code
B Fixed glass panel 1 99SG38001-WM
C Shower door 1 99SGD3801-WM
D Horizontal shower door support bar 1 99SGS3801-WM
E Shower door stopper 2 99SDS3801-WM
F Bar support 2 99SGC3801-WM
G Door sliding roller 4 99SWE3801-WM
H shower door handle 1 99SHA3801-WM
I Vertical seal strip 2 99SRU3801
J Vertical seal strip for the shower door 1 99SRU3802
K Bottom panel rubber strip 1 99SRU3803
L Aluminum track 1 99STR3801-WM
M Sliding door guide 1 99SGC3802-WM
N Metal seal strip 1 99STR3802-WM
O Decorative clip for the metal seal strip 2 99SHW3801-WM
P Bottom door panel rubber strip 1 99SRU3804
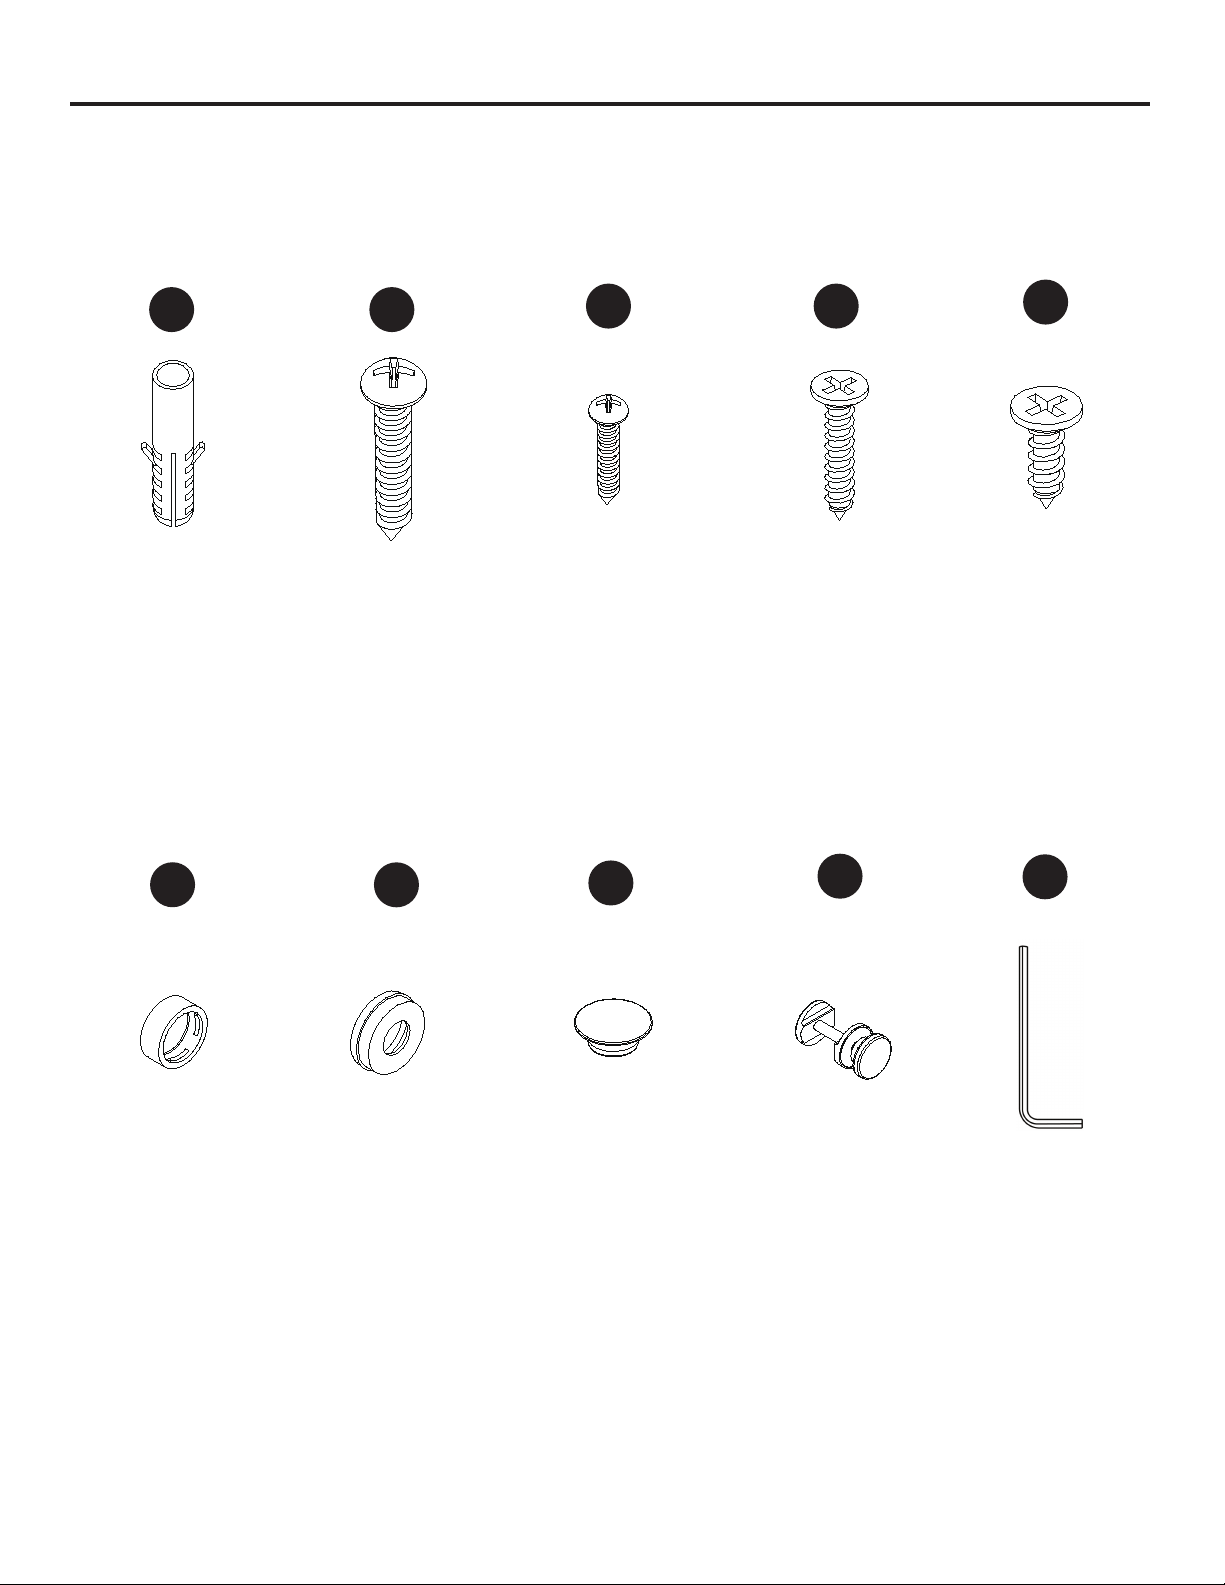
HARDWARE CONTENTS
6
Screw
ST 5 x 30
3+1
CC
EE
BB
Wall plug
ø 8 x 30
5+1
AA DD
Screw
ST 5 x 40
2+1
Screw
ST 4 x 20
2+1
Allen key
2 / 2.5 / 5 mm
x 3
Cap
x 3
ABS Cap
x 2
Glass
bracket
x 2
Fitting
x 3
FF
GG
Screw
ST 4 x 12
3+1
HH II JJ
PREPARATION
7
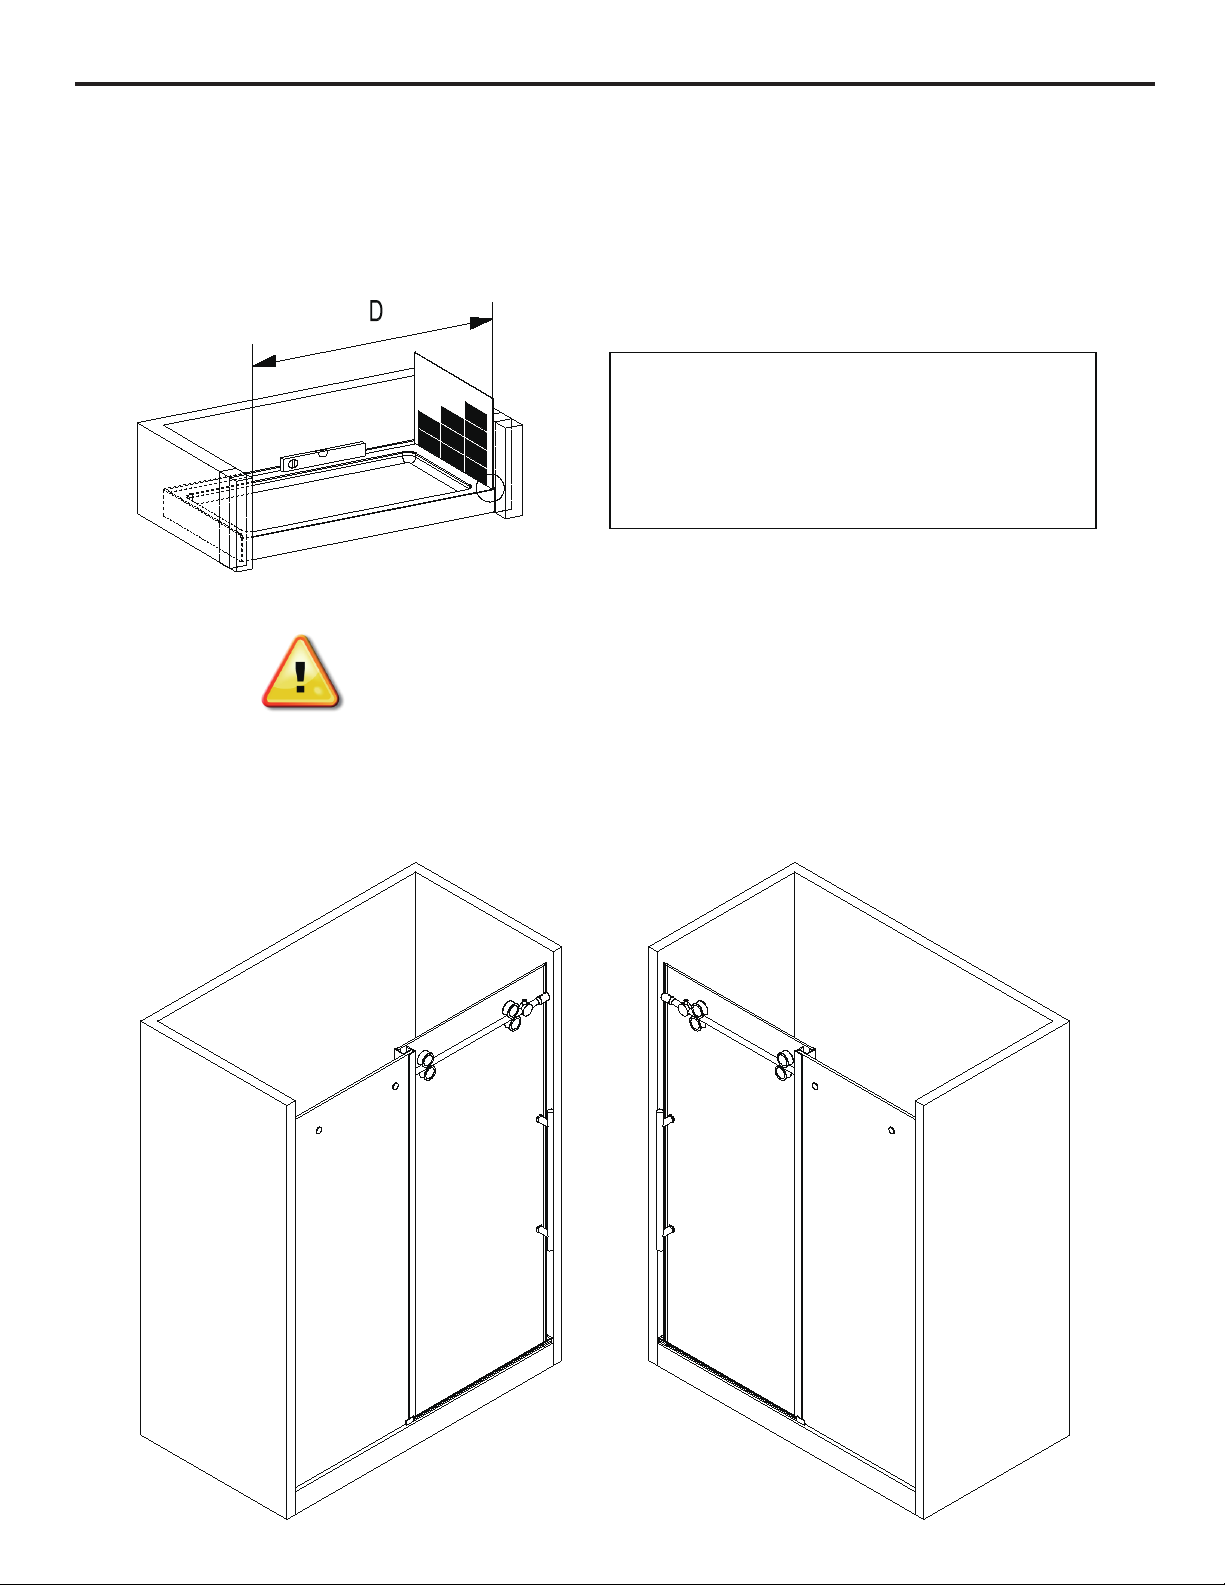
- Measure the thickness of your tiles on either side before installing the metal tracks. A thicker tile will
limit your space to install the shower panels.
- Make sure to have a distance tile to tile between 58 3/16 in (1478 mm) Min and 58 3/4 in (1493 mm)
Max (see image).
THIS SHOWER IS REVERSIBLE
This instruction is drawn up for an opening from right to the left (see illustration A).
For an installation from left to the right (see illustration B), use the same instructions, but switch
around the panels: mirror effect.
Make sure to have a distance (D) from the left
side tile to the right side tile:
D Min: 58 3/16 in (1478 mm)
D Max: 58 3/4 in (1493 mm)
A B
INSTALLATION INSTRUCTIONS
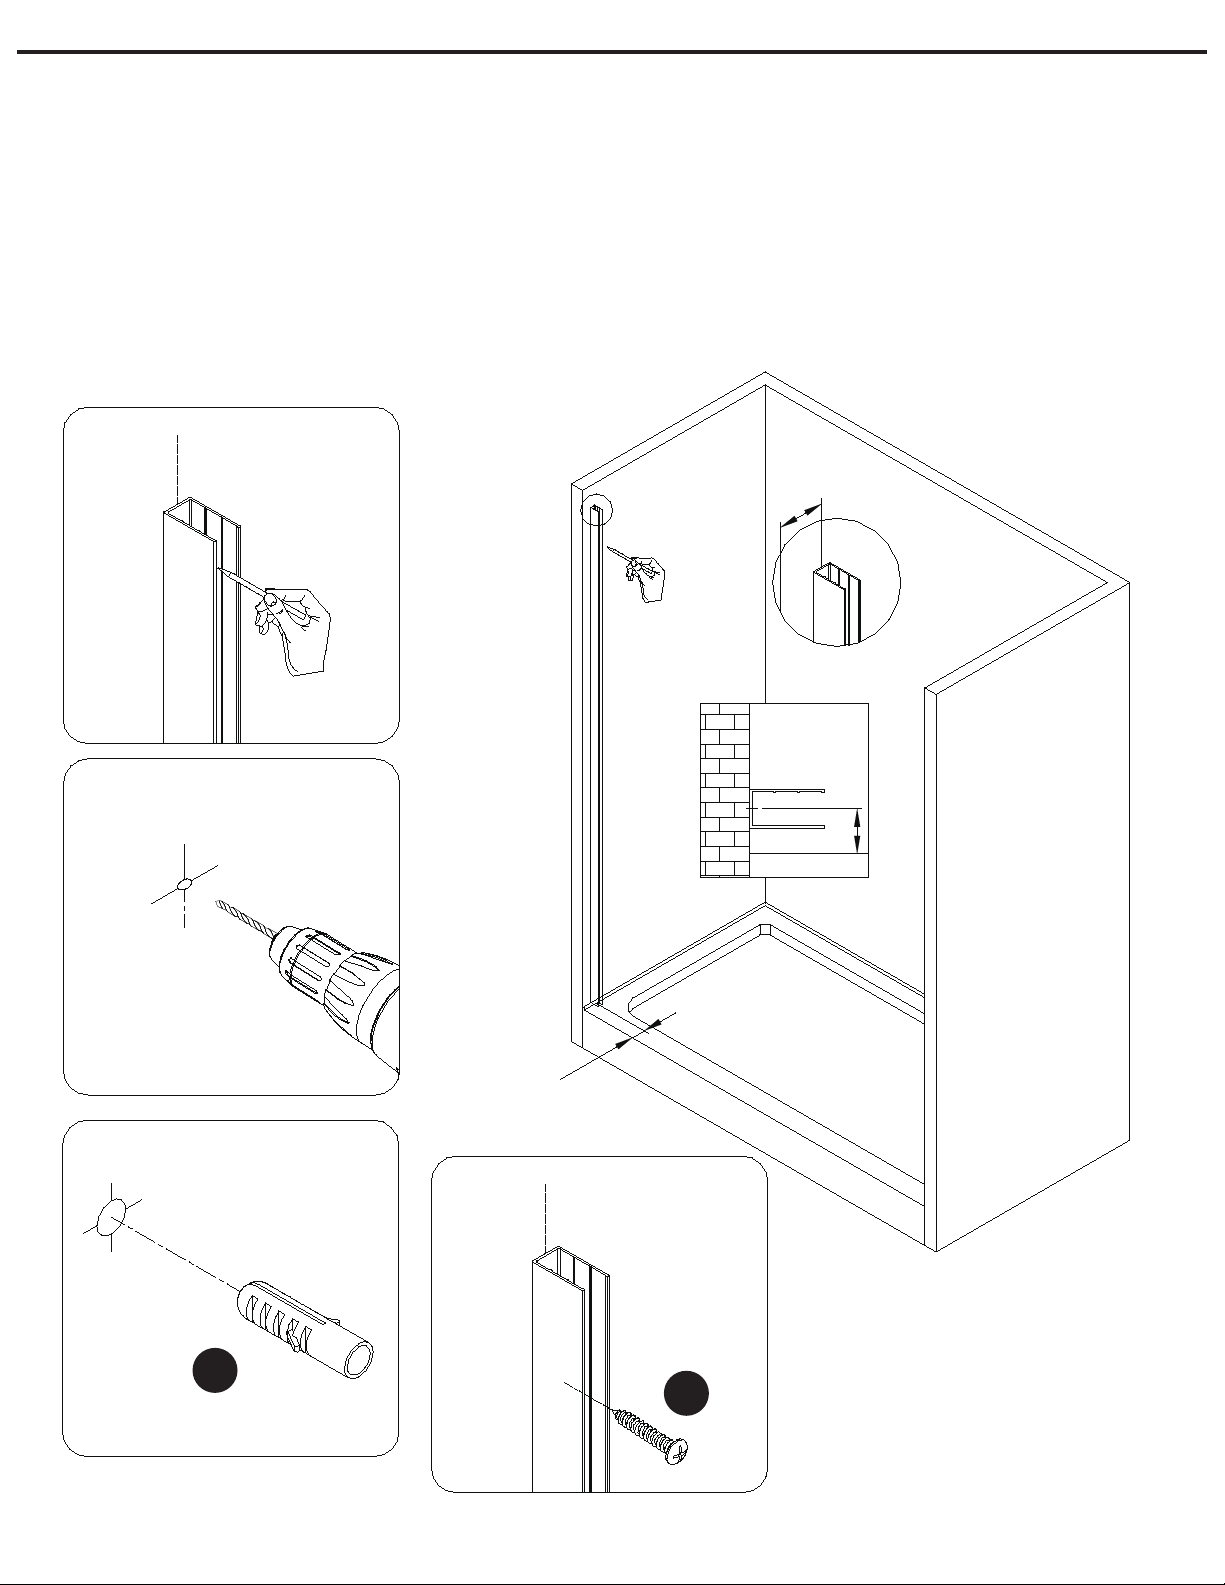
STEP A
1. Mark the position of the track (L) on the wall.
2. Drill the holes according to the illustration.
3. Put the wall plug (AA) into the holes.
4. Install the track (L) using the screws (BB).
8
L
L
L
1
L
2
3
AA
4
BB
F
20 mm
20 mm
20 mm
INSTALLATION INSTRUCTIONS
9
B
3
B
M
4
M
B
K
1
2
B
L
5
B
M
CC
HH
6
B
L
EE
FF
GG
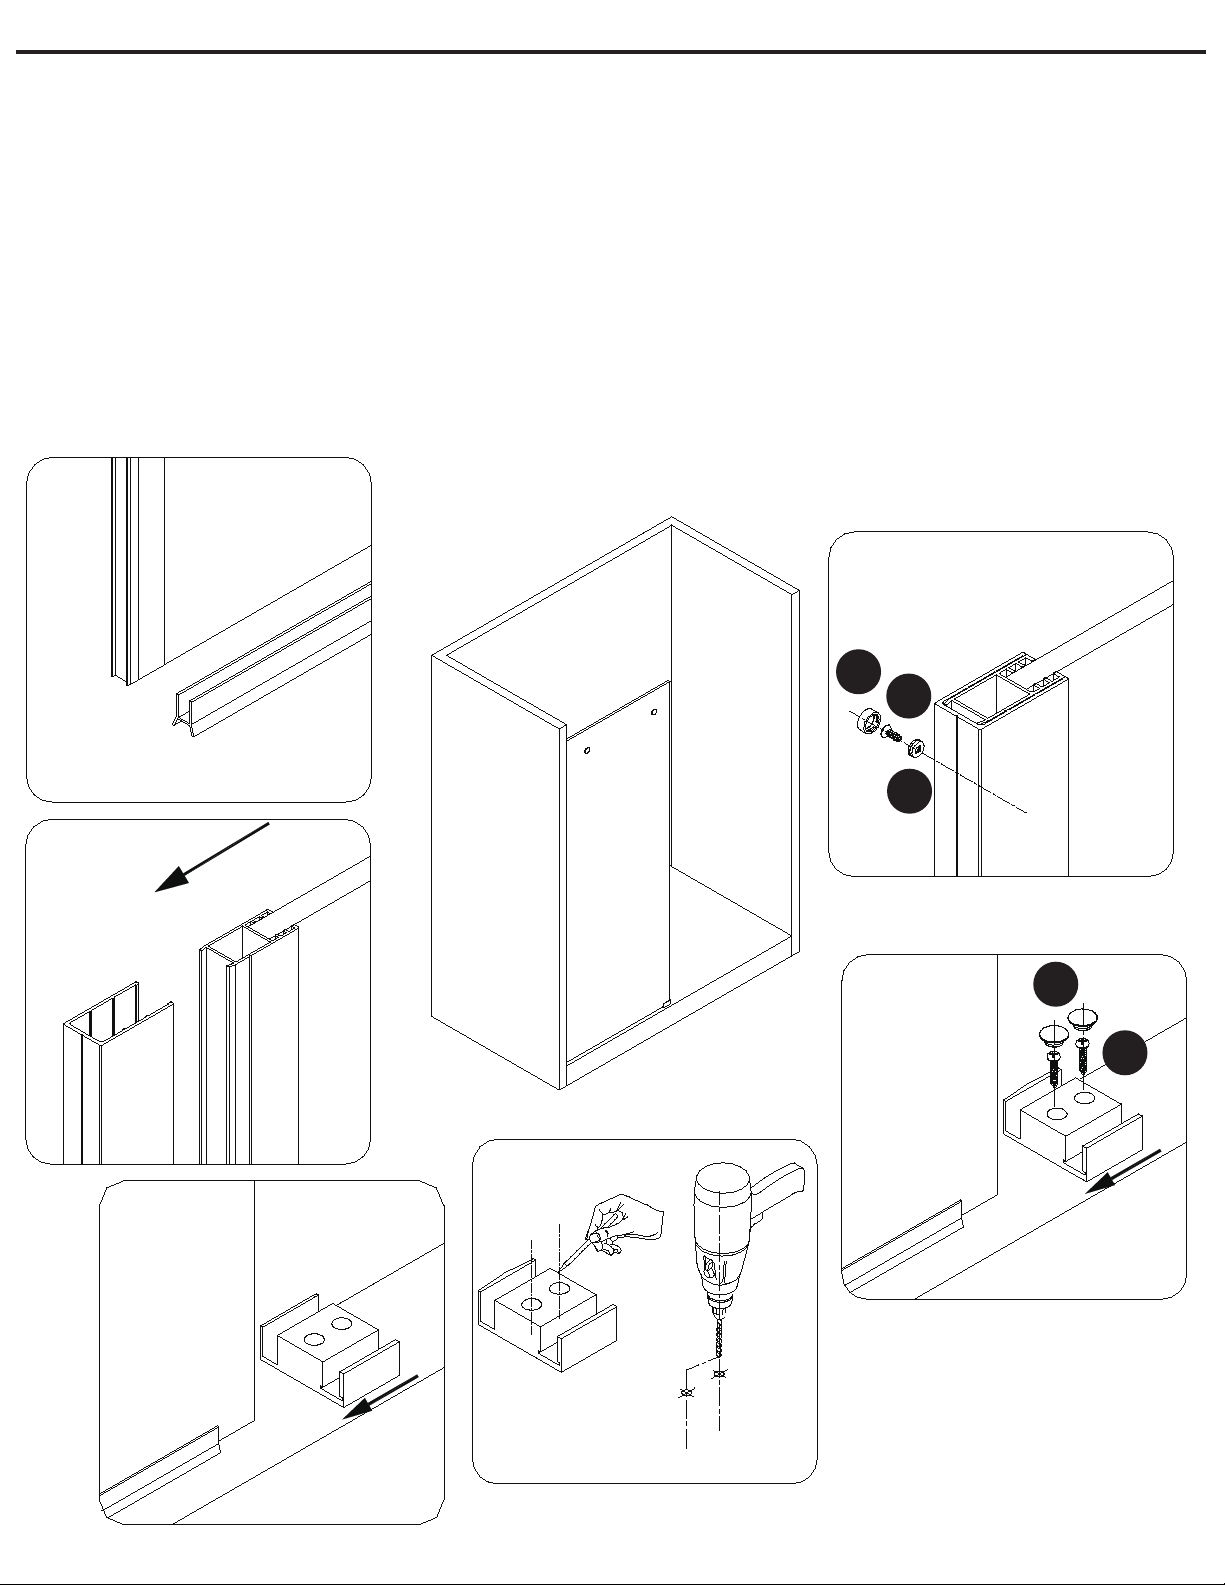
STEP B
1. Cut the bottom rubber strip (K) to size and place the strip (K) on the fixed panel (B).
2. Insert the panel (B) into the track (L).
3. Place the panel (B) on the guide (M).
4. Mark the position of the guide (M) and drill the holes.
5. Secure the guide (M) using the screws (CC) and the caps (HH).
6. Secure the panel (B) using the screws (EE), caps (FF) and rings (GG).
INSTALLATION INSTRUCTIONS
10
B
1
E
F
D
5
E
F
D
6
F
7
3
E
F
D
STEP C
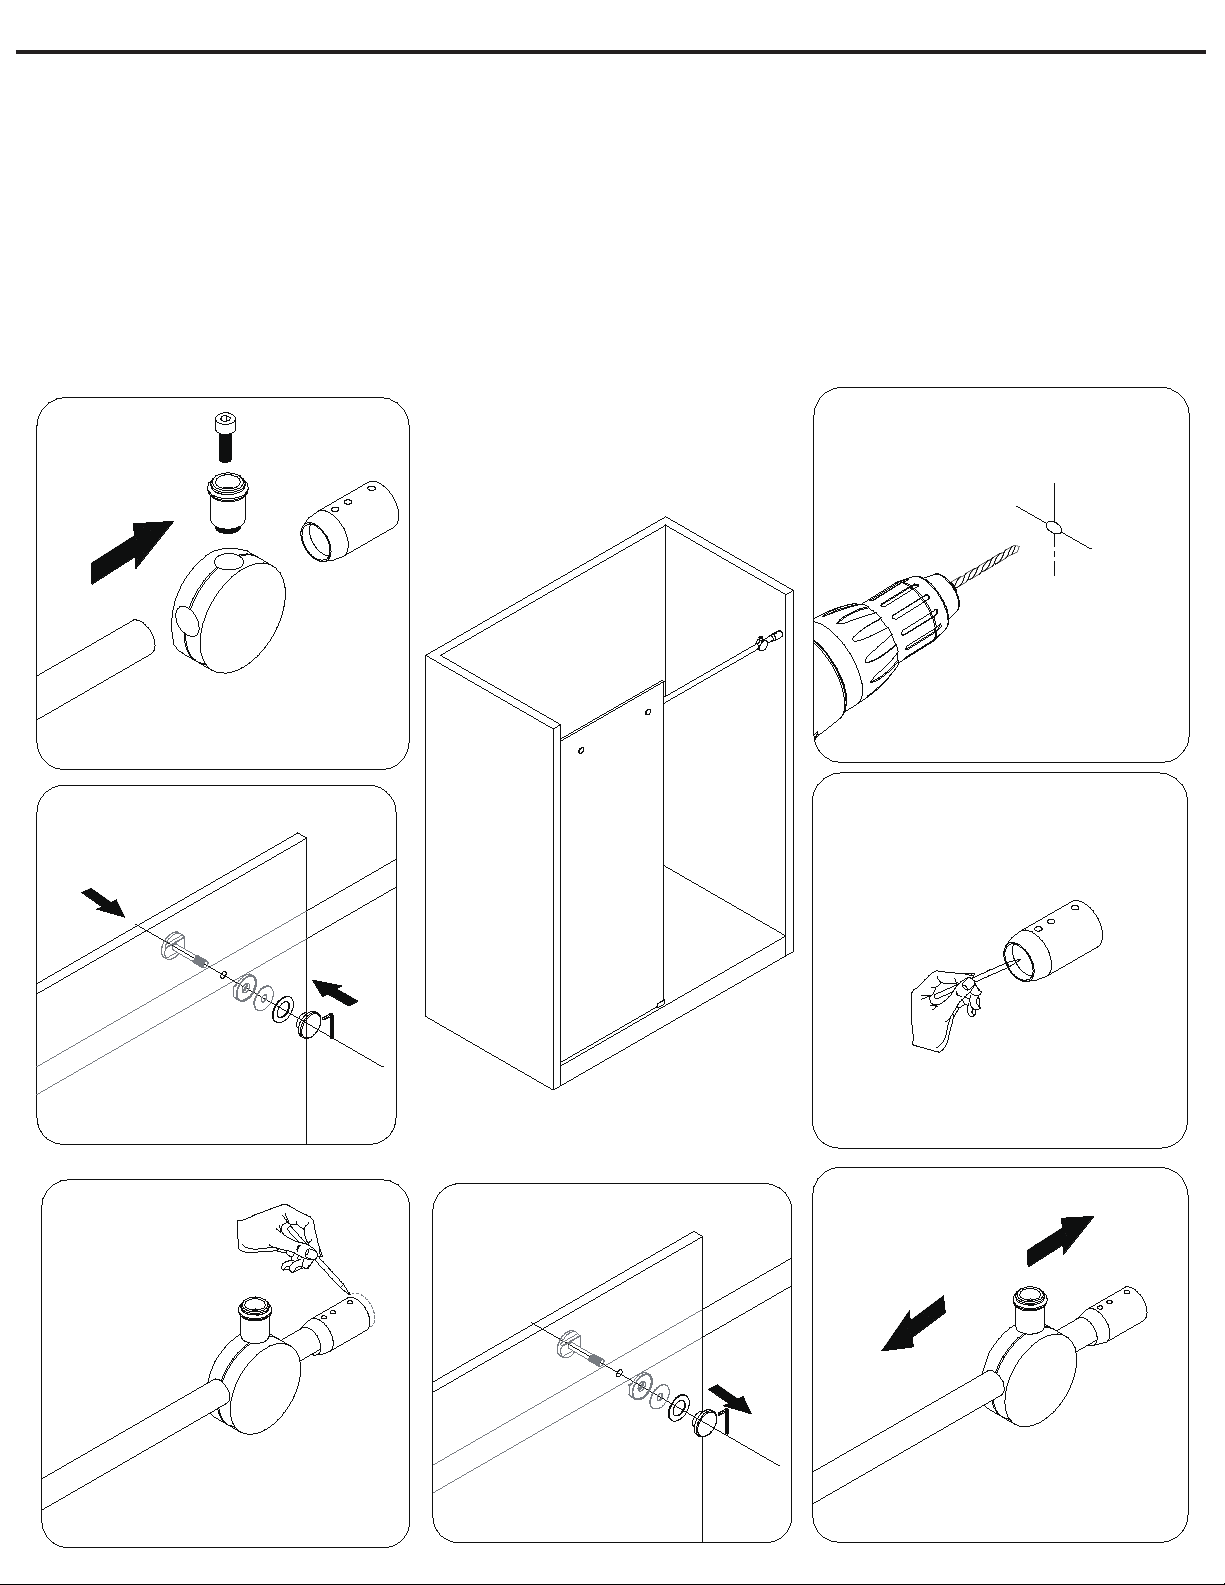
1. Slide the two stoppers (E) on the bar (D), then mount the two bar supports (F) without tightening.
2-3. Temporarily install the bar (D) on the glass panel (B) using glass bracket (II) and mark the position.
4-5. Temporarily remove the bar (D) from the glass panel (B) and remove the stoppers and bar supports (E&F).
6-7. Mark the position of the bar supports (F) and drill the holes.
2D
BII
BS-2mm
4D
BII
BS-2mm
Table des matières
Langues :
Autres manuels Schon Appareil de salle de bains


