
RUSTA 864011660101 Manuel utilisateur

Manual/Bruksanvisning/Gebrauchsanweisung/Käyttöohje
Item no. 864011660101
FIDENOENG SE
Hair trimmer
Hårtrimmer / Haarschneider /
Hiustrimmeri
2
Read through the
entire manual before
installation and use!
Thank you for choosing
to purchase a product
from Rusta!
ENG
Hair trimmer
SAFETY INSTRUCTIONS
• Use this appliance only for its intended use as
described in this manual. Do not use attachments
not recommended by Rusta AB.
• DO NOT use this product if it is not working correctly, if
it has been dropped or damaged, or dropped into water.
• An appliance should never be left unattended when
plugged into a power outlet.
• Keep the power plug and cord away from heated surfaces.
• Make sure the power plug and cord do not get wet.
• DO NOT plug or unplug the shaver with wet hands.
• If the supply cord is damaged, it should be replaced
by supplier, retailer, it‘s service agent or a similarly
qualified person in order to avoid a hazard.
• Charge, use and store the product at a temperature
between 15°C and 35°C.
• Only use the parts supplied with the appliance.
• This appliance can be used by children aged from
8 years and above and persons with reduced physical,
sensory or mental capabilities or lack of experience
and knowledge if they have been given supervision or
instruction concerning use of the appliance in a safe
way and understand the hazards involved. Children
shall not play with the appliance. Cleaning and user
maintenance shall not be done by children unless they
are older than 8 and supervised. Keep the appliance
and its cord out of reach of children less than 8 years.
WARNING!
If these instructions are not followed,
an accident may lead to serious personal
injury or property damage.

3
DESCRIPTION
1. On/O switch
2. Adjustable comb setting
3. Cutting comb length indicator
4. Blade length control setting
5. Charge indicator light
6. Charging adaptor
7. Removable adjustable comb attachment
8. Hair thinner mechanism
GETTING STARTED
CHARGING YOUR HAIRCLIPPER
Before using your hair clipper for the first time, charge for about
14 hours.
• Ensure the product is switched o.
• Connect the charging adaptor to the product and then to the mains.
The charging indicator will light up.Use only the charging adaptor
provided.
Your clipper cannot be overcharged. However, if the product is not
going to be used for an extended period time (2–3 months), unplug it
from the mains and store. Fully recharge your hairclipper when you
would like to use it again.
To preserve the life of your batteries, let them run out every six
months then recharge for about 14 hours.
CORDED USE
• Connect the charging adaptor to the product and then to the
mains 230V wall outlet socket.
CAUTION: Extended mains only use will result in the reduction
of the battery life.
• Use only with the AC adaptor provided.
HOW TO USE
BEFORE STARTING THE CUT
1. Inspect the clipper making sure that it is free from hair and dirt.
2. Seat the person so that their head is approximately at your
eye level.
3. Before cutting, always comb the hair so it is tangle free and dry.

4
ADJUSTING THE TRIM LENGTH
The comb attachment can be adjusted to give you 7 dierent trim
lengths simply by sliding the DIAL to the desired setting. On the
side of the product you will find a dial mechanism, which enables
you by gently rotating it, to move the comb up and down. The dial
will click into place as it reaches each setting, and the setting
number will appear on the length position indicator.
On the back of the product you will find a dial mechanism, which
enables you by gently pressing it, to move the moving blade up
and down. The dial will click into place as it reaches each setting,
and the setting number will appear on the length position indicator.
HAIR THINNER MECHANISM
Simply adjust the hair thinner mechanism by slide the stick at the
top part of the product.
COMB ATTACHMENT HAIR LENGTHS
Comb position Small comb Large comb
1 2 mm 22 mm
2 5 mm 25 mm
3 8 mm 28 mm
4 11 mm 31 mm
5 14 mm 34 mm
6 17 mm 37 mm
7 20 mm 40 mm
INSTRUCTIONS FOR HAIR CUTTING
NOTE: For even cutting, allow the comb attachment/blade to cut
its way through the hair.
1. Do not force it through quickly. If you are cutting for the first
time, start with the maximum comb length.
5
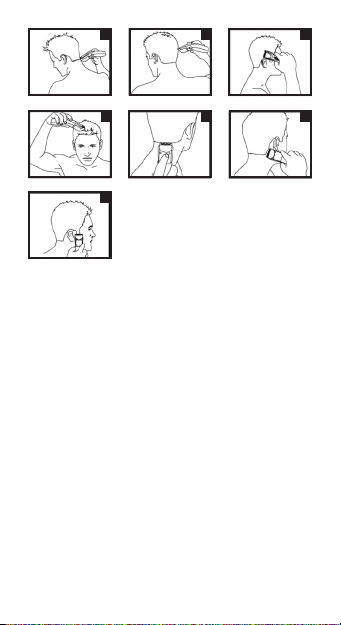
STEP 1 – Nape of the neck (Diagram A)
• Set the comb position between 3 mm and 6 mm.
• Hold the clipper with the blade teeth pointing upwards.
Begin starting at the centre of the head at the base of the neck.
• Slowly lift the clipper, working upwards and outwards through
the hair, trimming just a little at a time.
STEP 2 – Back of the head (Diagram B)
• Set the comb position at 12 mm or 17 mm, cut the hair at the
back of the head.
STEP 3 – Side of the head (Diagram C)
• Set the comb position between 3 mm and 6 mm, trim sideburns.
Then change to the longer setting (12 or 17 mm) and continue
to cut to the top of the head.
STEP 4 – Top of the head (Diagram D)
• Set the comb position between 17 mm and 22 mm, cut hair
on top of the head against the direction in which the hair
normally grows.
• For longer hair on top, use without comb attachment. Lift the
hair on top of the head with a small hand comb. Cut over the
hand comb with the hair lifted or hold the hair between the
fingers to lift it and cut it to the desired length.
• Always work from the back of the head.
A
D
G
B
E
C
F

6
STEP 5 – The finishing touches (Diagrams E, F & G)
• Use the clipper without an attachment comb for close trimming
around the base and sides of the neck.
• To produce a clean straight line at the sideburns, reverse the
hair clipper. Place the reversed clipper at right angles to the
head, tips of the blades lightly touching the skin and then
work downwards.
CARE FOR YOUR HAIRCLIPPER
Your clipper is fitted with high quality titanium/nanosilver blades.
To ensure long lasting performance of your clipper, clean the
blades and unit regularly.
AFTER EACH USE
• Ensure the clipper is switched o and disconnected from the mains.
• Brush the accumulated hair from the blades. Do not submerge the
clipper in water.
• To clean the unit, wipe with a damp cloth and dry immediately.
NOTE: Ensure that the clipper is turned o when cleaning.
CAUTION: Do not use liquid cleaners on the blades or harsh
or corrosive chemicals on the blade casing. Always use a soft
brush to remove the accumulated hairs.
• Unplug the charge adaptor from the power outlet when fitting
or removing attachments, or while cleaning the product.
• Always store this appliance and cord in a moisture-free area.
• Do not wrap the cord of the charging adaptor adaptor around
the appliance.
PROTECT THE ENVIRONMENT
• The product contains a Nickel Metal Hydride cell unit.
Do not dispose the trimmer in household waste at the end of
its useful life. Disposal can take place at our service centres or
appropriate collection sites. However, if you prefer to dispose
the cell unit yourself, please follow the instructions below.
CAUTION: Do not put in fire or mutilate your battery packs as
they may burst or release toxic materials.
7
RIGHT OF COMPLAINT
By law the product must be returned to the place of purchase
along with the original receipt in the event of a complaint.
The user is liable for any damage to the product that is caused by
not using the product for its intended purpose or by not following
this user manual correctly. The right of complaint will not apply
in these instances.
INFORMATION ABOUT HAZARDOUS WASTE
Used products should be handled separately from
household waste. They should be taken for recycling
in accordance with local rules for waste management.
BATTERY REMOVAL
• Ensure that the clipper is discharged of all power.
• Remove the 2 screws from the rear moulding of the clipper.
• Remove the screw from under the blanking plate. Carefully
force open the two case sections to expose the battery pack.
• Remove the battery pack diagonally (bottom left to bottom
right) from behind the switch board, twist whilst pulling to
break the wires.
TECHNICAL DATA
Charger input 100-240V, 50/60Hz, 0.3A
Charger output 3.6VDC, 1.0A
Protection class
Hair trimmer 2.4VDC, 1200mA

8
Hårtrimmer
SÄKERHETSFÖRESKRIFTER
• Använd apparaten endast på avsett sätt och enligt
beskrivningen i denna bruksanvisning. Använd inte
tillbehör som inte rekommenderas av Rusta AB.
• Använd INTE apparaten om den inte fungerar felfritt,
om den har fallit i golvet eller skadats på annat sätt,
eller fallit ned i vatten.
• Lämna aldrig apparaten utan uppsikt när den är
ansluten till ett eluttag.
• Håll stickproppen och strömkabeln borta från
varma ytor.
• Se till att stickproppen och strömkabeln inte blir våta.
• Sätt INTE i eller dra ut apparatens stickpropp med
våta händer.
• Om strömkabeln skadas ska den bytas av leverantör,
återförsäljare, återförsäljarens servicerepresentant
eller annan behörig person för att undvika fara.
• Ladda, använd och förvara apparaten vid temperatur
mellan 15°C och 35°C.
• Använd endast de delar som medföljer apparaten.
• Denna apparat får användas av barn från 8 år och
uppåt, samt av personer med fysiska, sensoriska
eller mentala funktionshinder eller personer utan
erfarenhet och kunskap, om de har övervakats eller
instruerats om användningen av apparaten så att de
kan använda den på ett säkert sätt och förstår vilka
risker användningen medför. Låt inte barn leka med
apparaten. Låt inte barn under 8 år rengöra eller utföra
normalt underhåll på apparaten utan en vuxens
överinseende. Förvara apparaten och strömkabeln
utom räckhåll för barn under 8 års ålder.
Läs igenom hela bruks-
anvisningen innan montering
och användning!
Tack för att du valt
att köpa en produkt
från Rusta!
SE

9
VARNING!
Om föreskriften inte efterföljs kan en
olycka leda till allvarlig person- eller
egendomsskada.

10
BESKRIVNING
1. På/av-knapp
2. Styrkamsinställning
3. Indikator för styrkamsinställning
4. Knivlägesinställning
5. Laddningsindikatorlampa
6. Laddningsadapter
7. Löstagbar inställbar styrkam
8. Håruttunningsmekanism
KOMMA IGÅNG
LADDNING
Ladda batteriet i cirka 14 timmar före första användning.
• Kontrollera att apparaten är avstängd.
• Anslut laddningsadaptern till apparaten och sedan till elnätet.
Laddningsindikatorlampan tänds. Använd endast den medföljande
laddningsadaptern.
Apparaten har inbyggt skydd mot överladdning. Om apparaten inte
ska användas på en längre tid (2–3 månader), bör den kopplas bort
från elnätet och läggas undan. Fulladda batteriet när apparaten ska
användas igen efter långtidsförvaring.
För att få bästa möjliga batterilivslängd, ladda ur batteriet helt var
sjätte månad och ladda det sedan i cirka 14 timmar.
ANVÄNDNING ANSLUTEN TILL ELUTTAG
• Anslut apparaten till laddningsadaptern och sätt sedan i
laddningsadapterns strömkabel i ett 230V eluttag.
VARNING: Långvarig användning ansluten till eluttag medför
att batteriets livslängd minskar.
• Använd endast den medföljande nätadaptern.
ANVÄNDNING
FÖRE KLIPPNING
1. Kontrollera att apparaten är fri från hårrester och föroreningar.
2. Placera den person som ska klippas med sitt huvud ungefär i
din ögonhöjd.
3. Innan klippning påbörjas, kamma håret tills det är torrt och
fritt från tovor.
Table des matières
Langues :


