RUSTA 308015570101 Manuel utilisateur

Manual/Bruksanvisning/Gebrauchsanweisung
SEENG NO DE
Car dashboard camera
Bilkamera /Autokamera
MANUAL
Item no. 308015570101

2
ENG
Thank you for choosing to
purchase a product from Rusta!
Read through the entire manual
before installation and use!
Car dashboard camera
Read the user manual carefully to make sure that the product is assembled, used and
maintained correctly, as described in the instructions in this user manual. Keep the user
manual for future reference.
1 2 3
PARTS INCLUDED
1. Camera
2. Suction-cup mount with bracket
3. Car charging adapter12-24V(1.0A)
4. USB cable (not pictured)
WARNING!
If these instructions are not followed, an accident may
lead to serious personal injury or property damage.

RIGHT OF COMPLAINT
By law the product must be returned to the place of purchase along with the original
receipt in the event of a complaint. The user is liable for any damage to the product that
is caused by not using the product for its intended purpose or by not following this user
manual correctly. The right of complaint will not apply in these instances.
TECHNICAL PARAMETERS
Video resolution VGA, WVGA, 720P, 1080P (interpol.), FHD1080P (interpol.)
Videoformat AVI
Recording mode Loop recording / motion detection recording
Picture resolution 12MP, 10MP, 8MP, 5MP, 3MP, 2MHD, 1,3m, VGA
Picture format JPG
Compatible memory card Micro-SDHC class 10, max 32GB
Battery 110mAh/3.7V lithium polymer battery
Powered by Rechargeable lithium battery / USB car charge / mobile power
Recording Recording closed or opened selectively
Lens 120° wide angle
Sensor HD CMOS image sensor
Display 2.4-inch high-definition bright screen
Working temperature -20°C ~ +65°C (-4°F ~ +49°F )
Cable Current 1.0A
Power Voltage DC 12V–24V (transfer to 5V) Measure
3
INFORMATION ABOUT HAZARDOUS WASTE
Used products should be handled separately
from household waste. They should be taken
for recycling in accordance with local rules for
waste management.
4
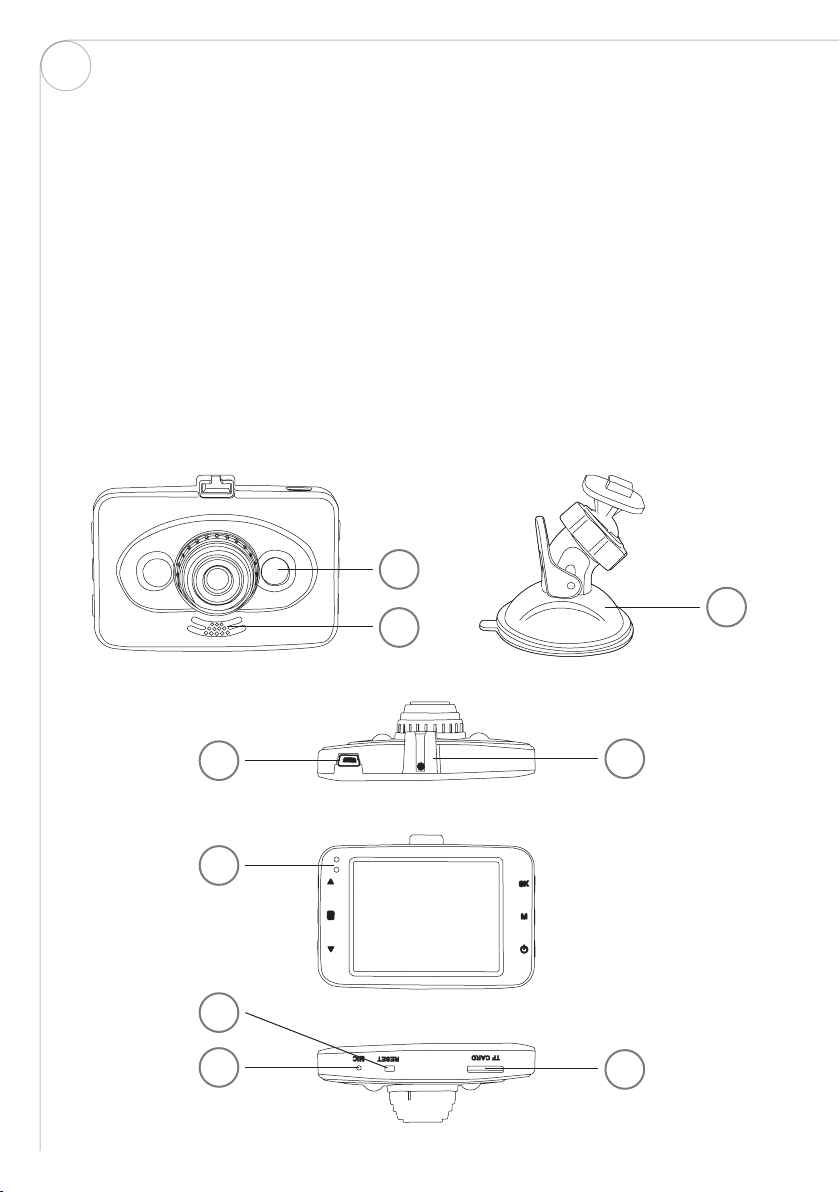
OVERVIEW
A. Fill-in IR light Turn on by pressing Power button (6) one time in standby mode/
recording mode/camera mode.
B. Speaker Voice broadcast
C. Bracket Suction cup mount
D. USB port For providing power supply / connecting the USB cable to transfer
data
E. Holder port To hang camera under bracket
F. Power/Work The indicator light will turn on when energized or working
G. MIC Microphone, recording port
H. RESET Resetting key, system restart. Reset button is only used to restore
factory settings, when crashed or abnormal situation.
I. TF card Memory card slot. Attention! Insert in correct direction and position
A
C
D
F
G
H
B
E
I
ENG

5
BUTTON DEFINITION
1. UP In option Menu, adjust the function keys up. In playback mode, press
1s to increase volume, press 3s to rewind video at dierent speed
(x2, x4, x8). In recording mode press to take photo.
2. MENU In standby mode, press 1s to open setup menu; press again to switch
among setup menus.
3. DOWN In option Menu, adjust the function keys down. In the playback mode,
press 1s to decrease volume, press long 3s to fast forward video (x2,
x4, x8).
4. OK To confirm choices. Recording / camera / playback/ confirmation key.
In recording mode, press to start recording, press again can stop
recording. In camera mode, press to take photo; In menu mode, it is
Enter Key.
5. MODE Switch between Recording / Camera / Playback. When date/time
setting, press to move the light bar to next choice. In recording mode,
press to lock video file.
6. Power switch Press 3s to turn ON/OFF. In standby/recording/camera mode, press
1s to turn ON/OFF the Fill-in IR-light.
1
2
3 6
5
4

6
MOUNTING THE CAMERA
1. Insert the hook of suction mount into the top slot of the camera as shown (A).
2. Select an area of the windshield directly above the dash board (make sure not ob-
structing driving view), then clean the area on windshield thoroughly.
ENG
A

7
3. With the suction lever in the released position (B) press the suction cup against the
windshield (C). Press the suction lever toward the suction cup to lock the mount in posi-
tion (D).
4. To adjust the angle of the camera, loosen the collar on the ball joint, adjust the angle,
then retighten in the desired position (E).
C
BD
E

8
CAMERA ADJUSTMENT
The camera records in one direction. To record the view in front of the vehicle. face the
camera aimed in the direction through the front windshield.
Optional: To record the view inside of the vehicle, face the camera looking out the rear
window. Adjust camera as needed to avoid direct sun glare. Recorded DVR video footage
is adversely aected by the harsh (direct) sunlight.
Important note: The HD DVR is not intended for use as a surveillance, security or time-
lapse camera system
INSTALLING THE CAMERA
1. Insert a memory card: Please insert the mem-
ory card correctly according to the instructing
directions of the slot, press the card until a
click is heard. Since the recording speed is
high, the card must be high-speed card (CLASS
10 or above). Note: For new card, please format
the card with the machine.
2. To remove the memory card: Press the mem-
ory card, pop up the slot. Note: Please don’t
remove or insert a memory card in boot state,
to avoid damaging the memory card.
3. Mount the camera on the windshield in front of
the car rearview mirror.
4. Connect to the power supply. Only use the original
factory standard charger. Connect one end of the car
charger with the USB port, connect another end to car
power socket. The camera will start to work, when
the car engine is turned on. Note: Place the wiring
along the windshield edge, as shown above so it does
not obstruct the drivers view.
5. On / O
(1) Auto On/O: Once the car engine turns on, the
device and recording will start automatically. Once
the car is turned o, the device will save the video
automatically and power o within 10 seconds.
(2) Manual On/O: press the power key 3s , the device
will turn ON or OFF.
ENG
POWER
SOCKET

9
MANUALLY VIDEO RECORDING
When Loop recording is turned o you can still manually record videos. Chose the VIDEO
mode with the MODE button. Start and stop recording by pressing the OK button. During
recording you can take pictures also by pressing the UP button.
TAKING PICTURES
To take pictures change to PICTURE mode by pressing the MODE button. Take a picture by
pressing OK button.
VIEW PICTURES / VIDEOS
To view your pictures and videos change to PLAYBACK mode by pressing MODE button.
Use UP and DOWN buttons to move between Picture/Videos. To play or stop a video,
press OK button. When playing video press UP or DOWN button for 3s or more to Rewind
or Forward at dierent speed (x2, x4, x8).
TROUBLESHOOTING
If troubleshooting occurs under normal operation, please refer to the following solutions.
UNABLE TO TURN ON:
Check whether the recorder is connected to the car charger correctly. If manually oper-
ation to turn on, please check whether the power is low. If keep having trouble, please
press the Reset button to restore to factory settings.
STOPS AUTO RECORDING / NO LOOP RECORDING:
If device stops recording automatically or no loop recording: Please use high-speed TF
card such as C10 card. Due to the huge data of HD videos, the read-write of the card
cannot keep pace.
If no loop recording, it’s possible because the G-Sensor is open and locked the files in the
card. Please check the G-Sensor, unlock and delete unwanted files or format the memory
card to enable new recordings.
WRONG INTERVAL RECORDING TIME:
The intervals or recording time is dierent from the setting time. Check whether the
motion detection is on, since the recording is long in motion detection mode, it depends
on the object’s movement.
PICTURE/VIDEO QUALITY:
Check if there is dirt or any finger prints on the lens. Clean the lens before recording or
taking photo and keep the lens always clean. The eect of the video files is sometimes
good but sometimes bad. Camera eects have great relationship with the shooting light
conditions, such as black lighting, smooth light, and the strength of the light. All these will
result in dierent video eects.
If the device crashes, please press the “RESET” button to reset the device to standard
settings.

10
DISPLAY EXPLANATION
DISPLAY IN VIDEO MODE
1. Mode icon show Video mode
2. Red flashing indicates the device is recording.
3. Can only be deleted if first unlocked, then deleted, or by formatting card.
4. Audio icon show if recording of audio is on or o
5. Fill-in light icon show if fill-in light is turned on or o
6. Parking guard icon indicates the parking guard function is turned on
7. Time 00:00:52. White font show memory card remaining recording time.
Red font current segment recording time
8. Video resolution icon: indicates the currently selected video resolution
9. Micro SD card icon: indicates Micro SD card in the card slot.
10. Battery level icon: indicates the current battery level.
11. Time icon, indicates the current standard time; initial set up before using it.
12. Date display, shows the current standard data, initial set up before using it.
13. EV exposure compensation icon, indicates the current selected exposure
parameters
14. Motion detection icon, when showing it indicates the motion detection is activated.
15. Loop recording segment time icon, indicating the chosen recording time per loop
(1,2,3,5 min)
ENG
2018/01/08 08:15:26
00:00:52
1080FHD
3
F
1
15
14
13
12 11
10
9
8
2 3 4 5 6 7
Table des matières
Langues :


