Rotolight NEO Manuel utilisateur

USER MANUALUSER MANUAL
V2.0V2.0

“Quite simply the most amazing, beautiful, versatile, portable,
continuous lights I’ve ever used” Jason Lanier - Sony Artisan of Imagery
- 02 -

ROTOLIGHT NEO
USER MANUAL
List of Box Contents
1) Rotolight NEO
2) NEO Filter holder
3) Rotolight Belt Pouch
4) Accessory Shoe Adapter
5) AC Adapter
6) AC Cord
7) NEO Standard 4 Piece Filter Kit
p04/05 Neo Basic Operation (Power, Brightness, Colour, Reset)
p06/07 Advanced operation, Display, Designer Fade™
p07 True Aperture Dimming™
p08/09 Cinematic Special Eects, Warning - Health Hazards.
p10/11 Strobe, Lightning, Throb, Cycle, Fire.
p12/13 SFX continued: Police, Television. VOLT , TEMP
p14/15 VERS(rmware version) , Filters, Mounting, Batteries
p16 Warranty and Copyright information, Optional Accessories
p17 Images by Jason Lanier, lit by NEO
p18/19 Polar Pattern, CRI, Tech Specs, TLCI, Photometrics, Contact
- 03 -
PAGE CONTENTS
Thank you for purchasing Rotolight
NEO! We hope you enjoy using it as
much as we enjoyed making it! Please
register and activate your warranty
at www.rotolight.com/register

NEO BASIC OPERATION
To operate NEO you will nd two red rotary controls,
which are also switches, and a DC on/off switch, these are
all located on the rear of NEO.
POWER
To power up NEO click the power switch (located next to
the DC input Jack)
NEO can be powered by 6 x AA Batteries or
rechargeables, or from a DC source in the range of 6v-15v
(i.e. optional Car 12v Socket, D-TAP from a broadcast
battery), or from the supplied AC Adapter. When
connecting a power source to the DC input socket , for
instance mains power or utilizing the D-Tap connection,
the AA batteries are automatically disconnected, thus
saving AA battery power. NB if you are connecting an
external DC source make sure the power is the correct
polarity, to avoid damaging your NEO.
On power up, you will see ‘ROTOLIGHT NEO’ scroll
across the screen, you can interrupt this anytime by
operating one of the control knobs.
To Power NEO Down , click the power switch again. NB
– NEO stores all the user settings in non-volatile RAM so
it will remember your last used settings.
(‘BRI’) BRIGHTNESS
You can adjust the brightness output of NEO by rotating
the left control knob.
If you rotate the knob quickly it will speed up the data
input. You can press and rotate to deliberately adjust the
brightness in steps of 10% (Fast Mode). Simply rotating
the knob will adjust the brightness in steps of 1%.
NEO has a dimming range of 0% -100% and is completely
icker free at any brightness level.
(NB There is a special mode called ‘True Aperture
Dimming’ (F-DIM) , available in the MENU section, which
will display the brightness as an F-Stop, based on your
camera exposure settings – see ‘True Aperture Dimming’)
- 04 -

(‘COL’) COLOUR
You can adjust and accurately display the Colour
Temperature (CCT) of NEO by rotating the right control
knob. If you rotate the knob quickly it will speed up the
data input. You can press and rotate to deliberately adjust
the colour in steps of 100kevin (Fast Mode). Simply
rotating the knob will adjust the brightness in steps of 10
kelvin.
NEO has a Colour Temperature Range of 3150 kelvin
(Tungsten) up to 6300 kelvin (direct daylight).
NEO has a special technology called ‘Dynamic Drift
Stabilisation’ which maintains the colour temperature
through the entire dimming range.
RESET
You can reset all the user parameters in NEO’s non-
volatile memory by holding down one of the red control
switches whilst simultaneously powering NEO ON.
The word ‘ZERO’ will be displayed, select Y for yes (reset
all data), or N for NO.
DISPLAY
LEFT KNOB/SWITCH
RIGHT KNOB/SWITCH
DC POWER SWITCH
DC INPUT (6v-18v)
BATTERY COMPARTMENT 6xAA
TRIPOD MOUNT
- 05 -

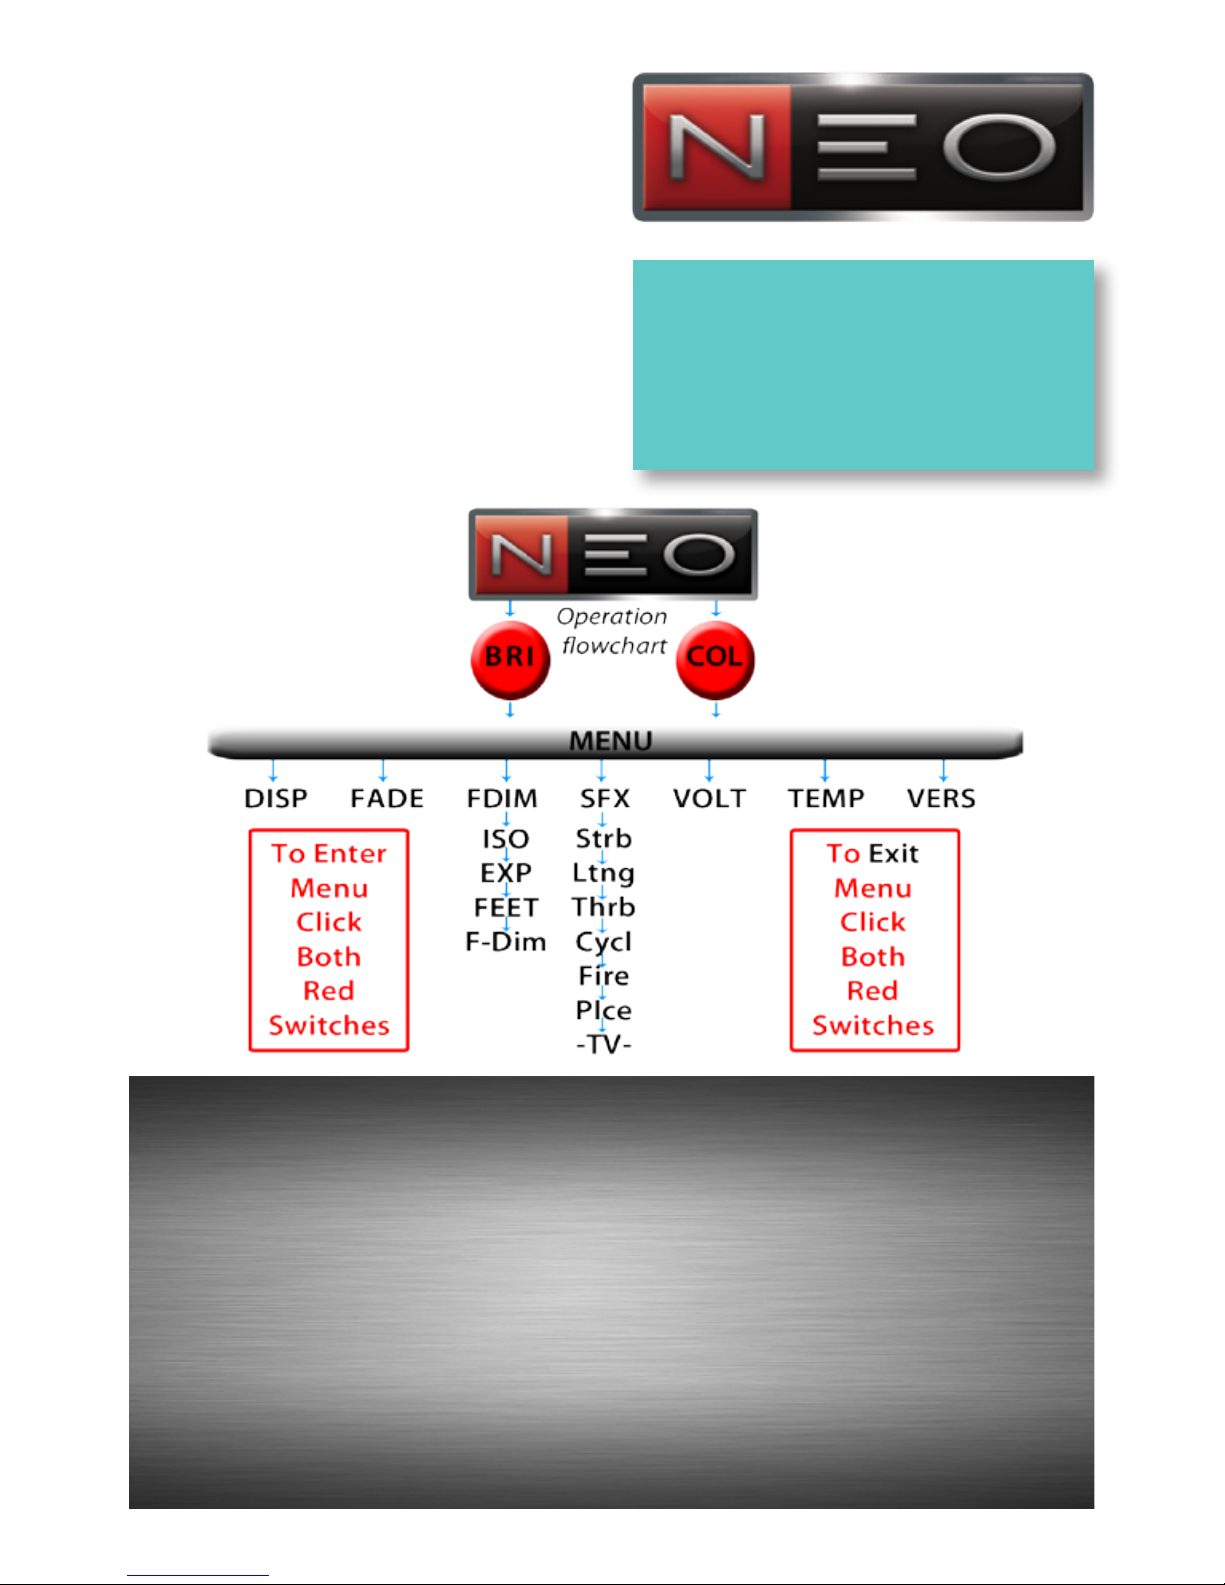
ADVANCED OPERATION ( MENU )
You can enter the MENU by pressing both red control
switches together (or clicking and holding down the left
switch followed by the right control switch). If you wish
to leave MENU, you can return to the basic operation (BRI
/ COL) by pressing both control switches together again.
In the MENU there are seven optional submenus , which
you can select by rotating the left knob:- ‘DISP’ ,‘FADE’ ,
‘F-DIM’ , ‘SFX ‘,‘VOLT’ ,‘TEMP’ , ‘VERS’
You can enter your selected function by clicking the Right
switch
You can leave the selected function by clicking the Left
switch, alternatively you can return to the basic operation
mode (BRI /COL) at any time by pressing both switches
together at the same time.
(‘DISP’) DISPLAY
Allows the display to be set to low brightness or ‘off’ to
reduce power consumption/increase battery life or for
discrete usage on set.
Click the left switch to enter ‘DISP’
Rotate either the left or right knob to select the display
mode:-
‘High’ – the display will be at full brightness
‘Low’ – the display will be dim, reduced power
consumption
‘Off’ – The display will automatically switch off after 5
seconds unless a control is operated for maximum power
saving.
Click the left switch to return to MENU, alternatively you
can return to the basic operation (BRI / COL) by pressing
both control switches together.
(‘FADE’) DESIGNER FADE™
(Programmable fade up / fade down production effects for
interview/ ENG applications.)
Scroll to ‘FADE’
Click the right switch to enter ‘FADE’ mode
- 06 -

Rotate the right knob to adjust the fade duration
(It will display DN (=fade down) followed by a numerial
value ‘X’s where X = seconds of fade duration)
The fade can be from 1 to 12 seconds long.
Please note, the FADE will be a fade to zero from the
current brightness level the NEO is set to (ie if brightness
is currently 80%, then fade will be 80%-0% over custom
time duration).
(NB: both the last used brightness setting and fade
duration parameter are stored in non volatile memory)
Once you have selected the length of the fade, Click the
right switch to perform the fade.
You will notice the display now shows UP X s (i.e. it will
now fade up to your previous brightness setting over ‘X’
seconds)
To fade up click the Right switch again
If you only want Fade downs’ use the Left switch to click
out of FADE and click back in – use the right switch to
perform the Fade.
Click the left switch to return to MENU, alternatively you
can return to the basic operation menu (BRI / COL) by
pressing both control switches together.
(‘F-DIM’) TRUE APERTURE DIMMING ™
(Shows the brightness setting as an accurately calculated
aperture (F-Stop) for your subject at a given distance.)
Cycle the menu to ‘F-DIM’ then Click the right switch to
enter ‘F-DIM’ mode.
Rotating the left knob cycles through the available user
parameters:-
‘ISO’ (your camera ISO setting),‘EXP’ (your camera
shutter speed) and ‘FEET’ (the distance from the light to
your subject in feet)
Rotating the right knob will adjust the selected user
parameter (ISO/EXP/FEET)
Clicking the right switch will enter the ‘F-Stop Dimming
Display’ where the brightness is dynamically displayed as an
aperture or ‘F-Stop
- 07 -

(True Aperture Dimming continued)
Adjust the brightness with the right knob and the display
will show the adjusted F-Stop aperture for your camera.
(Please note the ‘True Aperture Dimming ™’ algorithm
calculates the F-Stop based on the NEO Brightness setting,
your camera’s ISO and shutter speed, the distance to the
subject AND compensates for the skin contrast of the
subject)
To re-adjust the last selected parameter (usually FEET)
click the right switch , make the adjustment, then click
the right switch again to return to the ‘F-Stop Dimming
Display’ , alternatively rotate the left knob to select a
different parameter to edit, and then click the right switch
to re-enter ‘F-Stop Dimming Display’.
This enables you to effectively ‘bookmark’ the user
parameter that is dynamically changing during your shoot
(ie distance to subject), and without needing to re-meter
the shot, update the parameter and calculate the revised
F-STOP, allowing you to work fast.
Click the left switch to return to MENU, alternatively you
can return to the basic operation (BRI / COL) by pressing
both control switches together.
(‘SFX’) CINEMATIC SPECIAL EFFECTS
In collaboration with Stefan Lange, DOP and Visual FX
Veteran, we have created an arsenal of Cinematographic
Special FX ( CineSFX™ ) , these production tools are
designed to complement your feature/ music video/short
lm.
SFX Brightness and Colour Temperature :
Please note, the current brightness level and colour
temperature setting of NEO is used by SFX mode to
represent the ‘peak output’ level of each effect, enabling
accurate metering (ie if NEO is set to 75% brightness and
5600 Kelvin, then the lightning effect peak brightness level
shall be 75% brightness at 5600 Kelvin).
- 08 -

Therefore, to ensure maximum SFX brightness, set Neo to
100% brightness and 4300 Kelvin for maximum brightness
in SFX mode.To do this, you can return to the basic
operation (BRI / COL) by pressing both control switches
together.
WARNING - HEALTH HAZARD – USE STROBE WITH
CAUTION : CineSFX™mode uses Strobe Lighting effects
that may pose a risk to those at risk of photosensitive
seizures/ epilepsy. Manufacturer accepts no liability or
responsibility for misuse of this product.You should take
all precautions to pre-warn and ensure the safety of those
who may come into contact with the product. If you or
any of your relatives have a history of seizures or epilepsy,
consult a doctor before using. If you feel unwell from using
these effects, immediately discontinue use and consult
a doctor. If strobe lighting is to be used in a production,
warnings should be posted at the front of house or
entrance doors to the set/theater as well as in a video
or program, if distributed. Example: “WARNING: Strobe
lights are used during this performance”.
This product is not suitable for use by children of any age
and is designed for professional use only.
- 09 -
Photo Courtesy Simon Edwards
Guild of Television Cameramen

(‘SFX’) CINEMATIC SPECIAL EFFECTS (CineSFX™)
Click the Right switch to enter ‘SFX’
Rotating the left knob cycles through the available ‘SFX’:-
‘Strb’ - ‘Ltng’ - ‘Thrb’ - ‘Cycl’ - ‘Fire’ - ‘Plce’ - ‘TV’
You can activate your selected SFX function by clicking the
right switch
You can leave the selected function by clicking the left
switch, alternatively you can return to the basic operation
mode (BRI /COL) at any time by pressing both switches
together at the same time.
(‘Strb’) STROBE
The Strobe effect produces a regular ashing light, you can
control the speed
Click the right switch to activate the strobe effect
Rotate the right knob to adjust the strobe speed
(It will display XX hz , where= ‘XX’ = number of strobe
cycles per second) The strobe range is from 1hz up to 4hz.
(NB: the last used strobe parameters are stored in non
volatile memory). Rotate the left knob to adjust the ‘duty
cycle’ (ash duration) to eliminate any issues with rolling
shutter cameras. Click the left switch to exit the Strobe
Menu and return to SFX Menu.
(‘Ltng’) LIGHTNING
The lightning effect simulates real lightning, it is a random effect
but you can control the speed at which the lightning bursts
re-occur, ideally you would set the brightness (BRI) to 100% and
the colour (COL) temperature to 6000k
Click the right switch to activate the lightining effect
Rotate the right knob to adjust the lightining speed.
(It will display XX hz which is an indication of the effect
frequency)The lighting range is from 1hz up to 50hz.
Click the right switch to arm the effect and fade to black,
‘Trig’ will be displayed - re-Click the right switch to trigger
the effect. Rotate the left knob to adjust the ‘duty cycle’
(ash duration) to eliminate any issues with rolling shutter
cameras. (NB: the last used lightning parameters are stored
- 10 -
Table des matières
Autres manuels Rotolight Accessoires pour appareils photo