RockJam RJKSK Manuel utilisateur

Karaoke Super Kit
RJKSK
User Guide
Please read this user guide first before operating the Karaoke Super-Kit and save it for future
reference.
Congratulations on your purchase of this RockJam Karaoke Super-Kit.
To get the most from your purchase please take a few minutes to read these instructions.

1
Warnings
This product is designed primarily for indoor use. Do not expose to rain or other kinds of
moisture as that could lead to irreparable damage and the risk of electric shock.
Do not open the Amplifier casing under any circumstance. This could lead to damage or risk of
electric shock.
Important Safety Instructions
1. Read instructions - All the safety and operating instructions should be read before the
appliance is operated
2. Retain instructions - The safety and operating instructions should be retained for future
reference.
3. Heed Warnings - All warnings on the appliance and in the operating instructions should be
adhered to.
4. Follow instructions - All operation and use instructions should be followed.
5. Water and Moisture - The appliance should not be used near water; for example near a
bathtub washbowl kitchen sink laundry tub in a wet basement or near a swimming pool and
the like. Risk of electric shock if the unit gets wet.
6. Heat - The appliance should be situated away from heat sources such as radiators stoves or
other appliances that produce heat.
7. Power Sources - The appliance should be operated from a power supply only of the type
described in the operating instructions or as marked on the appliance.
8. Power Cable – Only use the power cable and fused plug supplied to power the unit.
9. Cleaning - The appliance should be cleaned only with a lightly dampened cloth. Do not use
solvents that will damage the plastics finish.
10. Long Periods of Non-Use - The Karaoke Super Kit should be unplugged when left unused
for a long period of time.
11. Object and Liquid Entry - Care should be taken so that objects do not fall and liquids are
not spilled into the enclosure through openings. Risk of electric shock if the unit gets wet.

2
12. Damage Requiring Service - The appliance should be serviced by qualified service
personnel when:
• The power cable has been damaged; or
• Objects have fallen or liquid has been spilled into the appliance; or
• The appliance has been exposed to rain; or
• The appliance does not appear to operate normally or exhibits a marked change in
performance; or
• The appliance has been dropped or the enclosure damaged.
13. Servicing - The user should not attempt to service the appliance beyond that described in
the operating instructions. All other servicing should be referred to qualified service personnel.

3
Index
Warnings.......................................................................................................................................1
Important Safety Instructions ........................................................................................................1
Location of Main Parts ..................................................................................................................4
Location of Controls on the Bluetooth Amplifier............................................................................5
Initial Setup ...................................................................................................................................6
Unpacking ................................................................................................................................6
Microphone Stand Assembly ...................................................................................................6
Operation ......................................................................................................................................8
Switching the Amplifier On/Off .................................................................................................8
Bluetooth Operation .................................................................................................................8
Volume Control ........................................................................................................................8
Listening to your iPhone iPod MP3 player Media Player etc. (AUX IN) ................................9
Using the Microphones ............................................................................................................9
Using the Phone and Tablet Holders .......................................................................................9
Troubleshooting Guide ...............................................................................................................10
No power................................................................................................................................10
No sound – Bluetooth mode ..................................................................................................10
No sound – AUX IN mode......................................................................................................10
No sound from the microphone..............................................................................................10
Bluetooth device pairing problems .........................................................................................11
Other Bluetooth problems ......................................................................................................11
Finding Karaoke Videos to Sing Along to ...................................................................................11
Product Disposal Instructions .....................................................................................................12
FCC Compliance Statement .......................................................................................................12
Specifications..............................................................................................................................13
4
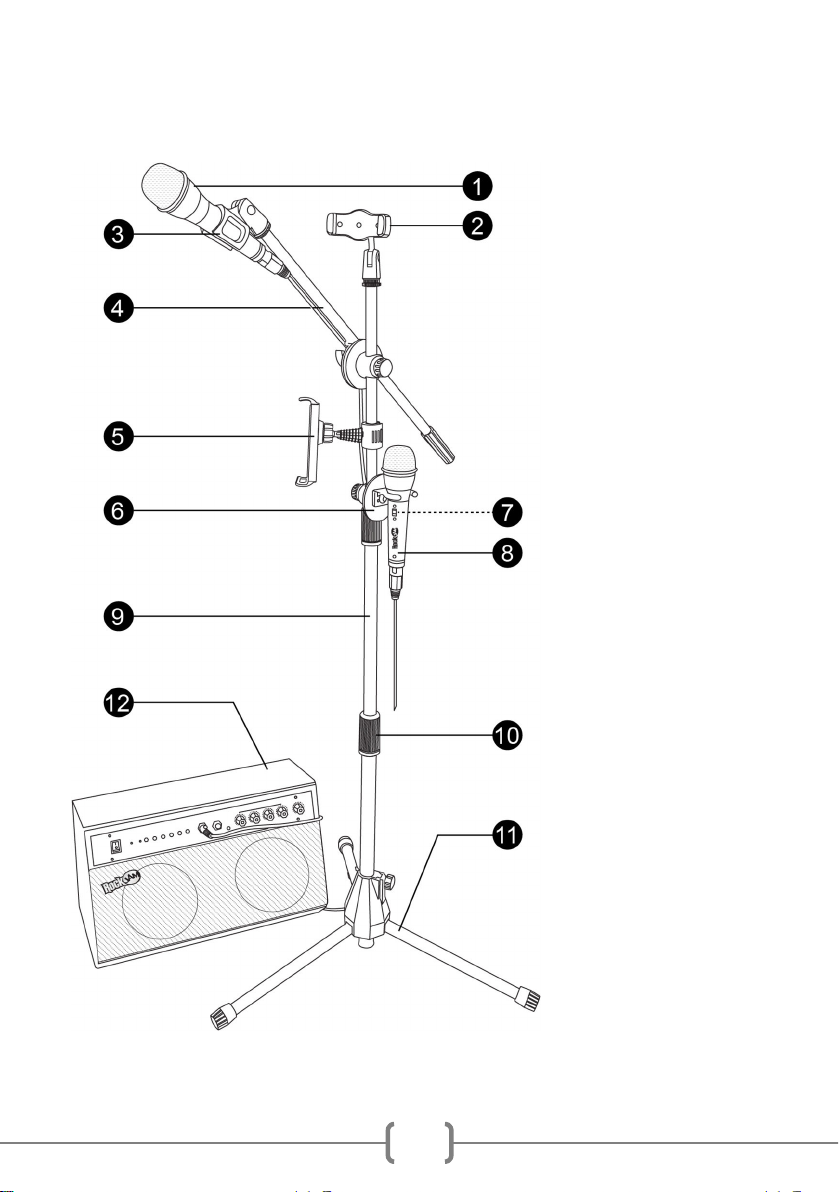
Location of Main Parts
1. Microphone
2. Phone Holder
3. Microphone Holder
4. Mic Boom Arm
5. Tablet Holder
6. Spare Mic Holder
7. Mic ON/OFF Switch
8. Second Microphone
9. Adjustable Mic Stand
10. Mic Stand Connector
11. Mic Stand Legs
12. Bluetooth Amplifier

5
Location of Contro s on the B uetooth Amp ifier
B uetooth Amp ifier Rear
16. Mains Power Input
1. Power ON/OFF
2. Power LED Indicator
3. Bluetooth Mode Indicator
4. Mode Selection Button
5. Skip Back
6. Play/ Pause
7. Skip Forward
8. MIC 1 Input Socket
9. MIC 2 Input Socket
10. AUX IN Socket
11. MIC 1 Volume Control
12. MIC 2 Volume Control
13. MIC 1&2 Echo Control
14. MIC 1&2 BASS Control
15. Master Volume Control

6
Initia Setup
Unpacking
Unpack the Karaoke super-kit carefully. We recommend that you save the box and packing
materials in case you wish to store the product. Before setting up the unit verify that the
following accessories are present:
• 1 x Microphone Stand
• 1 x Bluetooth Amplifier
• 1 x Tablet Holder
• 1 x Phone Holder
• 2 x Wired Metal Microphones
• 1 x Boom Arm with Mic Holder Attachment
• 1 x Spare Mic Holder
• 1 x Amplifier Power Cable
• 1 x User Guide
Microphone Stand Assemb y
Open out the microphone stand legs
so that the stand is supported on the
ground. Extend the central tube to the
highest setting and tighten into place
by turning the screw at the base
clockwise.

7
Screw the microphone holder
onto the end of the mic boom arm.
Then slide the arm onto the mic stand.
Adjust to the preferred angle and then
tighten this in place using the knob on
the side of the boom arm. Then
replace the washer that was removed
in
the first step
Turn the mic stand connectors anti-
clockwise one at a time to loosen and
then extend the central tube to the
preferred height. Turn the connector
clockwise to tighten into place. The
accessories will be added onto the
top section of the mic stand so you
may want to keep this section at its
maximum height.
Slide on the spare mic holder. Use the
screw at the back to fix this into place.
Connect the tablet holder to the mic
stand attachment. Place into position on
the mic stand and secure by hooking the
loop around the first notch and then
pressing the clip back on itself to tighten.
To add the accessories first remove
the washer at the top of the mic stand
by turning anti-clockwise. Keep this
safe.
Finally screw the phone holder into
place at the top of the stand and tighten
the washer against the phone holder.
4
1
3
2

8
Operation
Switching the Amp ifier On/Off
Connect the Amplifier power cable to the socket at the back of the Amp then connect the plug
to a mains power socket. Locate the power switch on the front of the Amplifier. Press the switch
towards “ON” to power on the Amp. The Power LED indicator will light up red. The Amplifier will
power up in Aux mode.
To turn the system off press the switch towards “OFF” and disconnect from the mains socket.
B uetooth Operation
The Amplifier included in the Karaoke Super-kit is Bluetooth compatible. Music can be played
through the Amp from a compatible Bluetooth device such as a mobile phone or tablet device.
Make sure the Amp is powered on. Press the MODE button until the Bluetooth Mode Indicator
flashes blue. A tone will also be heard.
Using your mobile phone or other Bluetooth enabled device search for Bluetooth devices and
select ‘RJKSK’ from the list of devices found. The Bluetooth device should then connect to the
Amp. The Bluetooth Mode Indicator will become a solid light once successfully connected. You
will also hear a connection tone. The Amplifier will then connect automatically with a paired
device when it is in Bluetooth mode.
NOTE: The music can be controlled using both the buttons on the AMP or the connected
device.
Vo ume Contro
Adjust the connected microphone volume by using the separate MIC 1 and MIC 2 Volume
controls.
The overall output (Main Volume) can be adjusted in two ways as follows;
• Adjust the volume on the Bluetooth device mobile phone tablet computer iPad etc.
• Turn the Main Volume control on the front of the Amp up or down.

9
Listening to your iPhone, iPod, MP3 p ayer, Media P ayer etc. (AUX IN)
You can listen to the sound of a connected external audio device such as an iPhone iPod or
MP3 player by connecting to the AUX IN socket.
To connect to the AUX IN socket – Connect a 3.5mm Aux cable (not included) into the AUX
socket located at the front of the Amplifier and the other end to your audio equipment (iPhone
iPod MP3 etc). You can skip/ play/ pause and adjust the master volume using both your
device and the controls on the front of the Amp.
NOTE: In AUX mode the P ay/ Pause button mutes and unmutes the music. To Fully Pause
the track use the Pause button on the device connected.
Using the Microphones
You can sing along with a friend to any music playing from the Amplifier using the two wired
microphones included.
Plug the microphone/s into the microphone socket/s on the front of the Amplifier and slide the
microphone power switch to the ON position. Adjust each microphone volume and echo control
as desired. If any howling sound occurs then stand further away from the speaker or reduce
the music or microphone volume until the howling stops.
If the second microphone is not being used this can be stored in the spare microphone holder.
Ensure that this is switched off.
NOTE: Do not tap or bang the microphone as this can cause damage to both the microphone
and speaker. Be careful not to twist or strain the microphone cable and do not swing the
microphone by the cable as this will cause irreparable damage.
Using the Phone and Tab et Ho ders
The Phone and Tablet holders extend to allow your device to fit securely inside. The following
precautions should be taken to ensure your device is placed and removed correctly.
• Before placing any device make sure that the holders are secured tightly onto the
microphone stand.
• Keep hold of the device being placed into the holder until the sides have retracted
tightly against the device.
• Keep hold of your device when removing it from the holders.
Table des matières
Autres manuels RockJam Système de karaoké


Manuels Système de karaoké populaires d'autres marques


Karaoke Warehouse
Karaoke Warehouse Player 2000 Manuel utilisateur

VocoPro
VocoPro DVG-888K II Manuel utilisateur

ION
ION DISCOVER KEYBOARD USB Manuel utilisateur

The Singing Machine
The Singing Machine SMVG-620 Manuel utilisateur

Singsation
Singsation CENTER STAGE FREESTYLE Manuel utilisateur

RSQ
RSQ NEO K-2 Manuel utilisateur


