
Riso SF9 Series Manuel utilisateur

RISO Printer Driver
SF9/SF5 Series
USER’S GUIDE
Ms6202-35E


1
1
Preface
Welcome to the high-speed PC printing eld presented by RISO printers through RISO Printer Drivers. The RISO
printers, which are designed to operate as a high-speed GDI printer, enable you to print various documents you create on
different computer platforms very speedily, only if an appropriate RISO Printer Driver is installed in your computer.
The GDI printer, as you know, uses the bit-mapped image data developed on your PC monitor screen as print data
source, enabling you to print the exactly same image as of what you see on your PC monitor screen in most cases.
Besides, it requires no printer font to print document, thus relieving you of the restrictions on the use of fonts when you
create documents on your PC.
The RISO printers can also operate as a network printer under various LAN environments, with an additional network
interface card embedded inside.
¢Descriptivecontentsinthisguide
• The reproduction of this guide in whole or in part is strictly prohibited without the permission of RISO KAGAKU
CORPORATION.
• The contents of this guide are subject to change in the future without prior notice for improvement of the product.
• Please note that we do not assume any responsibility for the effect of outcomes resulting from the use of this guide and
the operation of this machine.
¢Trademarks
• and are trademarks or registered trademarks of RISO KAGAKU CORPORATION in the United States and
other countries.
• Microsoft, Windows and Windows Vista are either registered trademarks or trademarks of Microsoft Corporation in the
United States and/or other countries.
• Other corporate names and/or trademarks are either registered trademarks or trademarks of each company
respectively.
¢Aboutsymbols
BImportantmattersthatrequirespecialattention.Readcarefullyandfollowtheinstructions.
BSupplementalexplanationthatprovidesusefulinformation.
ABIndicatesreferencepages.
¢Aboutscreens
• The screens and content appearing in this manual may differ from the actual product.
• The screens and messages appear in procedures may differ depending on the type of computer and application.
© Copyright 2016 RISO KAGAKU CORPORATION
2
2
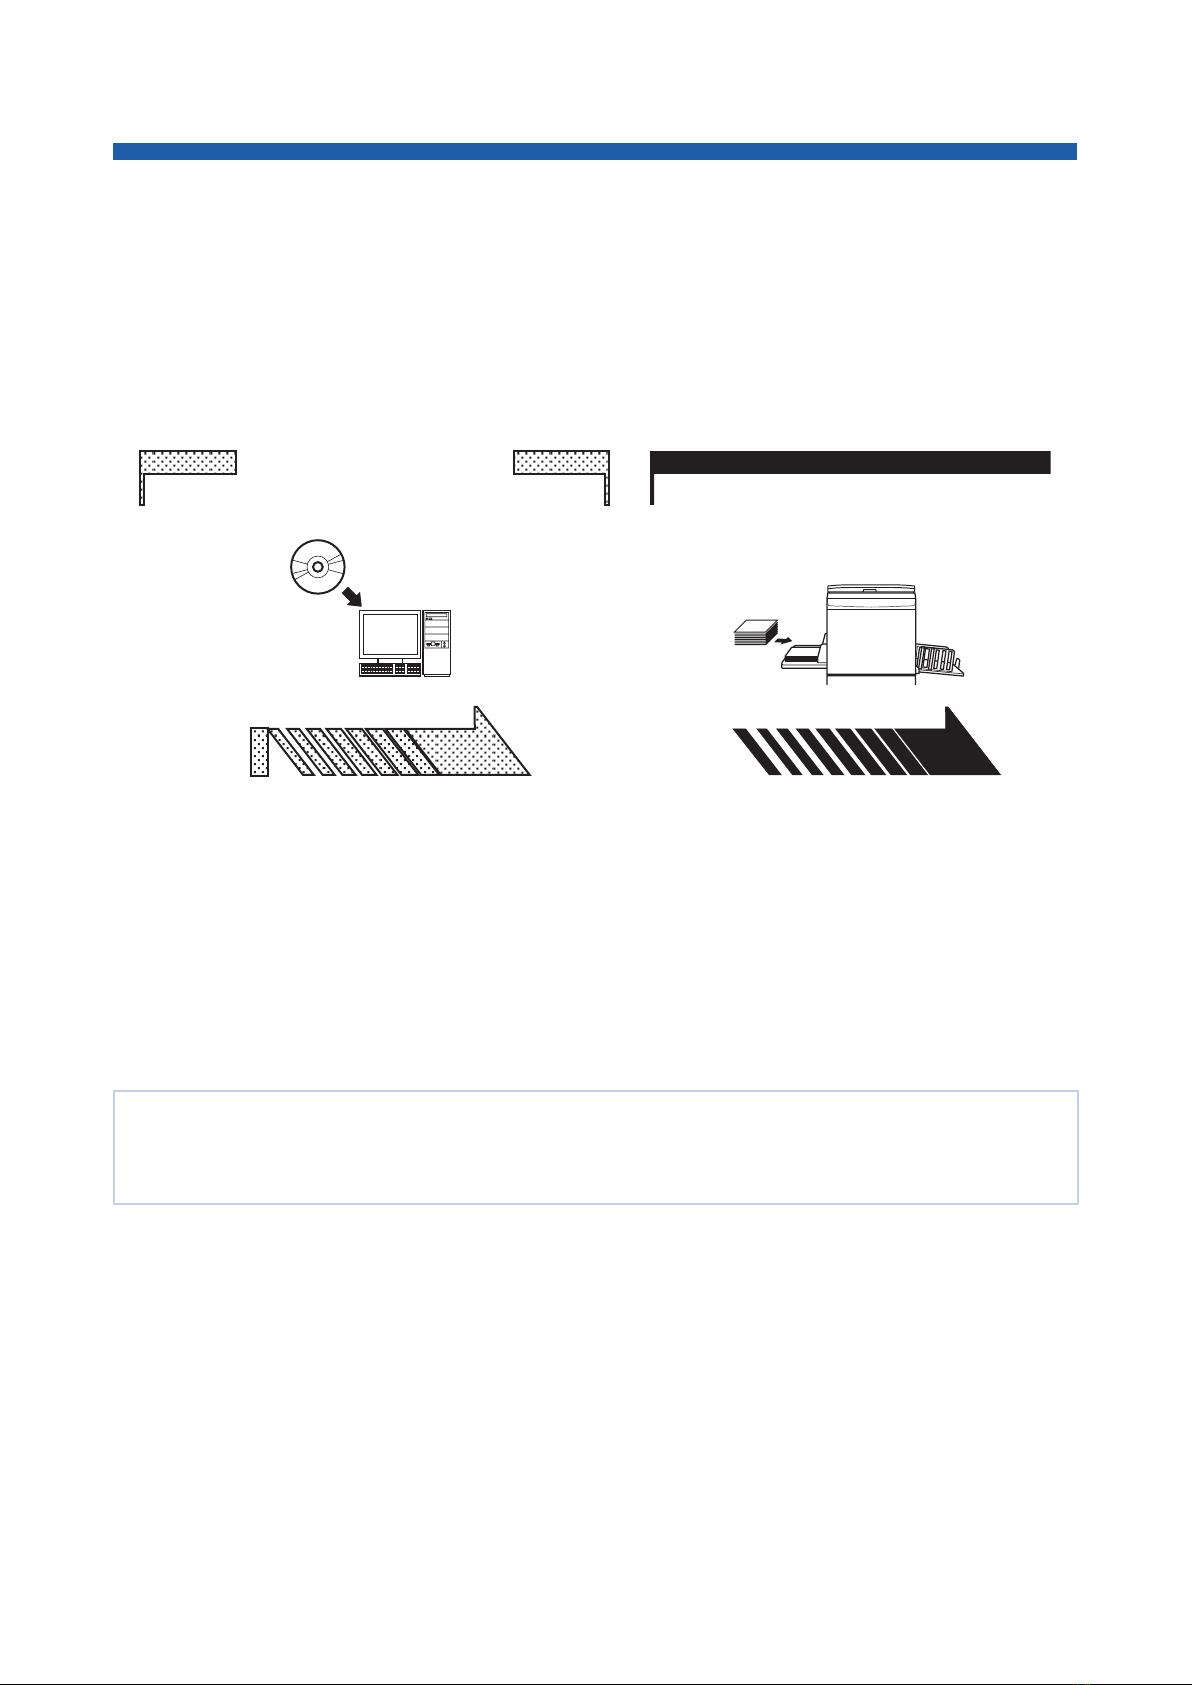
Procedurebeforeprinting
Before you use the printer at the rst time, carry out the installation procedure below.
After installation, follow the basic operation procedure. Then, you can print out the documentation data.
Installation (When the printer
is used at the rst time)
InstallingthePrinterDriver
Install the RISO Printer Driver into your
computer. A 7
● Depending on the connecting method, your
computer needs to be connected to the printer in
advance.
1.Preparingfortheprinter
Prepare for the printer and put the print
paper suitable for the original data to be
printed out onto the standard tray.
● For the preparation method for the printer, read
the user’s guide of the RISO printer.
¢OSSupport
This Printer Driver supports following OS:
Windows Vista®
(32-bit/64-bit)/Windows® 7 (32-bit/64-bit)/Windows®
8.1 (32-bit/64-bit)*/Windows®
10 (32-bit/64-bit)*
* Only compatible with desktop app
3
3
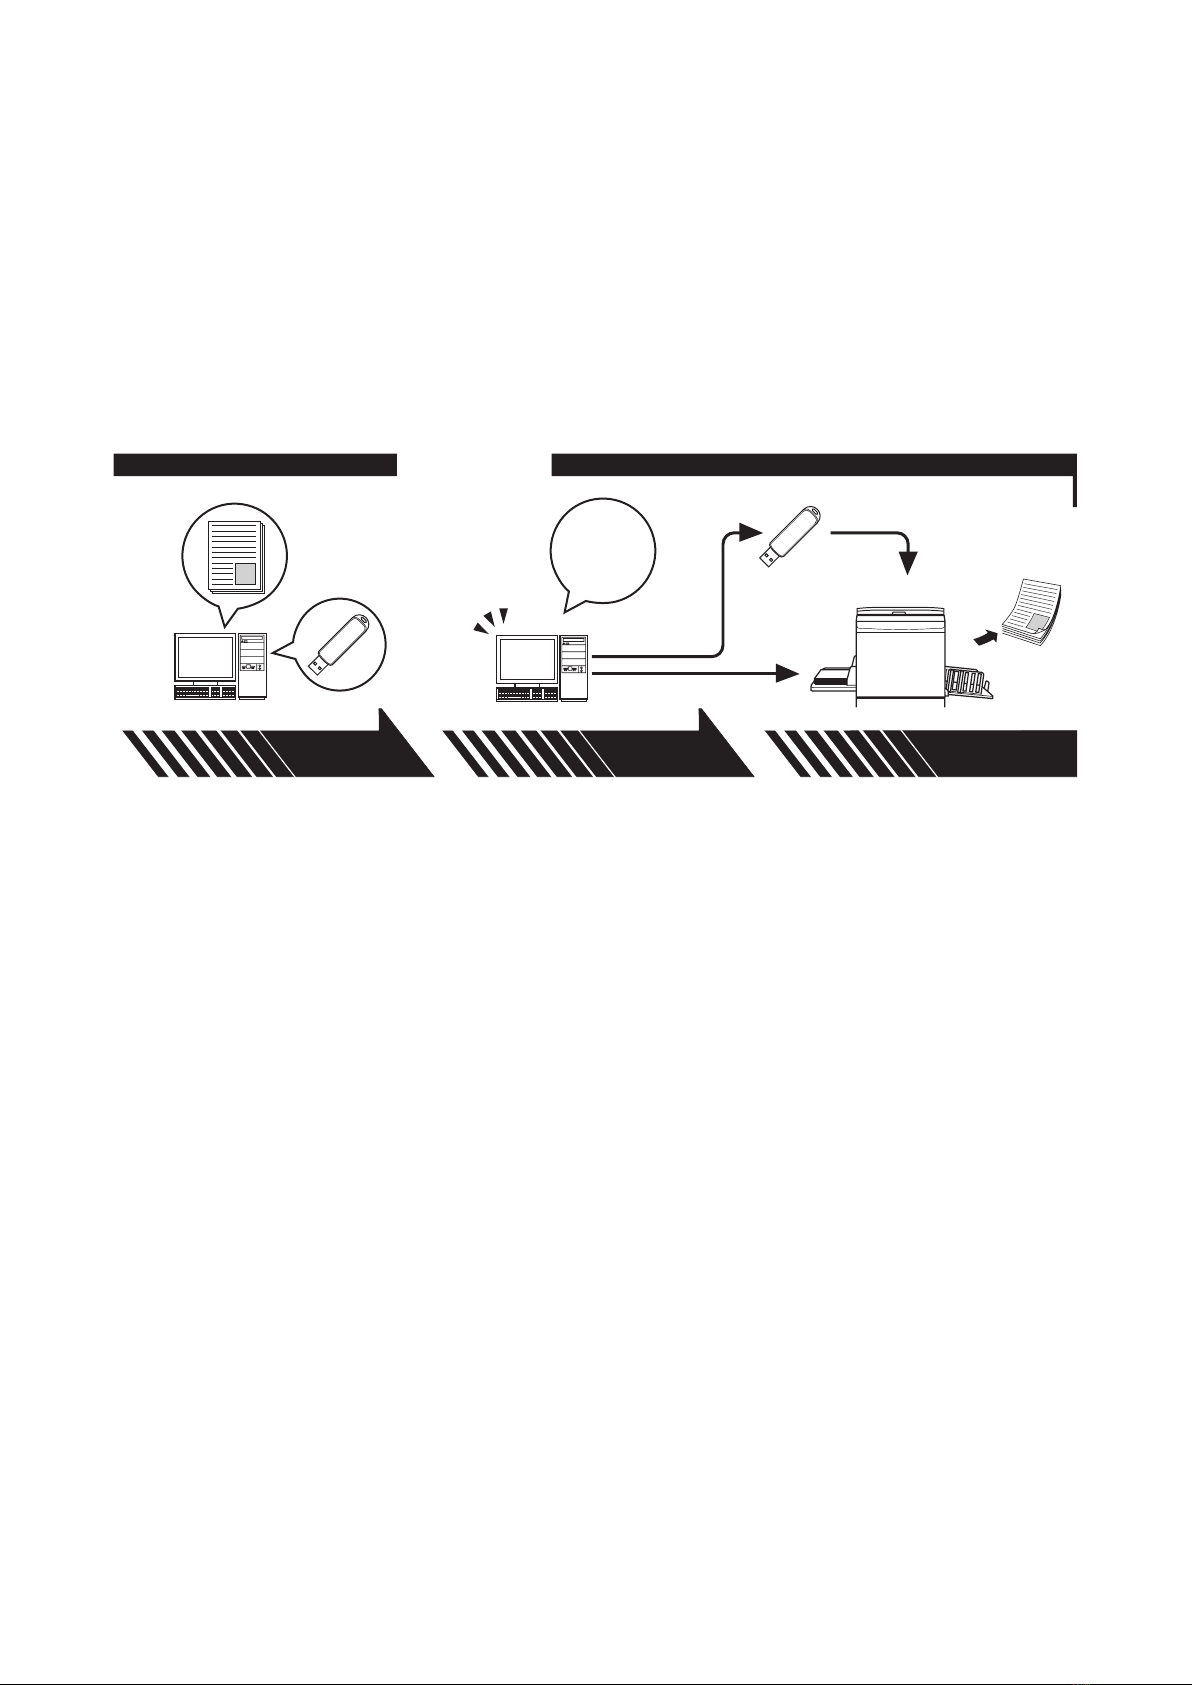
Basic operation
USB Flash Drive
Printing
OK USB Flash Drive
2.Setting
Open the data you want to print
out with your computer, select your
Printer Driver (or the USB ash-via-
Printer Driver) and make settings
for printing.
To print from a USB Flash Drive,
connect the USB Flash Drive to
your computer.
3.Printing
Open the [Print] dialog box on
your PC and click [OK]. The data
is transmitted to the printer or
stored in the USB Flash Drive.
4.Completionofprinting
The printer receives the data and
makes master and prints out the data.
To print from a USB Flash Drive,
connect the USB Flash Drive to the
printer.

4
4
ConnectingMethodsandPrinterDrivertypes
The types of Printer Drivers are as follows:
- Printer Driver
- USB ash-via-Printer Driver
Choose the Printer Driver to install according to your environment.
Theenvironmentforbeingconnectedviacable
In the following environment, the Printer Driver should be used.
¢WhenconnectedviaUSBcable(A 8)
USB cable
¢Whenconnectedvianetwork(A 13)
Network cable
Hub
Theenvironmentfornotbeingconnectedviacable
Save the data to the USB Flash Drive by using the USB ash-via-Printer Driver (A 23). Connect the USB Flash Drive to
the printer to print out the data.
USB Flash Drive
BEven in the environment where the printer and your computer are connected via cable, the data can be printed by using USB
Flash Drive.

5
5
TableofContents
Procedurebeforeprinting ………………………………………………………………………………………… 2
ConnectingMethodsandPrinterDrivertypes ………………………………………………………………… 4
■The environment for being connected via cable ………………………………………………………………………… 4
■The environment for not being connected via cable …………………………………………………………………… 4
TableofContents …………………………………………………………………………………………………… 5
Chapter1 InstallingthePrinterDriver
USBConnection……………………………………………………………………………………………………… 8
■Installing the Printer Driver ………………………………………………………………………………………………… 8
NetworkConnection…………………………………………………………………………………………………13
■Connecting with PC ……………………………………………………………………………………………………… 13
■Installing the Printer Driver ………………………………………………………………………………………………… 14
USBFlashDriveOutput ……………………………………………………………………………………………23
■About USB Flash Drive …………………………………………………………………………………………………… 23
■Installing the USB ash-via-Printer Driver ……………………………………………………………………………… 23
■Create a Folder …………………………………………………………………………………………………………… 28
■Printing a test page ………………………………………………………………………………………………………… 30
Chapter2 WorkingwiththePrinterDriver
ChangingthePrinterDriverConguration………………………………………………………………………33
SendingandPrintingData …………………………………………………………………………………………37
SettingthePrintConditions ………………………………………………………………………………………41
■[Basic] Tab ………………………………………………………………………………………………………………… 42
■[Layout] Tab ………………………………………………………………………………………………………………… 47
■[Image] Tab ………………………………………………………………………………………………………………… 50
■[Advanced] Tab …………………………………………………………………………………………………………… 53
■[Option] Tab ………………………………………………………………………………………………………………… 57
■[About] Tab ………………………………………………………………………………………………………………… 58
CreatingaRISORINC-formatle …………………………………………………………………………………59
■Adding a Local Port for RISORINC Files ………………………………………………………………………………… 59
■Selecting a Local Port for RISORINC Files ……………………………………………………………………………… 61
■Outputting RISORINC Files ……………………………………………………………………………………………… 62
Chapter3 UninstallingthePrinterDriver
UninstallthePrinterDriver…………………………………………………………………………………………64
Chapter4 Manuallyinstalling/uninstallingthePrinterDriver
WindowsVista:Manualinstallation/uninstallation ……………………………………………………………67
■Manual installation with a USB Cable Connection ……………………………………………………………………… 67
■Manual Installation with a Network Connection/USB Flash Drive Output …………………………………………… 69
■Manual uninstallation ……………………………………………………………………………………………………… 70
Windows7:Manualinstallation/uninstallation …………………………………………………………………71
■Manual installation with a USB Cable Connection ……………………………………………………………………… 71
■Manual Installation with a Network Connection/USB Flash Drive Output …………………………………………… 73
■Manual uninstallation ……………………………………………………………………………………………………… 74

6
6
Windows8.1:Manualinstallation/uninstallation ………………………………………………………………75
■Manual installation with a USB Cable Connection ……………………………………………………………………… 75
■Manual Installation with a Network Connection/USB Flash Drive Output …………………………………………… 77
■Manual uninstallation ……………………………………………………………………………………………………… 78
Windows10:Manualinstallation/uninstallation ………………………………………………………………79
■Manual installation with a USB Cable Connection ……………………………………………………………………… 79
■Manual Installation with a Network Connection/USB Flash Drive Output …………………………………………… 81
■Manual uninstallation ……………………………………………………………………………………………………… 82
Chapter5 Appendix
ErrorMessageonPC’sDisplay……………………………………………………………………………………84
OperationProblems …………………………………………………………………………………………………85
■No Printout ………………………………………………………………………………………………………………… 85
■Unexpected Print Result …………………………………………………………………………………………………… 86
■Unexpected Action ………………………………………………………………………………………………………… 87
■Unable to Specify Settings ………………………………………………………………………………………………… 87

7
The method of installing the Printer Driver using the installer is described here.
InstallingthePrinterDriver
Chapter1
USBConnection……………………………………………………………………………………………………… 8
■Installing the Printer Driver ………………………………………………………………………………………………… 8
NetworkConnection…………………………………………………………………………………………………13
■Connecting with PC ……………………………………………………………………………………………………… 13
■Installing the Printer Driver ………………………………………………………………………………………………… 14
USBFlashDriveOutput ……………………………………………………………………………………………23
■About USB Flash Drive …………………………………………………………………………………………………… 23
■Installing the USB ash-via-Printer Driver ……………………………………………………………………………… 23
■Create a Folder …………………………………………………………………………………………………………… 28
■Printing a test page ………………………………………………………………………………………………………… 30
8Chapter 1 Installing the Printer Driver
8Chapter 1 Installing the Printer Driver
USBConnection
InstallingthePrinterDriver
This section describes how to install the Printer Driver for windows supporting the Plug&Play installation when your
computer and the RISO printer are connected via USB cable.
(Regarding the procedure for manual installation, see A 66.)
BYouarerequiredtohavetheadministrator’sprivilegetoinstalltheprinterdriverprograminyourcomputer.
BThisPrinterDriverdoesnotsupportserverOSorprintersharing.
BUseacommerciallyavailableUSBcable(Hi-speedUSB,3morless).
To update the Printer Driver, change cable connections or reinstall a Printer Driver of the same series, deletion
of the driver package is required. Uninstall the installed Printer Driver manually before new installation. “Manual
uninstallation” (A 66)
0BDonotconnecttheUSBcableuntilyouareinstructedtodoso.
1Insertthe[RISOPrinterDriver]DVD-ROMintoyourcomputer’sDVD-ROMdrive.
The installer is started. If the installer does not start up, double-click on the [Setup(.exe)] le in the folder below.
Fora32-bitOS:
(DVD-ROM):[Windows 32-bit] folder
Fora64-bitOS:
(DVD-ROM):[Windows 64-bit] folder
B If the [User Account Control] dialog appears, click [Yes] or [Allow] (for Windows Vista).
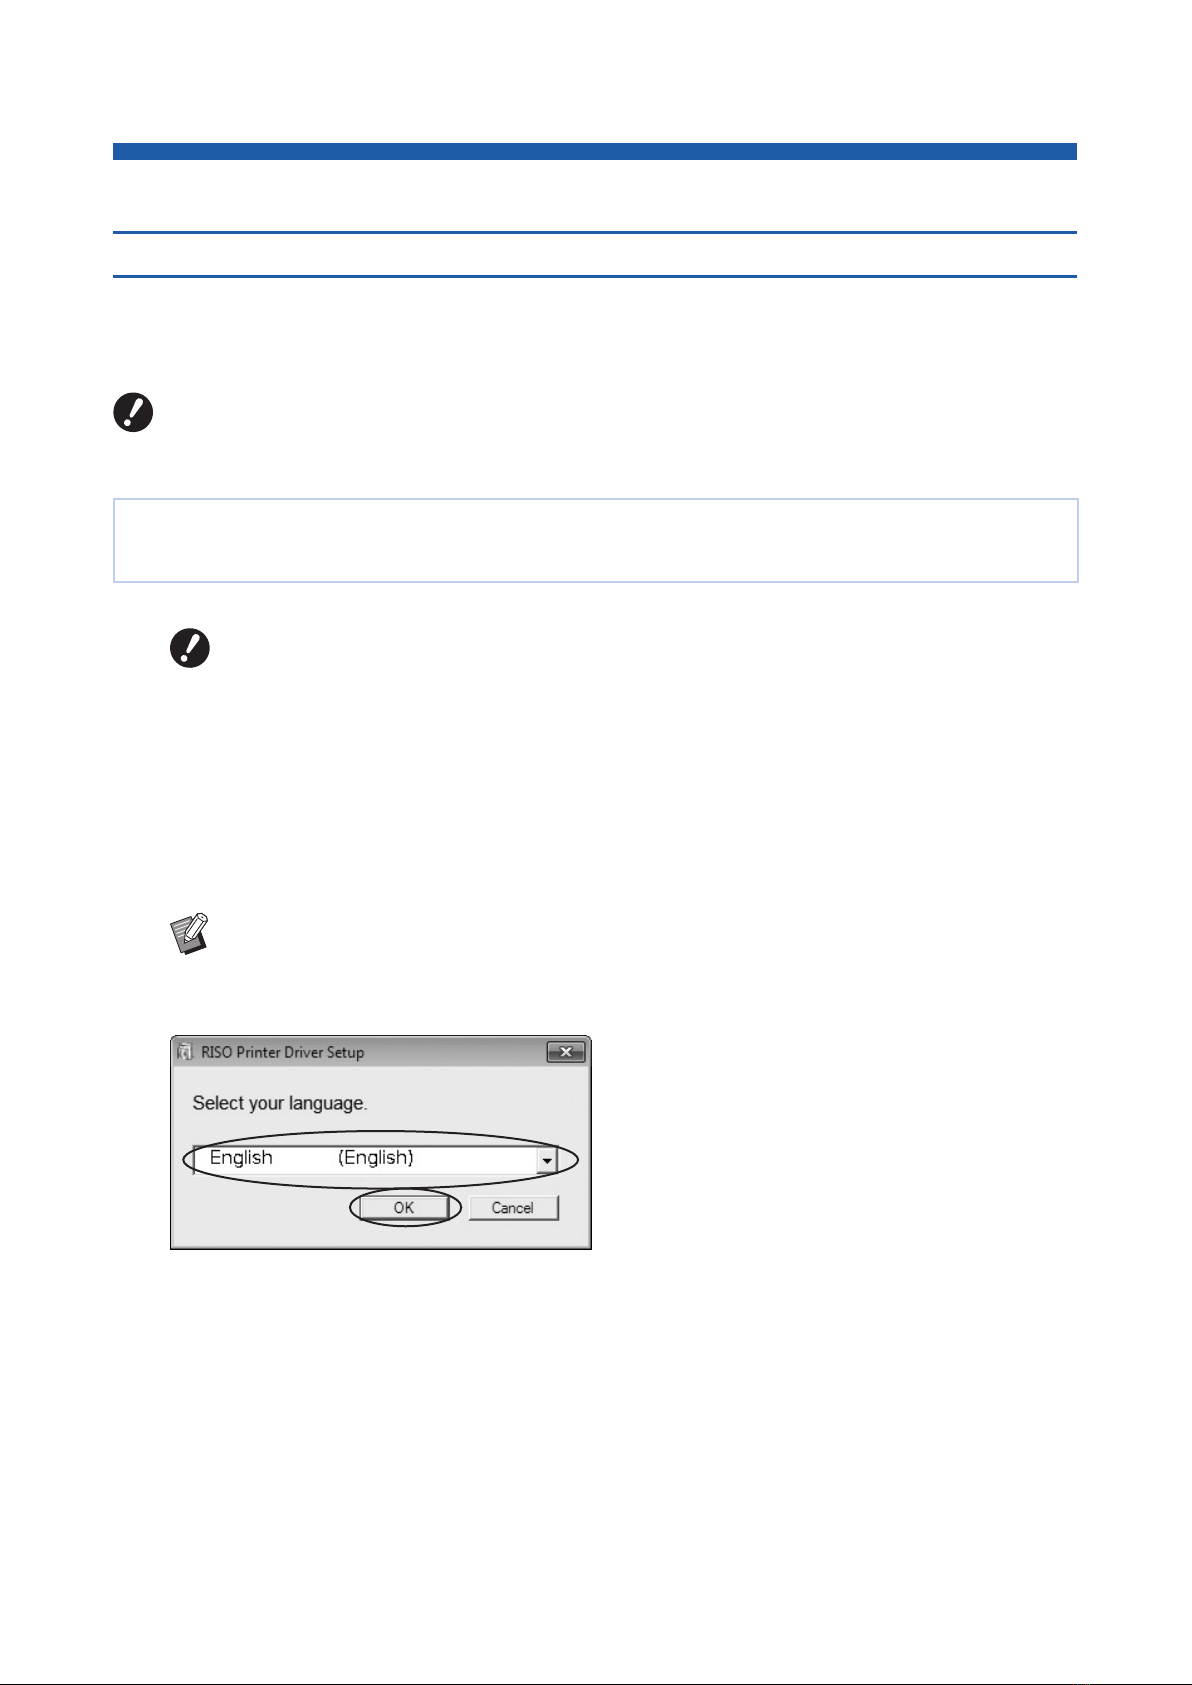
2Selectyourlanguagefromthedrop-downlist,thenclick[OK].
Ce manuel convient aux modèles suivants
1
Table des matières
Manuels Entraînement CC populaires d'autres marques

Vincent Associates
Vincent Associates UNIBLITZ ED12DSS Manuel utilisateur

EKSMA OPTICS
EKSMA OPTICS DQ-100-4 Manuel de la liste des pièces

Chamberlain Garog
Chamberlain Garog D Series Manuel utilisateur

Parker
Parker PDS Series Manuel utilisateur

Festo
Festo DGC G Series Guide de configuration

Binks
Binks QS-5012-1-CE Manuel utilisateur


