
RELM RP6500 Manuel utilisateur

Page 1 of 31
RP6500 User’s Manual
FM Portable Radio
We are very grateful for your purchasing RELM two-way radios produced by RELM Wireless
Corporation.
RELM two-way radio always incorporates the latest technology. The quality and function of
the RELM two-way radio can meet your demands for reliable communication.
Notice to the User:
·Please read this instruction manual before operating this radio.
·It’s prohibited to use the radio or charge it at any area with a potentially explosive
atmosphere (where the air contains gas, dust and smog, etc.), such as while taking on
fuel, or while parking at a gasoline service station; or any area where radio
communication is prohibited (such as a hospital or a airport.)
·It’s prohibited to operate the radio without permission at the areas where the government
laws prohibit radio communication.
·Please don't expose the radio to direct sunlight for a long time; don't place the radio near
any heating devices, either.
·Please don't put the radio in extremely dusty, moist or dabbling places; don’t place it on any
unstable surfaces, either.
·If you want to develop or remodify the radio
·Refer service to the well-trained professional technicians only and do not disassemble or
assemble the radio.

RP6500 User’s Manual
Page 2 of 31
CONTENTS
Unpacking and checking
Supplied accessories
Preparation
Charging the battery
Installing/Removing the battery pack
Installing the antenna
Installing the optional speaker/microphone
Installing the belt clip
Radio Overview
Basic Operation
Programmable Button functions
VOX
Copy mode
Whole setting
Time-out Timer(TOT)
Battery Saving
Low Power Warning
Channel Annunciation
CTCSS/ DCS
User’s resolution
Busy Channel Lockout(BCL)
Receiving squelch mode
DTMF signaling
2TONE signaling
5TONE signaling
Transmit beginning/ending signaling (PTT ID)
Problems and troubleshooting
Major Specifications
Status setting
RP6500 User’s Manual
Page 3 of 31
Unpacking and checking
Unpack the transceiver carefully. We recommend that you identify the items listed in the
following table before discarding the packing material. If any damage has occurred during
shipment, please contact the dealer immediately.
Supplied accessories
Item Quantity
Antenna 1
Battery 1
Belt clip 1
Charger 1
Power adapter 1
Hand strap 1
User’s Manual 1
Antenna Power Adapter Battery Hand Strap Belt Clip Charger
Preparation
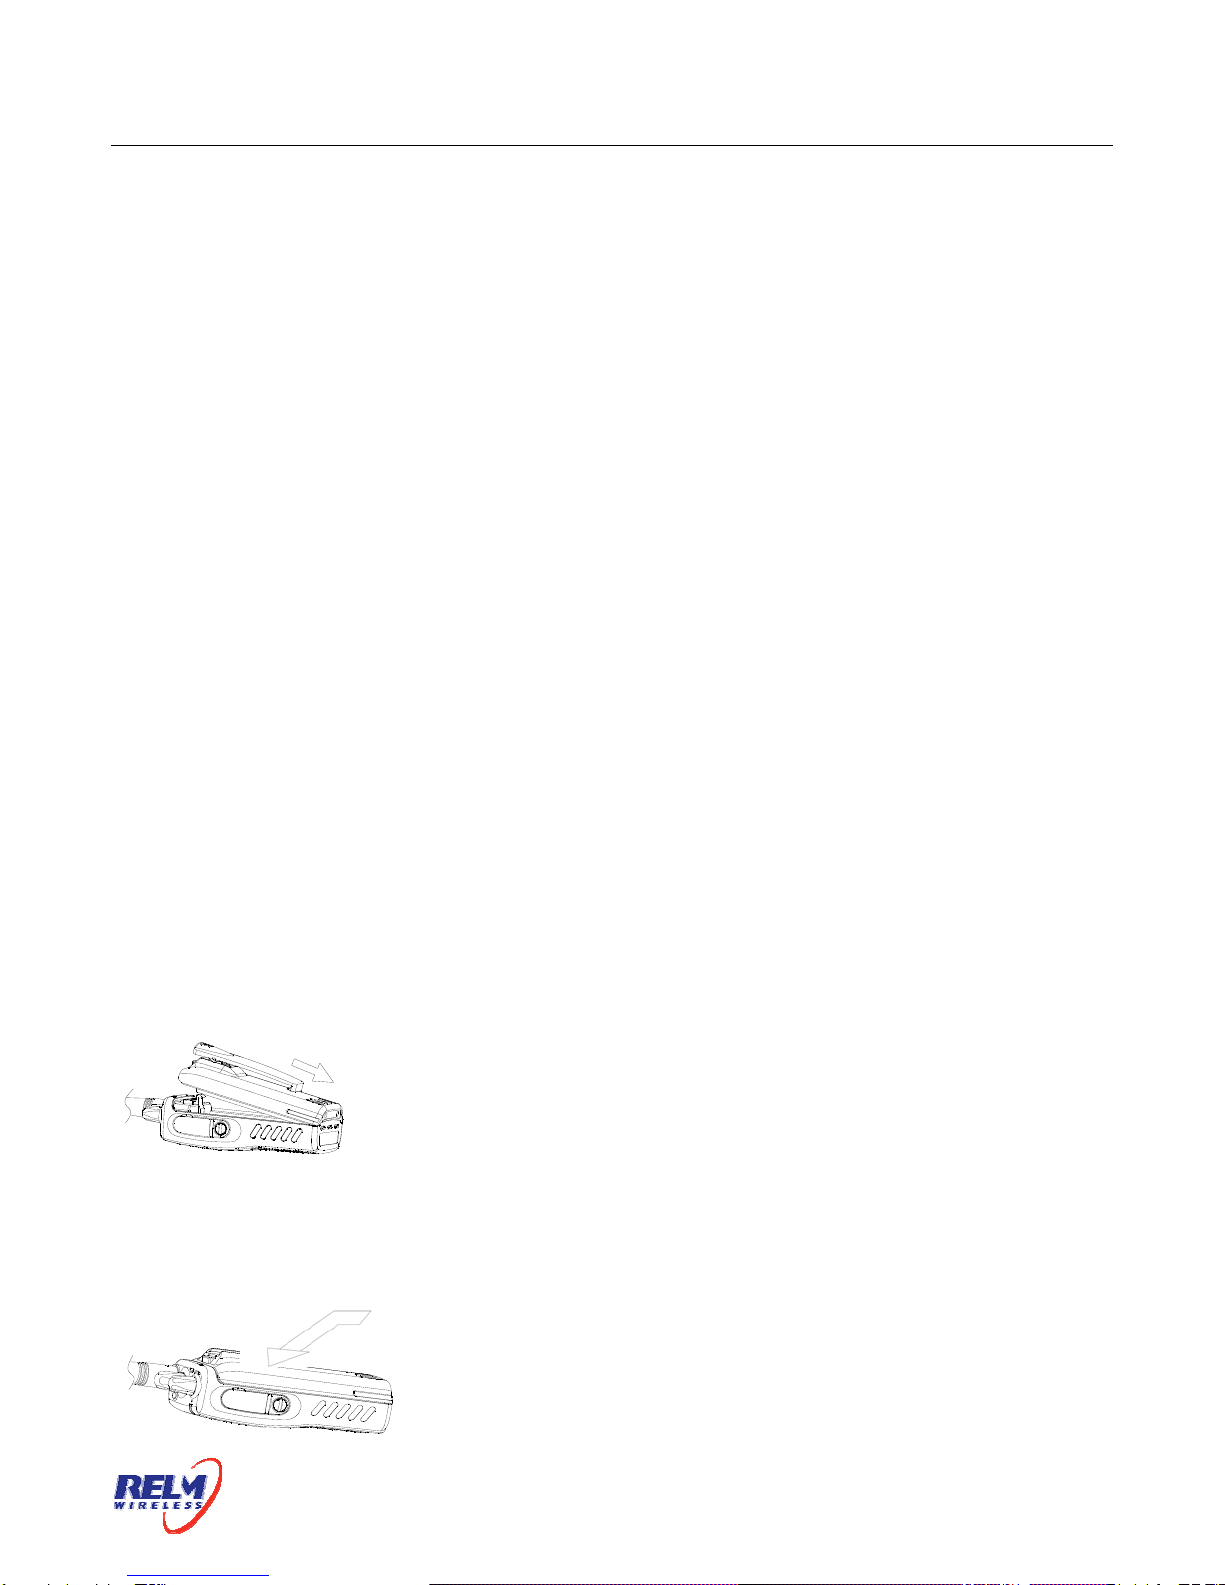
Charging the battery
Plug the power adapter into the proper AC wall outlet; and then the green
indicator lights.
Insert the battery or transceiver into the charger slot, and make sure the
transceiver has been turned off.
Make sure the battery is well connected with charger, then the indicator
turns red or flashes, then the charger gets in the state of charging
automatically.
When battery is fully charged the indicator turns green.
RP6500 User’s Manual
Page 4 of 31
The performance will be at the best condition if you remove the battery when the green
indicator is on. Then remove the power adaptor from the wall outlet.
The charger will enter the protection mode when the yellow indicator flashes, which means the
temperature or the circuit is abnormal. Do not charge the battery at this moment, just remove
the battery and turn off the power of the charger.
Notes:
* The battery is not fully charged in the factory. Before the initial use, please charge the new
battery.
* When you charge the battery the first time or after long time storage (2 months), several
times of charging is needed. Make sure the battery is charged at least once every three
months.
* Do not charge the battery again if it is charged fully or not in the low-pressure warning mode,
otherwise, it will have bad effects on its life and performance. Remove the battery from the
charger after charging.
* There is a protection circuit in KB-36C battery, so the power will be cut off at too low power.
Installing/Removing the battery pack
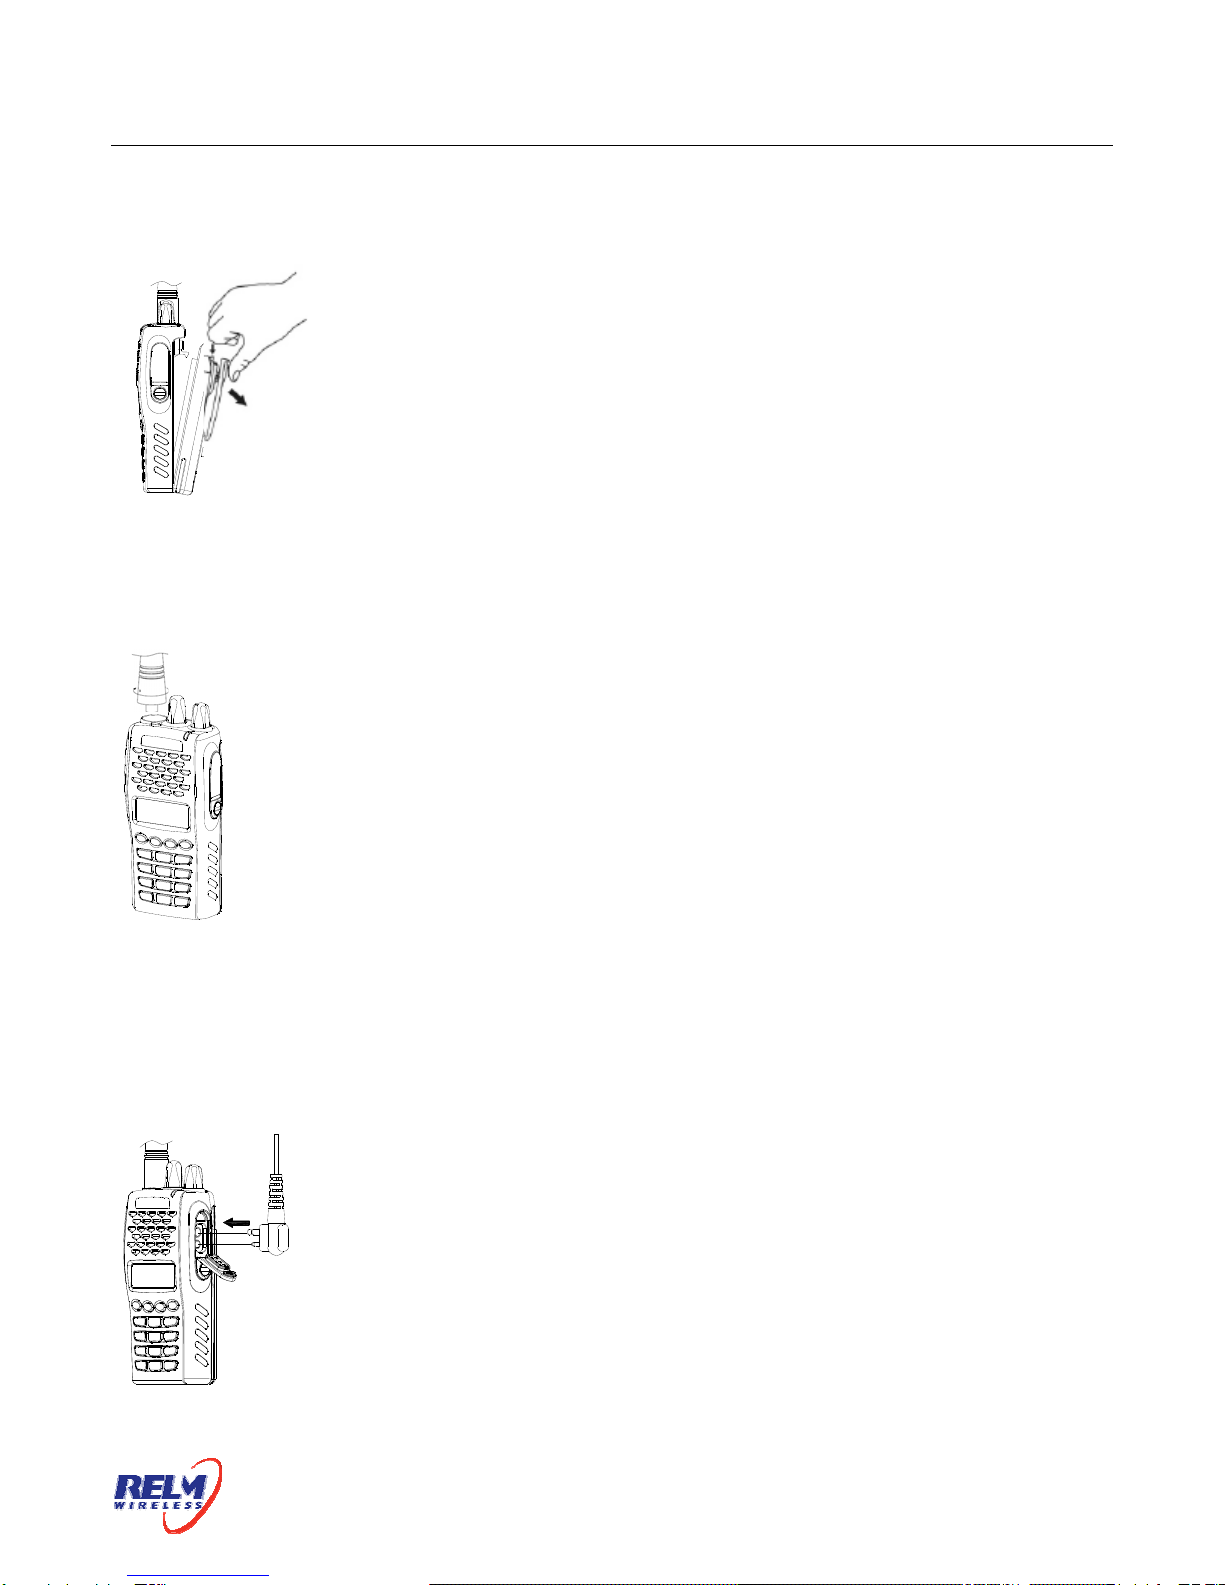
To install the battery pack:
Match the 3 bulges of the battery pack with the corresponding slots at
the rear bottom of the transceiver.
To install the battery pack:
Then firmly press the battery pack downwards to lock it in place
until a click is heard.
RP6500 User’s Manual
Page 5 of 31
To remove the battery pack:
To remove the battery pack, use your thumb to press the belt clip, one
side of your index finger to press the release button and then pull the
battery away from the radio
Notes:
* Do not cause short-circuit or throw the battery to the fire.
* Do not disassemble the battery by yourself.
Installing the antenna
Screw the antenna into the connector at the top of the transceiver by
holding the Button of the antenna and turn it clockwise until secure.
Installing the optional speaker/microphone
Insert the speaker/microphone plug into the jacks of the versatile connector,
and fix it with the supplied snail screw.
7
RP6500 User’s Manual
Page 6 of 31
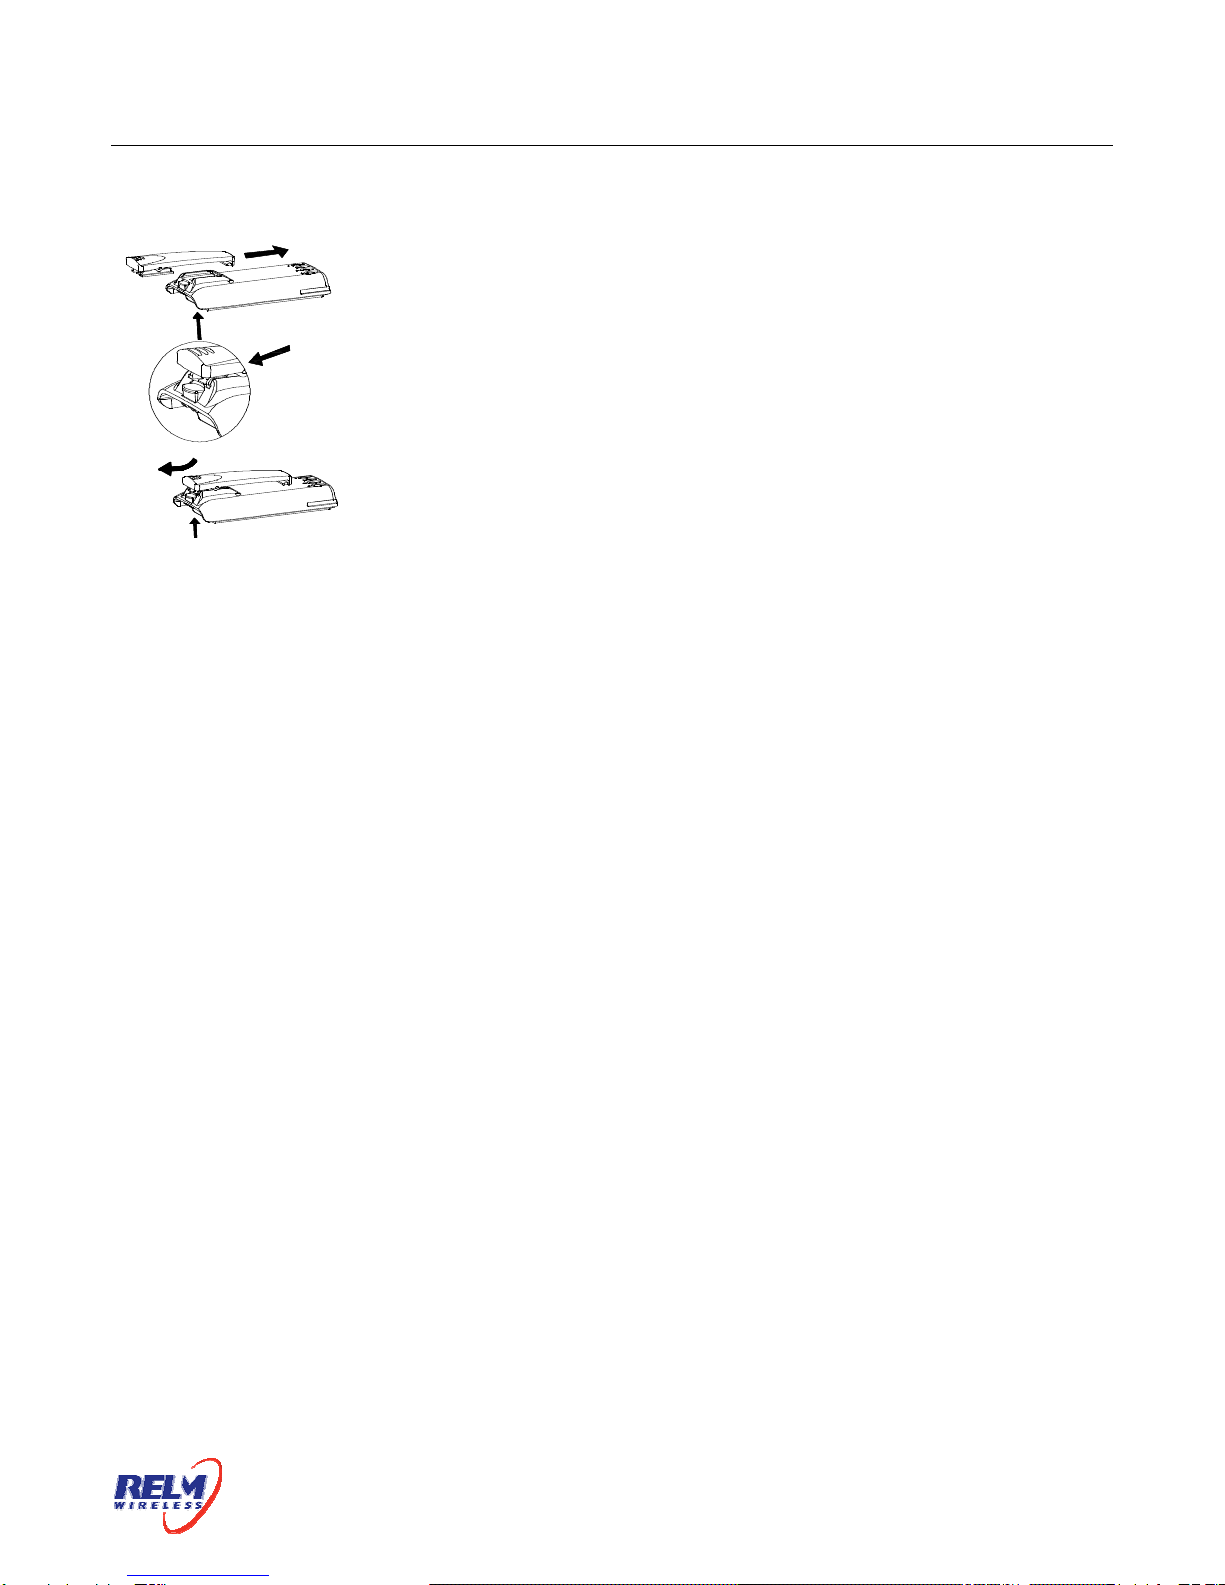
Installing the belt clip
Match the grooves of the belt clip with those on the rear of the battery.
Then press belt clip downwards to lock it in place. Push the card by
inserting your nail or tool into the groove at the upper part of the clip to
remove the belt clip.
RP6500 User’s Manual
Page 7 of 31
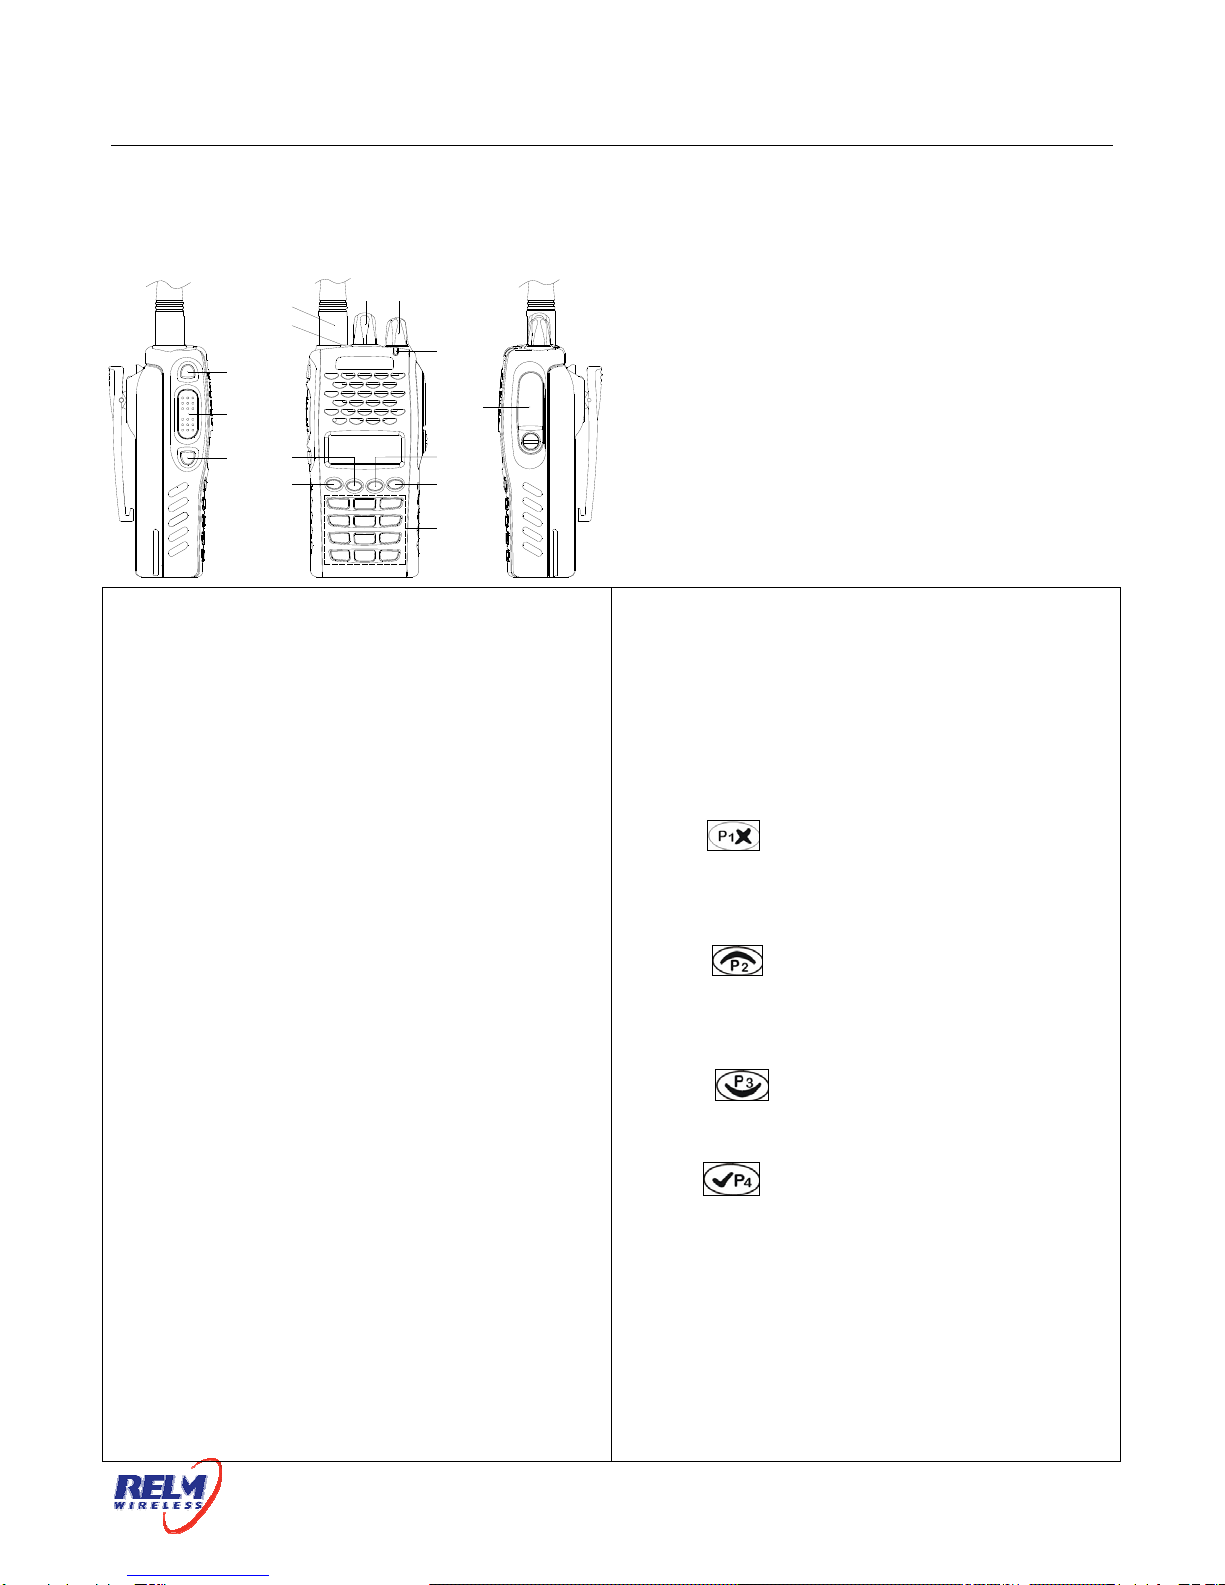
Radio Overview
The functions of the components are as follows:
A. LED Indicator
Lights red while transmitting;
Lights green while receiving.
B. Power/Volume Switch(Knob)
Turn clockwise till a click is heard to switch
on the radio.
Turn counterclockwise till a click is heard to switch off
the radio.
Rotate to adjust the volume after turning
on the radio.
C. Channel Selector
Rotate to select the channel 1-128.
D. Antenna
E. Top Button (programmable button)
It is recommended to be set as the
emergency warning Button.
F. Side button 1 (programmable button)
G. PT T(PUSH-TO-TALK):
To make a call, press and hold the PTT button, then
speak into the microphone with normal voice. Release
the PTT button to receive signals.
H. Side button 2 (programmable button)
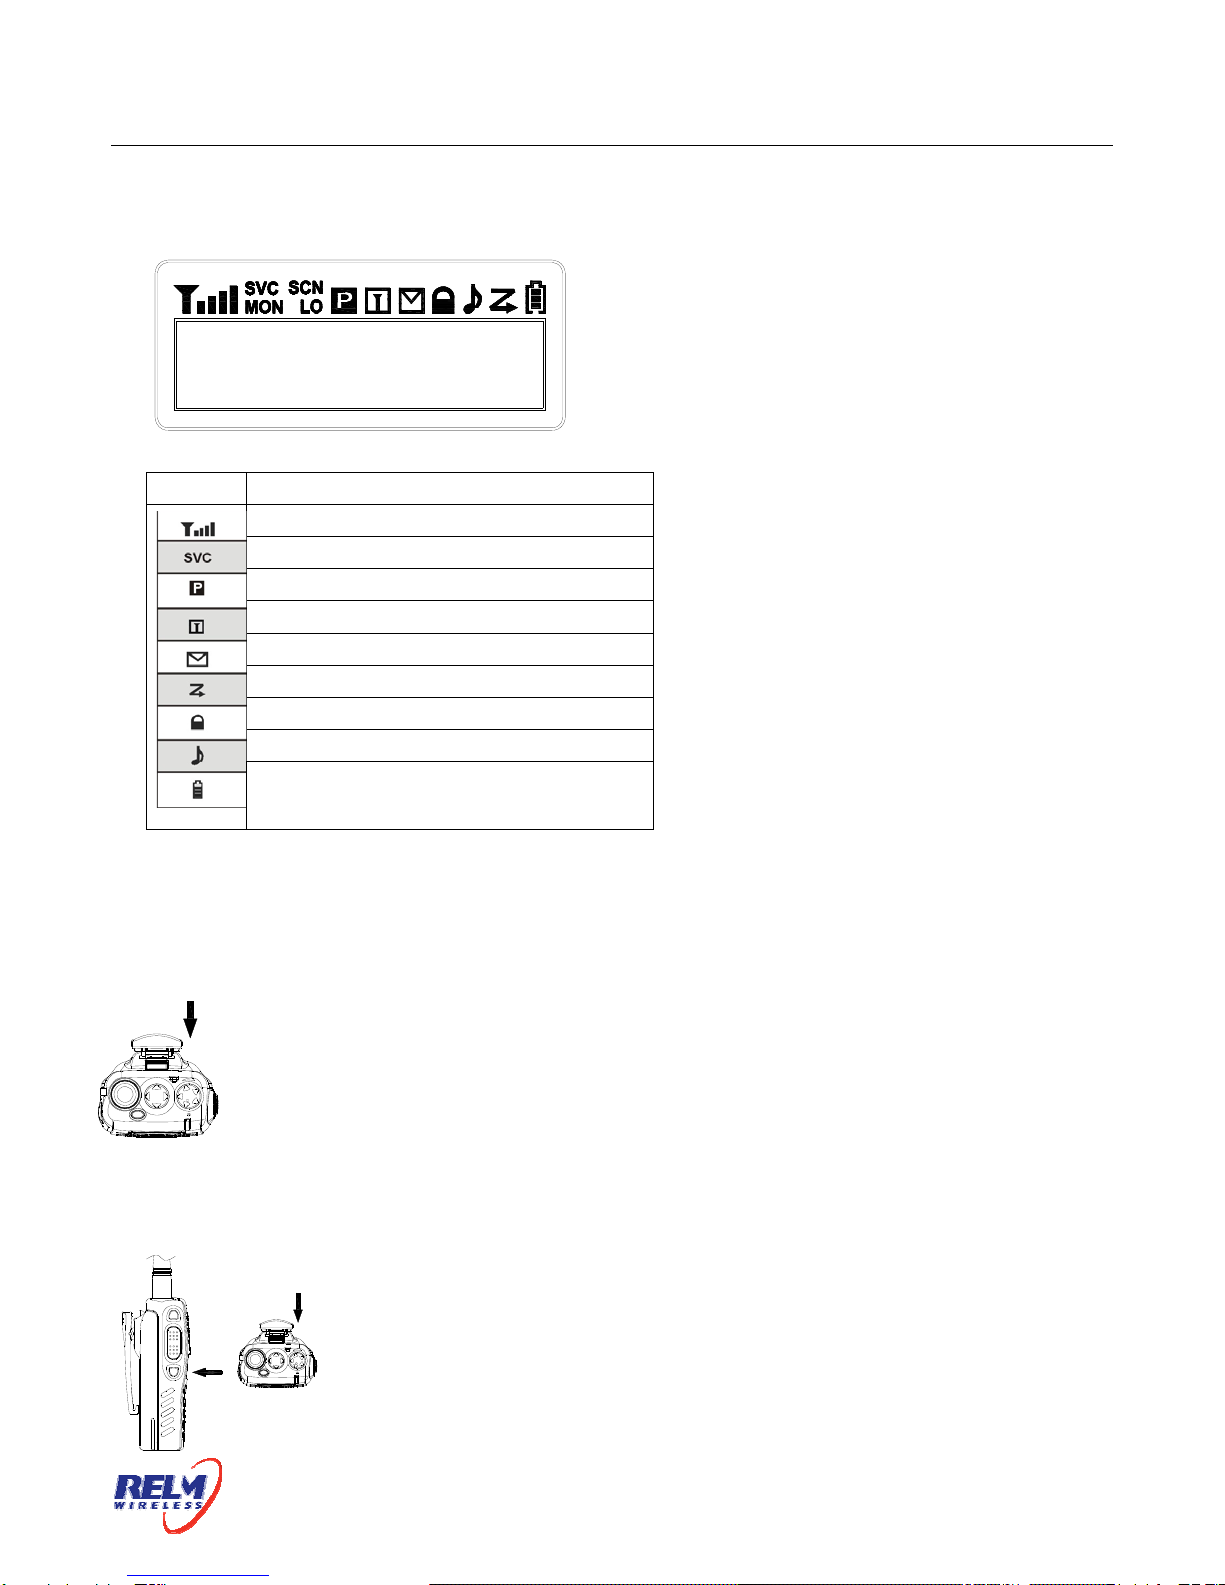
I. Button
Return and delete button in the menu.
J. Button
Select Button.
K. Button
Select Button.
L. Button
Enter and Confirm Button.
M. Numeric keypad
N. Microphone/speaker jacks
For connecting microphone/speaker.
D
E
A
CB
G
H
F
N
J
IL
K
M
RP6500 User’s Manual
Page 8 of 31
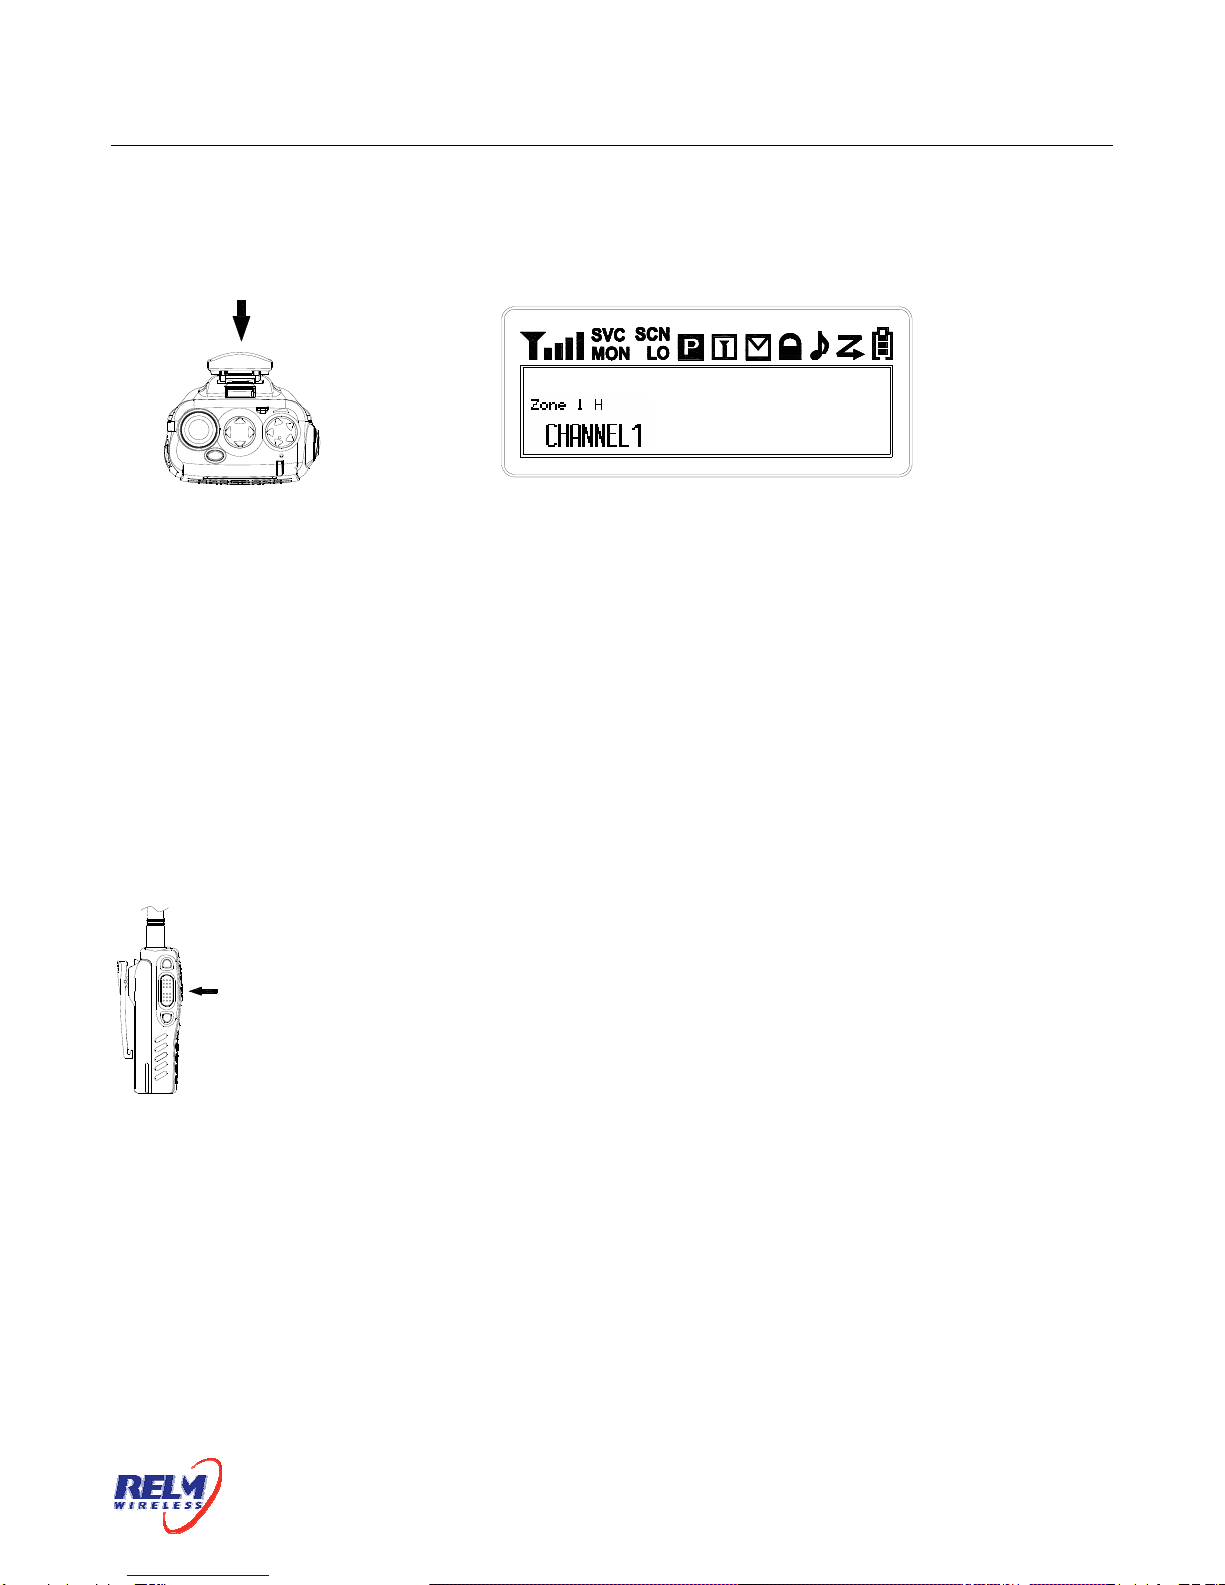
Explanation for the screen
Basic Operation
1. Switch On
Switch on the radio by turning the Power/Volume switch clockwise
till a click is heard, then the radio will be in the state of stand by
and you will hear a beep if the dealer has set it.
2. Adjust Capacity
Press the button preset as canceling squelch to listen to the
background noise and rotate the Power/Volume switch to adjust
capacity.
Icon Description
Signal intensity
SVC
Compandor
Disturbance Frequency
Busy channel lockout
Scanning
Key lockout
Signal reminder is programmed
Battery capacity, flashes when the
battery power goes too low
RP6500 User’s Manual
Page 9 of 31
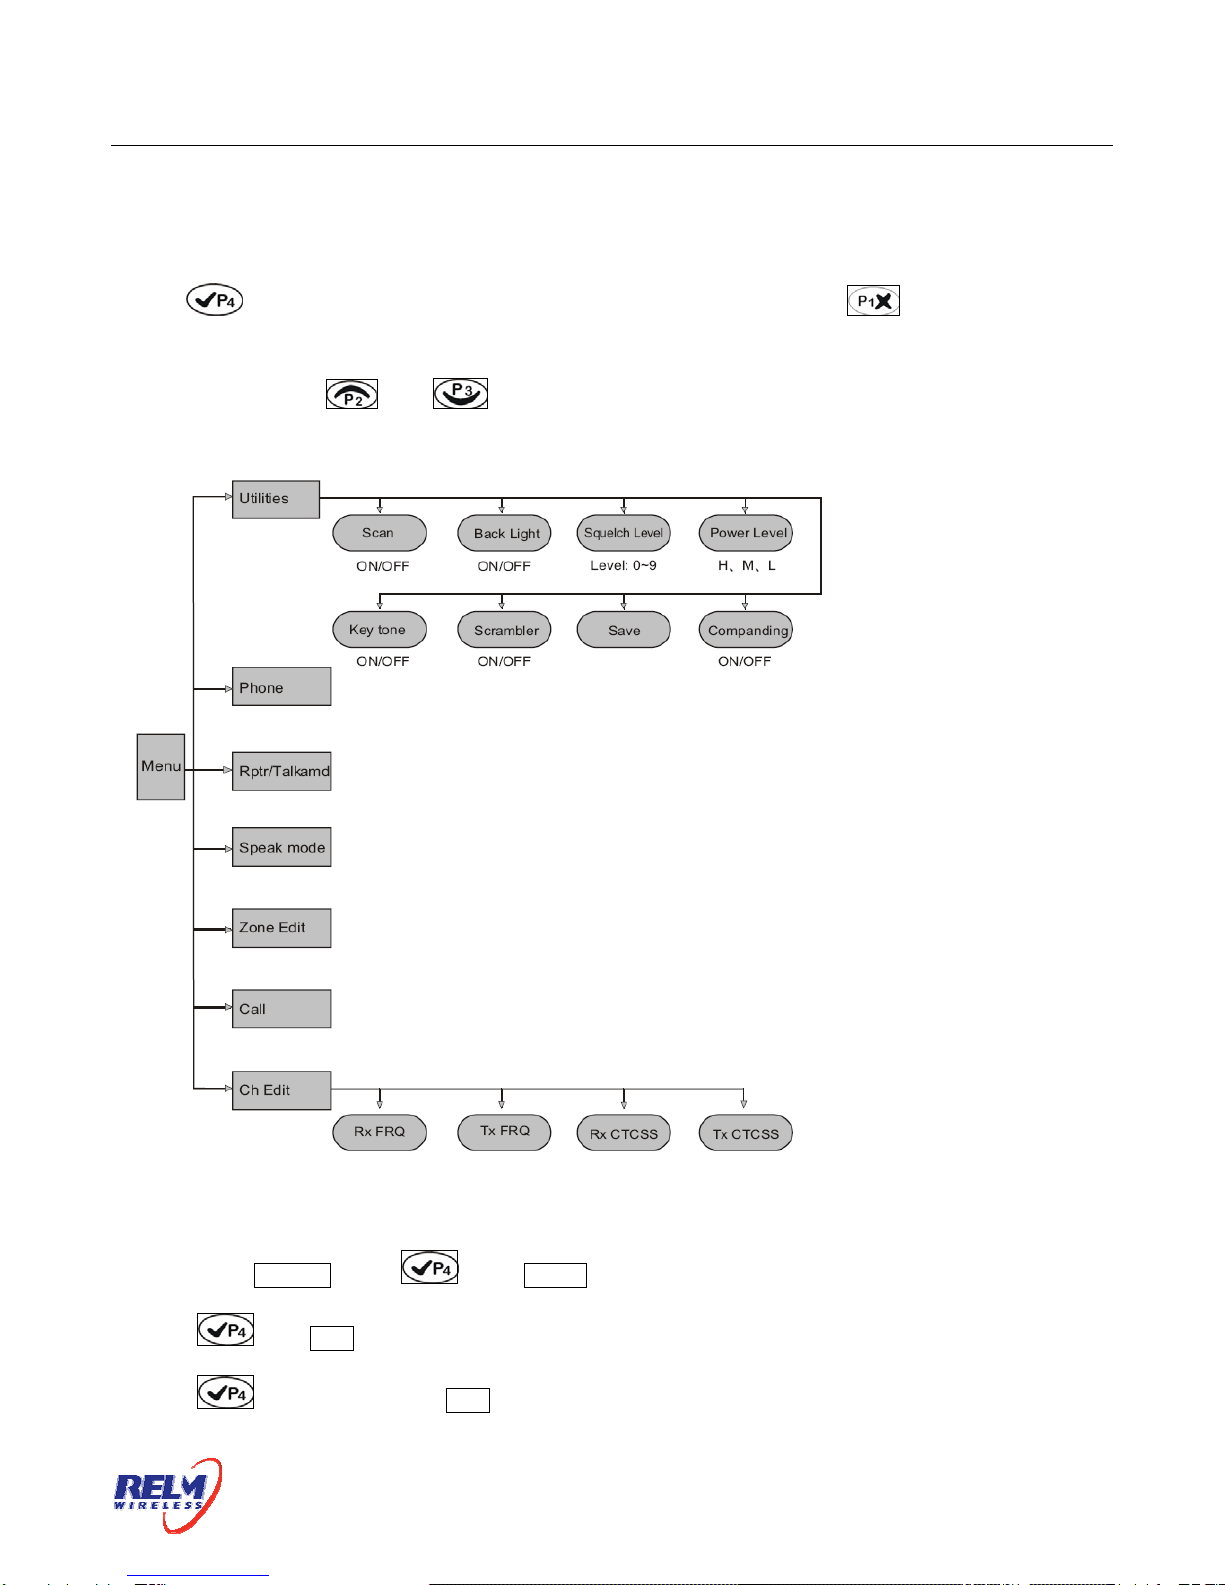
3. Select a Channel
Rotate the channel selector to select channels. You will hear voice from the speaker while
receiving proper signals.
As shown in the above right figure:
Zone 1 is the zone of current channel (8 zones from 0 to 7).
H is the transmit power of the channel, H stands for high power, M for middle power while
L for low power.
CHANNEL 1 is the current channel (128 zones from 1 to 128).
4. Make a Call
To make a call, press PTT, and speak in normal voice. Please keep your mouth
3~4 cm away from the microphone.
5. Receive a Call
Release the PTT button to receive a call.
Your dealer can set CTCSS, DCS, 2 Tone signaling on you radio channels by PC software. If
you select a channel that has been preset with the tone signaling, you will not hear any other
calls except those from your own system.
RP6500 User’s Manual
Page 10 of 31
6. Operation on menu:
press “ ”button to enter the menu or confirm any contents; press “ ” button to return to
the previous menu or cancel the set. When entered the menu, select the sub-menu with the
“channel selector”, “ “or “ ”.
The menu is as follows:
The operations are as follows:
Set scanning:
1. As shown: in CH 1 , press , then utilities is shown;
2. Press , then scan is shown;
3. Press , then enter selecting scan;
Table des matières
Autres manuels RELM Radio portable


