Redtiger T27 Manuel utilisateur

T27 USER MANUAL
Email: support@redtigercam.com
Website: http://www.redtigercam.com
Phone: +188 8966 8028

WARNING: Be careful when using your
camera and its accessories. Always be
caution of your surroundings to avoid
injuring yourself and others.
Make sure to follow all local laws
including all privacy laws which may
restrict recording in certain areas.

IC warning:
This device contains licence-exempt transmitter(s)/receiver(s)/ that comply with Innovation Science and Economic
Development Canada's licence-exempt RSS(s). Operation is subject to the following two conditions:
1. this device may not cause interference and
2. this device must accept any interference, including interference that may cause undesired operation of the
device.
Radiation Exposure: This equipment complies with Canada radiation exposure limits set forth for an uncontrolled
environment; To maintain compliance with IC's RF Exposure guidelines, This equipment should be. installed and
operated with minimum distance of 20cm the radiator your body. This device and its antenna(s) must not be co-
located or operation in conjunction with any other antenna or transmitter.
Déclaration de l'ISED Canada :
Cet appareil contient des tasmittre (s) / récepteur (s) sans licence / conformes à l'innovationRSS exemptes de
licence de Sciences et Développement économique Canada. L'opération est sous réserve des deux conditions
suivantes :
1. cet appareil ne peut pas causer d'interférences et
2. cet dispositif doit accepter toute interférence, y compris peut provoquer le fonctionnement indésirable de
l'appareil.
Exposition aux rayonnements : Cet équipement est conforme aux radiations du Canada limites d'exposition pour
un environnement incontrôlé noncé d'exposition RF Pour maintenir le respect des guides d'exposition RF d'IC,
cquipment doit être.installé et actionné avec une distance minimale de 20cm le radiateur de votre corps. Cet
appareil et ses antennes ne doivent pas être co-localisé ou en opération en conjonction avec toute autre antenne
ou émetteur.

01
Contents
Meeting your T27
T27 Power Tools
Setting Up Your Camera
Mounting the rear camera
Mounting the GPS&Mirror
Playback your T27
Customizing Your T27
Parking Mode ( Optional )
GPS Player (PC)
Trouble Shooting
Customer Service
Product Information
02
03
04
05
08
10
11
14
15
18
19
20
NOTES Before Installation
Do not directly plug and unplug the cable or SD
card, please perform related operations after
camera off.
Do not expose to the sun for a long time is the
best, camera will heat on during its working, any
damaged by high temperature will be added to 1
year free replacement warranty.
Please use the cables and accessories provided in
the package.
Please plug in all accessories and power the dash
cam to confirm whether it can work well before
installation.
If you encounter any problems, please feel free to
contact our customer service.

02
Meeting Your T27 Meeting Your T27
T27 Mirror Dash Cam
GPS Receiver
User Manual*1 Tool *1 Cleaning Cloth *1
Car Charger *1
Straps *4
Backup Camera *1
Backup Camera
Cable *1
3M Sticker*1
Mount Bracket*1
Screws *4
(Inside of Vehicle)
NO. Name Description
1
2
3
4
5
6
7
8
Front Camera
GPS Port
Micro SD Card Slot
Rear Camera Port
Power Supply Port
Fasteners
Screen
Power Button
Record the front view of the vehicle.
Connect the GPS receiver.
Connect the rear view camera.
Connect the car charger.
Please use the included silicone straps.
11.26 inch IPS touch screen.
Short press to turn off the screen,long
press to turn off the power.
Insert aMicro SD card
(maximum support 128G).

03
Meeting Your T27 T27 Power Tools
Settings: Touch to enter the menusetting
File Playback: Playback the video & Photo
Start/ Stop Recording
Snapshot: Take a Snapshot
Date & Time
Recording Status: Yellow flashing means Lock Recording
Audio Record is on
Button's beep sound status
GPS Status: Once the GPS signalis successfully received, the
icon will turn GREEN. Otherwise, it turns WHITE.
Speed & Driving Direction: Once GPS is connected,the
information will show
1. Cig Charger
(No Battery Protection)
SEE PAGE 5
2. Hardwire Kit
(Parking Mode Needed)
(Extra charge)

04
Setting Up Your Camera Setting Up Your Camera
SD CARD
With your camera off, insert the SD card into the
card slot with the label facing the back of your
camera.
You can eject the card by pressing it into the slot
with your fingernail.
You'll need a micro SD card (sold separately)
to save your videos and photos. Use a U3 Class
10 SDTM Card dedicated or your camera may
malfunction.
SD cards can degrade over time and affect your
camera's ability to save your media. Try swapping
out an older card for a new one if you're having any
problems.
WIRING SET UP
Connect your camera to a Cig charger using the
included cig charge cable.
UPDATING YOUR CAMERA'S SOFTWARE
To get the latest features and best performance
from your camera, make sure it's using the most
current software.
Visit - https://www.redtigercam.com/
pages/firmware-1

05
Setting Up Your Camera Mounting the rear camera
On the LEFT side of the screen: Slide up and down
to adjust the angle of view.
On the RIGHT side of the screen: Slide up and
down to adjust the brightness.
Anywhere on the screen: Swipe the screen left or
right to switch between front view, rear view, or
split-screen view.
How to install the rear camera
We recommend installing the rear camera outside
the car (above the license plate). The effect of the
rear camera inside the car may be affected by the
windshield.
1. Tear off the 3M tape on the
rear lens and paste it above
the license plate.
2. Remove the Panel
Remove the inner panel of the
trunk to expose the rear wiring
compartment of the car. Open
the trunk and look for a sturdy
inner panel covering the
other side of the license plate
installation area. Then, insert
a decorative removal tool or
another thin device behind
the panel and pry it apart.

06
Mounting the rear camera Mounting the rear camera
3. Snake the cable
Use a trim removal tool to pop
out tailgate trim, then run the
cable from outside of the car
into the trunk of your car.
4. Connect the rear cameras
power cable to the extension
cable. After snaking your rear
camera's extension cable,
connect the power cable to
your rear camera's extension
cord.If you need to install a
trigger cable to activate the
reversing guidelines, please
find the positive cable of
the reversing lamp or ask a
professional for help.
1. After testing, our 3M glue is sufficient to support
the weight of our rear camera.
2. We suggest to install outside the car, the effect
inside the car is far worse than outside the car.
3. If your car is a RV or a pickup truck, you can install
the rear camera forward (the bracket is below),
and turn on the "Upside down of rear camera" and
turn off the "Rear Cam" Mirror Image" to adjust the
image.If you need a license plate bracket, we also
provide this accessory, feel free to CONTACT US.
07
Mounting the rear camera Mounting the rear camera
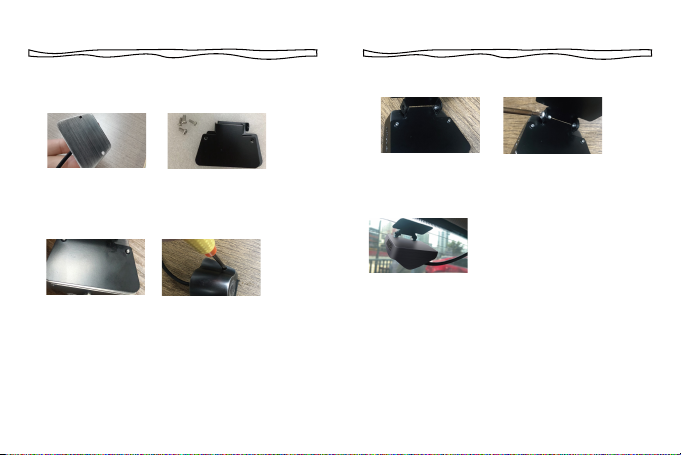
Step 3: Join the two iron sheets together and turn
on the screws.
Step 4:Stick the bracket to
the rear windshield with 3M
glue
PLACEMENT OF REAR LENS INSIDE CAR
Step 1: Confirm the accessories
1 pc mount bracket (2 pcs black iron sheets)
4 pcs screws (2 pcs small screws, 2 pcs large screws)
Step 2: Place a iron sheet over the rear camera, aim
it at the hole, and screw it on.
Autres manuels pour T27
1
Table des matières
Autres manuels Redtiger Caméra embarquée


