Redliro SL-Q20 Manuel d'utilisation

MODEL
SL-Q20
REDLIRO TREADMILL
PRODUCT USE GUIDE

Service
Safety Information
Product Specications
Package List
Product Structure
Introduction to Display
Remote Control Instructions
Battery Replacement
Instructions for Using the Treadmill
Preparation before Use
Instructions for Use
Bluetooth Speaker Instruction
Product Maintenance
Daily Cleaning
Routine Maintenance
Troubleshooting and Handling
Workout Guide
Warranty
SERVICE
Thank you for purchasing this Redliro product. Questions, problems,
missing parts? Before returning to your retailer, contact our Customer
Service Department to receive more complete service, please email
your order number to: service@redliro.com
Response
Time
URL : www.redliro.com
FOR INFORMATION REGARDING WARRANTY, REPLACEMENT PARTS, AND REFUNDS,
PLEASE CONTACT OUR CUSTOMER SUPPORT.
Emailing us with the information above will be the best
method to receive a response during peak business hours.
CONTENT
2
4
5
6
7
8
10
13
14
14
14
18
19
19
20
22
26
27

45
SAFETY INFORMATION
TO REDUCE THE RISK OF INJURY, PLEASE READ INSTRUCTIONS IN FULL BEFORE USE.
• Intended for at-home use only. Please only use in an area with 3 - 6 feet of free space around your device.
Do not operate your device on a carpet more than 0.5 inches thick or near water.
• Treadmill is not intended for use by children or those with physical, sensory, or cognitive impairments.
• To avoid injury, do not disassemble this machine without guidance of manufacturer.
• This product only works with electrical outlets with a voltage between 100 and 120VAC. If your product’s
plug does not t your home’s outlets, do not attempt to use.
• Check all parts before use to ensure the screws and nuts are not loose.
• Keep ngers away from moving parts. Don’t put your hands or feet in the space under the running belt.
Keep children or pets away from the treadmill.
• Wear appropriate exercise clothes and athletic shoes while using the treadmill. Loose tting or oversized
clothing can get caught in machine.
• Unstable power supply may overload the circuit. Do not plug high-power devices such as a computer into
an outlet on the same circuit.
• This product can only be used by one person at a time.
• Do not place any objects on the machine. Do not stand directly on the belt when the machine is turned on.
• Always unplug the power cord after use before cleaning and performing maintenance.
• Only use manufacturer’s accessories. Never exceed product’s maximum weight capacity of 265 lbs. (120kg)
• Moisture and overheating will aect the use of the product. Please keep the machine, motor, power cord
and plug away from water and high temperatures.
• If the treadmill overheats, emits smoke or a burning smell during use, please stop using it immediately and
contact customer service for replacement
• The company is not responsible for any harm caused by improper use
PRODUCT SPECIFICATIONS
Product configuration Technical parameters
Input voltage 110V
Speed range 0.5-4.0mph
Maximum load bearing 265LBS
Package size 51.96x25.39x6.22inches
Assembly size 48.81x21.26x4.33inches
Operating area 41.33x16.53inches
Rated power 2.25hp
Net/gross weight 48.5/ 59.5lb

67
PRODUCT STRUCTURE
SERIAL NO. DESCRIPTION Q U A N T I T Y UNIT
1TREADMILL 1 PC
2POWER CORD (THREE-PINPLUG) 1 PC
3SILICONE LUBRICANT 1 PC
4L STYLE WRENCH 1 PC
5REMOTE CONTROL 1 PC
PACKAGE LIST
TREADMILL × 1
REMOTE CONTROL × 1SILICONE LUBRICANT × 1POWER CORD
(THREE-PINPLUG) × 1
L STYLE WRENCH × 1
Display Panel
Motor Lower Cover
Rear Shield (Left)
Motor Upper Cover
Running Belt
Foot Edge Strip
Rear Shield (Right)
NOTE: THE RUNNING BELT IS MADE OF HEAD AND TAIL SPLICING, THERE ARE
SEAM MARKS, IT IS NORMAL PROCESS PHENOMENON, AND DOES NOT AFFECT THE
NORMAL USE OF THE TREADMILL.
Power Switch

89
INTRODUCTION TO DISPLAY
1. The “TIME” window has two display modes.
• Standard mode counts from 00:00 ~ 99:00 and resets to 0 when it reaches 99:00.
• The preset/custom mode allows user to set a time for length of use. Select from 5 minutes to 99 minutes.
Once countdown has reached 0, your device will slowly stop and enter standby mode.
2. The "CALORIES" window has two display modes.
• Standard mode counts from 0 to 9999, and resets to 0 when it reaches 9999.
• The preset/custom mode allows user to set calorie value. Select from20 to 990. Once countdown has
reached 0, your device will slowly stop and enter standby mode.
Note: The default mode displays Distance and Calorie. Press the “M” button to switch between cyclic display
mode and xed display mode.
3. The "SPEED" window displays the current running speed, and the speed range is 0.5mph~4.0mph.
In preset mode, 12 preset schemes (P1 ~ P12) are displayed.
4. The "DISTANCE" window has two display modes.
• In standard mode, the distance will increase from 0.0 to 99.9 miles, and the count will reset to 0 when it
reaches 99.9
• In preset/custom mode, the distance will be reduced from the inputted data (setting range: 1~99.9 miles) to 0.
When the display is 0, your device will slowly stop and enter the standby state.
5. When your device started, the display between each option in 5 second intervals. Press the “M” button to
switch between cyclic display mode and xed display mode.

10 11
REMOTE CONTROL INSTRUCTIONS
HOW TO ESTABLISH A NEW CONNECTION
1. Ensure the treadmill is connected to the power source but keep it powered on.
2. Hold the Mute button and Reset buttons on the remote control simultaneously for 5 seconds. The light on
the remote control will ash as it enters pairing mode.
3. The remote control will pair with treadmill automatically after a few seconds.
Increase Speed
Mode
ResetMute
Start / Stop Reduce Speed
Programs
NOTE: TO USE THE REMOTE CONTROL, YOU MUST FIRST ESTABLISH A NEW CONNECTION
Start/Stop button:
Press Start/Stop button in standby mode and the treadmill will start after 3 seconds. The default speed is 0.5
mph.
Press Start/Stop button in preset/custom mode and the treadmill will start immediately, running at preset
values. It will immediately begin accumulating data.
Press Stop button while running belt is in motion and the treadmill will slow down slowly and return to pause
mode.
In the pause mode, press Start button and the running belt will begin moving at the previous selected
program.
+/- button:
Used for speed adjustment while your device is in use. Speed will be adjusted 0.1 mph each time you press.
Hold for more than 0.5 seconds and the speed will continue to increase or decrease. Can also be used to
adjust settings in preset/custom mode.
M button:
Press the M button while in standby mode to switch to custom mode. Select between time setting (setting
range 5:00 ~ 99:00), distance setting (setting range1 ~ 99miles ) and calorie setting( setting range 20 ~ 990 ).
Press M button to change the cyclic display or xed display mode when in use.
Mute button:
Press the "Mute" button once to mute noise. Press it twice to cancel the operation.
Reset button:
In the pause mode, press Reset button and the running belt will slowly return to standby mode
P button:
In standby mode, the P button is used to select 12 preset automatic programs (P01 ~ P12)
FUNCTION OF THE REMOTE CONTROL

12 13
TIME
PROGRAMA
SET TIME/20=RUNNING TIME FOR EACH SECTION
P1 SPEED 1 2 3 4 4 3 4 4 4 3 4 4 4 4 4 2 3 4 3 2
P2SPEED13444242444444424432
P3SPEED14414414444244124332
P4SPEED14222424422341244442
P5SPEED13434431244442341443
P6SPEED12243142321423412413
P7SPEED14444243441234123423
P8SPEED14444314441344234433
P9SPEED12312421121412342443
P10SPEED13344434241443444444
P11 SPEED14444444331244444422
P12SPEED14442444441444424422
The 12 preset programs have the following speeds:
Step 1: Push back to remove the cover and install the battery.
BATTERY REPLACEMENT
andinstallthebattery.
Step 2: Remove button cell of remote control:
After long-term use, the remote control will have reduced sensitivity or become inoperable due to insucient
power, and the battery needs to be replaced. Remove battery cover and take dead batteries out of your
remote control.
Step 3: Install button cell of remote control:
Ensure you have purchased new batteries that are the right type for the remote control by comparing with the
dead ones. Insert your new batteries into the remote and replace cover. Dispose of old batteries responsibly.
1
1
1
2
2
2
3
3
3

14 15
INSTRUCTIONS FOR USING THE TREADMILL
PREPARATION BEFORE USE:
INSTRUCTIONS FOR USE
1. Plug in the power cord
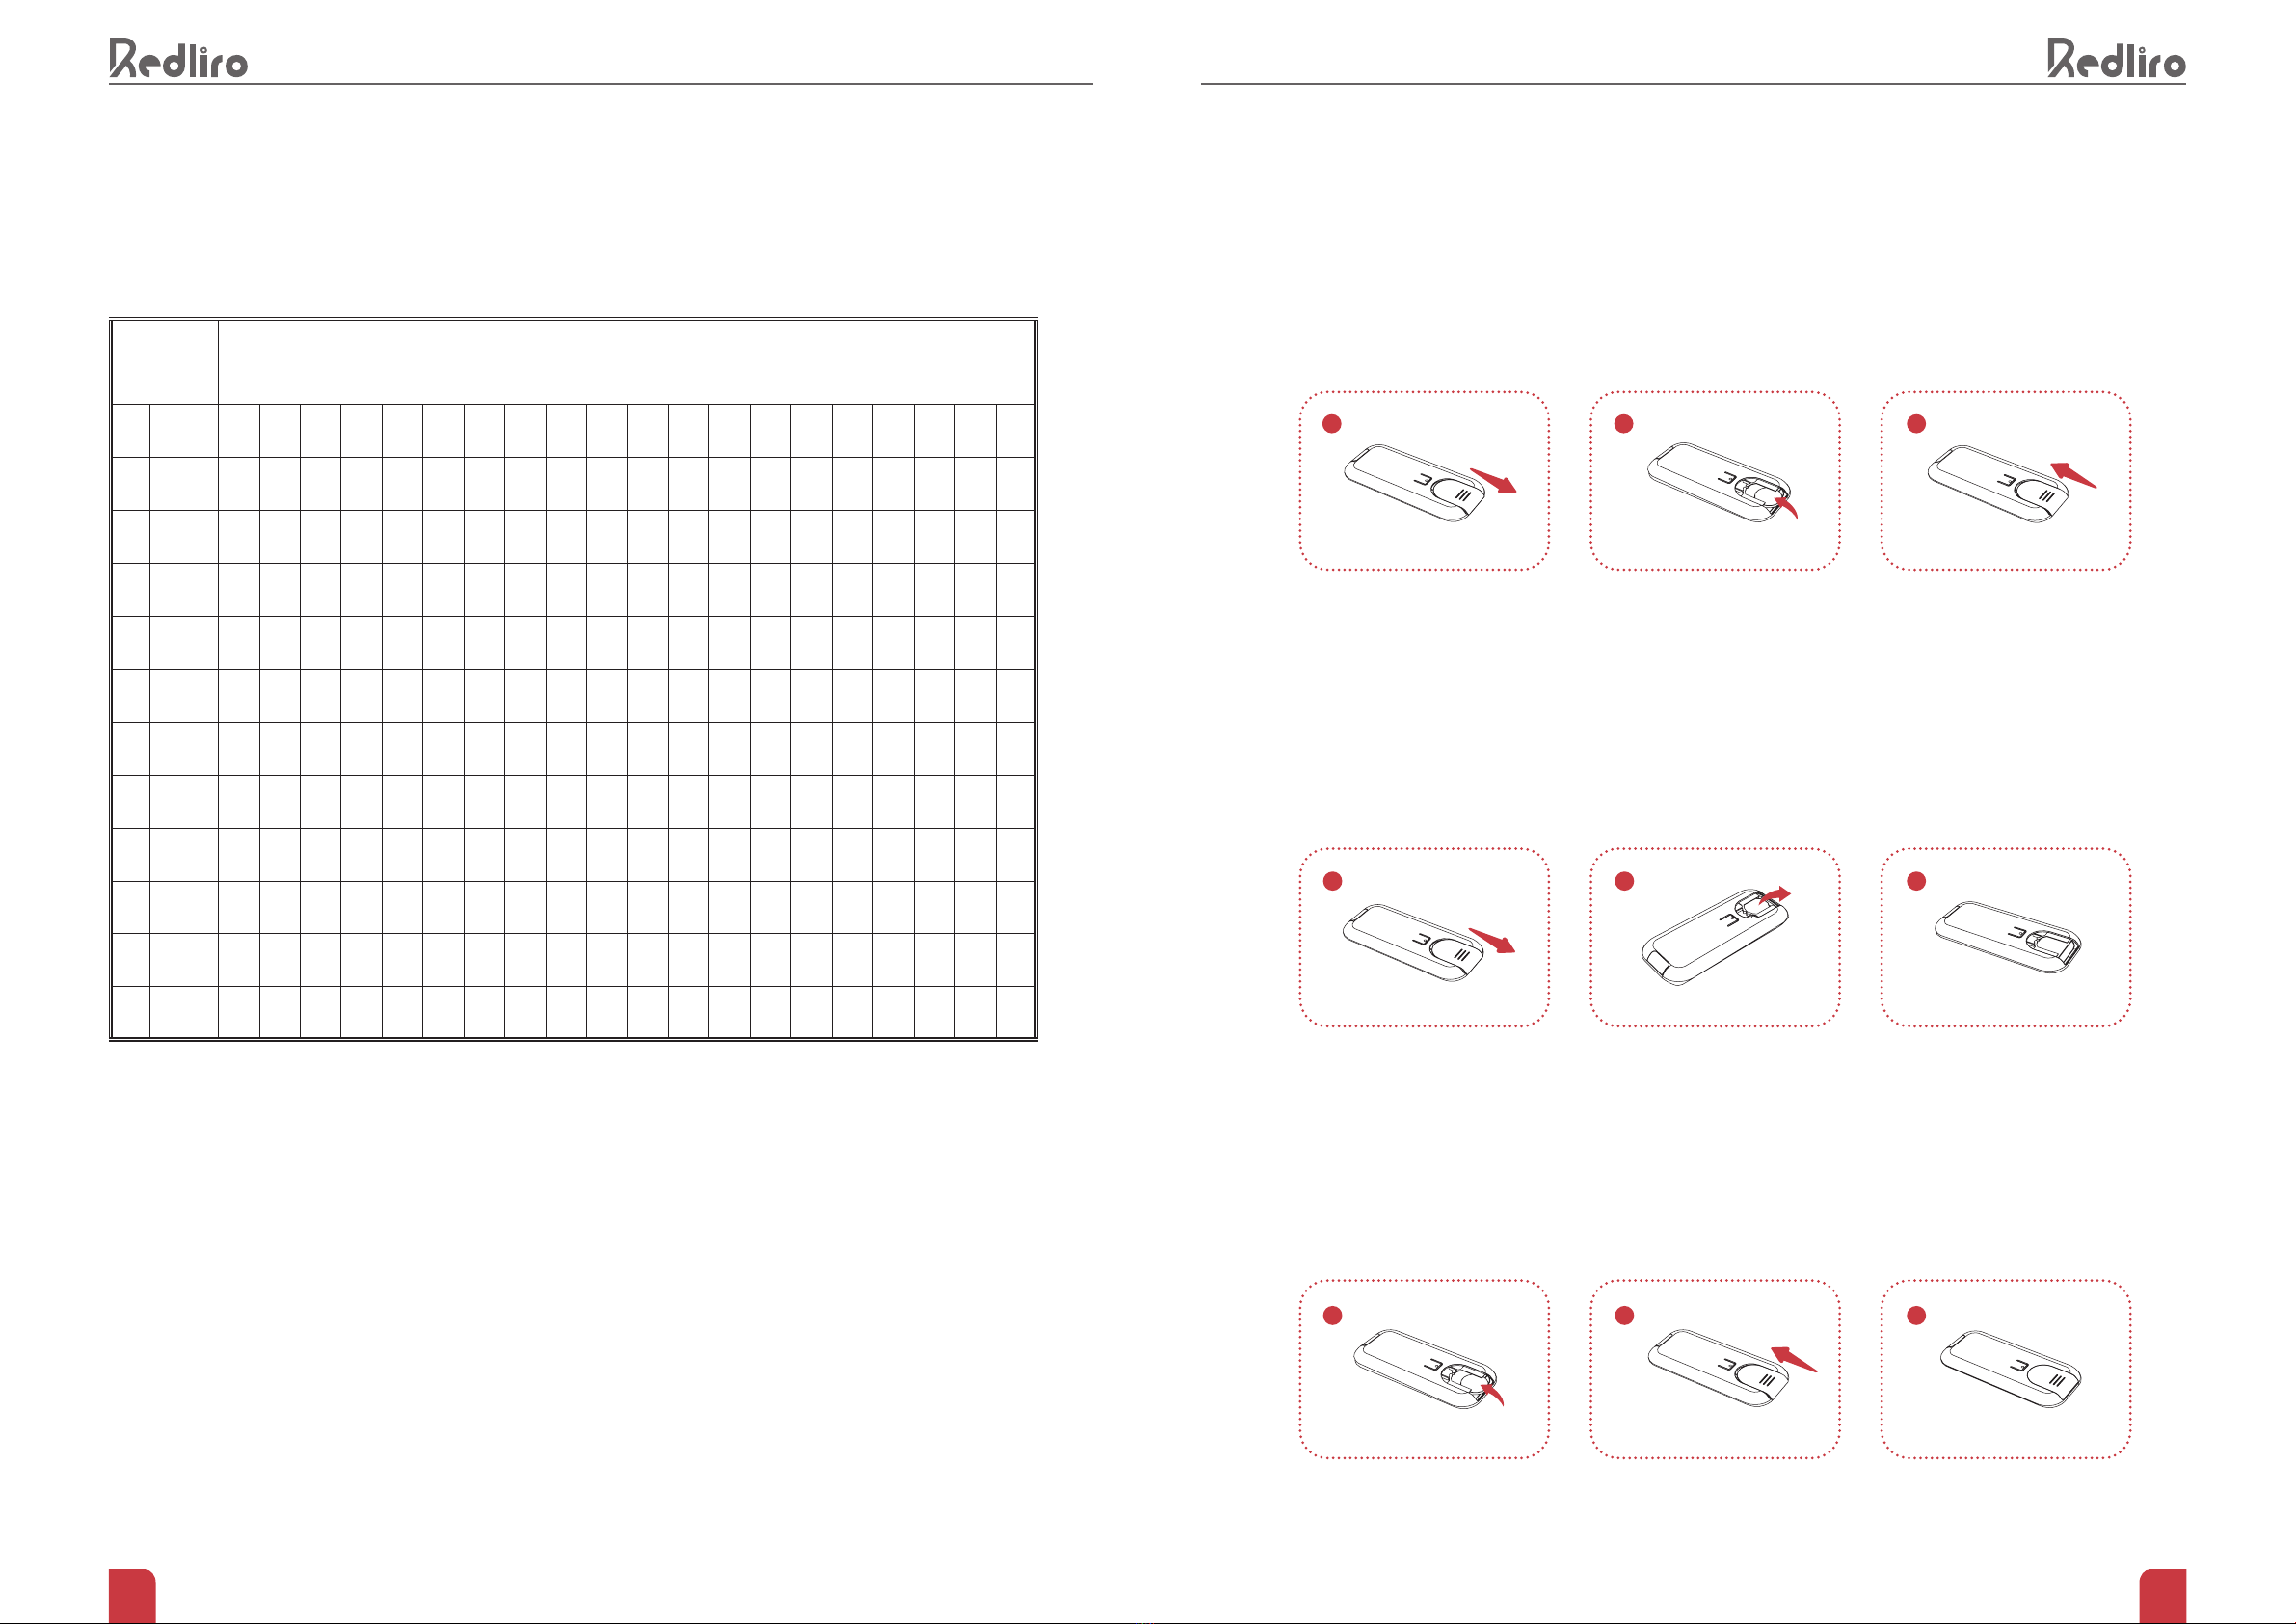
2. Establish the connection between the treadmill and the remote control
3. Press the power switch on the treadmill and wait for the indicator light to turn on
Note: All modes of the treadmill must be started while the machine is in standby. Keep treadmill in standby
before switching to a dierent mode.
Note: In order to extend the life of treadmill, the maximum time for one workout has been set to 99 minutes.
The treadmill will stop running should you hit this time and the display screen will read END.
HOW TO USE THE TREADMILL IN STANDARD MODE
1. How to turn on the treadmill
In standby mode, press the Start/Stop button on the remote control and the running belt will begin moving at
0.5mph in 3 seconds
2. How to adjust the treadmill speed
To change the speed of the running belt, press the +/- buttons on the remote control; the speed will be
adjusted by 0.1mph when you press the button. Hold for 0.5 seconds or longer and the speed will increase or
decrease continuously.
3. How to select the desired display mode
The screen displays four modes: Time, Calorie, Speed and Distance. When the treadmill is running, you
can select xed display or cyclic display mode by pressing the M button on the remote control. The display
between each option in 5 second intervals.
4.How to pause/restart the treadmill
Press Start/Stop button on the remote control while running belt is in motion and the treadmill will slow down
slowly and return to pause mode.
In the pause mode, press Start/Stop button on the remote control and the running belt will begin moving at
the previous selected program.
5. How to turn o the treadmill
When the treadmill is suspended, press the reset button on the remote control and the treadmill will slowly
return to standby mode.
HOW TO USE THE TREADMILL IN PRESET MODE
1. How to choose a program
In standby mode, you can select from 12 preset automatic programs (P1-P12) by pressing the P button on
the remote control
2. How to adjust the time of the preset program
After you have selected a preset program, press the +/- buttons on the remote control to adjust its duration
in 1 minute increments. Hold for over 0.5 seconds for timer to roll quickly. The selectable time range is 5-99
minutes.
3. How to turn on the treadmill
When you have selected the desired automatic program and duration, press the Start/Stop button on the
remote control, and the running belt will begin moving at the preset program speed in 3 seconds
4.How to pause/restart the treadmill
Press the Start/Stop button on the remote control while running belt is in motion and the treadmill will slow
down slowly and return to pause mode.
In the pause mode, press the Start/Stop button on the remote control and the running belt will begin moving
at the previous selected program.
5. How to turn o the treadmill
When the treadmill is paused, press the Reset button on the remote control and the treadmill will slowly
return to standby mode.
Note: The speed can’t be adjusted when running in preset mode
HOW TO USE THE TREADMILL IN CUSTOM MODE
1. How to choose a program
In standby mode, you can press the M button on the remote control to select a mode from time, distance and
calorie
2. How to set the value of the program
Note: Only one of the three modes can be selected.

16 17
Time setting:
In standby mode, press the M button on the remote control and adjust time by pressing the +/- buttons to
adjust its duration in 1 minute increments. Hold for over 0.5 seconds for timer to roll quickly. The selectable
time range is 5-99 minutes.
Distance setting:
IIn standby mode, press the M button on the remote control twice and then adjust the distance by pressing
the +/- buttons on the remote control. Hold for more than 0.5 seconds for counter to roll quickly. The
selectable distance range is 1-99 miles.
Calorie setting:
In standby mode, press the M button on the remote control 3 times, and then adjust the number of calories
you wish to burn by pressing the +/- buttons. Adjustments made in units of 10 calories. Hold for more than
0.5 seconds for the value to increase or decrease continuously. The selectable calorie burn range is 20-990
calories.
3. How to turn on the treadmill
Once you've set up your desired program, press the Start/Stop button on the remote control and the running
belt will begin moving at 0.5mph in 3 seconds
4. How to adjust the treadmill speed
To change the speed of the running belt, you can press the +/- buttons on the remote control. Pressing the
button once will adjust speed by 0.1 mph; holding the button will allow counter to roll quickly.
5.How to pause/restart the treadmill
Press the Start/Stop button on the remote control while running belt is in motion and the treadmill will slow
down slowly and return to pause mode.
In the pause mode, press the Start/Stop button on the remote control and the running belt will begin moving
at the previous selected program.
6. How to turn o the treadmill
When the treadmill is suspended, press the Start/Stop button on the remote control, the treadmill will slowly
stop and return to the standby mode.

18 19
PRODUCT MAINTENANCEBLUETOOTH PAIRING GUIDE
REGULAR MAINTENANCE IS IMPORTANT FOR YOUR SAFETY AND TO EXTEND THE LIFE OF
YOUR PRODUCT. PLEASE CHECK AND TIGHTEN ALL PARTS BEFORE YOUR FIRST USE AND
REPLACE WORN PARTS OVER TIME AS NEEDED.
PLEASE STAYING WITHIN RANGE OF YOUR TREADMILL WHILE YOU HAVE YOUR DEVICE TO
KEEP THE CONNECTION.
DAILY CLEANING
Clean your treadmill regularly. The running belt and console must be clean and dry for long term safe use.
Power o and unplug your treadmill. Wipe the exterior with a damp cloth and a small amount of mild soap.
The display console must be kept dry, however; wipe it with a dry, soft towel.
Dry the treadmill thoroughly with a soft towel.
Note: Do not spray liquid directly on the treadmill. To avoid damaging the console, keep it dry at all
times.
Pair your Bluetooth device with the treadmill by:
1. Turing your treadmill on
2. Make sure that Bluetooth is enabled on your device
3. On the pairing screen, nd your treadmill with name “Bluetooth”, select and connect it
Autres manuels pour SL-Q20
1
Table des matières
Autres manuels Redliro tapis roulant

Redliro
Redliro JK1608E-2 Manuel d'utilisation

Redliro
Redliro JK30H-9 Manuel d'utilisation

Redliro
Redliro JK105C-1 Manuel d'utilisation

Redliro
Redliro JK1608L Manuel d'utilisation

Redliro
Redliro JK1608P Manuel d'utilisation

Redliro
Redliro JK1608L-T Fiche technique

Redliro
Redliro SL-Q20 Fiche technique

Redliro
Redliro JK105C-1 Manuel d'utilisation
Manuels tapis roulant populaires d'autres marques

Smooth Fitness
Smooth Fitness EVO 3i Manuel utilisateur

NordicTrack
NordicTrack NETL81810.0 Manuel utilisateur

Schwinn
Schwinn 830/Journey 8.0 Manuel utilisateur

Keys Fitness
Keys Fitness HealthTrainer HT-740T Manuel utilisateur

Spirit
Spirit XT8 Manuel utilisateur

NordicTrack
NordicTrack T 14.0 Treadmill Manuel utilisateur


