RAEV BULLET PRO Manuel utilisateur

User Manual of Electric Bicycle
Note:
PRO version means
a single battery and
GT version means
double batteries
BULLET
PRO / GT

1.Basic Information......................................................................02
1.1 Unpacking Information.........................................................02
1.2 Parts Description...................................................................... 03
2.Installation Procedure.....................................................04
2.1 Handlebar Installation ..........................................................04
2.2 Front Wheel Installation.....................................................04
2.3 Pedal Installation.....................................................................05
2.4 Headlamp Installation .........................................................06
2.5 Battery Installation and Removal ................................ 06
3.Battery Charging ...................................................................07
4.Riding Introduction.................................................................08
4.1 Riding Mode ................................................................................08
4.2 Introduction to Instrument Key Functions........... 09
5.Use of Gearbox ........................................................................10
5.1 Diagram of Gearbox ...............................................................10
5.2 Pay Attention to the Following Details When Using
the Drive System......................................................................10
6.Precautions about Use....................................................11
6.1 Compliance with Traffic Laws and Traffic
Safety Tips ............................................................................................11
6.2 Safety Precautions about Electric Bicycle............. 11
6.3 Preparation for Riding .........................................................11
6.4 Code Position Diagram.......................................................11
7.Battery ................................................................................................12
7.1 Precautions about Use of Lithium Battery............. 12
7.2 Operating Environment......................................................12
7.3 Charging Environment........................................................13
7.4 Storage Environment........................................................... 13
8.Technical Parameters..................................................... 14
Contents
01

1. Basic Information
User Manual
RL
02
1x Bicycle 1x Wheel 1x Light
1x Charger 2x Pedal
8x Tool
1x Front Fender
1x User ManualGT Version 1x Battery
PRO Version 2x Key
GT Version 4x Key
1x Bicycle
1x Wheel
1x Light
1x Charger
2x Pedal
1x front fender
GT Version 1x Battery
8x Tool
PRO Version 2x Keys
GT Version 4x Keys
1x User Manual
1.1 Unpacking Information

1.2 Parts Description
Cushion
Taillight
Rear suspension
Trigger shifter
Handlebar cover
Motor
Rear gearbox
Pedal
Controller
LCD Display
Brake handlebar
Car light
Battery
GT version battery
Front disc
brake
Front fork
03

04
2. Installation Procedure
2.2 Front Wheel Installation
2.1 Handlebar Installation
90°
Remove the pre-tightened set screws of the handlebar end cover using 4mm socket head wrench
Place the handlebar, adjust it to a suitable angle, close the end cover of the handlebar and pre-tighten 4 screws
using 4mm socket head wrench
Tighten set screws of the handlebar end cover in the order of 1, 2, 3 and 4
Align the front disc at the space of the gateway lining, align the front axle at the front fork axle hole and insert it
into the hole
Install gaskets and cap nuts on both sides
Tighten cap nuts on both sides using 15mm open spanner
14
32

05
2.3 Pedal Installation
Differentiate the identifiers of left and right pedals, L means left pedal and R means right pedal
When installing pedals, keep the pedal bolt end face vertical to the mounting hole of the crank and tighten and
fix it using 15mm open spanner
(When installing the left pedal, rotate it anticlockwise; when installing the right pedal, rotate it clockwise)
L
L
R
R
R
L
L
R
During installation
Align the left to left and
the right to right
L R

06
2.4 Headlamp installation
2.5 Battery Installation and Removal
Take the headlamp accessories out of the accessory box and install the fixed support of the headlamp;
Adjust the headlamp angle and tighten set screws of the supports on both sides using 5mm socket head wrench;
Connect the connecting line of the headlamp
Insert the key, rotate it to ON state and place the battery in the body preset position
Forcibly push the battery until you hear a crisp sound
Rotate the key to Lock state and pull it out
GT version battery installation

Open the soft cover on the battery side
Insert the plug of the charger into the charging port of the battery and connect the other plug to the power supply;
The status light of the charger is red in the charging process
After the battery is fully charged, the status light of the charger is green
Remove the charger, keep it properly and close the soft cover after charging
If the battery is charged on board, please power off the instrument
3. Battery Charging
07
Charging Port
Soft cover
Soft cover
Charging Port
GT version battery

4.1 Riding mode
4.Riding Introduction
08
In EV mode, press and hold ON. After power-off, adjust the gears (1-3) by Instrument ± Key, and pull the speed
thumb shifter to enter EV mode
In assistant mode, press and hold ON. After power-on, adjust the gears (1-3) by Instrument± Key, step on the
pedal for more than half a cycle to enter assistant mode
In manual riding mode-press and hold ON. After power-on, adjust the gear (0) by Instrument ± Key, and step on
the pedal to enter manual riding mode
Note: The maximum speed at gear 1 is 12mph, that at gear 2 is 20mph and that at gear 3 is 28mph
Brake
handlebar
Handlebar grip
Instrument
Speed thumb shifter
Speed thumb shifter key ±
MPH
Km/h
W POWER
Mile Km
TRIP
ODO
TIME
MAX
AVG
ON/OFF: Press and hold ON for more than 2s to turn on the power; in startup state, press and hold ON for more than 2s
to turn off the power;
In startup state, short press ON/OFF, and the displayed information is switched among total distance (mileage/h), trip
distance (mileage/h), riding time (h), output power (W), total distance (mileage/h), maximum speed (mileage/h) and
average speed (mileage/h);
± key: In startup state, press and hold + for 2s to turn on the instrument backlight and turn on the headlamp. When the
headlamp is turned on, press and hold for 2s to turn off the headlamp. Short press ± to switch among assistance gears
(0-3) of the electric bicycle. Gear 1 means that the instrument is turned on, and gear 0 means parking mode and no
motor output;
09
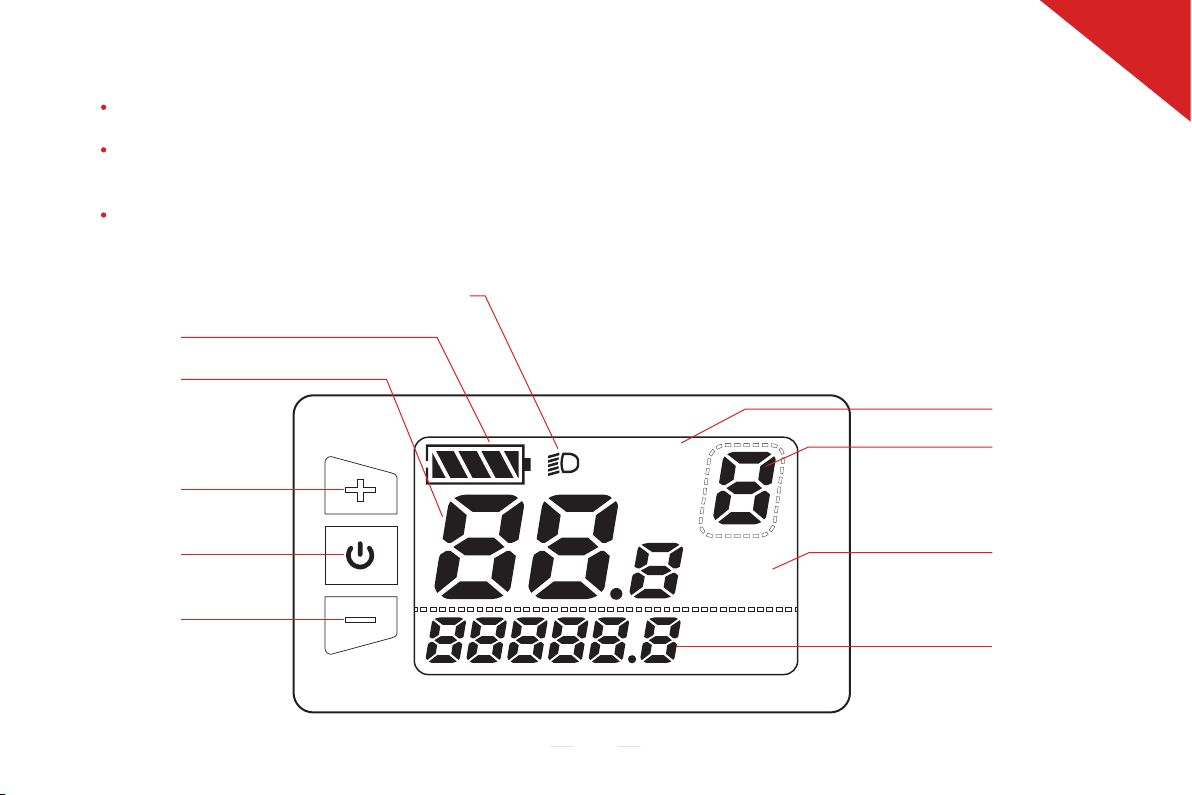
4.2 Introduction to Instrument Key Functions
UP key
Power indication
Headlamp indication
Speed per hour
Mileage (switch)
Gear indication
�Speed unit
Mileage display
Down key
ON/OFF key
Ce manuel convient aux modèles suivants
2
Table des matières
Manuels Scooter populaires d'autres marques


First Choice Mobility
First Choice Mobility Roma Medical Corella S741 Manuel utilisateur

Carrera
Carrera impel Manuel utilisateur

Afikim
Afikim Superlight SL-3 Manuel utilisateur

CareCo
CareCo ZOOM Manuel utilisateur

Douglas
Douglas Vespa G.S. Manuel utilisateur

Gazelle
Gazelle with BOSCH System Manuel utilisateur