Radic8 VK MEDI Manuel utilisateur

USER GUIDE AND INSTRUCTIONS
AIR STERILISER
VK MEDI

3
Dear Customer
Thank you for purchasing the VK Medi Air Steriliser, this is “clean
air technology” at its best. This product is packed with power and
technology to provide fast and ecient clean air. We hope that
you enjoy using your new unit!
• Use the unit only for its intended use.
• To protect against a risk of electric shock, do not immerse
any part of the system in water or in any other liquids.
• This appliance is NOT a toy.
• This appliance is NOT to be used by children or persons
with reduced physical, sensory or mental capabilities.
• Children should be supervised at all times.
• Never look directly at a burning ultra-violet light, as this
may permanently damage your eyes.
• To reduce the risk of an electric shock or damage to the
unit, switch the off and unplug before cleaning or per-
forming any maintenance to the unit.
• Heed all warnings
READ ALL INSTRUCTIONS BEFORE USING YOUR UNIT
When using your VK Medi, basic safety precautions
should be observed, including the following:
TO REDUCE THE RISK OF FIRE, ELECTRIC SHOCK, OR INJURY
WARNING

4
IMPORTANTSAFETYINSTRUCTIONS...................................................................3
SYMBOLS USED IN THIS MANUAL ...................................................................... 4
INSTALLATION SAFETY ..................................................................................... 5
KEY PARTS AND COMPONENTS .......................................................................... 7
THE UNIT .............................................................................................. 7
DISPLAY MONITORING .......................................................................... 8
REMOTE CONTROL ............................................................................... 9
CLEANING AND MAINTENANCE ........................................................................10
CLEANING THE PRE- FILTER .............................................................. 10
REPLACING THE HEPA FILTER ............................................................ 10
REPLACING THE REACTOR CHAMBER .................................................. 11
ERROR MESSAGES ........................................................................................... 12
TROUBLESHOOTING ........................................................................................ 13
CUSTOMER SERVICES...................................................................................... 14
SPECIFICATIONS .............................................................................................. 14
Warning – Indicates important safety instructions that must be
followed to avoid injury.
SUMMARY
EN USER GUIDE AND INSTRUCTIONS
Caution – Indicates important information to your attention to
avoid the risk of injury or damage to the unit
Prohibited – Indicates forbidden action
5
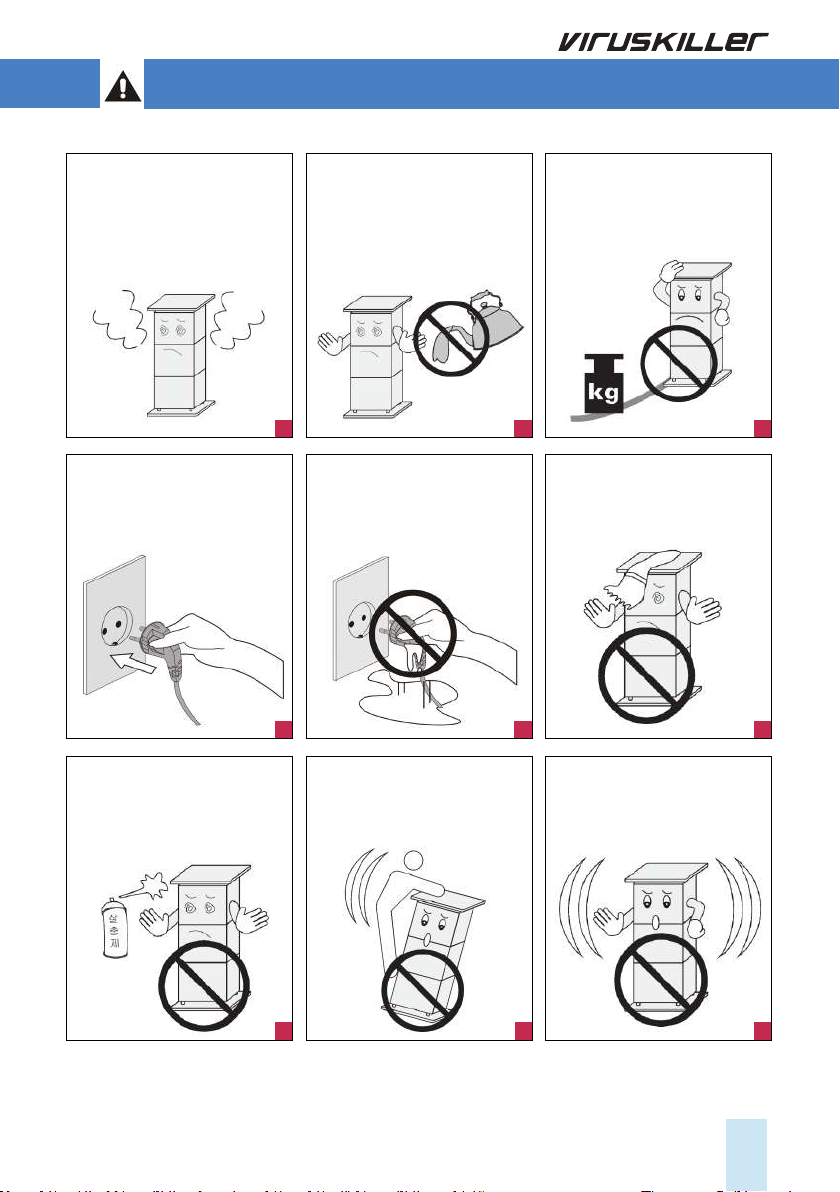
INSTALLATION SAFETY
Should the unit emit smoke,
unusual odors or make any
strange noises, immediately
switch off the unit unplug it.
Contact your distributor.
Make sure the power cord is
plugged rmly into the outlet.
If the power is not plugged in
correctly, this may cause a re.
Do not spray inammable
materials near the unit, as this
is a re hazard.
Do not touch the plug with
wet hands, as this may cause
serious injuries.
Do not sit, stand or place heavy
objects on the unit, as this may
result in injury and/or damage
to the unit
Do not block the air inlet of
the unit, as this will reduce the
airow and result in poor per-
formance and damage the unit.
Do not move the product while
it is switched on. as this may
cause a re and/or an electric
shock.
No form of water or liquid
should enter the unit. Should
this occur, immediately switch
off the unit and unplug it.
Contact your distributor.
Do not place any heavy
objects on the power cord as
this may cause a re and/or
an electric shock.
1
4
7 8 9
2
5
3
6

6
Switch the unit OFF, when
cleaning a room.
After cleaning, it is important
to ventilate the room properly
before switching the unit back
ON.
Daily room ventilation for at
least 30 minutes.
The unit is designed to purify
and sterilize your indoor air and
will do this effectively when
used correctly. Good indoor
air quality also requires room
ventilation. We recommend
opening windows and doors, or
operating the air conditioning,
for a least 30 minutes a day.
Switch the unit OFF, while
cooking.
Oils released while cooking may
reduce the life span of the ster-
ilizer. After cooking, the room
must be ventilated to remove
oils. You may now switch the
unit ON to remove any smells.
Position the unit at least 3
meters away from the bed,
to avoid excessive cooling
caused from sleeping in direct
airow.
Airow must NOT be
restricted or obstructed,
by large items such as fur-
niture, electronic items or
curtains.
Use a dedicated power outlet.
Lightning or static electricity
could affect the circuit and
may cause a re or damage
the unit. To avoid this, plug the
unit into a dedicated, grounded
outlet.
Do not alter or modify the plug
or cord of this unit as it could
cause a re or an electric
shock.
To protect against a risk of
electric shock, do not immerse
any part of the system in water
or in any other liquids.
Do not attempt to repair or
replace any part of this equip-
ment unless it is specically
recommended in this manual.
All other services should be re-
ferred to a qualied technician.
Plug the unit into a 220V AC
outlet only, if unsupervised, it
may cause an electric shock.
Use the proper power cable
and outlet, do not over-load
the outlets with several cords
simultaneously.
Keep the product away from
inammable gases, liquids, or
other combustible substances,
as this could cause an explo-
sion.
220V
10
13
16
19
11
14
17
20
12
15
18
21
7
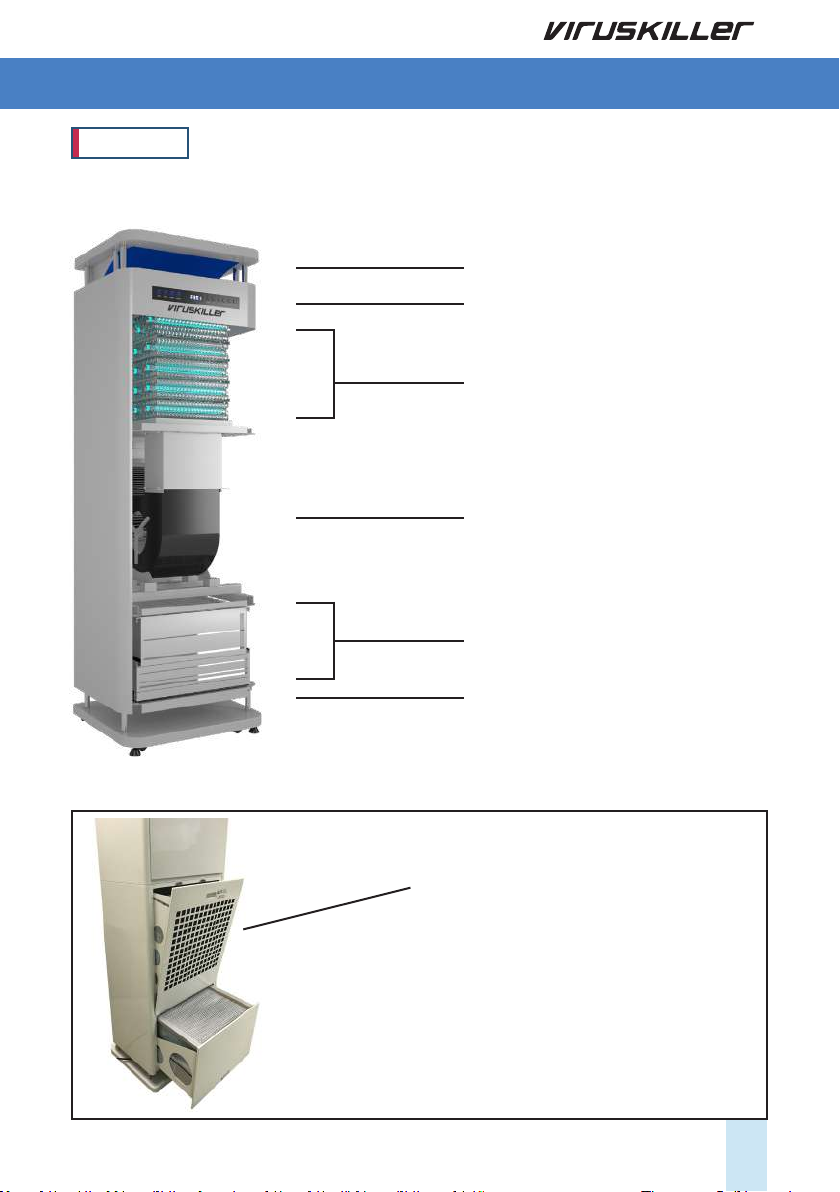
KEY PARTS AND COMPONENTS
Four Way Air Outlet
Display and monitoring
Reactor Cell
Sirocco Fan
Carbon Filter
HEPA Filter
Pre Filter
Four Way Air Inlet
THE UNIT
The VK Medi has an extra “back lter tray”,
which allows it to integrated into a positive
pressure system.
8
Remote control
sensor
Reactor Replacement
Alarm
Filter Replacement
Alarm
VOC’s Static Display
Dust Static Display (LED)
Display
Power button ON/OFF
Fan speed UP
Fan speed DOWN
LED ON/OFF
TIMER
UVC ON/OFF
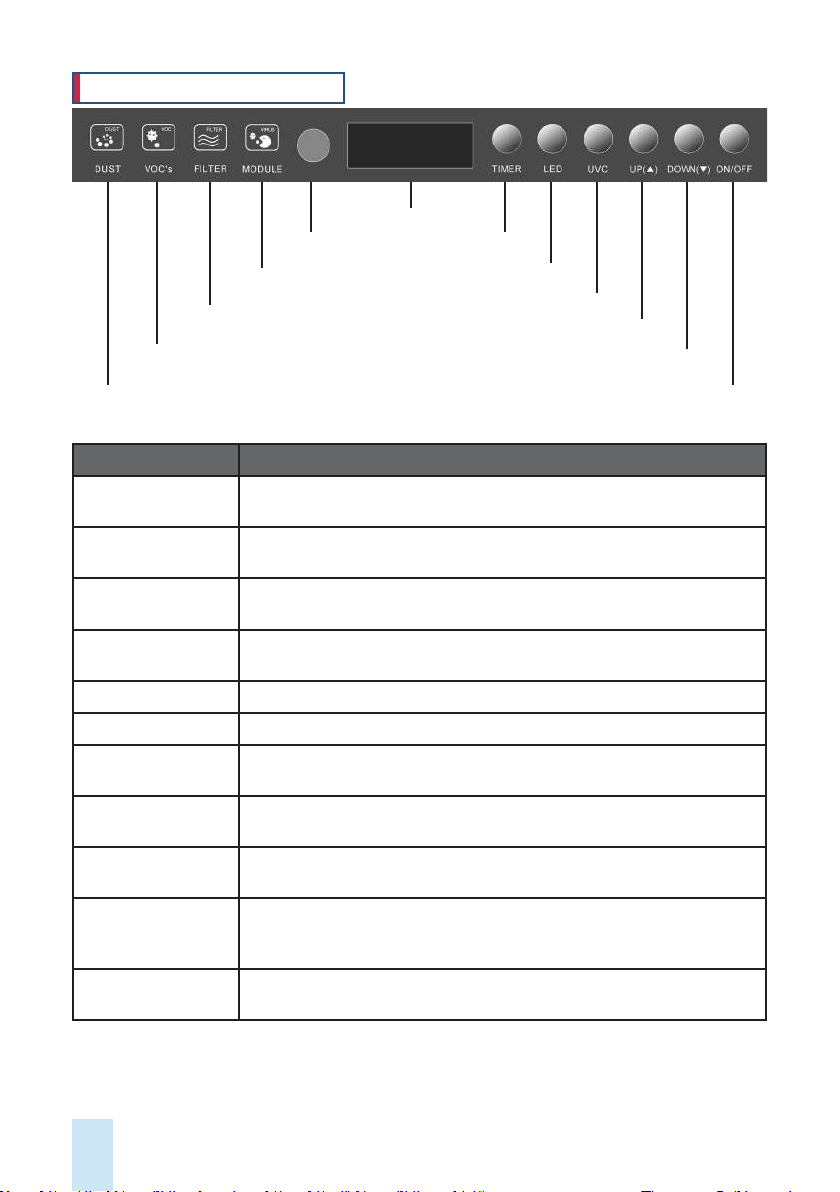
Name Function
Display and
Monitoring
Changes the information displayed on the LED in the following order: UV
Lamp Time, Current Temp, Fan Speed.
Remote Control
Sensor
Point your remote control at the sensor in order to use your remote oper-
ate the unit.
Reactor Replacement
Alarm
When this LED turns from blue to red, it is time to replace the reactor cell.
Filter Replacement
Alarm
When this LED turns from blue to red, it is time to replace the lters.
VOC’s Static Display Color indicates air quality: blue – good, yellow – normal , red – poor
Dust Static Display Color indicates air quality: blue – good, yellow – normal , red – poor
Timer Sets a working time for the unit. The unit will stop after the specied time
has passed.
LED ON/OFF Hold the “lamp” button down for a few seconds in order to switch the LED
lights ON/OFF.
UVC ON/OFF Turns the UVC lamps ON or OFF. (Keep this on for air sterilization, keep it
off for simple air purication through the mechanical lters)
Fan Speed Press the “Up” button to increase the fan speed. Press the “down” button
to decrease the speed. Fan speeds: FAN 1 (Quiet), FAN 2 (Normal), FAN 3
(High Speed).
Power button
ON/OFF
To switch the unit ON/Off. You will hear a beep sound.
DISPLAY AND MONITORING
9
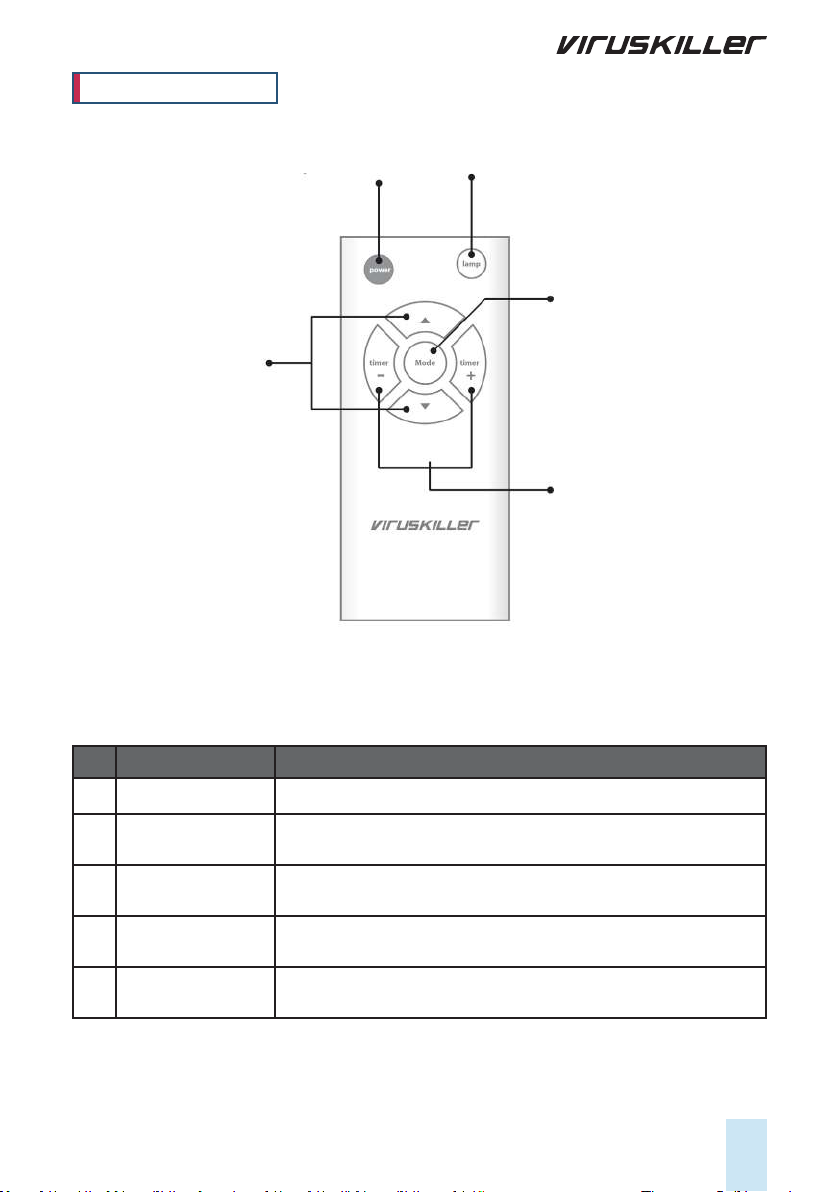
1) Power On/Off 5) LED Lamp On/Off
3) Mode
4) Timer
2) Fan Speed
No Name Function
1) Power ON/OFF To switch the unit ON/Off. You will hear a beep sound.
2) Fan Speed Increase the fan speed. Fan speeds: FAN 1 (Quiet), FAN 2 (Normal),
FAN 3 (High Speed). Decrease fan speed.
3) Mode Changes the information displayed on the LED in the following order:
UV Lamp Time, Current Temp, Fan Speed
4) Timer Sets a working time for the unit. The unit will stop after the specied
time has passed.
5) LED Lamp ON/OFF Used to switch the blue LED Lamp ON/OFF on the unit.
REMOTE CONTROL
10
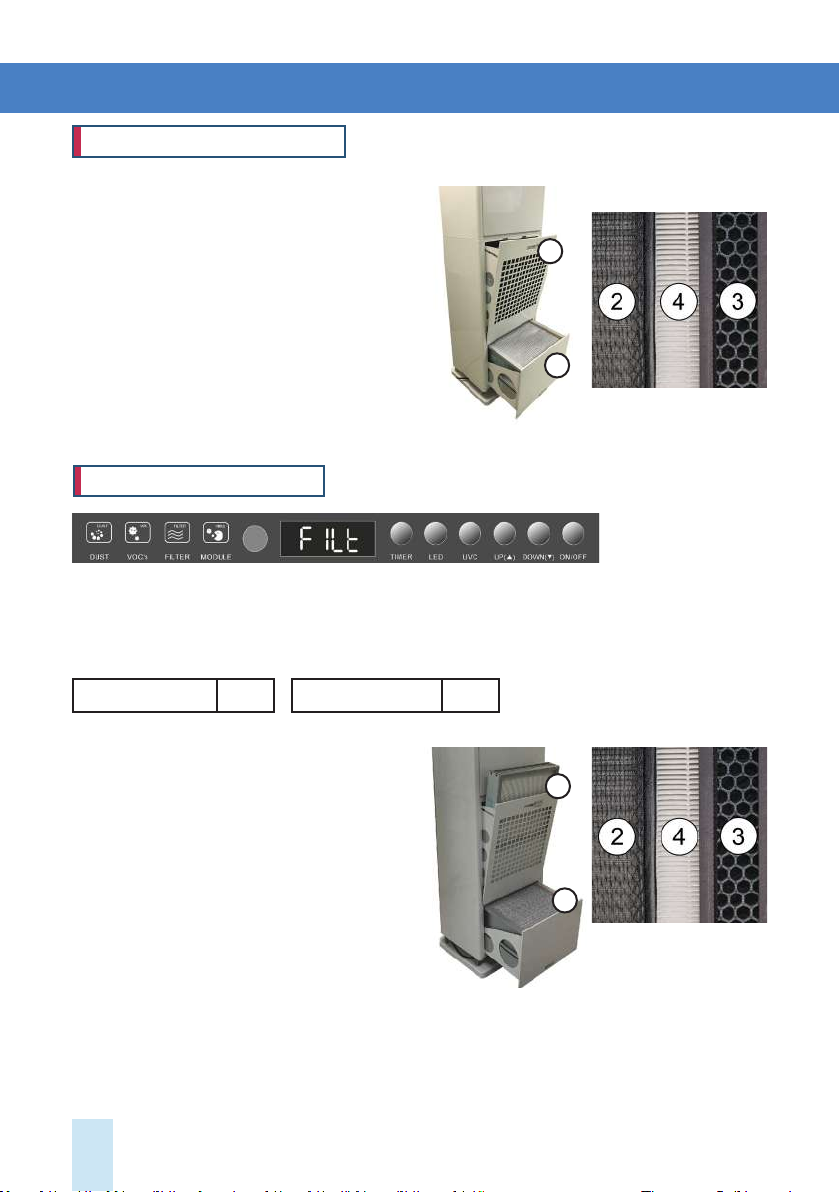
CLEANING THE PRE-FILTER
Replacing the HEPA lter
The plastic pre-lter is reusable. To clean it,
follow this procedure:
1. Pull out the bottom lter case ①
2. Remove pre-lter ② from lter case ①and
separate from carbon lter ③ and HEPA lter ④.
3. Clean the pre-lter with a vacuum cleaner.
4. Place the lter back into the lter case.
5. Repeat the process for the top lter case ⑤
1. Pull out the bottom lter case ①
2. Separate the carbon lter ③ and HEPA lter
④ from the pre lter ②
3. Replace them with new lters.
4. Place them back into the lter case.
5. Repeat the process for the top lter case ⑤
6. Press the UP button on the Display for at least
5 seconds, to reset the Filter timer to zero.
CLEANING AND MAINTENANCE
HEPA lters (hrs) 6000 Carbon lters (hrs) 6000
When the Filter LED light changes to RED, it is time to replace the HEPA and Carbon lters. The
HEPA and Carbon lters are not reusable and should be replaced. Please contact your distributor to
purchase replacement HEPA and Carbon lters. Depending on the levels of pollution, the lifetime of
the HEPA lter may be longer or shorter than the recommended use times below:
5
1
5
1
Table des matières
Autres manuels Radic8 Stérilisateur


Manuels Stérilisateur populaires d'autres marques

Dust Free
Dust Free LightStick Manuel utilisateur

Euronda
Euronda E9 Next 18L Manuel utilisateur

UVPLUS
UVPLUS ALS UVP201R Manuel utilisateur

SterileLight
SterileLight Illumicide SL-UVC-IDC-01-B Manuel utilisateur

Norka
Norka BUENOS AIRES UV-C 997 100 02 Series Manuel utilisateur

CertoClav
CertoClav Vacuum Pro 45 Manuel utilisateur

Chicco
Chicco SterilNatural 2in1 Manuel utilisateur

Market Forge Industries
Market Forge Industries Sterilmatic Manuel utilisateur

Philips AVENT
Philips AVENT SCF271/20 Manuel utilisateur

Easypix
Easypix SteriBox SB1 Manuel utilisateur

ASP
ASP sterrad NX Manuel utilisateur

Vital Baby
Vital Baby NURTURE advanced pro UV mini Manuel utilisateur


