Quad H2O HexH2O Manuel utilisateur

Waterproof Drones - The HexH2O and QuadH2O professional waterproof drones
Waterproof Multirotors
https://www.quadh2o.com
The HexH2o Build Guide v1.0
We have put together the following build guide for our HexH2o customers. You are free to build the
HexH2o in whichever way you wish. Our tutorial is in no way a definitive guide, however it is
recommended it’s followed as closely as possible in order to obtain the most from your purchase.
This tutorial is based on using the DJI E600 Tuned Propulsion System. This is also the same
process used when building our RTF kits.
TIP: Before building your HexH2o, we recommend you test ALL electrics BEFORE you install
them.
1 / 30

Waterproof Drones - The HexH2O and QuadH2O professional waterproof drones
Waterproof Multirotors
https://www.quadh2o.com
TIP: Read this guide IN FULL before you start.
1. Unpacking your HexH2o
Your HexH2o will arrive in one box. (Please see our T&C in the unlikely event that your frame
arrives damaged).
Your kit will include:
Painted (yellow) HexH2o body
Foam buoyancy aids & retainer strips
Perspex viewing dome and rear hatch with retaining clips and seal
7 x Black Anodized ESC heat sinks (frame holes pre cut)
Carbon top and bottom plates & stand offs
6 x Carbon Fibre 16mm arms
6 x Lightweight carbon motor mount assembly
6 x Folding centre arm assembly
HexH2o sticker kit
GoPro (3 & 4) anti reflection sticker
Electronics tray with DJI Naza and gimbal mounts
Distribution board mount
24v Cooling Fan
Bolt, washer and grommet kit
GPS Mount/casing assembly
Naza LED stand off and grommet assembly
Cable location mounts & cable ties
Breather kit
2 x HexH2o hex keys
2 / 30

Waterproof Drones - The HexH2O and QuadH2O professional waterproof drones
Waterproof Multirotors
https://www.quadh2o.com
2. Tools for the job
Below is an overview of the recommended tools required to build your QuadH2o:
3 / 30

Waterproof Drones - The HexH2O and QuadH2O professional waterproof drones
Waterproof Multirotors
https://www.quadh2o.com
Soldering Iron, flux, solder
Heat shrink (various sizes)
Quick drying (5min) Epoxy
Marine grade sealant (Sikaflex 291i recommended)
Hot (glue) gun
Cables for wiring harness and extending motor cables
Bullet connectors, 18 female (3.5mm)
Parallel Lead (if using 2 lipos) (eg: XT60/XT90)
Power connectors (eg: XT60)
Thread lock
Wire cutters
Hobby knife
Small socket set (7mm)
4 / 30

Waterproof Drones - The HexH2O and QuadH2O professional waterproof drones
Waterproof Multirotors
https://www.quadh2o.com
3. Dome and rear hatch
Each dome is fitted to its allocated frame, so you may find some corners have been sanded on the
inside edge of the corners, this is to ensure the best fit possible. However it may be required to
make further adjustments in order get obtain a watertight seal – see below.
When removing the dome, carefully turn the retaining clips quarter turn ANTI-CLOCKWISE. If you
try to open them by turning clockwise you may damage the paintwork. To fit the dome, carefully
align the dome evenly on the rubber seal and turn each retaining clip quarter turn CLOCKWISE.
Work around each opposing clip.
TIP: Use a finger to apply light pressure to the lip of the dome next to the retaining clip you are
turning.
Carefully fit the dome and proceed to do a water test. Fill your sink, bath or other suitable water
container. Carefully lower the front of the HexH2o into the water, just enough to ensure the dome is
submerged and check to ensure its water tight.
If water does come through check the following things:
1. Ensure your dome is seated correctly
2. Ensure the dome seal is in place
3. Check, and where required tighten the retaining clips *
4. Add some silicone grease to seal
* To tighten the retainer clips: remove the dome, put the clip to its ‘closed’ position. Holding the
clip in place carefully tighten the screw. Do not over tighten, otherwise you will not be able to get
the clip over the dome and/or may damage the paintwork.
You can test this by placing a sheet of paper between the clip and the HexH2o body; as you
(carefully and slowly) open the clip it should (just) clear the paper.
TIP: If adjustment is required, only tighten the nuts 1 quarter turn at a time. Do not over tighten.
Once you are happy the dome is watertight, repeat the process with the rear hatch.
Once completed, remove both the dome and rear hatch and put to one side.
WARNING: Keep your dome protected to avoid scratching the surface.
5 / 30

Waterproof Drones - The HexH2O and QuadH2O professional waterproof drones
Waterproof Multirotors
https://www.quadh2o.com
TIP: Adding a small amount of silicone grease to the seals will help to retain a water tight seal.
4. Fitting the foam buoyancy aids
Using the provided velcro fit the buoyancy aids to either side of the hull.
TIP: Space the velcro evenly as this will allow you to adjust the buoyancy aids.
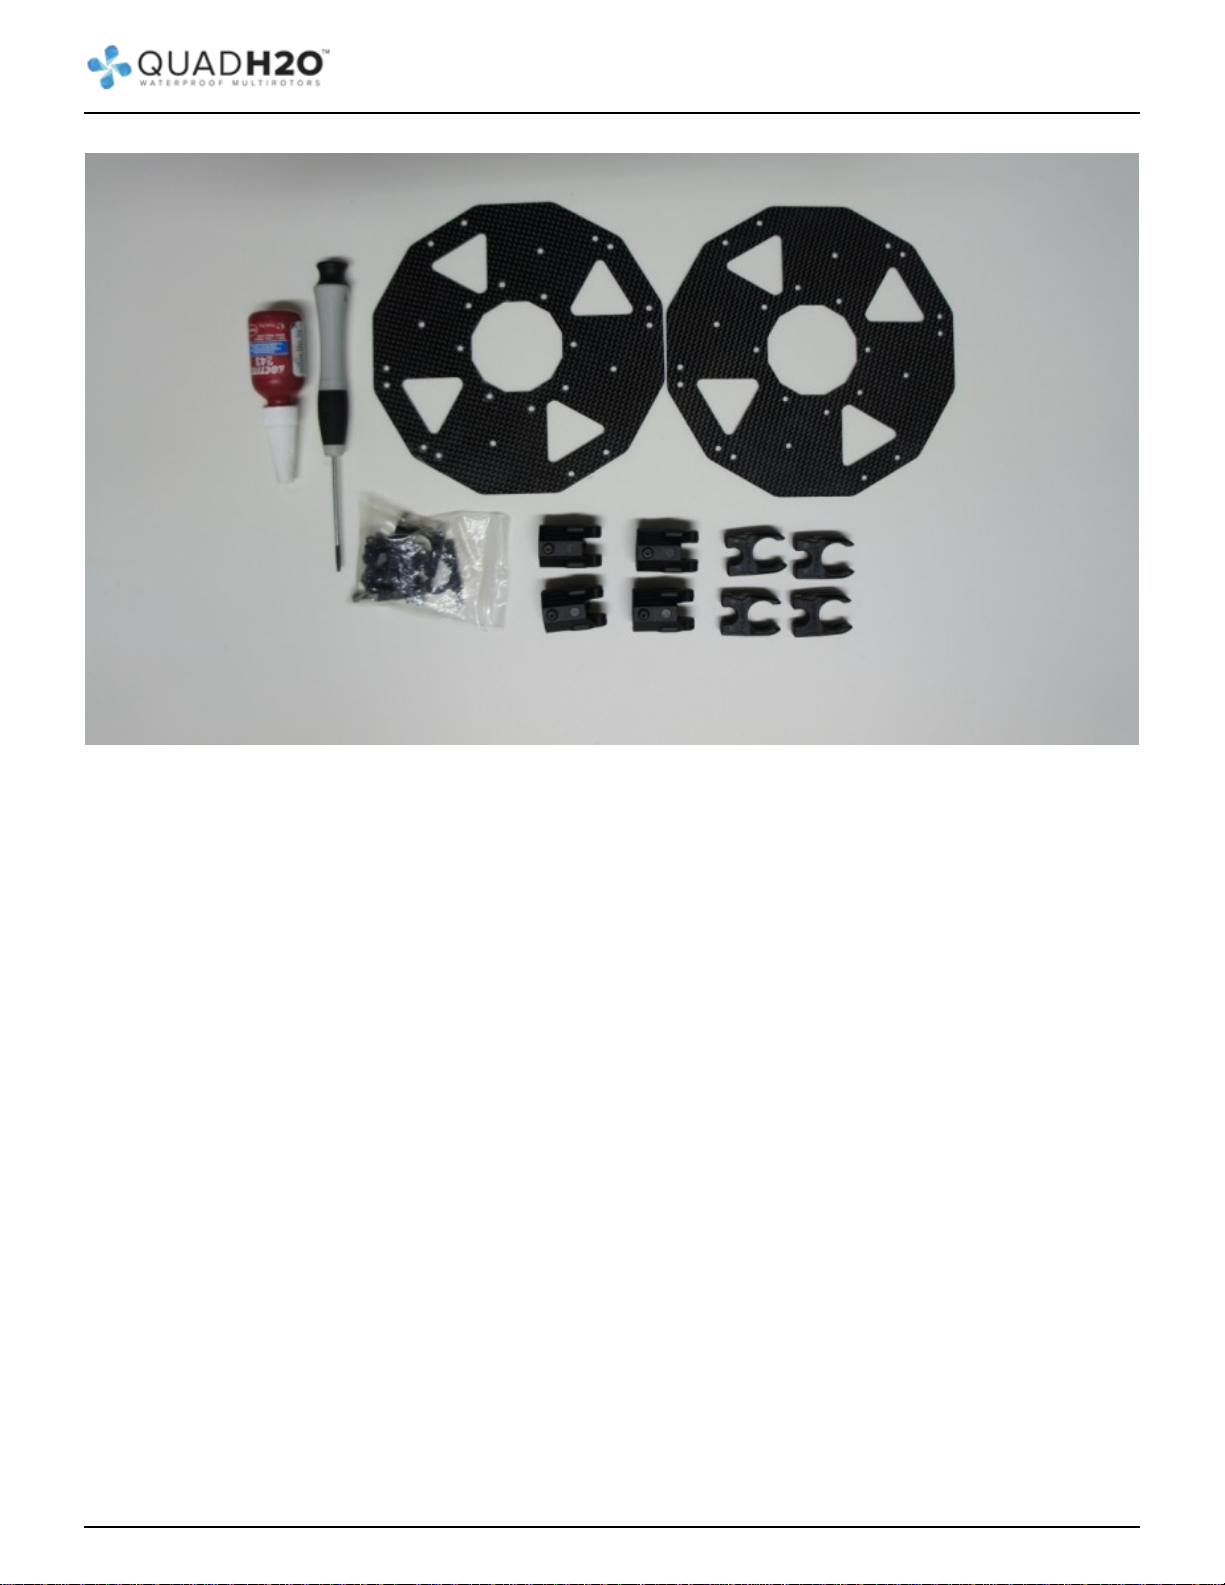
5. Build up the top plate assembly
6 / 30
Waterproof Drones - The HexH2O and QuadH2O professional waterproof drones
Waterproof Multirotors
https://www.quadh2o.com
Using the provided components, build up the top and bottom carbon plates, arms and mounting
clamps. You will note that the arms have holes pre-drilled at the ends. The arms can only be
inserted one way in order for the holes to line up.
7 / 30

Waterproof Drones - The HexH2O and QuadH2O professional waterproof drones
Waterproof Multirotors
https://www.quadh2o.com
TIP: Don’t fit the motor mounts to the arms just yet.
Use the supplied washers (were required) on the boom clamps to ensure the gap in the top and
bottom plates are equal.
8 / 30

Waterproof Drones - The HexH2O and QuadH2O professional waterproof drones
Waterproof Multirotors
https://www.quadh2o.com
Note the bottom plate is the one with the counter sunk holes (for the stand off bolts) – there are
access holes in the top plate allowing you to access the bolts even after the plates are built
up/fitted.
TIP: Don’t fit the top plate assembly to the stand-offs just yet.
6. Fit the grommets, stand offs & breather tubes
9 / 30

Waterproof Drones - The HexH2O and QuadH2O professional waterproof drones
Waterproof Multirotors
https://www.quadh2o.com
Carefully fit the 6 larger motor cable grommets into the pre-drilled holes in the top of the hull, then
fit the 2 remaining smaller grommets into the pre-cut breather tube holes (see picture).
Now fit the provided breather tubes through the breather tube grommets (leave approximately 4?
sticking out). These can be kept in place inside the hull using two or the provided cable tie clips.
Ensure the end of the tube is close to the bottom of the HexH2o (see picture).
10 / 30
Ce manuel convient aux modèles suivants
1
Table des matières
Autres manuels Quad H2O Drone


 Manuel utilisateur")


