Force1 rogue F72 Manuel utilisateur

USER MANUAL
Visit us online at force1rc.com for product information, replacement parts, and ight tutorials.
FOR MORE INFORMATION
Altitude Hold VideoPhotoHeadless
Mode
3 SpeedFlight Path
Mode
FPV Mode One Key
Lift/Land
360
°
360°
Inversion


ATTENTION:
PLEASE WATCH THIS
FLIGHT INSTRUCTION
VIDEO BEFORE
FLYING YOUR DRONE.
https://youtu.be/tk3qzsUwoWs

FORCE1
2
CONTENTS
Welcome & General Safety Precautions·······················3
LI-PO Battery Care ·······················································4
Drone Battery Charging ···············································5
Contents & Transmitter Battery Installation··················6
Drone Overview ··························································· 7
LCD Overview and Phone Clip····································· 8
Throttle Modes Overview·············································9
Drone Assembly ·························································10
Preflight Operations ···················································12
Preflight Checklist·······················································13
Basic Flight Controls···················································14
Trim Adjustments························································15
Functions ····································································16
Force1 F72 App Installation ······································20
App Icons Overview ···················································21
App Controls ······························································24
Aerial Photography & Video······································· 26
Troubleshooting ·························································27
Spare Parts ·································································28

F72 Rogue User Manual
3
WELCOME!
SAFETY PRECAUTIONS
Welcome to the Force 1 Team, and thank you for your Force1 drone purchase. Please read this manual
carefully before drone operation.
(1) This drone is not a toy! It’s a pro-level drone suitable for experienced RC drone users aged 14 years and
older. You accept all liability for operation.
(2) This drone does not require FAA registration or permitting, but FAA rules still apply. Please download
the B4UFLY mobile app for the most up-to-date zoning info, and heed all local government ordinances.
(3) The ying eld must be legally approved by your local government.
Any questions? We’d love to hear from you! Please contact us at support@force1rc.com any time and we’ll
be happy to help.
*Please use only original Force1 parts and accessories.
*Please keep the packaging and this user manual for future reference.
This drone is suitable for experienced RC drone operators aged 14 years and older. It contains small
parts, and should be kept out of reach of small children.
Please follow these safety procedures:
(1) Flight Zone
This drone does not require FAA registration or permitting, but FAA rules still apply. Please download
the B4UFLY mobile app for the most up-to-date zoning info, and heed all local government
ordinances.
(2) Avoid Moisture
Humidity and water can damage your drone, which in turn may cause accidents.
(3) Fly Safely
Please operate your drone as your skill level allows. User fatigue, impairment and improper operation
can cause accidents.
(4) Avoid Moving Parts & Hot Motors
Do not touch propellers, motors or other moving parts while your drone is on.
(5) Avoid Heat
Keep your drone away from heat and prolonged exposure to direct sunlight to avoid damage.

FORCE1
4
LI-PO BATTERY CARE
Avoid Overheating
Your batteries will sometimes be warm/hot to the touch after use. This is normal, but beware that battery
components will fail if not allowed to cool down between uses. Also, do not leave batteries exposed to
direct sunlight.
Store Properly
Store batteries at room temperature, between 5C°/40°F and 27°C/80°F.
Use Carefully
• Leave time between charging and using the battery
• To extend the lifetime of the battery, always keep about 20% of the power remaining in the drone
battery (rather than completely draining it)
• If the battery is pushed beyond its limits, the battery could get hot and the performance will drop
• When using the battery for a long time, the battery will increase in temperature. If it is sealed, the air
inside will inate rapidly causing further heating
Charging
• DO NOT overcharge the battery; never charge batteries unattended, and stop charging as soon as your
batteries indicate they are charged
• DO NOT attempt to charge batteries that appear damaged in any way (cracking, swelling, discoloration, etc.)
• If you feel a battery isn’t charging properly, try using another charger if possible. If you nd your battery
or charger is defective, please visit force1rc.com for a replacement, or email us at support@force1rc.com
• To inspect a battery, remove it from the device and examine the battery, battery pins and contacts. If
you notice damage, please visit force1rc.com for a replacement, or email us at support@force1rc.com
• Check your battery and connections after every crash
• Please use genuine factory parts and replacements from force1rc.com
WARNING:
DO NOT LEAVE BATTERY
CHARGING UNSUPERVISED
F72 Rogue User Manual
5
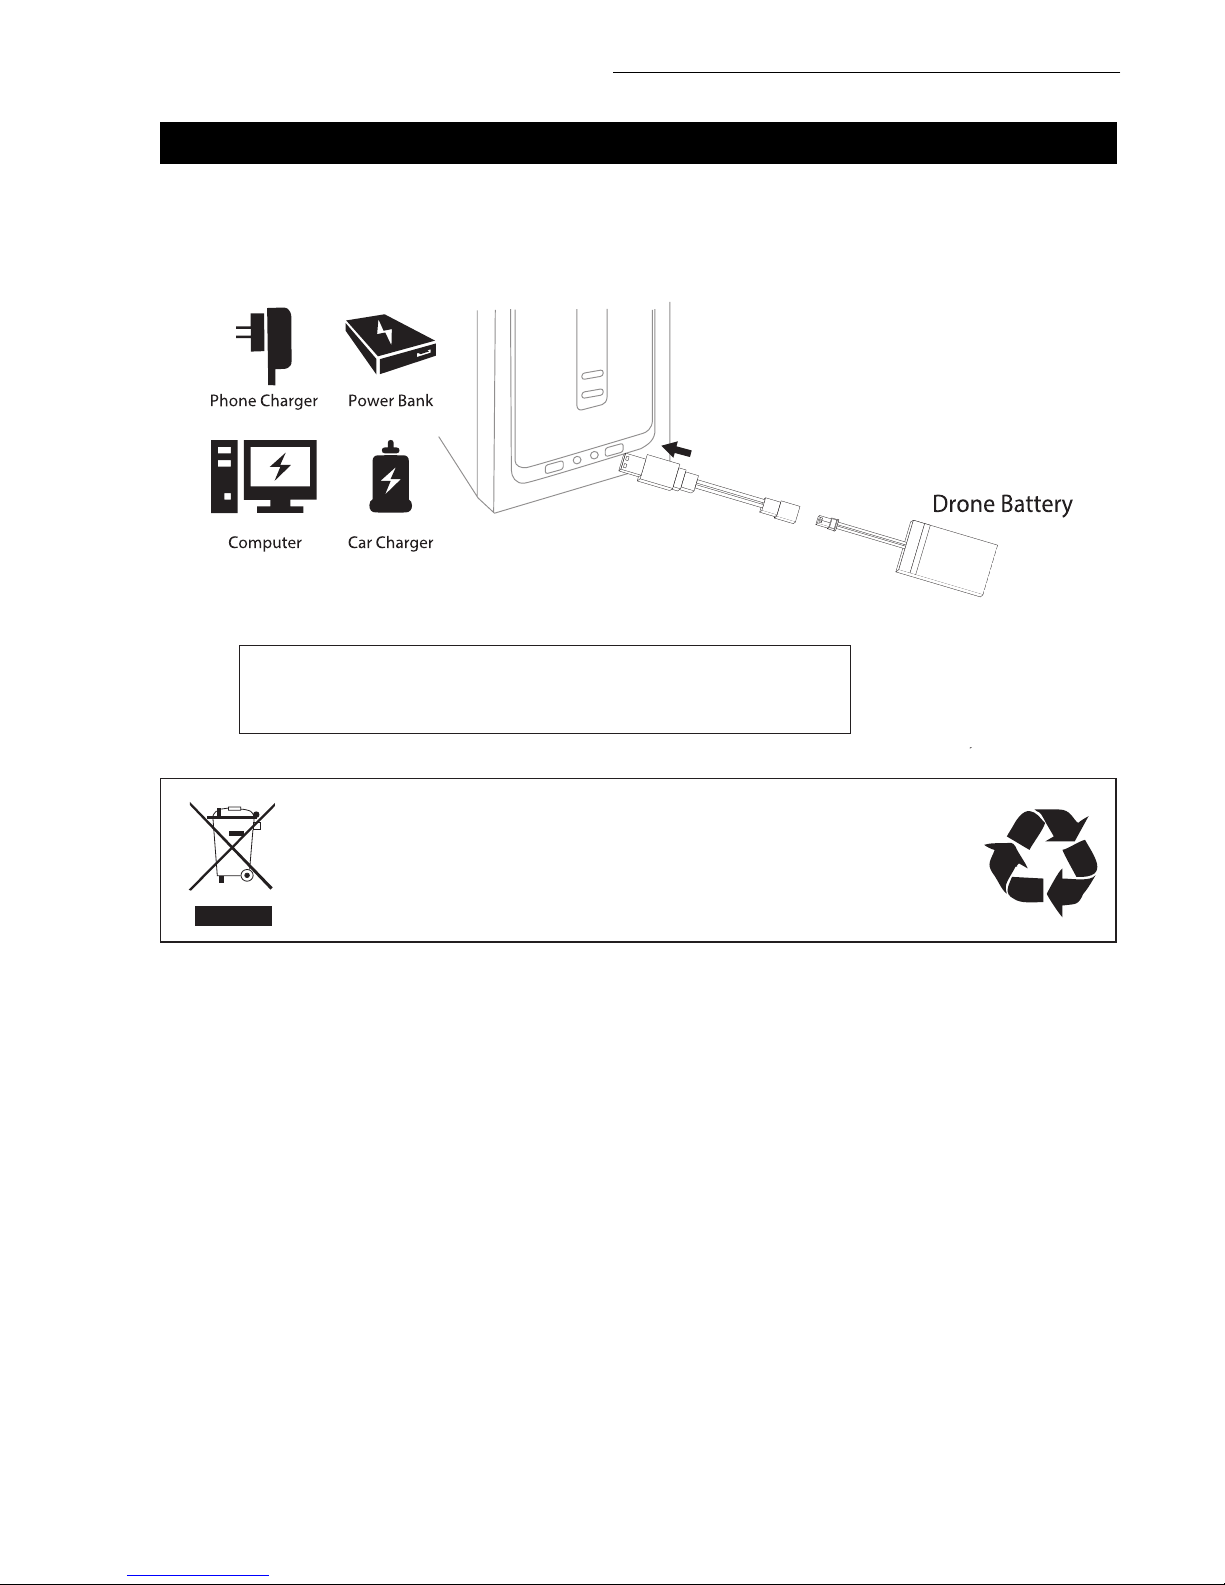
DRONE BATTERY CHARGING
LI-PO BATTERY DISPOSAL & RECYCLING
Do not put lithium-polymer batteries in household trash. Please contact your
local waste management agency or LI-PO battery recycling center for more info.
1. First, attach your USB cable to the drone battery, then connect it to your preferred charging
source.
2. When the battery is charging, a red indicator light on the USB appears. When the battery is fully
charged, a green indicator light appears. The battery charging time is around 70-85 minutes.
NOTE
Use a 5V 2A AC adapter (not included) for faster charging.

FORCE1
6
PHONE CLIP
BOX CONTENTS
DRONE WITH CAMERA TRANSMITTER PROPELLERS (4)
USB CHARGER
SD CARD READER DRONE TOOLS
7.4v 350mAh
LITHIUM BATTERY (2)
TRANSMITTER BATTERY INSTALLATION
Open the battery cover and insert 4 AA batteries as shown below (not included).
• The transmitter needs 4 AA batteries to work
• Insert batteries in correct polarity (+) and (-)
• Don’t mix old and new batteries
• Don’t mix alkaline, standard (carbon-zinc) and rechargeable (nickel-cadmium) batteries
• Remove rechargeable batteries before charging
• Only charge batteries under adult supervision
• Remove spent batteries from the transmitter
• Regularly inspect the charging cable, cord, plug, enclose and other parts; if you notice damage, please
visit Force1rc.com for a replacement, or email us at support@force1rc.com
CAUTION:

F72 Rogue User Manual
7
DRONE OVERVIEW
FRONT
PROPELLER B
COUNTERCLOCKWISE
PROPELLER A
CLOCKWISE
PROPELLER A
CLOCKWISE
PROPELLER GUARD
PROPELLER B
COUNTERCLOCKWISE
REAR
LANDING GEAR
[1] MOTOR
[2] CAMERA
[3] FRONT INDICATOR LIGHT
[4] BATTERY COMPARTMENT
[5] REAR INDICATOR LIGHT
[1]
[3]
[4]
[5]
[2]

FORCE1
8
1. Insert the clip vertically, down into the transmitter in front of the antennae (Fig. 1). There will be a
click when the clip is firmly in place.
2. Put the phone into the clip and then release the clamp; the clamp should hold your phone
tightly.
3. Use the right silver knob to modify the angle of the phone clip (Fig. 2).
PHONE CLIP ATTACHMENT & USE
FIGURE 1 FIGURE 2
DIRECTIONAL TRIMMINGROTATIONAL TRIMMING
LCD SCREEN
ALTITUDE
HOLD
DIRECTION
DISPLAY ICON
THROTTLE
DISPLAY ICON
MODE 2 DISPLAY
FORWARD/
BACKWARD TRIM
(MODE 1)
4 AXIS FLIGHT ICON
HEADLESS MODE ICON
HIGH/MED/LOW
SPEED ICONS
MODE 1 DISPLAY
TRANSMITTER
BATTERY LEVEL
FORWARD/
BACKWARD TRIM
(MODE 2)
THROTTLE
DISPLAY ICON
Table des matières
Autres manuels Force1 Drone

Force1
Force1 halo3000 Manuel utilisateur

Force1
Force1 F200C SPECTER Manuel utilisateur

Force1
Force1 MONARCH Manuel utilisateur

Force1
Force1 F200 Shadow Dimensions

Force1
Force1 F200W SHADOW Manuel utilisateur

Force1
Force1 UFO5000 Manuel utilisateur

Force1
Force1 F200C SPECTER Manuel utilisateur

Force1
Force1 Scoot Manuel utilisateur

Force1
Force1 U49C RED HERON Manuel utilisateur


 Manuel utilisateur")


