PROPOINT 10.8V Li-ion Manuel utilisateur

User Manual
8380271V 2.0
Please read this manual before use.
10.8V Li-ion
Cordless Mini Drill Driver


3
For technical questions call: 1-800-665-8685
8380271V 2.0
10.8V Li-ion
Cordless Mini Drill Driver
SPECIFICATIONS
Voltage 10.8V
Variable speed 0 to 800 RPM
Max. Torque 5.9 ft-lb
Chuck 1/4" keyless
Charging Time 1 hr charger
INTRODUCTION
This Cordless Mini Drill/Driver is powered by Li-ion batteries, which last longer, weigh less and are better for the
environment than Ni-Cd batteries.
IMPORTANT SAFETY PRECAUTIONS
WARNING! Read and understand all instructions before using this tool. Keep this manual for the safety warnings
and precautions, operating, inspection and maintenance instructions. When using this tool, basic precautions
should always be followed to reduce the risk of personal injury and/or damage to the equipment. Note that when
this manual refers to a part number, it refers to the parts list included. Before allowing someone else to use this tool,
make sure they are aware of all safety information.
WORK AREA
1. Keep your work area clean and well lit. Cluttered and dark areas invite accidents.
2. Operate in a safe work environment. Do not use machines or air tools in damp or wet locations. Do not expose
to rain. Do not use power tools in the presence of flammable gases or liquids.
3. Keep children, bystanders and visitors away from the work area. Do not let them handle tools or extension
cords. No one should be in the work area if they are not wearing suitable protective equipment.
4. Store unused equipment. When not in use, tools must be stored in a dry location to prevent rust. Always lock up
tools and keep them out of reach of children.

10.8V Li-ion Cordless Mini Drill Driver
4For technical questions call: 1-800-665-8685
V 2.08380271
PERSONAL SAFETY
1. Dress properly, wear protective equipment. Use breathing, ear, eye, face, foot, hand and head protection.
Always wear ANSI approved impact safety goggles, which must provide both frontal and side protection.
Protect your hands with suitable gloves. Wear a full face shield if your work creates metal filings or wood chips.
Protect your head from falling objects by wearing a hard hat. Wear an ANSI approved dust mask or respirator
when working around metal, wood and chemical dusts and mists. Wear ANSI approved earplugs. Protective,
electrically non-conductive clothes and non-skid footwear are recommended when working. Wear steel toed
boots to prevent injury from falling objects.
2. Do not over reach; keep proper footing and balance at all times. Proper footing and balance enables better
control of the tool in unexpected situations.
3. Keep any articles of clothing, jewelry, hair etc. away from moving parts. These can be caught in moving parts,
resulting in damage to the tool and/or serious injury.
4. Stay alert, watch what you are doing and use your common sense. Do not operate any machine or tool when
you are tired, under the influence of drugs, alcohol or medications.
5. Use clamps or other practical ways to secure and support the work piece to a stable platform. Holding the work
piece by hand or against your body is unstable and may lead to loss of control.
VIBRATION PRECAUTIONS
This tool vibrates during use. Repeated or long-term exposure to vibration may cause temporary or permanent physical
injury, particularly to the hands, arms and shoulders.
1. Anyone using vibrating tools regularly or for an extended period should first be examined by a doctor and
then have regular medical check ups to ensure medical problems are not being caused by or worsened from
tool use. Pregnant women or people who have impaired blood circulation to the hands, past hand injuries,
nervous system disorders, diabetes or Raynaud's Disease should not use this tool. If you feel any medical
symptoms related to vibrations (such as tingling, numbness, and white or blue fingers), seek medical attention
as soon as possible.
2. Do not smoke during use. Nicotine reduces the blood flow to the hands and fingers, increasing the risk of
vibration-related injury.
3. Wear suitable gloves to reduce the vibration effects on the user.
4. Use tools with the lowest amount of vibration when there is a choice between different processes.
5. Do not use for extended periods. Take frequent breaks when using this tool.
6. Let the tool do the work. Grip the tool as lightly as possible (while still keeping safe control of it).
7. To reduce vibrations, maintain tool as explained in this manual. If abnormal vibrations occur, stop using
this tool immediately.
8. This tool will not stop moving immediately. Do not lay the tool down or leave it unattended until it has come
to a complete stop. A part that is moving could make the tool jump or grab a surface and pull the tool out
of your control.

10.8V Li-ion Cordless Mini Drill Driver
5
For technical questions call: 1-800-665-8685
V 2.0 8380271
SPECIFIC SAFETY PRECAUTIONS FOR CHARGER AND BATTERY PACK
WARNING!
1. Caution! To reduce risk of injury, charge only specific type rechargeable battery packs. Other types of battery
packs may burst causing personal injury and damage.
2. Before using charger, read all instructions and cautionary markings on battery packs and chargers.
3. Do not expose charger to rain or snow.
4. To reduce the risk of damage to electric plug and cord, pull by plug rather than cord when
disconnecting charger.
5. Use of an attachment not recommended or sold by the charger manufacturer may result in a risk of fire, electric
shock, or injury to persons.
6. Make sure cord is located so that it will not be stepped on, tripped on, tripped over, or otherwise subjected
damage or stress.
7. Do not operate charger with damaged cord or plug. Replace them immediately.
8. Do not operate charger if it has received a sharp blow, been dropped, or otherwise damage in any way, take it
to qualified center.
9. To reduce risk of electric shock, unplug charger from outlet before attempting any maintenance or cleaning.
Turning off controls will not reduce this risk.
10. Do not disassemble charger or battery pack; take it to a qualified service center while repair is required.
Incorrect reassembling may result in a risk of electric shock or fire.
ADDITIONAL SAFETY RULES FOR CHARGER & BATTERY PACK
WARNING!
1. Do not charge battery pack when temperature is below 10°C (50°F) or above 40°C (104°F).
2. Do not attempt to use a set-up transformer, an engine generator or DC power receptacle.
3. Do not allow anything to cover or clog the charger vents.
4. Always cover the battery pack terminals with the battery pack cover when the battery pack is not used.
5. Do not short the battery pack.
6. Do not touch the terminals with any conductive material.
7. Avoid storing battery pack in a container with other metal objects such as nails, coins, etc.
8. Do not expose battery pack to water or rain. A battery pack short can use large current flow, overheating,
possible burns and even a breakdown.
9. Do not store the machine and battery pack in locations where the temperature may reach or exceed 50°C
(122°F)
10. Do not incinerate the battery pack even if it is severely damaged or completely worn out. The battery pack can
explode in a fire.
11. Be careful not to drop, shake or strike battery pack.
12. Do not charge inside a box or container of any kind. The battery pack must be placed in a well ventilated area
during charging.
13. Do not leave batteries unused for extended period of time. Recharge the battery every 3 to 6 months and bring
Li-Ion battery to 40 to 80% charge level before storage.
14. Li-Ion batteries are sensitive to high temperature and should be kept in a cool, dry and out of direct light
exposure. Ideal temperature for operation and storage is below 77°F.
15. This product is designed with low voltage protection, which prevents the tool from over discharging and to
prolong battery's lifespan.

10.8V Li-ion Cordless Mini Drill Driver
6For technical questions call: 1-800-665-8685
V 2.08380271
TOOL USE AND CARE
1. Use the right tool for the job. Do not attempt to force a small tool or attachment to do the work of a larger
industrial tool. The tool will perform better and more safely at the task for which it was intended. Do not modify
this tool or use for a purpose for which it was not designed.
2. Securely hold this tool using both hands. Using tools with only one hand can result in loss of control.
3. Maintain tools with care. Keep tools clean, sharp and in good condition for a better and safer performance.
Follow instructions for lubricating and changing accessories. Inspect tool fittings, alignment and hoses
periodically and, if damaged, have them repaired by an authorized technician or replaced. The handles must
be kept clean, dry and free from oil and grease at all times. A properly maintained tool reduces the risk of
binding and is easier to control. Sharp tools are safer than tools which have become dull because you do not
have to apply excessive amounts of force to make your cuts. Applying excessive force can lead to slips and
damage to your work or personal injury.
4. Remove adjusting keys and wrenches. Check that keys and adjusting wrenches are removed from the tool or
machine before connecting it. A wrench or key that is left attached to a rotating part of the tool increases the
risk of personal injury.
5. Avoid unintentional starts. Be sure that the switch is in neutral or OFF position when not in use and before
connecting it to any power source. Do not carry the tool with fingers near or on the switch.
6. Only use the lubricants supplied with the tool or specified by the manufacturer. Other lubricants may not be
suitable and may damage the tool or even make the tool explode.
7. When not in use for an extended period, apply a thin coat of lubricant to the steel parts to avoid rust.
8. Maintain the label and name plate on the tool. These carry important information. If unreadable or missing,
contact Princess Auto for a replacement.
LUBRICATION
All of the bearings in this tool are lubricated with a sufficient amount of high grade lubricant for the life of the unit
under normal conditions. Therefore, no further lubrication is required.
UNPACKING
1. Carefully remove the parts and accessories from the box.
2. Make sure that all items listed in the parts lists are included.
3. Inspect the parts carefully to make sure the tool was not damaged while shipping.
4. Do not discard the packaging material until you have carefully inspected and satisfactorily operated the tool.
WARNING! If any part is missing, do not operate the tool until the missing parts are replaced. Failure to do so
could result in serious personal injury.

10.8V Li-ion Cordless Mini Drill Driver
7
For technical questions call: 1-800-665-8685
V 2.0 8380271
OPERATION
PARTS IDENTIFICATION ACCESSORY
INSTALLING OR REMOVING BATTERY PACK
1. Always switch off the machine before insertion or removal of the battery pack.
2. To remove the battery pack, pull out the set plate on the machine and grasp
both sides of the battery pack while withdrawing it from the machine.
3. To insert the battery pack, align the tongue in the battery pack with the groove
in the housing and slip it into place. Snap the set plate back into place. Be sure
to close the set plate fully before using the machine.
4. Do not use force when inserting the battery pack. If the battery pack does not
slide in easily, it is not being inserted correctly.
CHARGING THE BATTERY PACK (SEE FIG.5)
1. Your new battery pack is not charged. You will need to charge it before use.
2. If you try to charge a battery pack from a just-operated machine, sometimes
the charging light will not come on. If this occurs, let the battery pack cool off
for a while. Then reinsert it and try to charge it once more.
3. When you charge a new battery pack or a battery pack which has not
been used for a long period, it may not accept a full charge. This is a normal
condition and does not indicate a problem. You can recharge the battery pack
fully after discharging it completely a couple of times.
4. If you wish to charge two battery packs, allow 15 minutes between charging
on the fast charger.
5. Plug the fast charger into you source. Insert battery pack so that the plus and
minus terminals on the battery pack are in the same slides as their respective
markings on the fast charger.
6. The charging light will come on and charging will begin. If the charging light go out soon, remove
the battery pack from the charger and let it cool off for more than one minute. Then reinsert it and try to charge
it once more.
7. If the charging light goes out within one minute even after repeating this procedure a couple of times, the
battery pack is dead. Replace it with a new one. When the charging light goes out after about one hour, you
may remove the fully charged battery pack.
8. After charging, unplug the charger from the power source.
Charger
Fig. 2
Fig. 5
Fig. 3
Fig. 4

10.8V Li-ion Cordless Mini Drill Driver
8For technical questions call: 1-800-665-8685
V 2.08380271
THE LED LIGHT ON THE CHARGER
WARNING!
1. Charger is plugged into a 100 to 240V AC outlet only.
2. If the battery pack is too hot or too cold, the charger will not fast charge the battery pack and the red Indicator
light is “blinking”. The charger will automatically begin charging when the battery pack temperature returns to
between 0°C (32°F) and 50°C (122°F).
3. If both red and green indicator lights are “ON” the battery pack either does not comply or is defective. Please
contact your retailer.
4. Do not charge the battery pack in the rain, snow or high temperature environment.
5. Do not charge battery pack when environment temperature is below 0°C (32°F) or above 40°C (104°F)
6. While charge the cool battery pack (below 0°C) in the warm indoor, keep the battery pack in the room for one
hour to warm up before starting the battery pack. A cool battery may charge unsaturated.
7. Remove the plug after finishing the charge.
8. Do not use generator for charging the battery pack.
Power On
(Green light flashes slowly)
Battery charged 100%
(Green light stays illuminated)
Battery Pack temperature
is too hot or too cold
(Red light flashes slowly)
Battery Pack malfunction
(Red and Green lights stay
illuminated)
Battery Low
(Red light stays illuminated)
Battery charged 80%
(Green light flashes rapidly)
Fig. 6

10.8V Li-ion Cordless Mini Drill Driver
9
For technical questions call: 1-800-665-8685
V 2.0 8380271
TOOL OPERATION
ATTACHING THE BITS
(Bits Excluded)
INSERT IMAGE 8380271_attaching bit.jpg
1. Insert the bit into the hole of the driver shaft.
2. To remove the bit, pull it out from the bit holder.
TOOL OPERATING
1. How to insert and remove bit:
• To remove a bit from the chuck, hold
“ part B” firmly in one hand and turn
part “A” counterclockwise.
• To insert a bit into the chuck, hold “part B”
firmly in one hand and turn the
“part A” clockwise.
2. Forward / Reverse Rod selection button:
Select the forward or reverse direction of the tool
by pushing the Forward/Reverse Rod.
3. Select the applied torque:
Use the 11 sections adjustment ring to select the
right torque for your application.
4. Drill model:
Select the torque ring to the sign for the
maximum torque position if you would like to drill
into wood.
ELECTRICAL TOOLS
1. The brushes should be checked periodically and worn-out brushes should be replaced. After replacing, inspect
whether the new brushes can move freely in the brush holder. Run the motor for 15 minutes without load to
shape the brushes, so that they are properly aligned with the commutator.
2. Keep the vent passage clear from dirt. Clean off the accumulated dust and oil dirt periodically.
3. During normal operation, if anything happens, the power supply should be cut off at once and the tool should
be checked and repaired.
4. Clean the tool after each use.
CAUTION! Only qualified service personnel should repair the tool.
9.5mm(3/8”) to 11.5mm(7/16”) 6.35mm(1/4”)
Fig. 9
forward reverse
Forward/Reverse
Rod
Remove the bit
Turn clockwise
10.8V Li-ion Cordless Mini Drill Driver
10 For technical questions call: 1-800-665-8685
V 2.08380271
MAINTENANCE
Before making any adjustments or changing any accessory, turn off the tool and unplug it from its power source.
1. Check for damaged parts. Before using any tool, any part that appears to be damaged should be carefully
checked to determine that it will operate properly and perform its intended functions. Check for alignment and
binding of moving parts, for broken parts or mounting fixtures, or for any other condition that may affect proper
operation. Any part that is damaged should be repaired or replaced by a qualified technician.
2. When servicing, use only identical replacement parts. Only use accessories intended for use with this tool.
Replace damaged parts immediately.
3. Keep the tool clean. Wipe the tool with a clean cloth and periodically blow out all areas with compressed air.
If compressed air is not available, use a brush to remove dust from all areas. Do not use harsh chemicals or
solvents to clean the tool. These chemicals could seriously damage the plastic housing.
4. Regularly inspect all mountings and screws to ensure tightness. Should any screws become loose,
tighten immediately.
5. If repairs are required, bring your tool to an authorized service center.
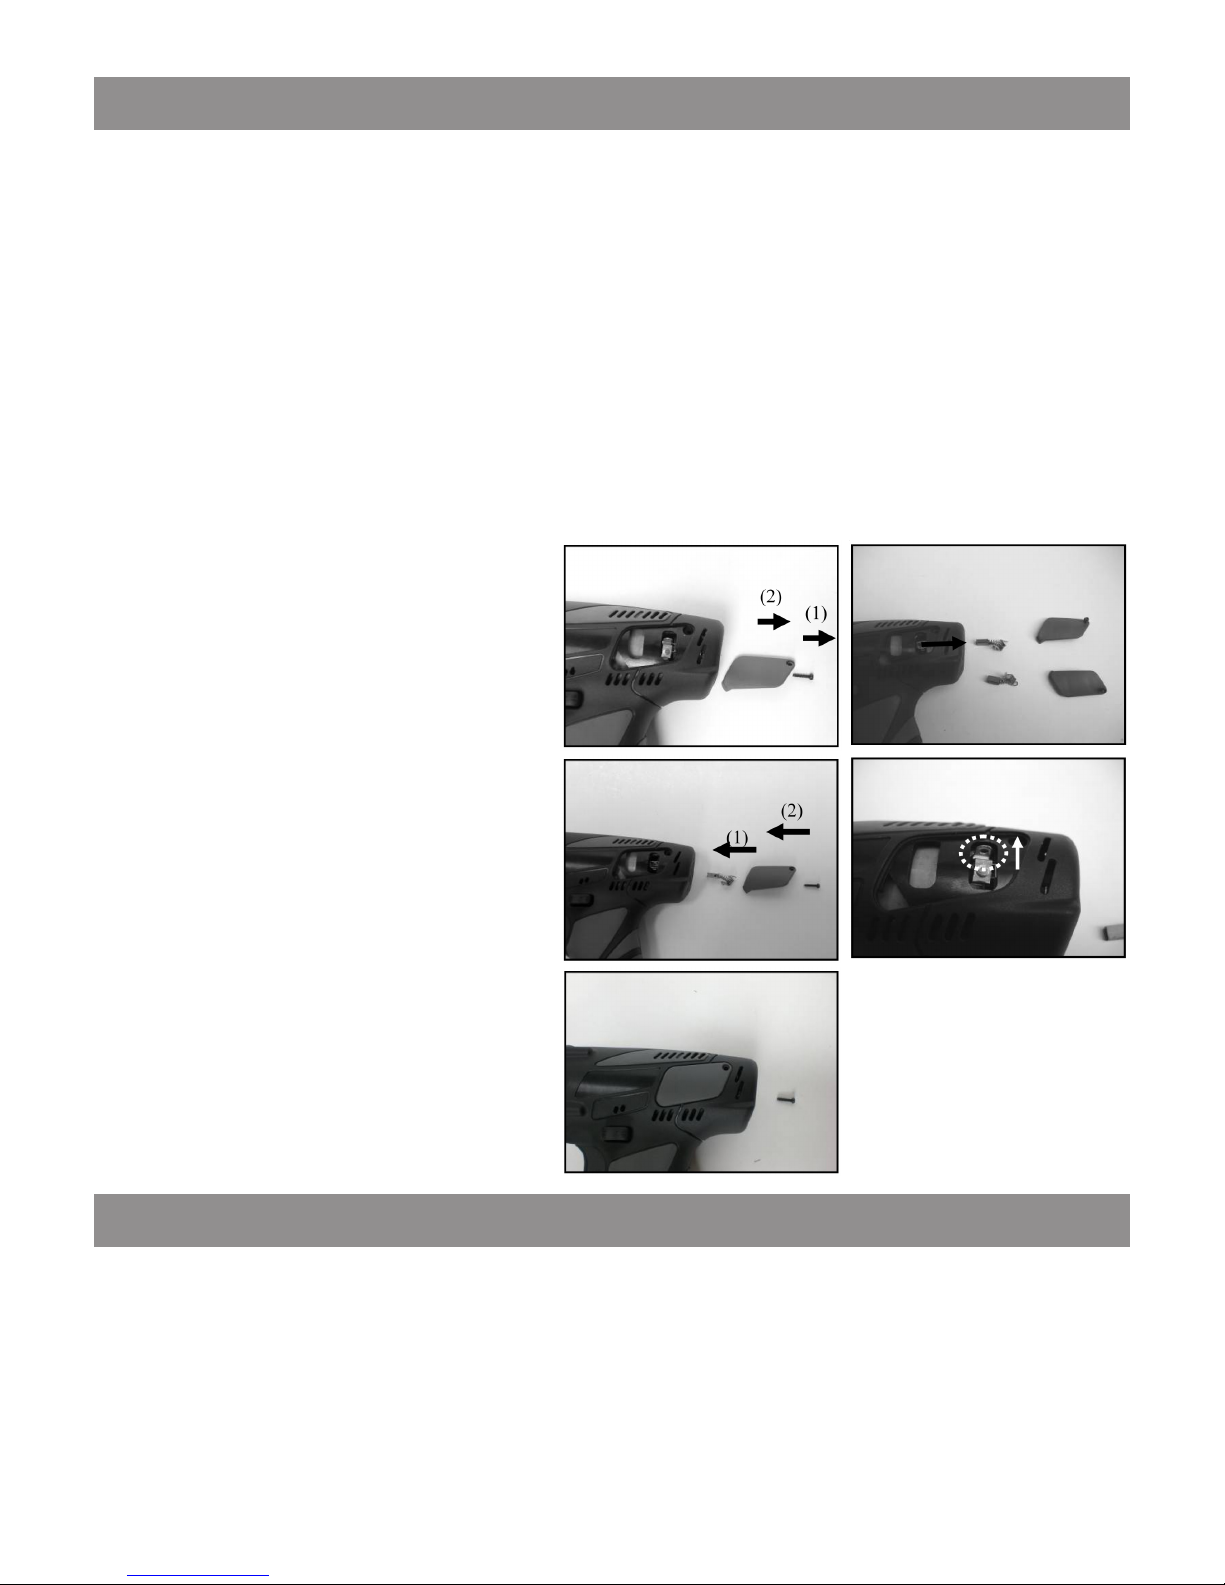
REPLACING CARBON BRUSH
1 Replacement procedure is as follows:
• Use T8 size bit to loosen the side panel
screws and remove side panel by hand.
(Fig.10)
• Take out the carbon brushes on both sides.
(Fig.11)
• Put the new carbon brush and side panel
into the hosing in proper order. Refer to
picture for the direction of installing the
carbon brush. (Fig.12-13)
• Lock the side panel clockwise by using T8
size bit. (Fig.14)
CAUTION! Always be sure that the machine is
switched off and is unplugged from the power
outlet removed before carrying out any work
on the machine. To maintain product safety and
reliability, repairs, maintenance or adjustment
should be carried out by an authorized service
center.
DISPOSING OF THE TOOL
If your tool has become damaged beyond repair, do not throw it out. Bring it to the appropriate recycling facility.
Fig. 10 Fig. 11
Fig. 12 Fig. 13
Fig. 14
Table des matières
Langues :


