Promaker PRO-SD360 Manuel utilisateur

Lithium Battery Cordless Screwdriver
User’s Manual
Model No.: PRO-SD360
English: 2 I Español: 14

2

3

4
The numbers in the text refer to
the diagrams on pages 2 - 3.
Read the operating
instructions carefully before
using this device. Familiarise
yourself with its functions and
basic operation. Service the device
as per the instructions to ensure
that it always functions properly.
The operating instructions and the
accompanying documentation must
be kept in the vicinity of the device.
Introduction
This screwdriver is intended for
tightening and loosening screws
(Fig. 2 - 9). The screwdriver is not
suitable for screwdriving heavy
constructions, for example repairing
a big fence.
1. MACHINE INFORMATION
Specications
Battery Li-ion
Voltage 3.6V Li-ion
Speed 220rpm
Weigh 0.81lbs
Max Torque 3Nm
Vibration level
The vibration emission level stated
in this instruction manual has been
measured in accordance with a
standardised test given in EN
60745; it may be used to compare
one tool with another and as a
preliminary assessment of exposure
to vibration when using the tool for
the applications mentioned.
• Using the tool for different
applications, or with different or
poorly maintainted accessories,
may signicantly increase the
exposure level.
• The times when the tool is
switched off or when it is running
but not actually doing the job,
may signi cantly reduce the
exposure level
Protect yourself against the effects
of vibration by maintaining the tool
and its accessories, keeping your
hands warm, and organizing your
work patterns.
Contents of packing
1 Cordless screwdriver
1 Charger
1 Instruction manual
Check the appliance, any loose
parts and accessories for damage
caused during transport.
Product information
Fig. 1
1. Bit holder
2. On/Off-switch
3. Softgrip
4. LED (Red)
5. Charger connection
6. Extension piece
7. Bit
8. LED (White)

5
2. SAFETY INSTRUCTIONS
Explanation of the symbols
Denotes risk of personal injury,
loss of life or damage to the tool in
case of non-observance of the
instructions in this manual.
Indicates electrical shock hazard.
Indoor use only.
In case of failure, the transformer
is not dangerous
Thermic protector.
Do not dispose of in household
waste.
Specic safety instructions
• Only use the accumulator block
with the battery charger provided
– using other chargers could be
dangerous.
• Keep the accumulator block, tool
and battery charger away from
damp and wet conditions.
• Before using the battery charger,
check all wires are properly
connected.
• If any wires on the charger are
damaged, do not use it until these
have been replaced.
• When the charger is not in use it
should not be plugged in. When
unplugging, do not pull the plug out
by the cable.
• If the charger breaks down or suffers
from other technical problems, take
it to a recognised dealership to be
checked before using it again. Any
damaged parts must be replaced.
• Take care when handling the
accumulator block, do not drop it or
knock it against other things.
• Never attempt to repair the battery
charger or accumulator block
yourself; this can be extremely
dangerous. Repairs should always
be carried out by a recognised
dealership.
• Always unplug the charger before
cleaning or carrying out any other
maintenance on it.
• Do not attempt to charge the
accumulator block in temperatures
of below 5 degrees or above 40
degrees centigrade.
• Never throw the accumulator block
into water or a re – it may explode.
• Turn the drill immediately off after
the screw is fastened. Overloading
and damaging the battery or motor
can be prevented this way. Use the
torque to loosen the fastened screw.
Electrical safety
When using electric machines
always observe the safety
regulations applicable in your
country to reduce the risk of re,
electric shock and personal injury.
Read the following safety
instructions.
Always check that the power
supply corresponds to the voltage
on the rating plate.

6
Class ll machine. Your machine
is double insulated; therefore no
earthwire is required.
Replacing cables or plugs
Immediately throw away old
cables or plugs when they have
been replaced by new ones. It is
dangerous to insert the plug of a
loose cable in the wall outlet.
3. ASSEMBLING INSTRUCTIONS
Inserting and removing bits
Fig. 1+7
The bits can easily be placed directly
into the bit holder or on the extension
piece. The extension piece can be
used for screws that are difcult to
reach.
4. OPERATION
Always observe the safety
instructions and applicable
regulations.
Firmly hold the machine and ferm
the bit with even pressure into
the workpiece. Do not force the
machine. Use only bits that do not
yet show any signs of wear. Worn
bits have a negative effect on the
efciency of the machine.
Locking the screwdriver
Fig. 8
The screwdriver is tted with an
automatic spindle lock feature.
When the On/Off switch (2) is not
pressed, the spindle is locked. Now
it is possible to use the screwdriver
(even when the battery is empty) as
a manual tool.
Screwdriving
Fig. 1
• To switch the tool on, press the On/
Off switch (2).
• Press the tumbler switch (R)
for clockwise rotation (tightening
screws)
• Press the tumbler switch (L) for
counterclockwise rotation (loosening
screws).
To switch the tool off, release the on/
off switch.
The white LED will illuminate when
the tumbler switch is pressed.
Warning! Looking straight into
LED light for a prolonged period of
time from close distance can cause
damage to the eyes.
User tips for optimum use
•Always hold the tool and screwdriver
bit in a straight line with the screw
and always use the correct type and
size of bit.
• If screws are difcult to tighten, try
applying a small amount of washing
liquid or soap as a lubricant (Fig. 9).
• Use the spindle lock feature to
loosen very tight screws or to rmly

7
tighten screws.
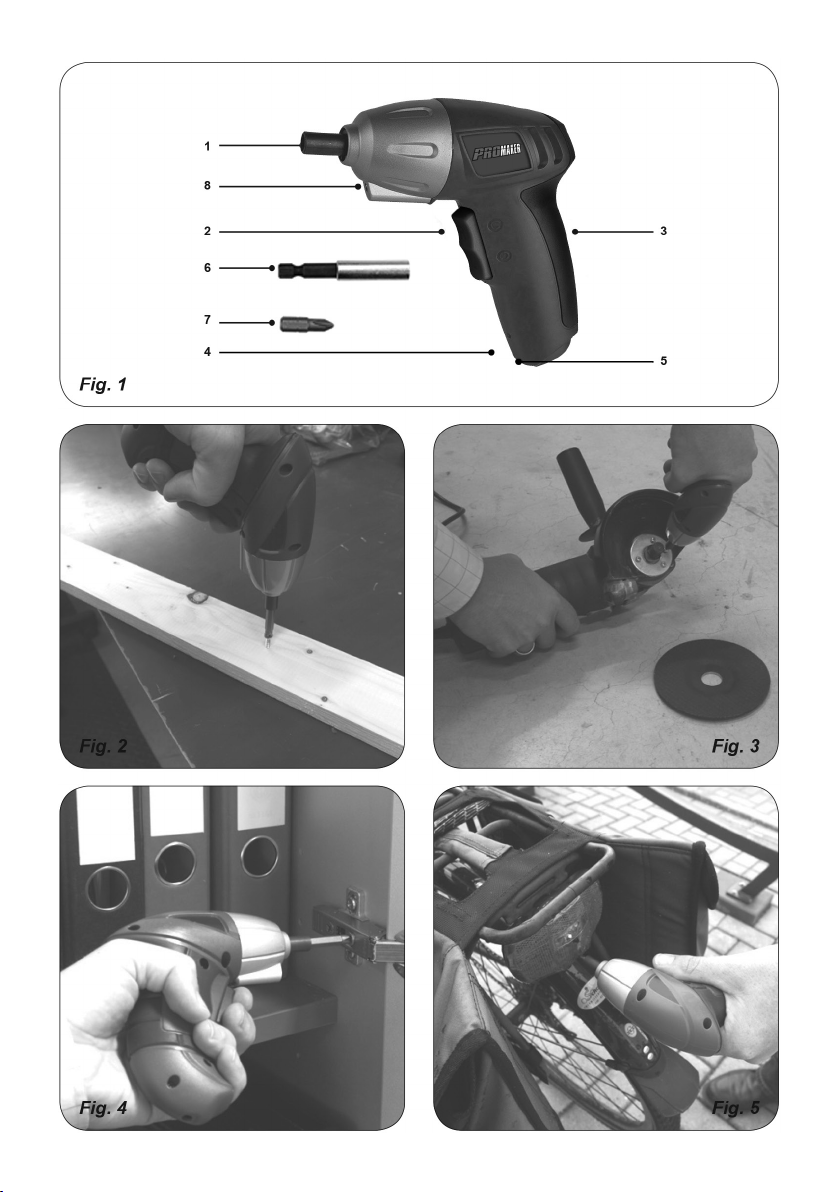
• When screwing in wood, it is
recommended to drill a hole with a
depth equal to almost the length of
the screw. A pilot hole guides the
screw and prevents splintering or
distortion of the work piece.
5. CHARGING THE BATTERY
Charging Li-Ion battery
Fig.10
The battery charger supplied is
matched to the Li-Ion battery
installed in the machine. Do not use
another battery charger.
The Li-Ion battery is protected
against deep discharging. When
the battery is empty, the machine
is switched off by means of a
protective circuit: the tool holder no
longer rotates. Caution: if the On/Off
switch is subject to continued use,
the Li-Ion battery can be damaged.
The charging procedure starts as
soon as the mains plug of the battery
charger is inserted into the socket
and the adapter plug is connected
to the appliance (the underside of
the handgrip).
• Put the adapter plug of the charger
into the handle (underside).
• Plug the mains adapter into the
(wall) socket.
• The charging process starts; the
red LED is now on.
• The battery is fully charged when
the red LED goes out.
• Charging the battery takes
maximum 5 hours.
• During the charging procedure, the
handgrip of the machine warms up.
This is normal.
6. SERVICE & MAINTENANCE
Make sure that the machine is
not live when carrying out
maintenance work on the motor.
Thesemachineshavebeendesigned
to operate over a long period of time
with a minimum of maintenance.
Continuous satisfactory operation
depends upon proper machine care
and regular cleaning.
Cleaning.
Keep the ventilation slots of
the machine clean to prevent
overheating of the engine.
Regularly clean the machine
housing with a soft cloth, preferably
after each use. Keep the ventilation
slots free from dust and dirt. If the
dirt does not come off use a soft
cloth moistened with soapy water.
Never use solvents such as petrol,
alcohol, ammonia water, etc. These
solvents may damage the plastic
parts.
Lubrication.
The machine requires no additional
lubrication.
Faults.
Should a fault occur, e.g. after
wear of a part, please contact the
service address on the warranty

8
card. Separate you nd an exploded
view showing the parts that can be
ordered.
Environment.
To prevent damage during transport,
the appliance is delivered in a solid
packaging which consists largely of
reusable material. Therefore please
make use of options for recycling
the packaging.
Faulty and/or discarded
electrical or electronic
apparatus have to be
collected at the appropriate
recycling locations.
Exploded view.

9
WARRANTY
1. PROMAKER®,through its PX2
warranty for power tools, has the
following characteristics:
• It covers the products for 2 years
from the date of purchase against
any defect in its operation, for
faults in the materials or labor
used in its manufacture.
• Provides 2 years of free
maintenance service and labor
for replacement of consumables.
• Provides a trial period of
2 months where you can
exchange the tool for a higher
capacity one if the original does
not meet your requirement, by
paying the difference in price.
• All the attributes offered by the
warranty are valid presenting
the original purchase invoice.
2. For warranty service, please
contact the present the warranty
card and the original invoice for the
warranty service.
3. This Warranty DOES NOT
applies for:
• Transportation damages after sales.
• Services not provided by our
authorized service centers.
• Accessories and spare parts, if
any, provided in the package.
• Damage resulted from commercial
or industrial use, as this product is
intended for DIY use only.
EC DECLARATION OF
CONFORMITY
We hereby declare that the machine
described below complies with the
relevant basic safety Directives, both
in its basic design and construction
as well as in the version put into
circulation by us. This declaration
shall cease to be valid if the
machine is modied without our
prior approval.
Product: Lithium Battery Cordless
Screwdriver
Type: PRO-SD360

NOTES
Table des matières
Langues :
Autres manuels Promaker Tournevis électrique


