Projecta BM320 Manuel utilisateur

SMART BATTERY GUAGE
BATTERY METER
P/No. BM320

2
IMPORTANT SAFETY INFORMATION
Please read this instruction thoroughly before installing the product.
WARNINGS
• Risk of explosive gas. Working in the vicinity of a lead-acid battery can be dangerous
• Batteries might release explosive gases during normal operation and charging
• Before using the product, read and follow the instructions carefully. Follow all
manufacturer’s instructions
• Do not smoke, use matches, use a cigarette lighter, or allow a spark or flame near
the battery
• Remove rings, bracelets, necklaces and watches when working with a lead-acid battery
• Before accessing the battery leads (Red for positive and Black for negative), disconnect the
all devices or power sources from sockets and dc terminals provided by the product
• Do not submerge the product in water or expose to rain
• Not recommended to use the product for critical power backup application
• Designed to work with 12V lead acid battery only
• This appliance is not intended for use by young children or infirm persons without
supervision. Young children should be supervised to ensure that they do not play with
the appliance
• Ensure that all cable connections have the correct polarity and are protected against
accidental short circuit
• Do not allow water or other liquids to enter the installation area
3
OVERVIEW
Projecta BM320 – A sophisticated, full colour LCD monitor that accurately displays a
battery’s total capacity, overall health and general status. It is Ideal for camper trailer and
caravan interiors as it is housed in a modern and simple to install enclosure. The BM320
comes with all the necessary components to connect to your battery system.
It has the following features:
• 2.4” full colour LCD display
• Configurable Low battery capacity and battery health alarm
• Suitable for popular deep cycle AGM lead acid battery
• Using patented technology to monitor battery characteristics like battery state of charge
and state of health
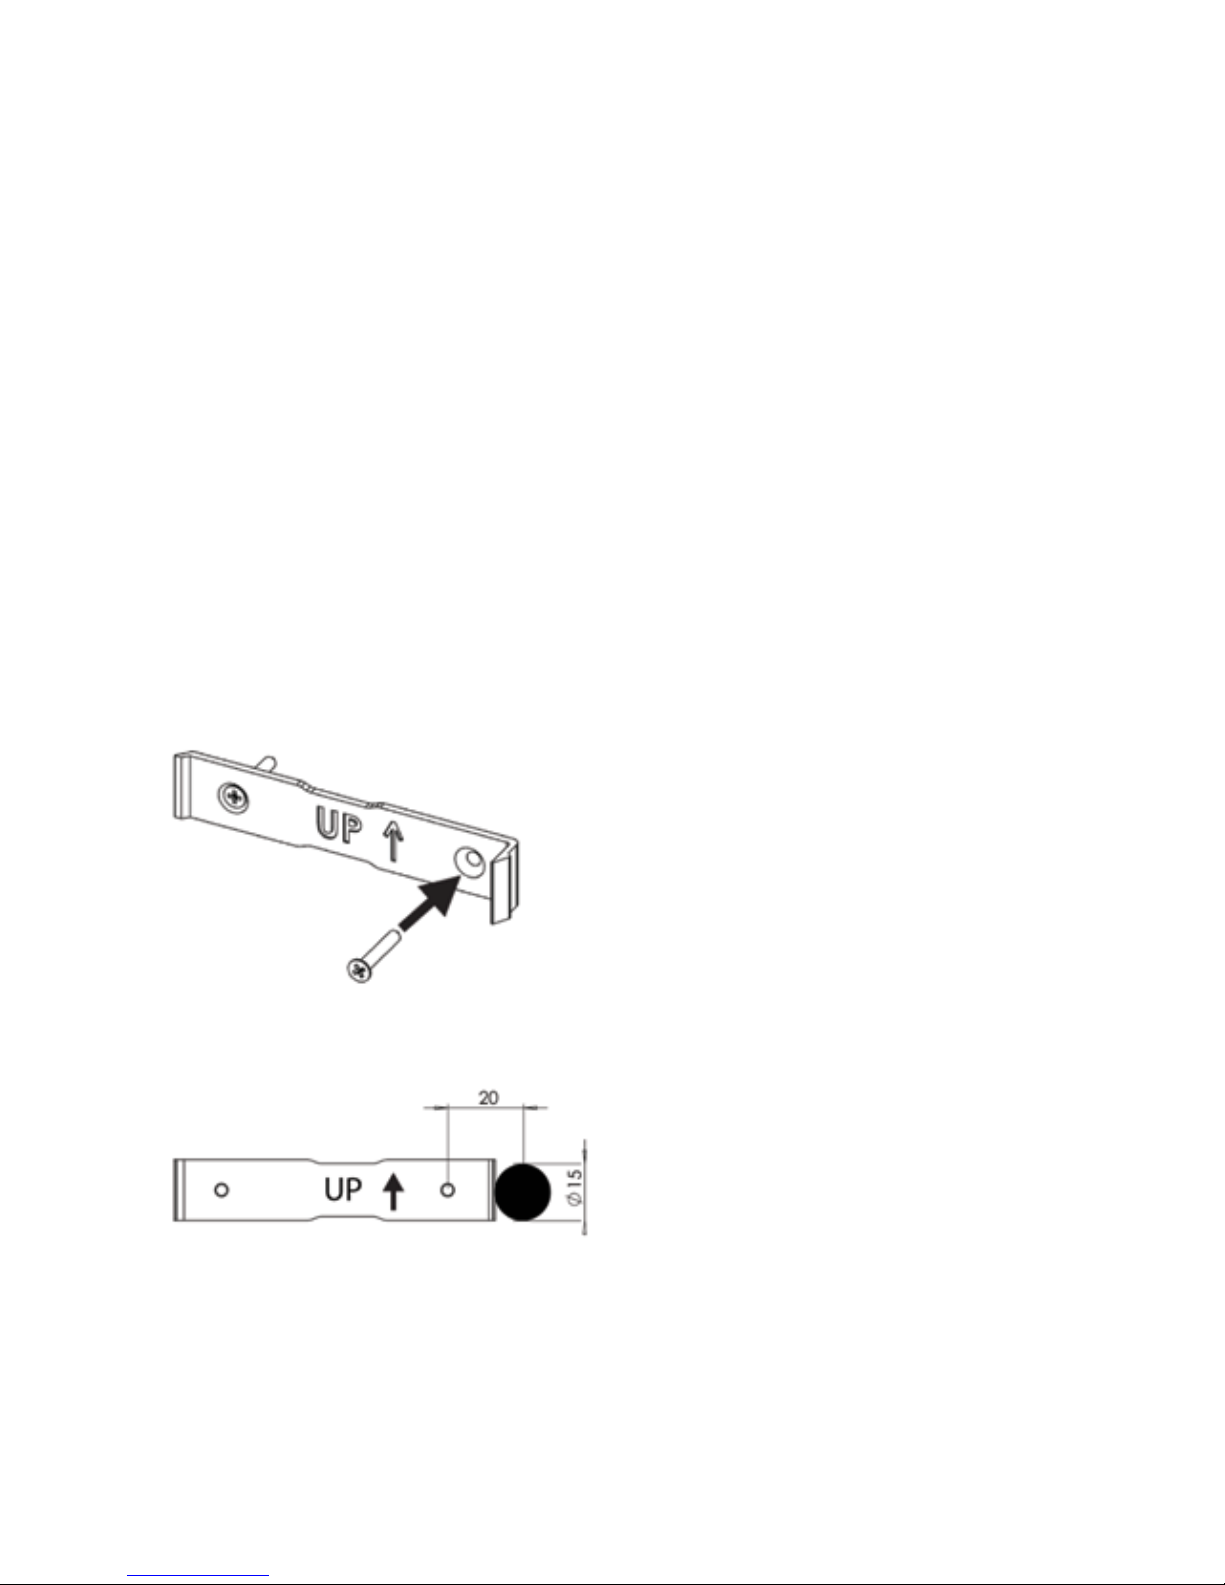
DISPLAY SCREEN INSTALLATION
Choose a flat location which is easily accessible and easy to view the display screen.
The location should be indoors away from weather.
Screw the mounting clip using supplied self-tapping screws ensuring that the arrow is
pointing “UP”.
Drill a 15mm Diameter hole 20mm from the screw hole as pictured to allow the connector to
pass through.

4
Plug in the supplied four pin connector to the recipicale at the back of the
battery monitor.
Feed the cable through the pre drilled hole and slide the left hand side of the battery
monitor into the bracket tab.
Close the battery monitor onto the clip until you hear the “click” sound.
Make sure that the cable assembly has been fed into the hole correctly.

5
SHUNT AND WIRING INSTALLATION
IMPORTANT: to maintain accurate record of the battery capacity, all current must be passed
through the shunt.
Disconnect the battery and turn off all devices before beginning the installation.
Mount the shunt in a secure location with adequate protection from damage.
The BM320 is designed for 12V applications only.
NOTE: There should only be one cable connected to the battery negative terminal.
This should be to the battery side of the shunt to ensure all load is measured through
the shunt. All other NEG/Earth connections should be made at a load side of the shunt.

6
BATTERY CABLE SELECTION CHART
ALTERNATIVE CONNECTION METHOD
NOTE: USE ONLY ONE CONNECTTION METHOD.
To connect using your own wiring harness use the supplied terminal block.
The terminal block is labelled, ensure you follow the wiring diagram and follow the colour
coded connection sequence.
Ensure no short circuit between the connector terminals and the wires. It is recommended
that a Fuse (1A fast blow) be used in line with the B+ve line.
Nearest Nominal AMP Nominal
B&S Area Rating O.D.
(mm²) (40°C) (mm)
8 7.71 66 5.5
6 13.5 92 7.2
4 20.26 120 8.3
3 26.45 150 10.2
2 32.07 167 11.3
1 39.55 187 12.1
0 49 219 12.7
00 64.15 260 14.5
000 83.19 298 16.4

7
Part No. BM320
Battery Fuel Gauge
Input consumption current 12V/1.5 mAdc
(backlight off )
Input Voltage Range 6.0--17.0 Vdc
Max discharge current 320A
Display Resolution:
Current 0.1 A
Voltage 0.1V
Battery Capacity 0.1Ah
Type of Battery Supported Wet/AGM/Gel/Calcium
Display Physical Characteristics
Weight 0.12 kg
External Dimension 118mm (L) x 96mm (W) x 18mm(H)
Operating Temperature 0 to 50oC
Compliance
EMC Certified to meet AS/NZS 61000.6.3
QUICK START
1. Press ENTER button to acknowledge the Welcome message on the LCD screen
2. Select the type of battery (AGM,WET,GEL,CAL)
3. Enter the battery capacity and press ENTER button to confirm
4. Enter value for the low battery capacity alarm and press ENTER button to confirm
5. Enter the value for battery health warning alarm and press ENTER button to confirm
6. For most accurate results – Charge the battery to full with any multi-stage battery charger
7. Disconnect the battery charger when the battery is full
8. Unit is ready to use
SPECIFICATIONS

8
BATTERY GUAGE USER INTERFACE
Main Menu
To enter into the main menu press the menu button on the display screen. To move through
the menu press the up and down buttons. Press the Enter button to change the settings.
Default Screen
MENU
Battery Settings
Alarm Settings
Display On Time Settings
Brightness
Exit
Function Description
Battery Settings Set Battery Capacity
Alarm Settings Set Low Battery Capacity and Battery Health Alarms
Display On Time Settings Set the LCD Display On Time (10 mins as default on time)
Brightness Set the brightness of the LCD Display (50% as default value)
Exit Exit Menu Screen and return to Default Screen
Time Remaining
6.5 A
12.5 V
120.0 hrs
100%
5:30pm
Time To Full
+ 6.5 A
12.5 V
5.0 hrs
70%
Battery Charging
Battery Voltage
Battery State:
Charging, Discharging
Battery Current
Lightning sign as
charging Indication
Time to Full when the battery is
charging, Time to Empty when the
battery is discharging, or Dipslay
“System Idle” when no current
passes through the battery
Battery State of Charge
(SOC) in %
Battery Symbol Colour:
Green – 50% < SOC <100%
Orange – 20% < SOC <50%
Red – SOC < 20%

9
5:30pm
100%
Time Remaining
Battery Capacity
GOOD
Battery Health
120.5 hrs
100.0Ah
6.5A12.5 V
70%
Time To Full
Power Remaining
GOOD
Battery Health
5.5 hrs
100.0Ah
+ 6.5 A12.5 V
Battery Charging
ADVANCED SCREEN
BATTERY SETTINGS
Use Up and Down buttons to choose your battery type which is marked on the battery case.
Press ENTER button to apply the changes. The default type is AGM.
Battery Voltage
Battery Capacity
Battery Current
“+” for Charging and
“–“ for Discharging
Time to Full when the battery is
charging, Time to Empty when the
battery is discharging, or Dipslay
“System Idle” when no current
passes through the battery
Battery State of
Charge in %
Lightning sign as
charging Indication
Battery Symbol
Colour:
Green – 50% < SOC
<100%
Orange – 20% < SOC
<50%
Red – SOC < 20%
Battery Health has
4 levels: Ideal, Good,
Fair and Poor
Battery State:
Charging,
Discharging

10
Use Up and Down buttons to change the value of battery capacity which is marked on the
battery case. Press ENTER button to apply the changes. The default value is 100Ah.
ALARM SETTINGS
LOW BATTERY CAPACITY
Use Up and Down buttons to change the value of low battery capacity alarm. Reduce the
value to 0 to disable the alarm. Press ENTER button to apply the changes. The default value
is 10Ah.
When the battery depletes its capacity to the set level, an audio alarm is activated. The
audio alarm can be muted by pressing any button.
Autres manuels pour BM320
1
Table des matières
Autres manuels Projecta Instrument de mesure


Manuels Instrument de mesure populaires d'autres marques


Endress+Hauser
Endress+Hauser Proline Promag 50 Caractéristiques techniques

Siemens
Siemens SITRANS F Coriolis FCT030 Manuel de la liste des pièces

KLINGER
KLINGER CMF V Series Manuel utilisateur

EXFO
EXFO FTB-2 Manuel d'exploitation et d'entretien

Keysight
Keysight M8290A Manuel utilisateur

ADTEK
ADTEK MW-5 Manuel utilisateur