Princess auto 8408197 Manuel utilisateur

User Manual
8408197V 2.0
14 pc 3/8"
Air Ratchet Set
Please read and understand all instructions before use.
Retain this manual for future reference.

2
For technical questions call: 1-800-665-8685
V 2.0 8408197
14 pc 3/8"
Air Ratchet Set
SPECIFICATIONS
Air Consumption 4 CFM @ 90 PSI
Max. Torque 45 ft-lb
No Load Speed 160 RPM
Drive Size 3/8”
Max. Pressure 150 PSI
Air Inlet ¼”
Min. Hose Size 3/8”
IMPORTANT SAFETY PRECAUTIONS
WARNING! The warnings, cautions and instructions discussed in this instruction manual cannot cover all
possible conditions and situations that may occur. It must be understood by the operator that common sense
and caution are factors which cannot be built into this product, but must be supplied by the operator.
WARNING! Read and understand all instructions before using this tool. Keep this manual for the safety warnings
and precautions, operating, inspection and maintenance instructions. When using this tool, basic precautions
should always be followed to reduce the risk of personal injury and/or damage to the equipment. Note that when
this manual refers to a part number, it refers to the parts list included. Before allowing someone else to use this
tool, make sure they are aware of all safety information.
SAFETY
WORK AREA
1. Operate in a safe work environment. Keep your work area clean and well lit. Do not use in damp or wet
locations and do not expose this tool to rain. Water entering a power tool will increase the risk of electric
shock. Do not use in the presence of flammable gases or liquids.
2. Keep anyone not wearing appropriate safety equipment away from the work area. Distraction can cause you
to lose control.
3. Store unused equipment. When not in use, tools must be stored in a dry location to prevent rust. Always
lock up tools and keep them out of reach of children.

14 pc 3/8" Air Ratchet Set
3
For technical questions call: 1-800-665-8685
8408197 V 2.0
PERSONAL SAFETY
1. Dress properly, wear protective equipment. Use breathing, ear, eye, face, foot, hand and head protection.
Always wear ANSI approved impact safety goggles, which must provide both frontal and side protection.
Protect your hands with suitable gloves. Wear a full face shield if your work creates metal filings or wood
chips. Protect your head from falling objects by wearing a hard hat. Wear an ANSI approved dust mask or
respirator when working around metal, wood and chemical dusts and mists. Wear ANSI approved earplugs.
Protective, electrically non-conductive clothes and non-skid footwear are recommended when working. Wear
steel toed boots to prevent injury from falling objects.
2. Do not over reach; keep proper footing and balance at all times. Proper footing and balance enables better
control of the tool in unexpected situations.
3. Keep any articles of clothing, jewelry, hair etc. away from moving parts. These can be caught in moving
parts, resulting in damage to the tool and/or serious injury.
4. Stay alert, watch what you are doing and use your common sense. Do not operate any machine or tool when
you are tired, under the influence of drugs, alcohol or medications.
5. Use clamps or other practical ways to secure and support the work piece to a stable platform. Holding the
work piece by hand or against your body is unstable and may lead to loss of control.
VIBRATION PRECAUTIONS
This tool vibrates during use. Repeated or long-term exposure to vibration may cause temporary or permanent
physical injury, particularly to the hands, arms and shoulders.
1. Anyone using vibrating tools regularly or for an extended period should first be examined by a doctor and
then have regular medical check ups to ensure medical problems are not being caused by or worsened from
tool use. Pregnant women or people who have impaired blood circulation to the hands, past hand injuries,
nervous system disorders, diabetes or Raynaud’s Disease should not use this tool. If you feel any medical
symptoms related to vibrations (such as tingling, numbness, and white or blue fingers), seek medical
attention as soon as possible.
2. Do not smoke during use. Nicotine reduces the blood flow to the hands and fingers, increasing the risk of
vibration-related injury.
3. Wear suitable gloves to reduce the vibration effects on the user.
4. Use tools with the lowest amount of vibration when there is a choice between different processes.
5. Do not use for extended periods. Take frequent breaks when using this tool.
6. Let the tool do the work. Grip the tool as lightly as possible (while still keeping safe control of it).
7. To reduce vibrations, maintain tool as explained in this manual. If abnormal vibrations occur, stop using this
tool immediately.
8. This tool will not stop moving immediately. Do not lay the tool down or leave it unattended until it has come
to a complete stop. A part that is moving could make the tool jump or grab a surface and pull the tool out of
your control.

14 pc 3/8" Air Ratchet Set
4For technical questions call: 1-800-665-8685
8408197V 2.0
SPECIFIC SAFETY PRECAUTIONS
1. Only use with accessories rated to handle the forces exerted by this tool during operation. Other accessories
not designed for the forces generated may break and forcefully launch pieces.
2. Attach all accessories properly to the tool before connecting the air supply. A loose accessory may detach or
break during operation.
3. Obey the manual for the air compressor used to power this tool.
4. Install an in-line shutoff valve to allow immediate control over the air supply in an emergency, even if a hose
is ruptured.
5. Use this tool with both hands only. Using tools with only one hand can result in loss of control.
6. Do not lay the tool down until it has come to a complete stop. Moving parts can grab the surface and pull the
tool out of your control.
TOOL USE AND CARE
1. Use the right tool for the job. Do not attempt to force a small tool or attachment to do the work of a larger
industrial tool. The tool will perform better and more safely at the task for which it was intended. Do not
modify this tool or use for a purpose for which it was not designed.
2. Securely hold this tool using both hands. Using tools with only one hand can result in loss of control.
3. Maintain tools with care. Keep tools clean, and in good condition for a better and safer performance. Follow
instructions for lubricating and changing accessories. Inspect tool fittings, alignment and hoses periodically
and, if damaged, have them repaired by an authorized technician or replaced. The handles must be kept
clean, dry and free from oil and grease at all times. A properly maintained tool reduces the risk of binding
and is easier to control. Applying excessive force can lead to slips and damage to your work or
personal injury.
4. Remove adjusting keys and wrenches. Check that keys and adjusting wrenches are removed from the tool or
machine before connecting it. A wrench or key that is left attached to a rotating part of the tool increases the
risk of personal injury.
5. Avoid unintentional starts. Be sure that the throttle switch is in neutral or OFF position when not in use and
before connecting it to any air source. Do not carry the tool with fingers near or on the switch.
6. Only use the lubricants supplied with the tool or specified by the manufacturer. Other lubricants may not be
suitable and may damage the tool or even make the tool explode.
7. When not in use for an extended period, apply a thin coat of lubricant to the steel parts to avoid rust.
8. Maintain the label and name plate on the tool. These carry important information. If unreadable or missing,
contact Princess Auto for a replacement.
AIR SOURCE
1. Disconnect air supply. Disconnect tools from air pressure source when not in use, before cleaning, servicing
or changing a piece or accessory. After disconnecting, discharge any residual air pressure.
2. Do not use tools if the trigger switch does not function properly. Any tool that cannot be controlled with the
ON/OFF switch is dangerous and must be repaired.
3. Use proper size and type of air pressure line and fittings. The recommended air line for a tool with a 1/4”
inlet is 3/8” I.D.
4. Always verify prior to using a tool that the air source has been adjusted to the rated air pressure or within the
rated air-pressure range. Over pressurizing a tool may cause bursting, abnormal operation, breakage of the
tool or serious injury to persons. Use only clean, dry, regulated compressed air at the rated range as marked
on the tool.
5. Never use pure oxygen, carbon dioxide, combustible gases or any bottled gas as an air source for a tool.
Such gases are capable of causing an explosion and serious injury to persons. Do not use an air source
besides an air compressor to power this tool.
14 pc 3/8" Air Ratchet Set
5
For technical questions call: 1-800-665-8685
8408197 V 2.0
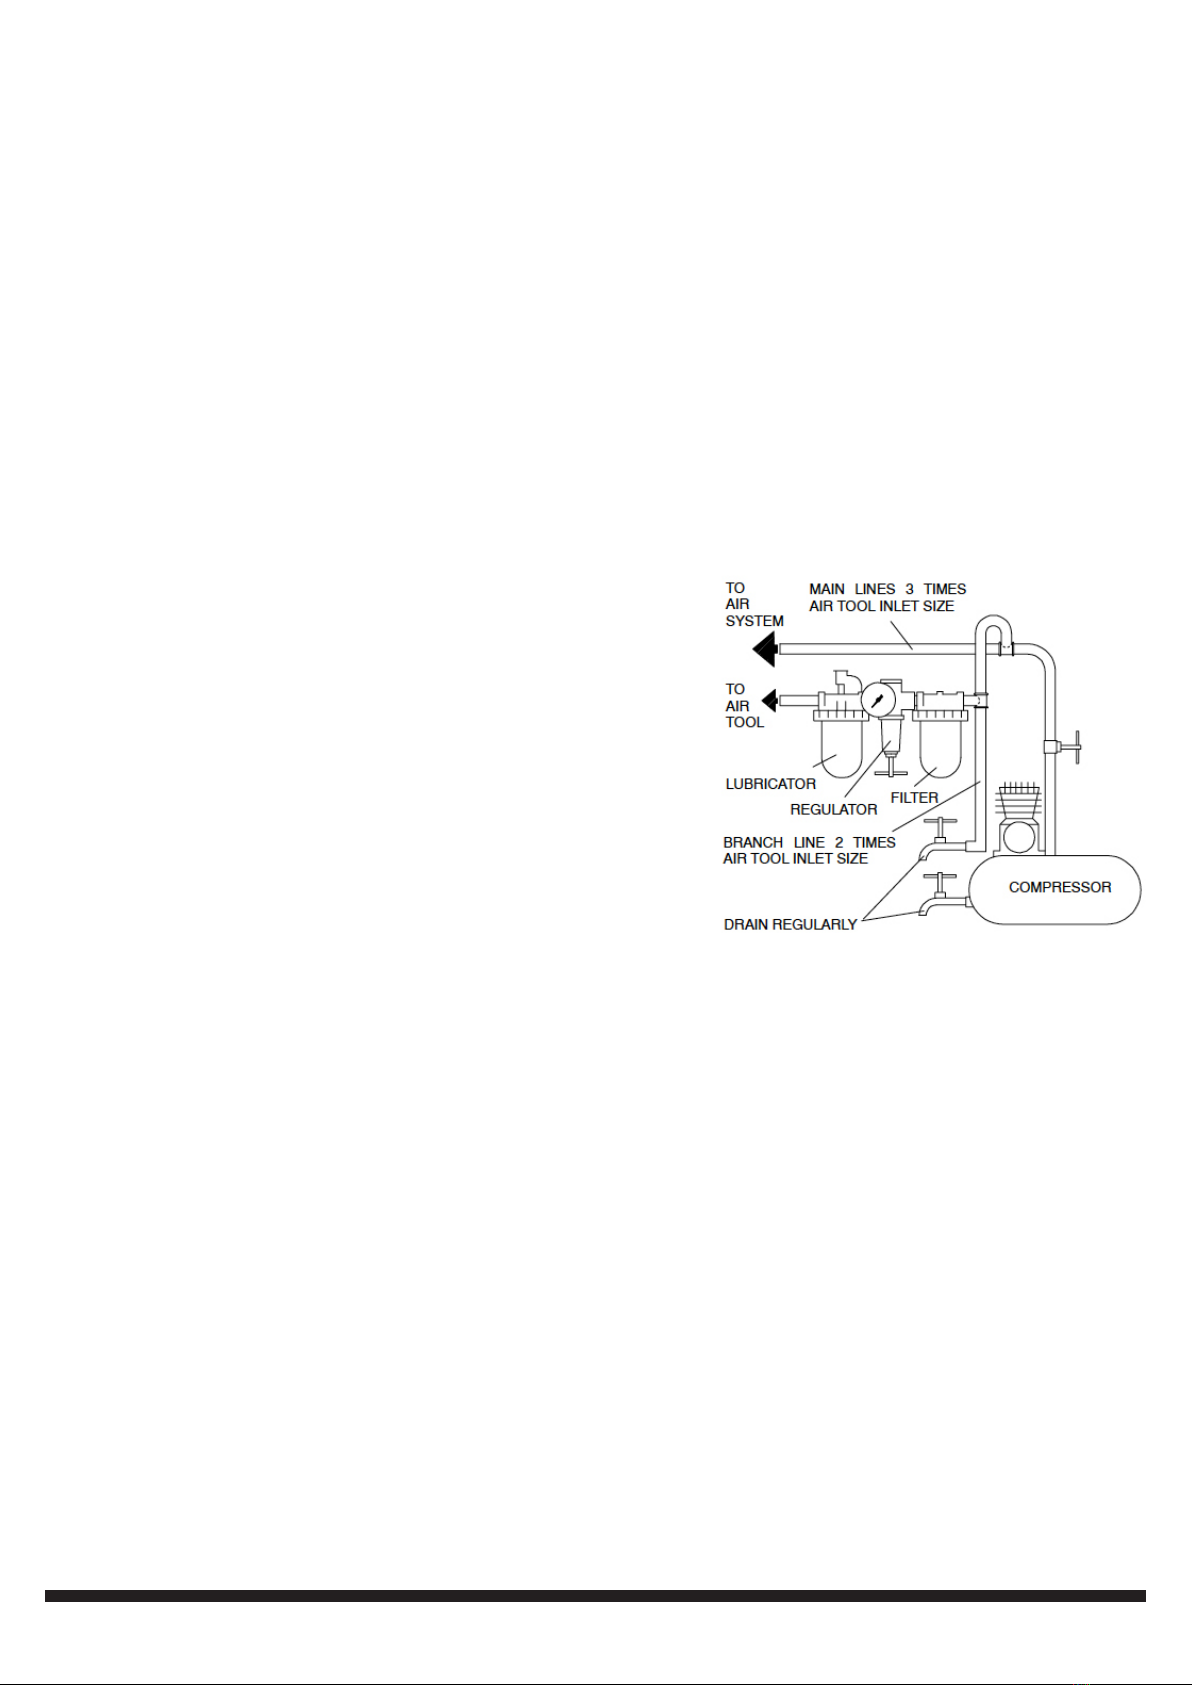
6. Always use an air regulator, an in-line filter and a moisture trap in your compressed air system. These
accessories will increase the tool’s life and keeps the tool in good working condition. See the diagram below
for recommended components of an air line.
7. Drain the air tank daily. Water in the air line will damage the tool.
8. Clean air inlet filter weekly.
9. Avoid using an unnecessarily long air hose. Avoid using too long of an air hose. The longer the hose, the
lower the pressure will be at the end of the hose, to the point that it may not meet the minimum requirement
for the tool. As well, a longer hose can become a tripping hazard.
10. Keep hose away from heat, oil and sharp edges. Check hose for wear, and make certain that all connections
are secure.
11. Always carry a tool by its handle; never carry the tool by the air hose.
12. Line pressure should be increased to compensate for unusually long air hoses (over 8 metres / 26 feet). The
hose diameter should be 3/8” I.D.
13. Air tool CFM consumption ratings are based upon a 25% duty cycle. If you require continuous duty, a larger
compressor will be required (eg. 4.0 CFM tool at continuous duty requires 16.0 CFM to function at
maximum torque).
AIR SOURCE INSTALLATION
1. Set the air pressure regulator on the air compressor to 90 PSI.
Do not exceed the tool’s recommended air pressure. Excess
pressure could result in damage to the tool, to your work piece
or serious injury.
2. Prepare a standard 1/4” air connector for use with your tool.
Wrap the threaded portion of the air connector with thread
tape. Attach it to the tool’s air inlet. Tighten securely.
3. Attach a standard quick connector to the air source’s hose.
Attach the air hose to the tool.
Note: If you are not using an in-line oiler, add a few drops of
air tool oil in the tool’s air inlet before use. In the same manner,
add a few drops after every hour of use.
4. Check the airline and its connections for air leaks. Do not use
this tool until you have repaired all air leaks.
Note: Turn off the air compressor, disconnect the air pressure hose and discharge any residual pressure
inside the tool before changing accessories or making any adjustments to the tool. Failure to do so could
result in severe injury, tool or property damage.

14 pc 3/8" Air Ratchet Set
6For technical questions call: 1-800-665-8685
8408197V 2.0
LUBRICATION
1. All air tools are packed in grease to prevent corrosion of internal parts during shipping and storage. We
recommend you clean this out to have optimum performance from your new air tool. Add a generous
amount of air tool oil in the air inlet, and then run the tool under no load until exhaust is clear to remove
packing grease. For future maintenance, add only one or two drops of oil daily.
2. It is very important that the tool be properly lubricated. Without proper lubrication, the tool will not work
properly and parts will wear prematurely. Manually dropping a drop or two of air tool oil once a day into
the tool’s male connector is better than using an automatic in-line lubricator, which should only be required
when there are multiple users of the same tool.
3. Keep the air line lubricator filled and correctly adjusted. The in-line lubricator should be regularly checked
and filled with air tool oil. Proper adjustment of the in-line lubricator is performed by placing a sheet of paper
next to the exhaust ports and holding the throttle open approximately 30 seconds. The lubricator is properly
set when a light stain of oil collects on the paper. Excessive amounts of oil should be avoided.
4. Air tool oil is the only recommended lubricant for use in all air tools. Do not try to use other types of
lubricants to oil your tools. Using the wrong lubricant will cause premature tool failure and / or loss of
power. Use only recommended lubricants, specially made for pneumatic applications. Substitutes may harm
the rubber compounds in the tool’s O-rings and other rubber parts.
5. Oiling your air tool regularly is important, but it is also important not to over oil your air tool. Over oiling
can cause premature tool failure. Your tool may not be ruined, but it will begin to experience loss of power
that will continually get worse until it no longer works, at which point the tool will have to be taken apart and
cleaned of excess oil.
6. In the event that it becomes necessary to store the tool for an extended period of time (overnight,
weekend, etc.), it should receive a generous amount of lubrication at that time. The tool should be run for
approximately 30 seconds to ensure oil has been evenly distributed throughout the tool. The tool should be
stored in a clean and dry environment.
WARNING! NEVER use WD-40 to clean or lubricate your air tool. WD-40 is a solvent that will break down the
internal grease and cause the air tool to seize up.
UNPACKING
1. Carefully remove the parts and accessories from the box.
2. Make sure that all items listed in the parts lists are included.
3. Inspect the parts carefully to make sure the tool was not damaged while shipping.
4. Do not discard the packaging material until you have carefully inspected and satisfactorily operated the tool.
WARNING! If any part is missing, do not operate the tool until the missing parts are replaced. Failure to do so
could result in serious personal injury.

14 pc 3/8" Air Ratchet Set
7
For technical questions call: 1-800-665-8685
8408197 V 2.0
OPERATION
WARNING! This tool generates considerable torque when in use. Always hold the tool with both hands when
using, and brace yourself to resist the torque which will be delivered to the work piece. The working torque of
the impact wrench is 45 ft-lb. Make sure that the nut or bolt you are using the tool to tighten can withstand the
rated torque and is rated for 160 RPM or greater. If available, check the recommended torque specifications for
the nut.
1. Ensure the air supply is clean and does not exceed 90 PSI while operating the wrench. Higher air pressure
and unclean air will shorten the ratchet’s life due to excessive wear, and could result in damage to the work
piece and serious personal injury.
2. Select the socket appropriate for the task at hand. Only use sockets that are specifically designed for use
with an air ratchet.
3. Tighten the nut as far as you can by hand before using the air ratchet.
4. Connect the tool to the air hose.
5. Place the socket over the subject nut.
6. Hold the tool firmly with both hands and depress the trigger to operate the tool.
Note: If the tool stalls while tightening, do not raise the outlet pressure of the air compressor above 90 PSI.
7. Do not use any additional force upon the ratchet in order to remove a nut.
8. Do not over-tighten nuts. They could shatter and cause damage to the tool or work piece or cause serious
injury. Use a torque wrench to torque the nut after using the air ratchet.
9. When finished with the tool, turn off the air compressor, disconnect the air hose and discharge any residual
air remaining in the tool. Put the air ratchet away in a safe storage area.
10. Do not allow the ratchet to run without load for an extended period of time, as this will shorten its life.
WARNING! DO NOT exceed the tool’s maximum air pressure rating. If the tool still does not have sufficient force
at the maximum pressure and sufficient airflow, then a larger tool may be required.
MAINTENANCE
WARNING!: Disconnect tool from air supply before changing accessories, servicing or performing maintenance.
Replace or repair damaged parts.
• Lubricate the ratchet daily with a few drops of air tool oil dripped into the air inlet.
• When not in use, disconnect the tool from its air source, discharge any residual air pressure, clean the
ratchet and store it in a secure location, away from children.
• Check for damaged parts. Before using any tool, any part that appears to be damaged should be carefully
checked to determine that it will operate properly and perform its intended functions. Check for alignment
and binding of moving parts, for broken parts or mounting fixtures, or for any other condition that may affect
proper operation. Any part that is damaged should be repaired or replaced by a qualified technician.
• When servicing, use only identical replacement parts. Only use accessories intended for use with this tool.
Replace damaged parts immediately.
• Keep the tool clean. Wipe the tool with a clean cloth and periodically blow out all areas with compressed air.
If compressed air is not available, use a brush to remove dust from all areas. Do not use harsh chemicals or
solvents to clean the tool. These chemicals could seriously damage the plastic housing.
• Regularly inspect all mountings and screws to ensure tightness. Should any screws become loose,
tighten immediately.
• If repairs are required, bring your tool to an authorized service center.

14 pc 3/8" Air Ratchet Set
8For technical questions call: 1-800-665-8685
8408197V 2.0
CLEANING
NOTE: The procedures are in addition to the regular checks and maintenance explained as part of the regular
operation of the air-operated tool.
DAILY AIR SUPPLY MAINTENANCE
The lubricator’s oil level needs to be maintained and the moisture filter must be regularly drained. Performing
routine maintenance on the air supply will allow the tool to operate safer and will also reduce the wear on the tool.
QUARTERLY (EVERY 3 MONTHS)
Have the internal mechanism cleaned, inspected, and lubricated by a qualified technician.
DISPOSING OF THE TOOL
If your tool has become damaged beyond repair, do not throw it out. Bring it to the appropriate recycling facility.
TROUBLE SHOOTING
Problem Possible Cause Likely Solution
Decreased Output
Not enough air pressure and/or
air flow
Check for loose connections and make sure that the air
supply is providing enough air flow (CFM) at the required
pressure (PSI) to the tool’s air inlet. Do not exceed
maximum air pressure
Obstructed trigger Clean around the trigger to ensure free movement
Incorrect lubrication or not
enough lubrication Lubricate using air tool oil and grease according to directions
Air leaking from loose housing Make sure that the housing is properly assembled and tight.
Mechanism contaminated Have a qualified technician clean and lubricate the mechanism
Housing heats during use
Incorrect lubrication or not
enough lubrication Lubricate using air tool oil and grease according to directions
Worn parts Have a qualified technician inspect the internal mechanism
and replace parts as needed
Air leakage (slight air leakage is
normal, especially on older tools)
Cross-threaded housing
components
Check for incorrect alignment and uneven gaps. If
cross-threaded, disassemble and replace the damaged
parts before use
Loose housing Tighten the housing assembly. If the housing cannot tighten
properly, internal parts may be misaligned.
Damaged valve or housing Replace damaged components
Dirty, worn or damaged valve Clean or replace valve assembly

14 pc 3/8" Air Ratchet Set
9
For technical questions call: 1-800-665-8685
8408197 V 2.0
PARTS BREAKDOWN
No. Model No. Description Qty
1 320-24-01 Housing 1
2 320-24-02 Rear Housing 1
3 320-24-03 Rear Plate 1
4 320-24-04 Roll Pin 1
5 320-24-05 Rotor 1
6 320-24-06 Rotor Blade 4
7 320-24-07 Cylinder 1
8 320-24-08 Front Plate 1
9 320-24-09 Front Bearing 1
10 320-24-10 Washer 1
11 320-24-11 Thread Ring Gear 1
12 320-24-12 Clamp Nut 1
13 320-24-13 Idler Gear 3
14 320-24-14 Idler Gear Pin 3
15 320-24-15 Idler Gear Plate 1
16 320-24-16 Spacer 2
17 320-24-17 Ratchet Housing 1
18 320-24-18 Crank Shaft 1
19 320-24-19 Drive Bushing 1
20 320-24-20 Ratchet Yoke 1
No. Model No. Description Qty
21 320-24-21 Reverse Button 1
22 320-24-22 3/8” Ratchet Anvil 1
23 320-24-23 Washer 1
24 320-24-24 Spring 1
25 320-24-25 Lock Pin 1
25A 320-24-25A Spring 2
25B 320-24-25B Steel Ball 2
26 320-24-26 Ratchet Pawl 1
27 320-24-27 Pin 1
28 320-24-28 Thrust Washer 1
29 320-24-29 Retainer Ring 1
30 320-24-30 Valve Plug 1
31 320-24-31 O-ring 1
32 320-24-32 Spring 1
33 320-24-33 O-ring 1
34 320-24-34 Roll Pin 1
34A 320-24-34A O-ring 1
35 320-24-35 Trigger 1
36 320-24-36 Trigger Pin 1
41 320-24-41 Connection Head 1

Table des matières
Langues :
Autres manuels Princess auto Outils électriques


