Precision matthews PM-833TV Manuel utilisateur

1
PM-833TV 4-13-21V1.indd Copyright © 2021 Quality Machine Tools, LLC
Model PM-833TV
VFD: Innitely variable spindle speed, 50 to 3200 rpm
Single-range belt drive, no gears
8-1/4 x 33 inch table
One-shot lubrication
220 Vac single-phase motor
± 90 degree tiltable headstock
Ground inch-pitch X & Y axis leadscrews
Weight (including stand) 880 lbs
Heavy duty precision milling machine
The PM-833TV is manufactured in Taiwan
PM-833TV variable speed precision milling machine

2
PM-833TV 4-13-21V1.indd Copyright © 2021 Quality Machine Tools, LLC
PM-833TV
FAQ
R8 collets won’t go
into the spindle
The collet locating screw could be
in too far. See the end of Section 4,
Maintenance, for special instruc-
tions on this.
This means that R8 devices are
not properly clamped. There are
two options:
1. Insert a 1/2" or 12 mm (clear-
ance) ID collar under the cap to
ll the gap.
2. Shorten the drawbar, see the
end of Section 4, Maintenance.
The drawbar cap doesn't
seat on the spindle
Motor switch turned ON,
but motor doesn't run
220 Vac power connected?
E-Stop button pressed in?
(Release it by turning clock-
wise)
Fuses good?

3
PM-833TV 4-13-21V1.indd Copyright © 2021 Quality Machine Tools, LLC
This manual contains essential safety advice on the proper setup, operation, maintenance, and service
of the PM-833TV mill. Failure to read, understand and follow the manual may result in property damage
or serious personal injury.
There are many alternative ways to install and use a milling machine. As the owner of the machine you
are solely responsible for its proper installation and safe use. Consider the material contained in this man-
ual to be advisory only. Quality Machine Tools, LLC cannot be held liable for injury or property damage
during installation or use, or from negligence, improper training, machine modications or misuse.
This manual describes PM-833TV machines as shipped from early 2020. There may be detail dierences between your specic ma-
chine and the information given here (with little or no impact on functionality). Please email us if you have questions about any aspect
of the manual or your machine (see our website www.precisionmatthews.com for support addresses). Your feedback is welcomed!
Section 1 FEATURES & SPECIFICATIONS
MODEL PM-833TV MILLING MACHINE
General information
The PM-833TV is a top-quality “dovetail column” mill designed for regular use in demanding industrial applications. A Variable
Frequency Drive (VFD) provides innitely variable spindle speeds from 50 to 3200 rpm. The spindle runs in high-quality ta-
pered-roller bearings in a precision-ground quill with coarse and ne downfeed options. Unlike most other bench-style mills, the
PM-833TV comes with a one-shot lubrication system, a great time saver in situations where continuous duty is a requirement.
All sliding surfaces are hand-scraped for precise t, good oil retention and ultra-smooth operation.
Variable-speed motor options are available to power the table (X-axis), and to raise/lower the headstock (Z-axis).
PM-833TV oor plan
Copyright © 2021 Quality Machine Tools, LLC
This material was originated by Precision Matthews. No portion
of the manual may be reproduced or distributed in any form
without the written approval of Quality Machine Tools, LLC.

4
PM-833TV 4-13-21V1.indd Copyright © 2021 Quality Machine Tools, LLC
PM-833TV SPECIFICATIONS
Dimensions
Weight, including stand 880 lb net,1030 lb shipping
Floor space required W 72 in. x D 35 in
Headroom required Normal operations 75 in. (max height 86 in)
Stand footprint W 17-3/4 in. x D 29-3/4 in.
Tray W 24-1/2 in. x D 30 in.
Electrical
Power requirement 220 Vac, 60 Hz, 1Ø
Full load current 9A, spindle motor only
Motors
Main (spindle) Cap-start induction: 2 HP (1.5 kW), 1720 rpm
X-axis power traverse (option) Gear motor: 110 Vac 1A
Z-axis power elevation (option) Gear motor: 110 Vac 1A
Headstock
Vertical travel* 17-1/2 in.
Left-right tilt 90 degrees clockwise/counter-clockwise
Spindle
Speeds (rpm) 50 to 3200
Internal taper R8
Top end 6 splines, 28 mm OD
Quill travel 4 in.
Quill diameter 3 in.
Spindle nose to table 19-1/2 in. max
Spindle centerline to column 11-3/4 in.
Drawbar 7/16 - 20
Table
Size W 33 in. x D 8-1/4 in.
Surface height over oor, on stand Approx 39-3/4 in.
Maximum load 400 lb, table-centered, less if overhanging
Acme, inch pitch, 10 tpi
Left-right table traverse (X-axis)* 22 in.
Front-back cross travel (Y-axis)* 10-3/4 in.
T-slots (3) 16 mm wide (5/8 in. nominal), pitch 2.22 in.
* DRO installation may limit these numbers. Ceiling height may limit the max
elevation of the headstock, also max distance from spindle nose to table
(overall height of mill at 14" elevation of headstock is approximately 86".
T-slot dimensions

5
PM-833TV 4-13-21V1.indd Copyright © 2021 Quality Machine Tools, LLC
Section 2 INSTALLATION
THESE ARE THE MAIN POINTS TO WATCH OUT FOR!
But read the following pages for more information
• Handling the mill is at least a two-man job.
• Before lowering the headstock, check that the exible oil line to the head-
stock is tucked inside the column — not trapped.
• Before lifting the mill, hand-crank the headstock down as far as possible (if
not already down, as shipped). BUT, if the optional Z-axis motor is in-
stalled, do not crank it down to the point where the limit switch touches the
limit stop.
• Lifting gear – sling, hoist or forklift – must be rated for at least 1500 lb.
• Working location of the mill must allow:
1. Full left-right travel of the table.
2. Headroom for the spindle motor at max Z height.
• Power requirement is 220V, 60Hz, 1φ, 15A circuit protection (spindle motor
only, 9A full load).
• Extension cord not recommended; if no alternative, use 12 AWG not longer
than 20 ft.
• Before connecting power be sure that:
1. The machine is on a rm footing.
2. There are no clamps or locks on moving parts.
3. The drawbar is not installed in the spindle.
4. The spindle speed control is fully counter-clockwise — lowest speed
setting.
If in doubt about any of the above, refer to the following
installation instructions, and to Section 3, Using the Mill.

6
PM-833TV 4-13-21V1.indd Copyright © 2021 Quality Machine Tools, LLC
PM-833TV
SPECIAL PRECAUTIONS
BEFORE ADJUSTING HEADSTOCK ELEVATION
If the headstock is power-assisted (Z-axis motor
option installed), there will be limit stops on the
left side of the column.
To avoid damage:
When raising and lowering the headstock BY
HAND, stop BEFORE the limit switch plungers
touch either of the limit stops.
If power is connected:
When the headstock is being raised/lowered for
the rst time UNDER POWER, run the motor
at the slowest speed, testing the limit switch IN
BOTH DIRECTIONS by applying light nger
pressure to each of the switch plungers.
Headstock motion should stop instantly, re-
suming when the switch plunger is released.
Look under the Y-axis way cover (black nitrile).
The metal-shielded oil line should be concealed
within the column casting. If it protrudes like this,
it will be trapped — and damaged — when the
headstock is lowered.
Tuck it into the column!
Figure 2-1 Snagged oil line
Figure 2-2 Z-axis limit stops
Z-axis motor option, inset
(File photo, Model PM-833)
One-shot
lube
reservoir
1
2

7
PM-833TV 4-13-21V1.indd Copyright © 2021 Quality Machine Tools, LLC
UNCRATING THE MILL
The PM-833TV mill and stand are usually shipped in
separate containers. In special instances, the mill and
stand may be shipped pre-assembled Before moving
the mill, check the two Special Precautions on the pre-
ceding page: 1. Oil line protruding from the column, Fig-
ure 2-1, and; 2. (if the headstock is power-assisted) Z
axis limit stops.
INSTALLING THE MILL
Check local codes for machine tool fastening require-
ments. If none is specied, the leveling mounts supplied
can be used, Figure 2-3, or the mill stand can be perma-
nently anchored to the oor. The leveling mount screws
are installed, hex heads up, in weld nuts on the stand
wings. The screws are centered by indentations on the
upper surface of the pads.
MOVING THE MILL (using slings)
If available, use a forklift to handle the mill. An engine
hoist can be used instead, but this may require some
experimentation along the lines suggested below.
The following notes assume that the mill is pre-in-
stalled on its stand. If the mill and stand were
shipped separately, the engine hoist must have
similar reach and lifting capability to raise the mill
above the surface of the stand.
The main objective of the procedure suggested here is
to lift the mill just enough to allow the pallet to be re-
moved. Thereafter the engine hoist can be used to roll
the mill to its working location.
This is at least a two-person procedure!
Figure 2-4 Using an engine hoist (File photo, Model PM-833)
1. Set the upper arm of the hoist as far out as possible
— but not beyond the point where its lifting capacity
is less than 1500 lb.
2. Remove the lag bolts, etc., securing the mill to the
pallet.
3. Roll the hoist over the pallet to bring the lift chain
directly over the graduated tilt scale at the back of
the headstock, Figure 2-4. Depending on the style of
hoist the legs will likely now be resting on the pallet,
with the casters clear of the oor.
4. At the cylinder end of the hoist insert an 8 x 8 or sim-
ilar wood beam under the legs to raise them clear
of the pallet (lift the hoist by hand, or use a jack).
Beam size is arbitrary, but the legs must be above
the pallet.
5. At the open end of the hoist lift each of the legs in
turn to insert similar wood blocks — or piles of scrap
material as in the photo. (All support material must
clear of the pallet to allow it to be moved away when
unweighted in the following steps).
6. Check that the headstock is fully lowered, spindle
just clear of the table.
Figure 2-3 Supplied leveling mounts
The leveling screws are 1/2-12 TPI, usually unavailable in the U.S.
If extra length is needed, install booster pads under the round pads
supplied.

8
PM-833TV 4-13-21V1.indd Copyright © 2021 Quality Machine Tools, LLC
7. Run a sling "basket style" under the headstock.
Wrap a soft cloth around the sling to prevent
damage to the paintwork and the tilt scale. If head-
room is limited use the shortest sling available. It
may also be desirable to remove the motor to allow
extra room (the motor is heavy). Make certain that
the sling, when taking the load, is clear of any deli-
cate components — use spreaders if necessary.
8. Very slowly lift the mill, controlling any tendency for
it to swing as it clears the pallet.
9. Remove the pallet, then install the four leveling
mounts, Figure 2-3.
10. Lower the mill to the oor.
11. Remove the wood blocks supporting the hoist.
12. Raise the mill just clear of the oor, then roll the mill
to its working location.
FINAL ASSEMBLY & CLEANUP
Unnished metal surfaces are protected by thick grease
and/or paper. Carefully remove these using a plas-
tic paint scraper, disposable rags and a light-oil type
degreaser such as WD-40. Level the mill using the ta-
ble surface for reference. Oil the ways and leadscrews.
Check the sight glass for gearbox oil level.
Assemble the support plate for the accordion-pleated
cover, as in Figure 2-6, then attach the support plate to
the top of the column with two M6 socket head screws.
Suggestion If the mill is in a location where dust or
debris can fall from the ceiling, it is a good idea to cover
the column with a 7-1/2 x 3-1/2" plate of scrap material.
MOVING THE MILL (using lifting eyes)
The four lifting eyes provided with the mill allow other
lifting choices, Figure 2-5. They can be hooked directly
to steel cables, or used with 1" diameter steel rods, long
enough (30" plus) to allow chains to be attached at both
ends. A forklift is another option if steel rods are inserted
through the eyes.
Figure 2-5 Lifting eyes
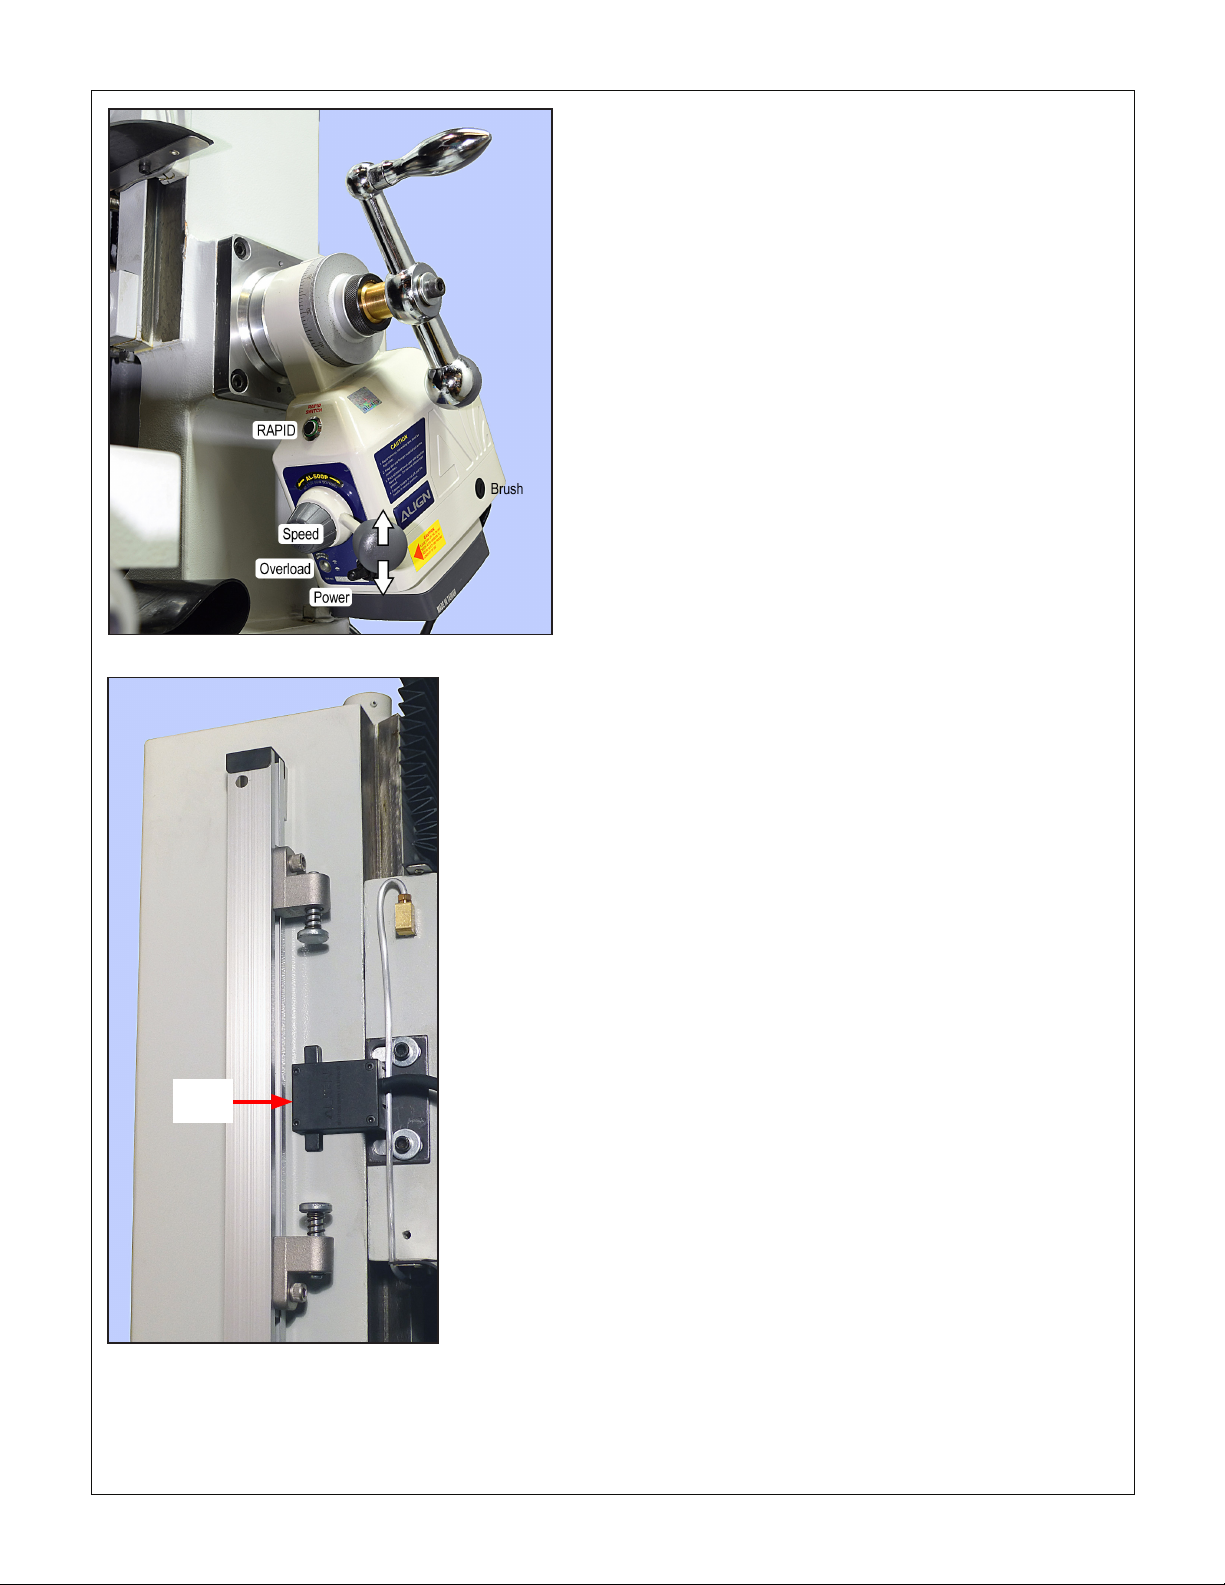
POWER ASSIST OPTIONS
Power-feed motors are available for the table (X-axis)
and headstock (Z-axis elevation). These are stand-
alone units trademarked ALIGN. Both are powered by
110 Vac. The dc motors in these units have twin carbon
brushes that should be inspected occasionally and re-
placed if worn. The motors may be installed on the mill
as-shipped. If not, see the installation instructions at the
end of the Section 4.
POWER-UP PROCEDURE
Depending on the available 220V wall outlet, install a
6-15 or 6-20 plug on the mill power cord. Connect the
"hot" wires (black/red, black/brown, blue/brown or black/
white) to the at blades. Connect the green/yellow
ground wire to the central U-shaped prong (this wire
may be tagged PE = Protective Earth).
Before connecting 220V power be sure that:
1. The spindle motor switch, bottom left of the front
panel, is set to its midpoint, OFF, Figure 2-7
2. There are no clamps or locks on moving parts, Fig-
ures 2-8, 2-9, 2-10.
3. The drawbar has been removed.
Figure 2-6 Accordion-fold cover support
FASTENING THE MILL TO THE STAND
Lower the mill onto the chip tray using tapered drifts to
align the screw holes. Secure the mill with four 100 mm
x 10mm hex head screws and washers (supplied).
Figure 2-7 Front panel

9
PM-833TV 4-13-21V1.indd Copyright © 2021 Quality Machine Tools, LLC
Figure 2-9 X-axis stops and clamp levers
Figure 2-10 Headstock clamp levers
Figure 2-8 Y-axis clamp screws
Before connecting 110V power to the X and Z-axis
power assist units, if installed, be sure that:
1. The power switch on each of the power units is set
to OFF, example Figure 2-11.
2. The speed control on each power unit is set fully
counter-clockwise (lowest speed).
3. The direction control lever on each power unit is
centered (STOP).
4. The X and Z axes can be manually cranked without
diculty — clamp levers loosened.
If power assist units are installed, test as follows:
TABLE - X AXIS
1. Rotate the speed control knob fully counter-clock-
wise, then clockwise about 45 degrees to set a low
speed.
Figure 2-11 Table power assist
2. Switch the table power-assist motor on. Test the
power traverse function by selecting Left traverse,
followed by stop (center), then Right.
3. While running the table to the left, check that the lim-
it switch stops motion when the right-hand plunger is
pressed, arrow in Figure 2-12.
4. Test the left limit switch in the same way. If either
test fails, service attention is required.
5. Test the fast traverse function (RAPID push button
on the motor).
HEADSTOCK - Z AXIS
1. Rotate the speed control knob fully counter-clock-
wise, then clockwise about 45 degrees to set a slow
speed, Figure 2-13.
2. Switch the Z-axis power-assist motor on. Select UP
motion (arrows, Figure 2-13).
3. While running the headstock slowly up the column,
press the upper plunger of the limit switch assembly,
Figure 2-14. Headstock motion should stop immedi-
ately, resuming when the plunger is released.
4. Check for no obstructions, then test the down limit
function in the same way. If either test fails, service
attention is required.
5. Test the fast raise/lower function (RAPID push-but-
ton on the motor).
Figure 2-12 X axis power assist limit switch & stops
Clamp levers

10
PM-833TV 4-13-21V1.indd Copyright © 2021 Quality Machine Tools, LLC
TEST RUN PROCEDURE
Do not leave the machine unattended during this
procedure
1. Drawbar removed? Speed control at lowest setting
(counter-clockwise)?
2. Test the spindle motor by setting the motor switch,
Figure 2-7, to Forward and Reverse in turn. Viewed
from above, the spindle should rotate clockwise
when Forward is selected.
3. Run the spindle at 60 rpm for a few minutes, then
stop.
4. With the spindle running, check the Emergency Stop
function by pushing rmly on the orange button. This
should immediately stop the motor. (If not, service
attention is required.) Once the E-stop button is
pushed in, it stays in until twisted rmly clockwise.
5. Run the spindle at various speeds up to the maxi-
mum, about 3000 rpm. Check that the lower end of
the spindle remains cool or slightly warm to the touch.
The machine should now be ready for normal opera-
tions.
Limit
switch
Figure 2-14 Z axis limit switch & stops
Figure 2-13 Headstock power assist
Table des matières
Autres manuels Precision matthews Outils électriques

Precision matthews
Precision matthews PM-835S Manuel utilisateur

Precision matthews
Precision matthews PM-932M Manuel utilisateur

Precision matthews
Precision matthews PM-727M Manuel utilisateur

Precision matthews
Precision matthews PM-932M Manuel utilisateur

Precision matthews
Precision matthews PM 728V-T Manuel utilisateur

Precision matthews
Precision matthews PM-727M Manuel utilisateur

Precision matthews
Precision matthews PM-739M Manuel utilisateur

Precision matthews
Precision matthews PM-940M Manuel utilisateur

Precision matthews
Precision matthews PM-30MV Manuel utilisateur

Precision matthews
Precision matthews PM 25MV-BD Manuel utilisateur


