
point PO9220K Manuel utilisateur
Electronic Kitchen Scale
PO9220K
2
Thank you for purchasing your new Point electronic kitchen scale. These
operating instructions will help you use it properly and safely. We
recommend that you spend some time reading this instruction manual in
order that you fully understand all the operational features it oers. Read all
the safety instructions carefully before use and keep this instruction manual
for future reference.
GB
Takk for at du kjøpte denne nye Point elektronisk kjøkkenvekt. Denne
bruksanvisningen hjelper deg med å bruke den ordentlig og sikkert. Vi
anbefaler at du tar deg tid til å lese gjennom hele bruksanvisningen for å bli
fortrolig med alle funksjonene den har. Les alle sikkerhetsanvisningene nøye
før bruk, og oppbevar bruksanvisningen for fremtidig referanse.
ENNO
Kiitos, kun valitsit uuden Point elektroninen keittiövaaka. Nämä
käyttöohjeet opastavat sinua käyttämään laitetta oikein ja turvallisesti.
Suosittelemme, että vietät hetken tämän käyttöoppaan parissa, jotta
ymmärtäisit täysin kaikki laitteen tarjoamat toiminnalliset ominaisuudet.
Lue kaikki turvallisuusohjeet huolellisesti ennen laitteen käyttöä ja säilytä
käyttöopas myöhempää käyttöä varten.
ENFI
Tak fordi du har købt din nye Point elektronisk køkkenvægt. Disse
brugsanvisninger hjælper dig med at bruge den korrekt og sikkert. Vi
anbefaler, at du læser denne brugsanvisning, så du får en fuld forståelse af,
hvordan alle funktionerne virker. Læs alle sikkerhedsinstruktioner nøje før
brug, og behold denne brugsanvisning til senere reference.
ENDK
Tack för att du köpt en ny Point elektrisk köksvåg. Denna bruksanvisning
hjälper dig att använda den på ett säkert och korrekt sätt. Vi rekommenderar
att du tar dig tid att läsa igenom denna bruksanvisning för att till fullo
förstå alla driftfunktioner som den erbjuder. Läs noga igenom alla
säkerhetsinstruktioner före användning och spara bruksanvisningen för
framtida bruk.
SE
3
SE NODK GBFI
Instruction Manual - English ........................ page 4 - 13
Bruksanvisning - Svenska
......................... sida
14 - 23
Brugsanvisning - Dansk
............................. side
24 - 33
Bruksanvisning- Norsk ............................... side
34 - 43
...............................
Käyttöohjeet - Suomi sivu
44 - 53

SAFETY WARNING
45
GB
1. Read all the instructions carefully before using this scale
and keep them for future reference.
2.This product has delicate electronic components.
Therefore interference may occur when it is near devices
which transmit radio signals. If errors occur in the
display, move the scale away from these signals or
remove the batteries briefly and then insert them again.
3.Keep batteries away from children. Do not leave
batteries lying around. They could be swallowed by
children or pets. In the event of swallowing a battery,
contact a doctor immediately.
4.This scale is for household use only. Do not use it for
commercial purposes.
5.Do not strike, shock or drop the scale.
6.Treat the scale with care as it is a precision instrument.
7.Clean the scale with a damp cloth and avoid water
getting inside the scale. Do not use chemical/abrasive
cleaning agents.
8.Keep the scale in a cool place with dry air.
9.Always keep your scale in a horizontal position.
10.If the scale fails to turn on, check to see if the
batteries are installed, or if their power is low. Insert
or replace with new batteries.
11. If there is an error on the display or you cannot turn
o the scale for a long time, take out the batteries
for about 3 seconds, then install them again to
remove soft-fault. If you cannot resolve the problem,
contact your dealer for consultation.
1. Open the battery compartment cover.
2. Remove the old batteries (if any) using a sharp object as
shown in the picture. Install one CR2032 (3V) lithium battery.
Make sure the positive (+) is facing upwards.
HINT: Make sure one side of the battery is placed underneath
the battery bae, then push the other side of the battery
until it clicks and secured.
3. Close the battery compartment cover.
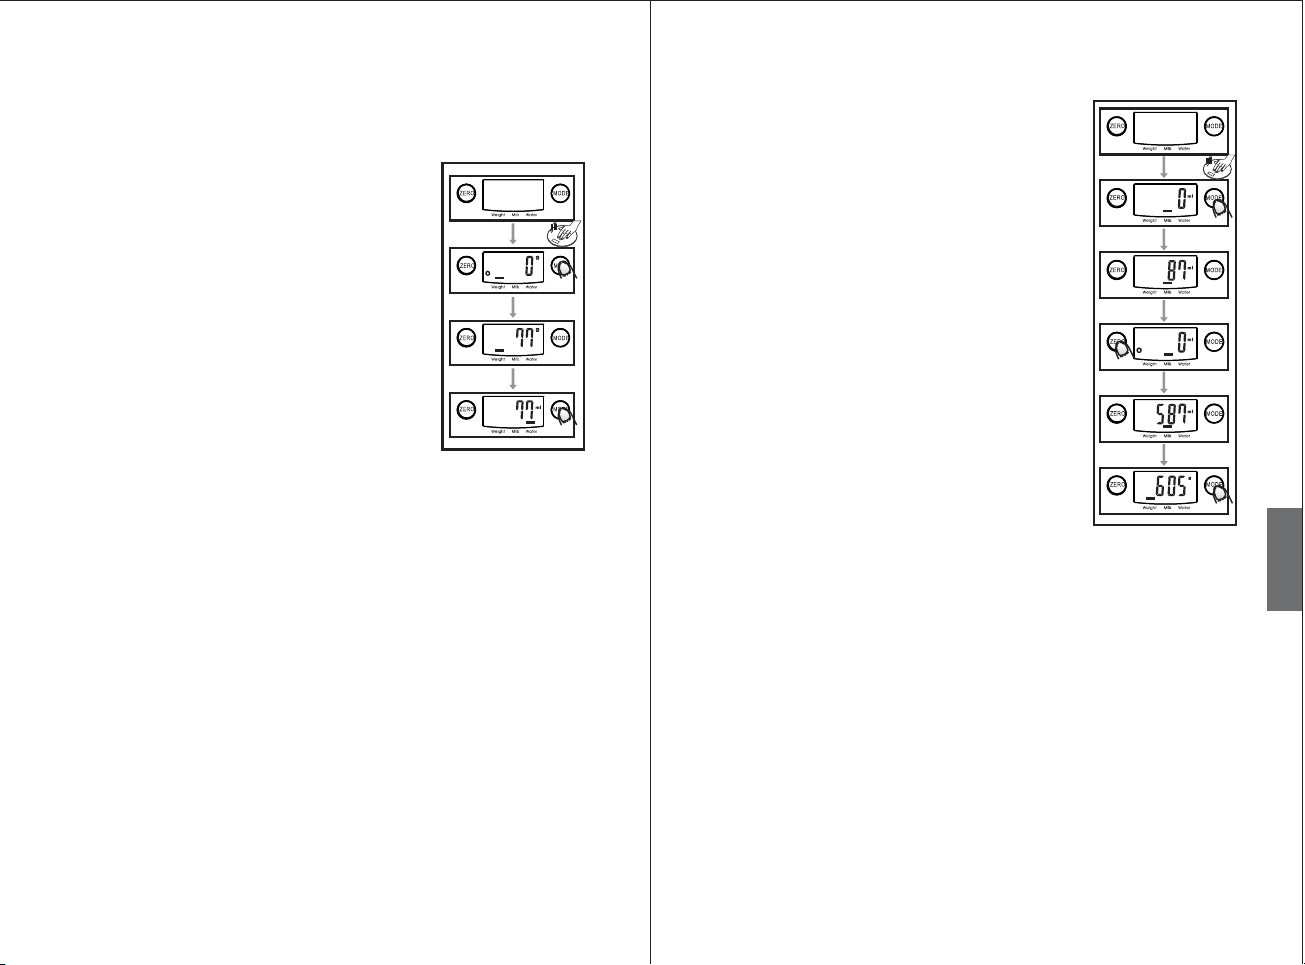
CHANGING MODES
After switching the scale on, press the MODE button repeatedly to select your
desired mode. (Weighing mode/ Water Volume mode / Milk Volume mode)
Weighing mode Milk volume mode Water volume mode
CHANGING WEIGHT UNIT
Press the UNIT button at the rear of the scale to select the
unit systems of metric (g, ml) and imperial (lb:oz, fl'oz). The
units will be displayed in the LC display.
CHANGING WEIGHT UNIT
If the model of your scale has both unit systems of metric (g, ml) or imperial
(lb:oz, fl'oz), first press the MODE button to select between Weighing mode and
Volume mode, the press the UNIT button to select between the unit systems of
metric (g, ml) and imperial (lb:oz, fl'oz). The units will be displayed in the LC
display.
HINT: If metric unit system is selected, the display will show "g" as the weight
unit, and "ml" as the volume unit. If imperial unit system is selected, the display
will show "lb:oz" as the weight unit , and "fl'oz" as the volume unit.
6 7
GB
LCD
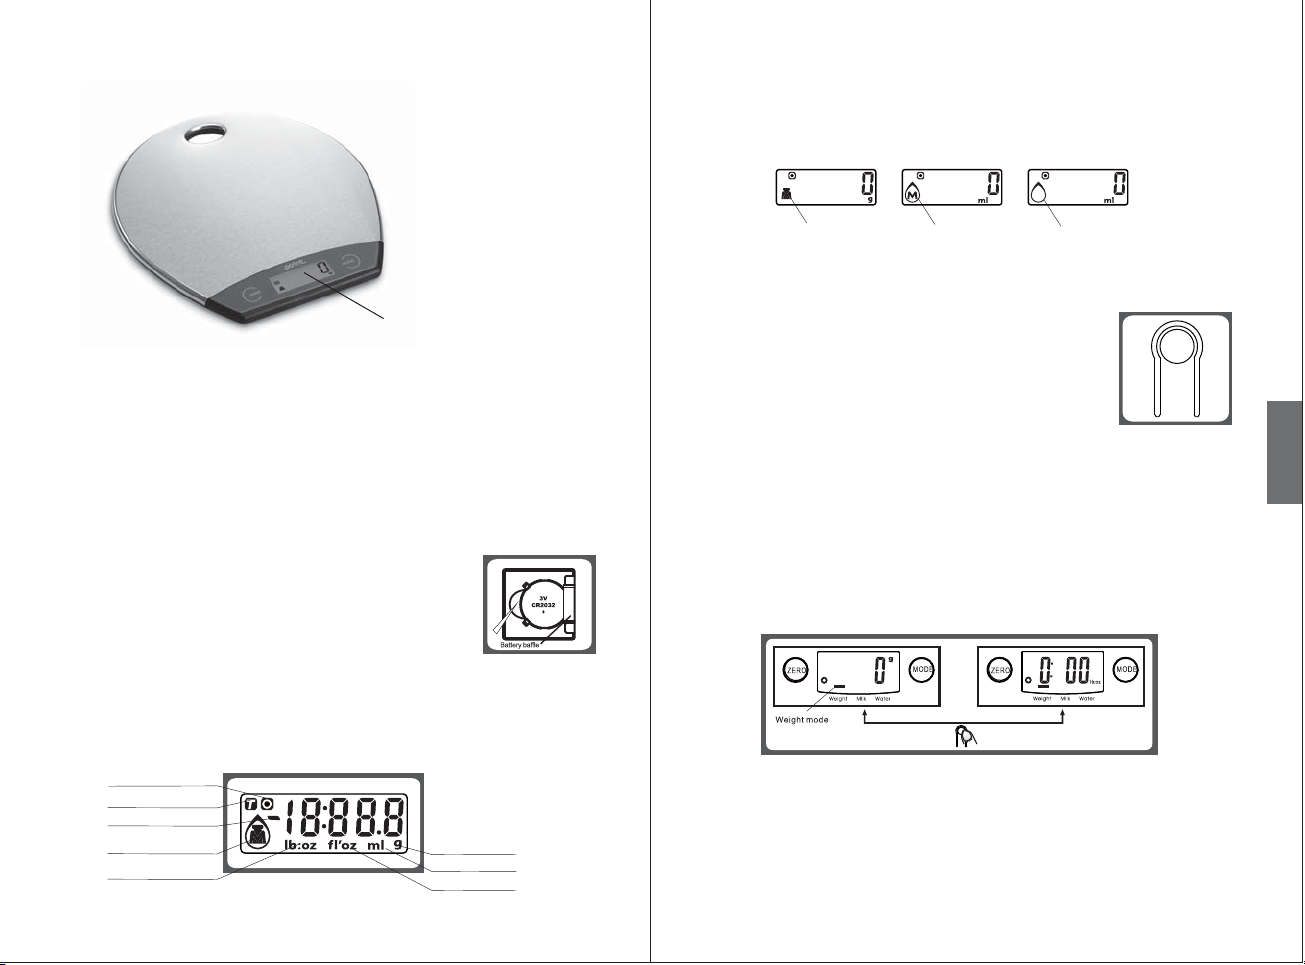
PRODUCT OVERVIEW
BATTERIES
LC DISPLAY
Depending on the model of your scale, dierent battery type is required. Find the
battery type of your scale, and replace the battery as follows:
The scale is operated by one CR2032 (3V) lithium battery (included). Before first
use, remove the insulation strip at the battery compartment.
Zero Weight
Tare Weight
Negative Value
Weight unit(lb:oz)
Weight unit(g)
Volune unit(ml)
Volune unit(fl’oz)
Working modes
(Weight/water /milk)
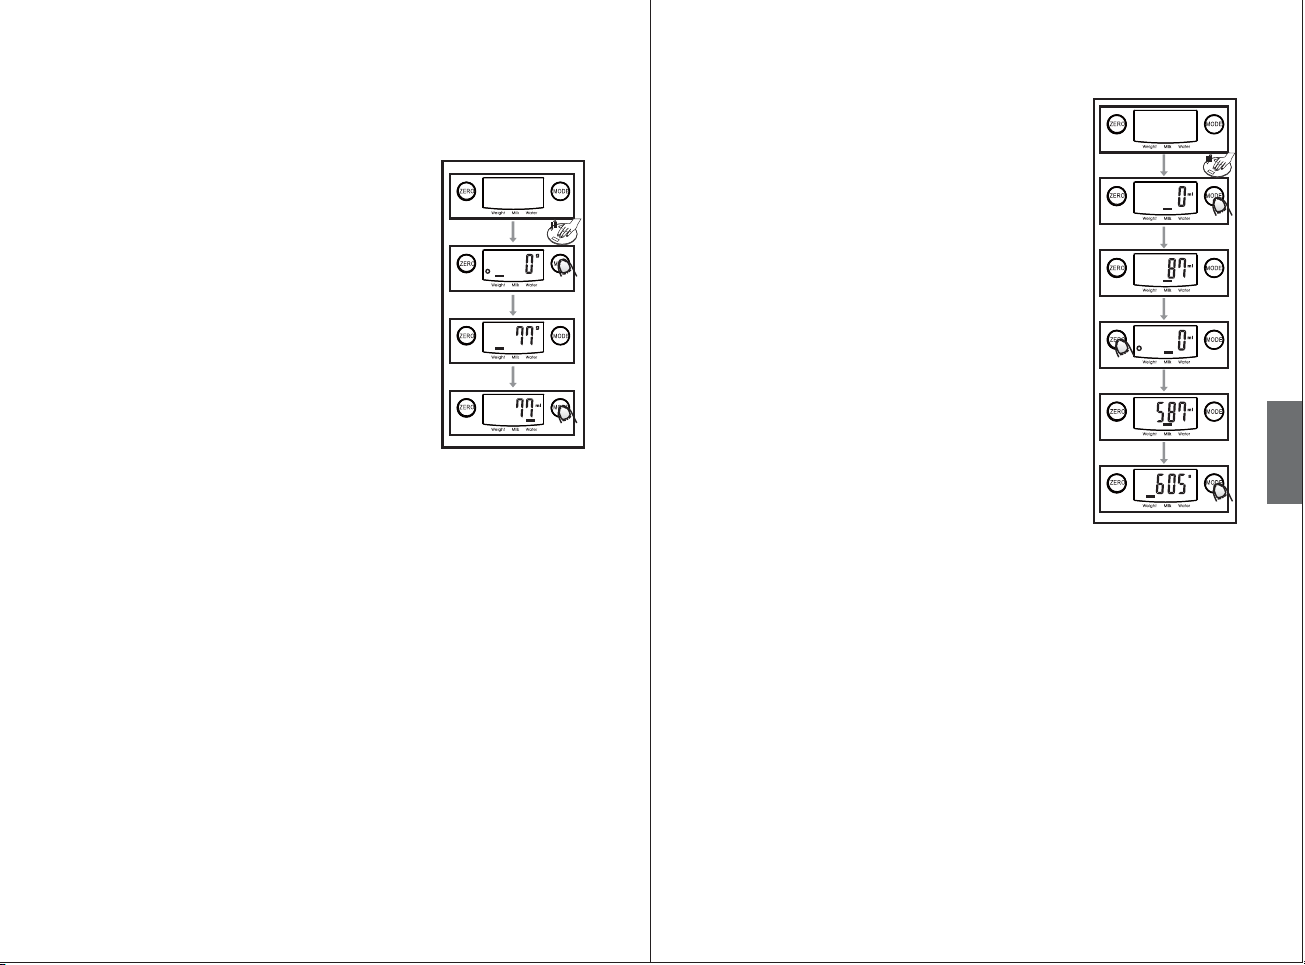
OPERATION
1) Weighing mode
Place the scale on a solid, level and
flat surface to weigh.
1. Gently press on the weighing surface to switch
the scale on. The LC display will show all
displays for a few seconds. During this time
the weighing sensor in the kitchen scale is
adjusting. Afterwards the display will show
zero.
2. Press the MODE button to select weighing
mode.
The unit display will show the last unit
selected.
Note: if an object (e.g. a bowl) is already on the
weighing surface before switching on, the
display will still show zero.
3. Place the item you wish to weigh onto the
scale. The display will show the weight of the
item you are weighing.
HINT: If the item you wish to weigh is water or
milk, press the MODE button to select the
Water Volume mode / Milk Volume mode .
2) Volume mode
Place the scale on a solid, level and
flat surface to weigh.
1. Gently press on the weighing surface to switch the
scale on. The LC display will show all displays for a
few seconds. During this time the weighing sensor
in the kitchen scale is adjusting. Afterwards the
display will show zero.
2. Press the MODE button to select Water Volume
mode / Milk Volume mode. The unit display will
show the last unit selected.
3. Place a container onto the scale, the scale will
show the weight of the container.
4. Press the ZERO button to reset the display to zero.
Note: if the container is already on the weighing
surface before switching on, the display will still
show zero.
5. Pour the water or milk you wish to weigh onto the
scale. The display will show the weight of the
water or milk you are weighing.
HINT: Press the MODE button to return to
Weighing mode.
8 9
GB
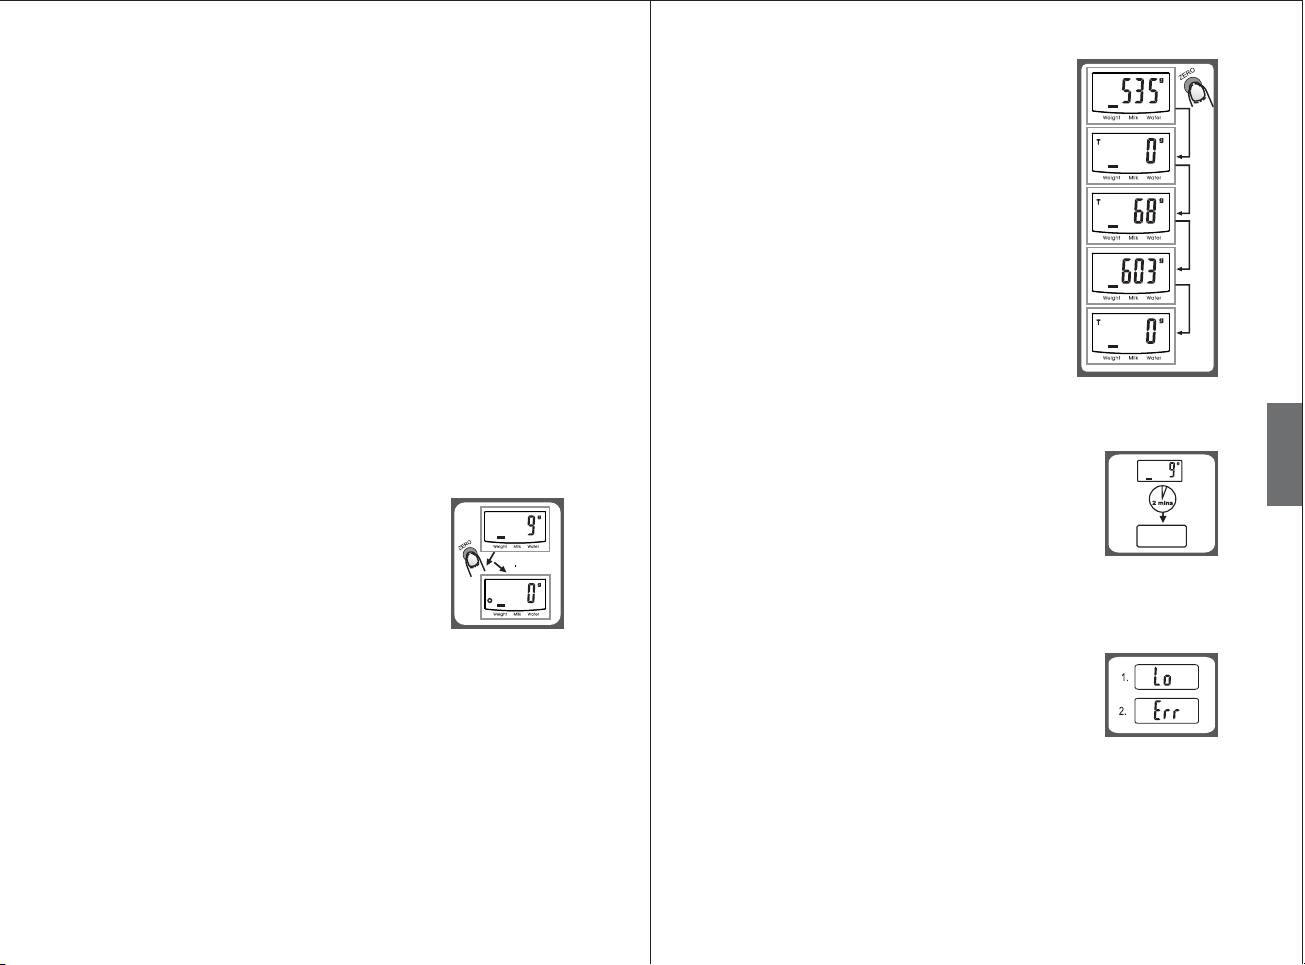
HINT: The display will show an icon "T" to
indicate TARE function is activated when the
total weight of all items on the scale is more
than 4% of the maximum weight capacity of the
scale. The capacity of the scale equals to the
maximum capacity of the total weight of the
items.
When using TARE function, you may check the
total weight of all items by pressing the ZERO
button. Then press the ZERO button again to
reset to zero and add another item onto the
scale to weigh.
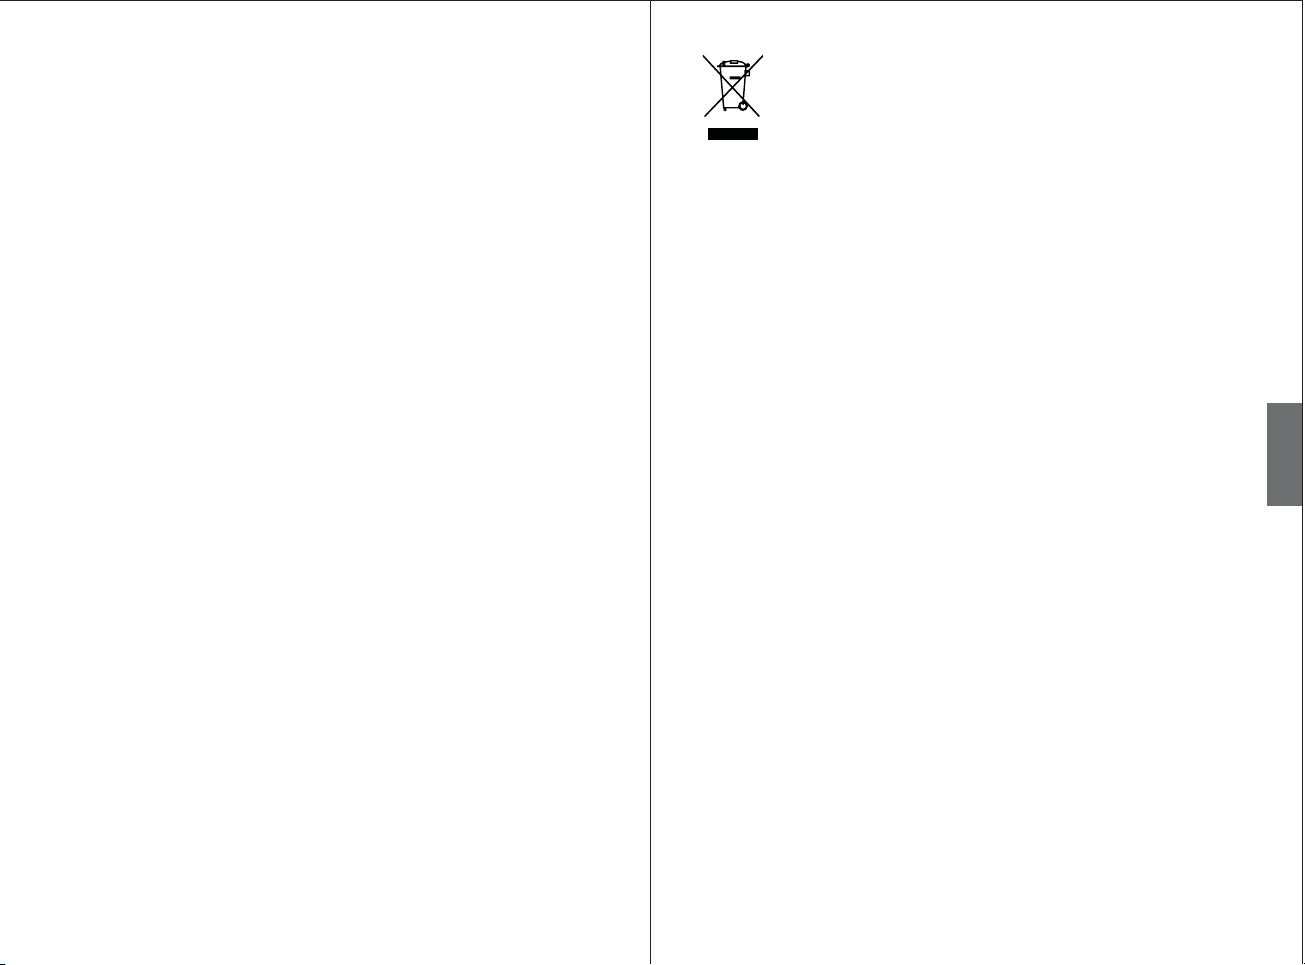
If no movement is detected on the weighing surface for
2 minute and no button is pressed, the scale will
automatically switch o.
If the scale shows “Lo”, it indicates that the
batteries are too weak and it is time to replace the
batteries. Refer to the section "REPLACING
BATTERIES" to replace batteries.
If the scale shows “Err”, it indicates that the scale is
overloaded. The maximum capacity is indicated on
the scale. Step o the scale to avoid causing
damage to the scale.
AUTO SHUT OFF
ZERO / TARE function allows you to weigh dierent items consecutively with out
removing the items form the scale.
1. Place the first item you wish to weight onto the scale, the display will show the
weight of the first item.
2. Press the ZERO button to reset the display to zero. The "0" or "T" icon will appear
on the display.
3. Now add another item to weigh onto the scale. The display will show the weight
of the newly added item.
If you remove the item added to the scale, the display will again show zero. But if
you remove all items from the scale, the display will show a negative value
indicated by a minus sign.
4. Press the ZERO button again, and the "0" or "T" icon will disappear.
HINT: The display will show an icon "0" to indicate
ZERO function is activated when the total weight of
all items on the scale is less than or equal to 4% of
the maximum weight capacity of the scale. The
maximum capacity remains unchange.
“ZERO” OR “TARE” FUNCTION
WARNING INDICATORS
10 11
GB
12 13
GB
Specification:
1. Model: PO9220K
2. 44.5 x 15.5 mm LCD
3. Capacity: 5 kg / 11 lb
4. Graduation: 1g / 0.1 oz
5. Power: 1x3V lithium cell (CR2032)
6. Low battery / over load indication
Imported and Exclusively marketed by:
Power International AS,
PO Box 523, N-1471 Lørenskog, Norway
Power Norge:
https://www.power.no/kundeservice/ T: 21 00 40 00
Expert Danmark:
https://www.expert.dk/kundeservice/ T: 70 70 17 07
Power Danmark:
https://www.power.dk/kundeservice/ T: 70 33 80 80
Punkt 1 Danmark:
https://www.punkt1.dk/kundeservice/ T: 70 70 17 07
Expert Finland:
https://www.expert.fi/tuki/asiakaspalvelu/ T: 020 7100 670
Power Finland:
https://www.power.fi/tuki/asiakaspalvelu/ T: 0305 0305
Power Sverige:
https://www.power.se/kundservice/ T: 08 517 66 000
This symbol on the product or in the instructions means that your electrical and
electronic equipment should be disposed at the end of its life separately from your
household waste. There are separate collection systems for recycling in the EU.
Notes for battery disposal
The batteries used with this product contain chemicals that are harmful to the
environment. To preserve our environment, dispose of used batteries according to
your local laws or regulations. Do not dispose of batteries with normal household
waste.
For more information, please contact the local authority or your retailer where you
purchased the product.

14 15
NO
SIKKERHETSADVARSEL
1. Les alle anvisningene nøye før du tar i bruk vekten, og
oppbevar dem for fremtidig referanse.
2.Dette produktet har delikate elektroniske komponenter.
Derfor kan interferens oppstå når det står i nærheten av
enheter som sender radiosignaler. Hvis det oppstår feil
på skjermen, flytter du vekten i bort fra disse signalene,
eller så tar du ut batteriet raskt ut og setter det inn
igjen.
3.Hold batterier unna barn. Ikke la batterier ligge omkring.
De kan svelges av barn eller kjæledyr. Dersom et batteri
svelges, må du kontakte lege umiddelbart.
4.Denne vekten er kun til husholdningsbruk. Ikke bruk den
til kommersielle formål.
5.Ikke slå eller slipp vekten i bakken.
6.Behandle vekten med omhu, da det er et
presisjonsinstrument.
7.Rengjør vekten med en fuktig klut, og unngå at vann
kommer inni vekten. Ikke bruk kjemiske/skurende
rengjøringsmidler.
8.Hold vekten på en kjølig plass med tørr luft.
9.Oppbevar alltid vekten i vannrett posisjon.
10.Hvis vekten ikke lar seg slå på, må du sjekke at
batteriene er installert eller om det er lite strøm. Sett
i eller skift ut batterier.
11. Hvis det oppstår en feil på skjermen, eller du ikke kan
slå av vekten på lang tid, tar du ut batteriene i ca. 3
sekunder og setter dem inn igjen; dette vil rette en
myk feil. Hvis du ikke kan løse problemet, kontakter
du forhandleren for å få hjelp.
16 17
1.Åpne lokket til batterirommet.
2.Ta eventuelt ut gamle batterier ved hjelp av en skarp gjenstand
som vist på bildet. Sett inn ett CR2032 (3V) litiumbatteri. Sørg
for at den positive siden (+) er vendt oppover.
TIPS: Sørg for at den ene siden av batteriet er plassert under
batteriplaten, og skyv den andre siden av batteriet til det
klikker og er på plass.
3.Sett på lokket til batterirommet.
ENDRE MODUSER
Når vekten er slått på, trykker du på MODE (MODUS)-knappen gjentatte ganger for
å velge ønsket modus. (Veiemodus / Modus for vannvolum / Modus for
melkevolum)
Veiemodus Modus for melkevolum
Veiemodus
Modus for vannvolum
ENDRE VEKTENHET
Trykk på UNIT (ENHET)-knappen på baksiden av vekten for
å velge enhetssystem: metrisk (g, ml) eller britisk
(pund:unse, flytende unse). Enhetene vises på
LCD-skjermen.
ENDRE VEKTENHET
Hvis vektmodellen støtter både metrisk (g, ml) og britisk (pund:unse, flytende
unse) enhetssystem, trykker du først på MODE (MODUS)-knappen for å velge
mellom Veiemodus og Volummodus, så trykker du på UNIT (ENHET)-knappen for å
stille enhetssystem til metrisk (g, ml) og britisk (pund:unse, flytende unse).
Enhetene vises på LCD-skjermen.
TIPS: Hvis metrisk enhetssystem er valgt, viser skjermen "g" som vektenhet og
"ml" som volumenhet. Hvis britisk enhetssystem er valgt, viser skjermen
"pund:unse" som vektenhet og "flytende unse" som volumenhet.
NO
LCD
PRODUKTOVERSIKT
BATTERIER
LCD-SKJERM
Ulike vektmodeller trenger ulike batterityper. Finn batteritypen til vekten, og bytt
batteriet på følgende måte:
Vekten drives av ett CR2032 (3V) litiumbatteri (følger med). Før du bruker vekten
for første gang, erner du isolasjonsstripen på batterirommet.
Nullvekt
Taravekt
Negativ verdi
Vektenhet (pund:unse)
Vektenhet (g)
Volumenhet (ml)
Volumenhet (flytende unse)
Driftsmoduser
(Vekt/vann/melk)
18 19
BRUK
1)Veiemodus
Plasser vekten på et fast, jevnt og flatt
underlag for å veie.
1.Trykk forsiktig på veieflaten for å slå vekten på.
LCD-skjermen viser alle elementer i noen
sekunder. Veiesensoren i kjøkkenvekten
kalibreres. Skjermen viser deretter null.
2.Trykk på MODE (MODUS)-knappen for å velge
veiemodus.
Enhetsvisningen viser den sist valgte enheten.
Merk: Hvis det allerede er et objekt (for
eksempel en bolle) på veieflaten før du slår på,
vil skjermen fortsatt vise null.
3.Plasser gjenstanden du vil veie på vekten.
Skjermen viser vekten til gjenstanden du veier.
TIPS: Hvis du vil veie vann eller melk, trykker
du på MODE (MODUS)-knappen for å velge
Modus for vannvolum / Modus for
melkevolum.
2)Volummodus
Plasser vekten på et fast, jevnt og flatt underlag
for å veie.
1.Trykk forsiktig på veieflaten for å slå vekten på.
LCD-skjermen viser alle elementer i noen sekunder.
Veiesensoren i kjøkkenvekten kalibreres. Skjermen
viser deretter null.
2.Trykk på MODE (MODUS)-knappen for å velge
Modus for vannvolum / Modus for melkevolum.
Enhetsvisningen viser den sist valgte enheten.
3.Plasser en beholder på vekten, så viser skjermen
vekten til beholderen.
4.Trykk på ZERO (NULL)-knappen for å tilbakestille
skjermen til null.
Merk: Hvis det allerede er en beholder på vekten før
du slår på, vil skjermen fortsatt vise null.
5.Legg vannet eller melken som du vil veie på vekten.
Skjermen viser vekten til vannet eller melken du
veier.
TIPS: Trykk på MODE (MODUS)-knappen for å gå
tilbake til Veiemodus.
NO
Table des matières
Langues :
Autres manuels point Échelle


