point POKM267 Manuel utilisateur

3D Beater
Kitchen Machine
POKM267
User Manual

Thank you for purchasing your new POINT Kitchen Machine.
These operating instructions will help you use it properly and safely.
We recommend that you spend some time reading this instruction
manual in order that you fully understand all the operational features it
offers. Read all the safety instructions carefully before use and keep
this instruction manual for future reference.
GB
NO
Takk for at du kjøpte ditt nye POINT Kjøkkenmaskin.
Denne bruksanvisningen vil hjelpe deg med å bruke den på en trygg og
riktig måte. Vi anbefaler at du tar deg tid til å lese gjennom hele
bruksanvisningen for å bli fortrolig med alle funksjonene som tilbys.
Les alle sikkerhetsanvisningene nøye før bruk, og oppbevar
bruksanvisningen for fremtidig referanse.
FI
Kiitos, kun valitsit uuden . POINT Monitoimikeittiökone
Nämä käyttöohjeet opastavat sinua käyttämään laitetta oikein ja
turvallisesti. On suositeltavaa käyttää aikaa tämän käyttöoppaan
lukemiseen, jotta ymmärrät täysin, mitä toiminnallisia ominaisuuksia
tuote tarjoaa. Lue kaikki turvallisuusohjeet huolellisesti ennen laitteen
käyttöä ja säilytä käyttöopas myöhempää käyttöä varten.
DK
Tak for købet af dit nye Køkkenmaskine fra POINT.
Disse brugervejledninger hjælper dig med at bruge dette apparat rigtigt og
sikkert. Vi anbefaler, at du læser denne brugervejledning, så du får en fuld
forståelse af hvordan alle funktionerne virker. Læs sikkerhedsforskrifterne
grundigt inden brug, og gem denne brugervejledning til senere brug.
SE
Tack för att du har köpt ditt nya Köksmaskin med flera från POINT.
Denna bruksanvisning hjälper dig att använda den på ett säkert och
korrekt sätt. Vi rekommenderar att du tar dig tid att läsa igenom denna
bruksanvisning för att till fullo förstå alla driftfunktioner som den
erbjuder. Läs noga igenom alla säkerhetsinstruktioner före användning
och spara bruksanvisningen för framtida bruk.
NO
DK
SE FI GB
Bruksanvisning – Svenska ......................................... sida 52 - 63
Bruksanvisning – Norsk ..............................................side 16 - 27
Brugervejledning – Dansk ...........................................side 40 - 51
Käyttöopas - Suomi ....................................................sivu 28 - 39
32
Instruction Manual – English ................................... page 4 - 15

IMPORTANT SAFEGUARDS
When using electrical appliances, basic safety precautions
should always be followed, including the following:
GB
54
Read all instructions carefully.
To protect against risk of electric shock, do not put mixer,
mains power cable, or plug in water or other liquids.
This appliance shall not be used by children. Keep the
appliance and its mains power cable out of reach of
children.
Children shall not play with the appliance.
This appliance can be used by persons with reduced
physical, sensory or mental capabilities or lack of
experience and knowledge if they have been given
supervision or instruction concerning use of the appliance
in a safe way and understand the hazards involved.
Cleaning and user maintenance shall not be made by
children without supervision.
Switch o the appliance and disconnect from the mains
power supply before changing accessories or approaching
parts that move in use.
Always disconnect the appliance from the mains power
supply if it is left unattended and before assembling,
disassembling or cleaning.
Do not use accessories other than those supplied with the
appliance.
Turn unit o and unplug it from the electrical outlet when
not in use, before putting on or taking o parts, and before
cleaning. To disconnect, turn o, grasp the plug, and pull
from the electrical wall outlet. Never yank on the mains
power cable.
Avoid contact with moving parts. Keep hands, hair,
clothing, as well as spatulas and other utensils, away from
beater, whisk or dough hooks during operation to prevent
injury and / or damage to the mixer.
Remove beaters from mixer before washing.
Keep hands and other utensils out of container while
blending food to reduce the risk of severe injury to persons
or damage to the unit. A scraper may be used but must be
used only when the unit is not running.
If the mains power cable is damaged, it must be replaced
by the manufacturer, its service agent or similarly qualified
persons in order to avoid a hazard.
The use of attachments, not recommended or sold by the
appliance manufacturer may cause fire, electric shock, or
injury to persons.
Do not use outdoors.
Do not let the mains power cable hang over edge of table
or counter or touch hot surfaces, including the stove.
Mixing flammable non-food substances can be harmful.
Do not use this appliance for other than intended use.
Do not operate in the presence of explosive and / or
flammable fumes.
To disconnect, turn the control to o, then remove the
plug from the electrical wall outlet.
CAUTION: In order to avoid a hazard due to inadvertent
resetting of the thermal cut-out, this appliance must not
be supplied through an external switching device, such as
a timer, or connected to a circuit that is regularly switched
on and o by the utility.
1.
2.
3.
4.
5.
6.
7.
8.
9.
10.
11.
12.
13.
14.
15.
16.
17.
18.
19.
20.
21.
SAVE THESE INSTRUCTIONS

Never run the mixer for longer than 10 minutes – it will
overheat.
If overheating occurs, the mixer will automatically activate
the overheating protection device and switch itself o.
Switch the mixer o and unplug it from the electrical wall
outlet. Release the mixer head and tilt it back until it is
locked into the tilt back position. Let the mixer rest for 30
min.
Don't use the whisk for heavy mixtures – you could damage
it.
After cleaning, re-fit the bowl. This keeps the mechanism
underneath covered.
76
GB
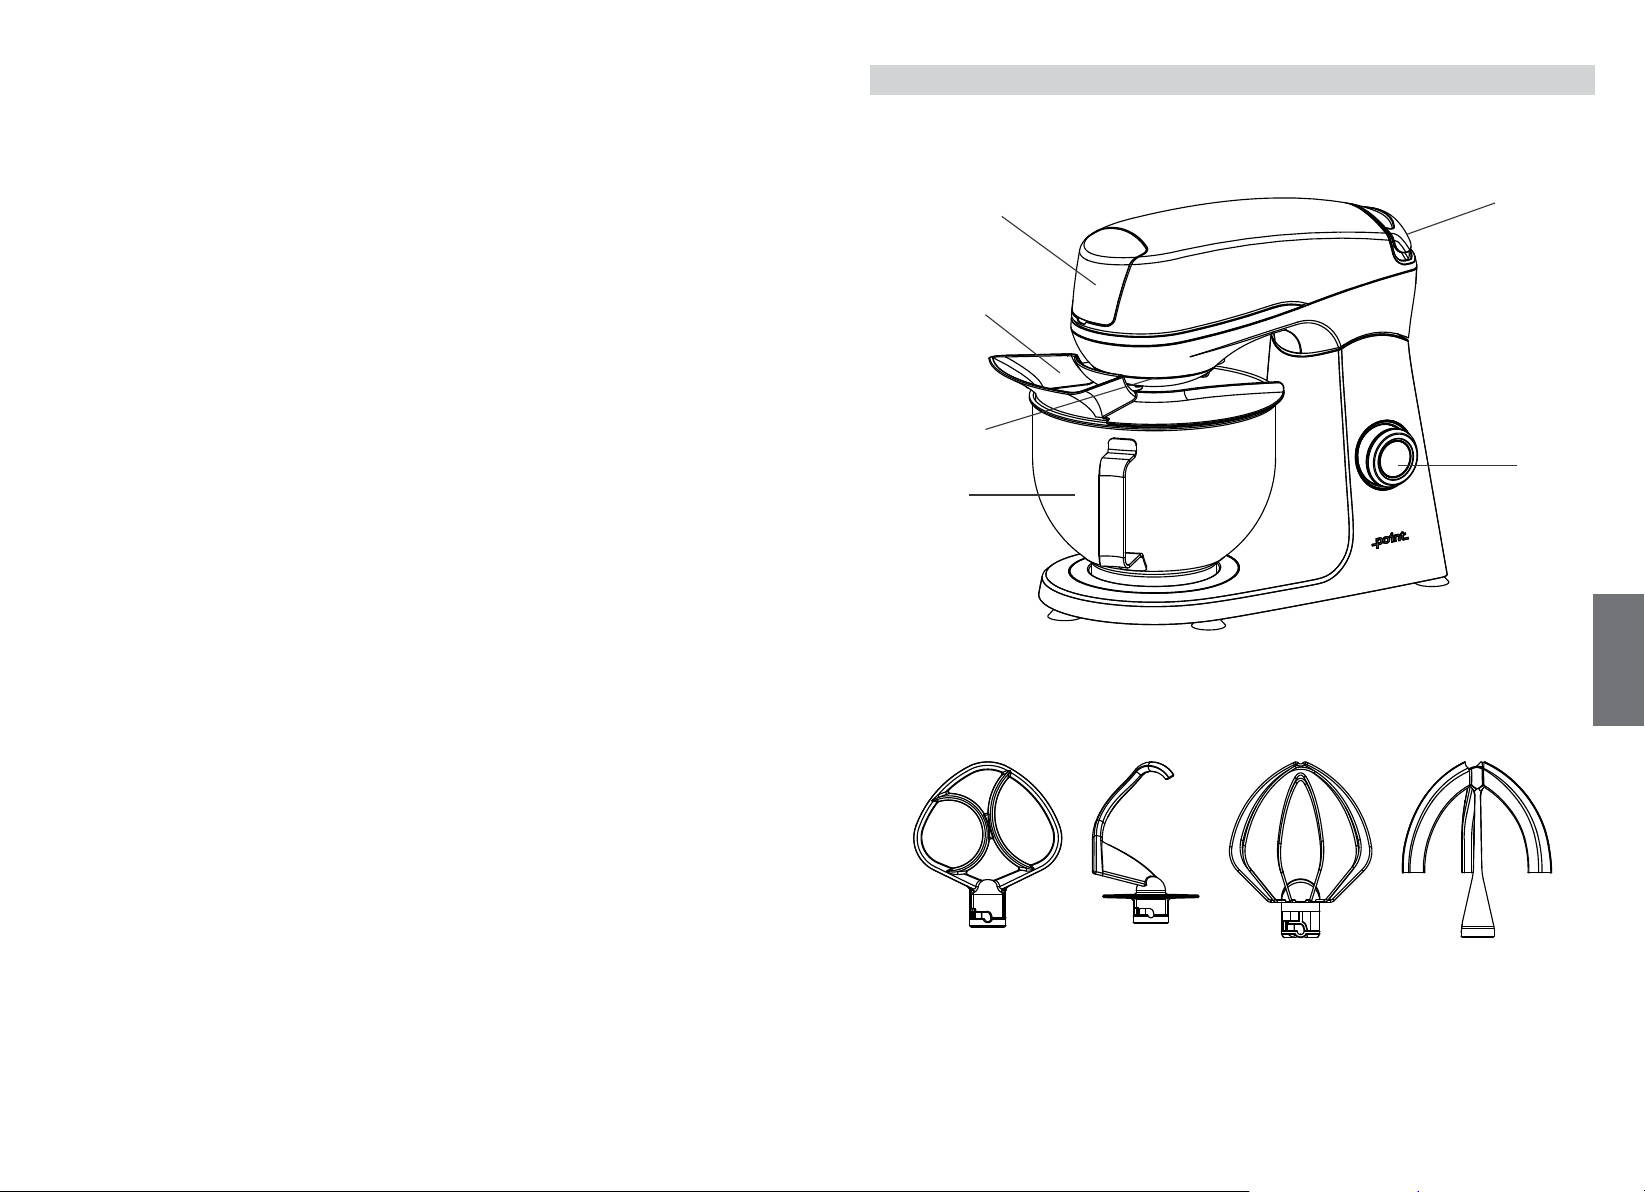
PRODUCT OVERVIEW
Beater Dough Hook Whisk 3D Beater
Mixer head
Bowl
Splash Guard
Attachment Cover Head
Release
Button
Speed
Control
1.
2.
3.
4.
CAUTION: To Ensure No Electrical Shock Hazards:
Plug into a 2 prong outlet.
Do not remove ground outlet.
Do not use an adapter.
Do not use an extension Cord.
Failure to follow these instructions can result in death, fire,
or electrical shock.
•
•
•
•
•
IMPORTANT

98
GB
OPERATIONS
Before First Use
Remove all packaging materials from the product
Clean the mixer base with a damp cloth and dry thoroughly. Wash the Flat beater,
Dough hook, Balloon whisk and the 4.6L Mixing Bowl in warm, soapy water and dry
thoroughly.
Using your mixer
How to Attach Bowl
1. Turn speed control to OFF.
2. Unplug Stand Mixer or disconnect power.
3. Tilt motor head back.
4. Place bowl on bowl clamping plate.
5. Turn bowl clockwise to lock into base.
How to Remove Bowl
1. Turn speed control to OFF.
2. Unplug Stand Mixer or disconnect power.
3. Tilt motor head back.
4. Turn bowl counterclockwise to unlock from
base.
How to Attach beater, Dough Hook or
Balloon Whisk
How to Remove beater, Dough Hook or
Balloon Whisk
1. Turn speed control to OFF.
2. Unplug Stand Mixer or disconnect power.
3. Tilt motor head back.
4. Slip beater onto beater shaft and press
upward as far as possible.
5. Turn beater counterclockwise, hooking
beater over pin on shaft.
6. Plug into a 2 prong electrical wall outlet.
1. Turn speed control to OFF.
2. Unplug Stand Mixer or disconnect power.
3. Tilt motor head back.
4. Press beater upward as far as possible and
turn clockwise.
5. Pull beater from beater shaft.
How to Operate Speed Control
The Speed control should always be set on the lowest speed for starting, then gradually moved
to a desired higher speed to avoid splashing ingredients out of the bowl.
How to Lock & Unlock Motor Head
1. Make sure motor head is completely down.
2. Before mixing, test the lock by attempting to raise the head.
3. Press the Head Release button down to UNLOCK the motor head, then tilt motor head back gently.
How to Attach Splash Guard How to Remove Splash Guard
1. Turn speed control to OFF.
2. Unplug Stand Mixer or disconnect power.
3. Unlock and pull up the motor head.
4. Attach Flat Beater, Dough Hook, or Wire Whip
and bowl.
5. Place the splash guard over the opening of the
bowl with the opened end of the splash guard
away from you.
1. Turn speed control to OFF.
2. Unplug Stand Mixer or disconnect power.
3. Pull out the splash guard.
How to select accessories for use
Attachment Use for / Task Recommended
Speed
Beater - Stirring:
Start all mixing at speed 1 for stirring
Combine dry ingredient prior to adding liquid
ingredient
– for mixtures:
Cakes
Creamed/butter frostings
Cookies
Pie Pastry
Biscuits
Mashed potatoes
Balloon whisk – Whipping:
– for mixtures that need air incorporated:
Eggs
Egg whites
Heavy cream
Boiled frostings
Sponge cakes
Mayonnaise
Dough hook - Slow Mixing:
Combine dry ingredient and liquid ingredient.
Mashing potatoes
– for mixing and kneading yeast dough:
Bread dough
Yeast dough
Pasta dough
3D Beater - Beating:
Mixing Semi-heavy butter
– high ecient mixtures:
Cakes
Creamed/butter frostings
Cookies
Pastry
Minced meat mixture
1
11-12
2-3
For kneading yeast dough, always select Speed 3 or lower. Using another speed higher than
speed 3 may damage the mixer.
Do not scrape the bowl while the Stand Mixer is operating.
The bowl and beater are designed to provide thorough mixing without frequent scraping.
Scraping the bowl once or twice during mixing is usually sucient.
Turn the Stand Mixer o before scraping.
The Stand Mixer may warm up during use. Under heavy load with extended mixing time, you
may not be able to comfortably touch the top of the Stand Mixer. This is normal.
CAUTION:
1.
2.
3.
4.
5.
Lock Unlock
1-3

Your stand mixer motor is equipped with an automatic Thermal
Protection feature which will shut your motor o if it gets too hot. Should this occur,
turn the speed selector to O, unplug the unit and allow it to cool down. It is normal for
the mixing head to become hot after prolonged use.
GB
THERMAL PROTECTION
Turn the stand mixer o and unplug it from the electrical wall outlet.
Press the attachment lock down and hold while pulling the accessory attachment out
of the hub.
USING ACCESSORY ATTACHMENT
CARE AND CLEANING
Before cleaning your Stand Mixer, ensure that the power is turned o at the electrical
wall outlet, and then remove the plug. Wipe over the outside area of the Stand Mixer
including the head and base, with a dampened cloth and polish with a soft dry cloth.
Wipe any excess food particles from the mains power cable.
We recommends to wash the mixing bowl, beater, whisk and dough hook in warm
soapy water and wipe dry - use a brush if necessary to remove any sticky food particles.
All plastic components deteriorate through prolonged dishwasher use. However, parts
of your Stand Mixer are tolerant to dishwasher use. These include the stainless steel
mixing bowl, beater, whisk and dough hook.
Note: Place only on the top rack of the dishwasher.
Storage
Keep your Stand Mixer in a convenient position on your kitchen bench ready for use at
all times.
Place the beater, whisk and dough hook in the mixing bowl as storage of these
attachments in a drawer with other kitchen equipment may cause damage.
Note: Never wind the mains power cable around the mixer after use as the warmth
from the motor may cause damage to it. For added convenience the unused length of
the mains power cable can easily be pushed into the base of the mixer for storage.
TROUBLESHOOTING GUIDE
Problem Possible Cause What to do
Motor will not start. Motor is over-heated.
Mixer head is not locked
down properly.
Unplug and allow the motor to
cool, (the mixer head should be
cool to touch).
Move mixture in mixing bowl to
the side of the attachment, to
allow the attachment to go all
the way into the bowl.
Motor is over-heated. Use of a high speed for a
long time.
Mixture too heavy.
Mixing quantity too large.
Unplug and allow the motor to
cool, (the mixer head should be
cool to touch).
Try mixing in batches.
Mixer head does not lock
down properly.
Attachment is hitting
the bowl.
Thick mixture is
preventing the
attachment from going
all the way down into
the bowl.
Move mixture in mixing bowl to
the side of the attachment, to
allow the attachment to go all
the way into the bowl.
Attachment is not
inserted correctly.
Mixing bowl is not locked
into the base properly.
Remove the attachment and try
inserting again. Refer to the
instructions in this booklet if
needed.
Lock the bowl into position.
Refer to the instructions in this
booklet if needed.
Mixer is moving on the
bench top.
Chosen speed is too high
for the mixture. Mixture
caught up in the
attachment.
Flour or spills on bench
top.
Lower the speed or mix in
batches.
Scrape down the attachment
and continue mixing.
Clean and dry the bench top as
well as the mixer base.
11
10
1.
2.
3.
4.
Ensure the stand mixer is turned o and the unit is unplugged.
Push up the “Attachments cover” and then press down and hold the accessory
release tab while inserting the accessory into the hub as far as it will go.
Let go of the accessory release tab and rotate the attachment slightly left and right
until you hear the locking pin click into place.
To ensure your attachment is locked into place try pulling it out while not pressing
down on the accessory release tab.
ASSEMBLING OPTIONAL FRONT POWER HUB ATTACHMENTS
REMOVING FRONT POWER HUB ATTACHMENTS
1.
2.

RECOMMENDED RECIPE
Put all ingredients (except butter) into the bowl.
Switch on the machine with speed 1, mix 30 seconds.
Change to speed 2-3 for another 2 minutes
Switch o the machine, add the softened butter into the mixture, slightly mix with
the dough with a spatula.
Switch on the machine again from speed 1 and moves to speed 3-4 for another 7
minutes maximum.
Put the dough into oiled covered with wet towel. Then leave it for a hour or until it
has doubled in size
Put the dough onto a lightly floured surface. Slightly knead the dough by hand to
release air.
Shape the dough into a loaf or your desired form. Second raise until it has doubled in
size.
Bake at 230°C/450°F for 20 –25 minutes for a loaf.
White bread
Tool:
Ingredient: Flour 500g Softened Butter 40g
Dry yeast 8g
White Sugar 60g
Water 340g
1.
2.
3.
4.
5.
6.
7.
8.
9.
Pre-heat your oven to 180°C.
Insert your 3D beater into the machine.
Make sure the silicon scraper tube is on the attachment.
Put the butter and icing sugar into the mixing bowl, start with speed 1, and turn to
speed 3-4 for about 2.5 minutes or until is very fluy.
Add the egg yolk into the butter (you do not need to stop the machine), mix for
another 1-2 minutes with Speed 1-3, until the batter becomes light yellow in colour,
and the texture become thick. No need to stop the machine during the whole
process.
Add all flour into the batter. Start with speed 1 for 30sec, change to speed 2-3 for
another 2minutes or until the cookie dough is evenly mixed.
Flour you table, then roll the cookie dough out to a thickness of 1 cm.
Use your cookie cutter to cut the shape you want.
Bake for 15 minutes.
Butter Cookie
Tool:
Ingredient: Cake flour 400g Unsalted butter(Softened) 200g
100g(Subject to favor) Salt 1 tsp
2
1.
2.
3.
4.
5.
6.
7.
8.
9.
Icing sugar
Egg yolk Vanilla extract Few drops
Put all the above ingredients into the mixing bowl.
Insert your 3D beater into the machine.
Make sure the silicon scraper tube is on the attachment.
Start with Speed 1, turn to speed 3 or 4, total mixing time: 2 minutes.
Meatballs
Tool:
Ingredient: Ground beef
900g Egg 2
Breadcrumbs 1.5 cups Parmesan cheese 3/4 cups
Salt 1/2 tsp Pepper 2 tsp
1.
2.
3.
4.
Onion Parsley 1 bunch
1(chopped)
The following quantities are provided as a guide, the dough can be of varying viscosity
due to the ingredients and recipes used so they may need to be adjusted as required.
13
12
GB

Imported and Exclusively marketed by:
Power International AS,
PO Box 523, N-1471 Lørenskog, Norway
Power Norge:
https://www.power.no/kundeservice/
T: 21 00 40 00
Expert Danmark:
https://www.expert.dk/kundeservice/
T: 70 70 17 07
Power Danmark:
https://www.power.dk/kundeservice/
T: 70 33 80 80
Punkt 1 Danmark:
https://www.punkt1.dk/kundeservice/
T: 70 70 17 07
Expert Finland:
https://www.expert.fi/tuki/asiakaspalvelu/
T: 020 7100 670
Power Finland:
https://www.power.fi/tuki/asiakaspalvelu/
T: 0305 0305
Power Sverige:
https://www.power.se/kundservice/
T: 08 517 66 000
This symbol on the product or in the instructions means that your
electrical and electronic equipment should be disposed at the end of its
life separ from your household waste. There are separate collection
systems for recycling in the EU. For more information, please contact the
local authority or your retailer where you purchased the product.
SPECIFICATION
Model :POKM267
Rated voltage : 220-240V~, 50-60Hz
Rated power : 1000W
GB
15
14

VIKTIGE SIKKERHETSFORANSTALTNINGER
Ved bruk av elektriske apparater må alltid grunnleggende
forholdsregler for sikkerhet følges, blant annet følgende:
Les alle instruksjonene nøye.
For å beskytte mot elektrisk støt må du ikke sette
kjøkkenmaskinen, strømkabelen eller støpselet i vann eller
annen væske.
Apparatet skal ikke brukes av barn. Hold apparatet og
strømkabelen utilgjengelige for barn.
Barn må ikke leke med apparatet.
Apparatet kan brukes av personer med reduserte fysiske,
sensoriske eller mentale evner eller mangel på erfaring og
kunnskap hvis de er under tilsyn eller har mottatt
anvisning om bruk av apparatet på en sikker måte og
forstår farene dette innebærer. Rengjøring og
brukervedlikehold må ikke utføres av barn uten tilsyn.
Slå av apparatet og koble det fra stikkontakten før du
skifter tilbehør eller nærmer deg deler som beveger seg
under bruk.
Koble alltid apparatet fra stikkontakten hvis den blir
stående uten tilsyn, samt før du monterer, demonterer
eller rengjør.
Ikke bruk annet tilbehør enn det fulgte med apparatet.
Slå av enheten og koble den fra stikkontakten når det ikke
er i bruk, før tilbehør tas av og på og før rengjøring. For å
koble fra må du først slå av, så tar du tak i støpselet og
trekker det ut av stikkontakten. Trekk aldri i
strømledningen.
Unngå å berøre bevegelige deler. Hold hender, hår, klær
samt slikkepott og annet tilbehør borte fra flatvispen,
ballongvispen eller eltekrokene under bruk for å forhindre
personskade og/eller skade på kjøkkenmaskinen.
Ta flatvispene fra kjøkkenmaskinen før vask.
Hold hender og andre redskaper ute av beholderen mens
du mikser matvarer for å redusere risikoen for alvorlig
personskade eller skade på enheten. Du kan bruke en
skrape, men bare når enheten ikke er i gang.
Hvis strømkabelen er skadet, må den skiftes av
produsenten, av produsentens servicerepresentant eller av
en tilsvarende kvalifisert person for å unngå fare.
Bruk av tilbehør som ikke anbefales eller selges av
produsenten til apparatet, kan føre til brann, elektrisk støt
eller personskade.
Ikke bruk den utendørs.
Ikke la strømkabelen henge over kanten av et bord eller en
benk eller komme nær varme overflater, inkludert
komfyren.
Det kan være skadelig å blande brennbare ikke-matvarer.
Ikke bruk apparatet til annet enn beregnet formål.
Ikke bruk ved eksplosiv og/eller brennbar røyk.
Når du skal koble fra, skrur du kontrollen til avslått, så tar
du støpselet ut fra stikkontakten.
FORSIKTIG: Da farlige situasjoner kan oppstå på grunn av
utilsiktet tilbakestilling av den termiske
sikkerhetsutkoblingen, skal apparatet ikke få strøm
gjennom en ekstern bryterenhet, for eksempel et tidsur,
og det må ikke kobles til en krets som regelmessig slår av
og på av strømmen.
1.
2.
3.
4.
5.
6.
7.
8.
9.
10.
11.
12.
13.
14.
15.
16.
17.
18.
19.
20.
21.
TA VARE PÅ DISSE INSTRUKSJONENE
NO
17
16

FORSIKTIG: For å sikre at det ikke er fare for elektrisk støt:
• Koble til en stikkontakt med to kontakter.
• Ikke ern jordkontakten.
• Ikke bruk adapter.
• Ikke bruk skjøteledning.
• Dersom ikke disse instruksjonene følges, kan det føre til
dødsfall, brann eller elektrisk støt.
VIKTIG
1. Kjør aldri kjøkkenmaskinen i mer enn 10 minutter – den vil
overopphetes.
2. Hvis kjøkkenmaskinen blir overopphetet, vil den automatisk
aktivere overopphetingsvernet og slå seg av. Slå av
kjøkkenmaskinen og trekk den ut av stikkontakten. Frigjør
hodet til kjøkkenmaskinen, og vipp det bakover til det låses i
bakre vippeposisjon. La kjøkkenmaskinen hvile i 30 min.
3. Ikke bruk ballongvispen til tunge blandinger – den kan bli
skadet.
4. Etter rengjøring setter du bollen på plass igjen. Dette holder
mekanismen under tildekket.
PRODUKTOVERSIKT
Visp Eltekrok Visp 3D-visp
Hodet til
kjøkkenmaskinen
Bolle
Sprutdeksel
Tilbehørsdeksel Utløserknapp
Hastighetskontroll
NO
19
18
Ce manuel convient aux modèles suivants
1
Table des matières
Langues :
Autres manuels point Mixer