
PNI 380 Manuel utilisateur

PNI 380
Chematoare pentru vanatoare
Hunting Caller
User manual / Ръководство за потребителя / Benutzerhandbuch / Manual de usuario / Manuel utilisateur
Használati utasítás / Manuale d’uso / Instrukcja obsługi / Manual de utilizare
EN User manual ............................................. 2
BG Ръководство за потребителя ................ 4
DE Benutzerhandbuch ................................... 6
ES Manual de usuario .................................... 8
FR Manuel utilisateur ..................................... 10
HU Használati utasítás ................................... 12
IT Manuale utente ........................................ 14
PL Instrukcja obsługi ..................................... 16
RO Manual de utilizare ................................... 18

EN
2
WARNINGS
Use the product in accordance with the instructions and procedures in this manual. Improper use may result
in malfunction, and loss of warranty.
This product can be used for the study of wildlife, the removal of certain species of pests or even during the
hunting season, thanks to the very loud horn speaker, the remote controls and the small dimensions, being
able to play the desired sound at very high level.
PRODUCT DESCRIPTION
USING DEVICE
1. Turn on the unit using the highlight button in Fig. C.
2. The LCD screen opens and you can view the information on the screen. (Fig. A)
(The controls from left to right are: Play / Pause), return key to the previous menu, next menu key (Next),
volume up key, volume down key.
The numeric keys from left to right are: 1,2,3,4,5,6,7,8, 9, repeat key, 0 key, M key).
3. Press the M key in the numeric key area after the unit has switched on to enter the menu. You have 4
submenus (Playback, Language, Time, Storage) available. Select the desired submenu using the keys
Previous or Next and press the M key to conrm.
a) Playback: Press the M key in the 4 modes: normal / all / same / random; Press “Play” key to play the
desired music le.
b) Language: The default language is English, press the M key to enter the language menu and briey
press the Previous or Next key to choose the desired language and then press the M key to conrm. You
have 18 languages (Ex: English, Simplied Chinese, Traditional Chinese, French, Danish).
c) Timer: Press the M key to enter the menu.
- Timer settings: Press the Previous or Next key to select the timer option, and then press the M key to
enter the timer mode. Press the Previous or Next key to move the cursor to the desired timer, and then press

EN
3
the volume up or volume down key to increase or decrease the timer.
- Timer setting: Press the Previous or Next key to move the cursor to the desired timer, and then press the
volume key + or volume - to increase or decrease the timer value, press the M key to conrm after you have
made the desired settings.
- Data storage: The unit has a TF (Micro SD purchase card separately) card reader, as shown in Figure D.
Press the M key to enter the main menu or use the Previous or Next keys to select the storage option and
then press the M key to select the TF memory and press the M key to conrm.
d) Customized options: Press keys 0-9 on the keyboard, which will also appear on the LCD screen, for
example, press the 9 key representing the 9th song, and then press the M key to play: Ex: 0001 0002 rst
and second songs.
e) External speaker (Fig. D), The 2 jack sockets allow the connection of 2 external speakers.
f) The power supply can be made with a dedicated 12V battery or AAA battery holder. If you cannot charge
the battery, you can use AAA batteries (Fig. B)
d) Press the Repeat key on the remote control keypad to pair a new remote control.
g) External power supply can be made with 12V c.c.
COPYING FILES
In order to use the caller you must insert a transash card (microSD to be purchased separately) in the
dedicated slot.
Then connect the caller using the USB cable ifrom package to a PC / Laptop.
Turn On caller from the dedicated switch, and open the external storage unit (the caller) on the PC /
Laptop.
Copy the desired les to the external storage unit (callers).
Disconnect the caller from the PC / Laptop and test / play the copied les.
LCD display 128 x 64
PC/Laptop connection USB 2.0 (read: 1000KB, write 800KB)
Card capacity (TF/MicroSD) max. 16 Gb
Power Li-ion battery 1000 mAh
External 12 V c.c.
Audio & specications
multimedia les
Output power 2 x 10 W
MP3, BPS: 5Kbps – 320 Kbps
WMA, WMV, ASF,
BPS
5 Kbps – 384 Kbps
Frequency
response
20 Hz – 20 KHz
S/N Radio 120 dB
Media format MP3/WMA
Autonomy over 8 hours
Temperature -26˚C - +60˚C
Default language Engleza
Operating system Windows XP, 7, 9, 10, Mac OS 10, Linux 2.4.2

BG
4
ПРЕДУПРЕЖДЕНИЯ
Използвайте продукта в съответствие с инструкциите и процедурите в това ръководство.
Неправилното използване може да доведе до неизправност, неизправност и загуба на гаранция.
Този продукт може да се използва за изучаване на дивата природа, премахване на определени видове
вредители или дори по време на ловния сезон, благодарение на много силния високоговорител на
клаксона, дистанционните управления и малките размери, като може да възпроизвежда желания звук
много силно и силно.
ОПИСАНИЕ НА ПРОДУКТА
ВЪВЕЖДАНЕ В ЕКСПЛОАТАЦИЯ
1. Включете устройството с помощта на бутона за осветяване на фиг. В.
2. LCD екрана се отваря и можете да видите информацията на екрана. (Фиг. A)
(Контролите отляво надясно са: Възпроизвеждане / Пауза), клавиш за връщане към предишното
меню, следващ клавиш от менюто (Следващ), клавиш за увеличаване на силата на звука, клавиш за
намаляване на силата на звука.
Цифровите клавиши отляво надясно са: 1,2,3,4,5,6,7,8, 9, ключ за повторение, ключ 0, ключ M).
3. Натиснете клавиша M в областта на цифровия клавиш, след като устройството се включи, за
да влезете в менюто. Имате на разположение 4 подменюта (Playback, Language, Time, Storage).
Изберете желаното подменю с помощта на клавишите Предишна или следваща и натиснете клавиша
M за потвърждение.
a) играя (Playback): Натиснете клавиша M в четирите режима: нормален / всички / същия / случаен;
Натиснете клавиш „Възпроизвеждане“, за да възпроизведете желания музикален файл.
b) език (Language): Езикът по подразбиране е английски, натиснете клавиша M, за да влезете в
менюто на езика, и за кратко натиснете клавиша Previous или Next, за да изберете желания език, след
което натиснете клавиша M, за да потвърдите. Имате 18 езика (напр .: английски, опростен китайски,
традиционен китайски, френски, датски).
c) синхронизиране (Timer): Натиснете клавиша M, за да влезете в менюто.

BG
5
- Настройки на таймера: Aнатиснете клавиша Предишен или Следващ, за да изберете опцията за
таймер, след което натиснете клавиша M, за да влезете в режим на таймера. Натиснете клавиша
Предишен или Следващ, за да преместите курсора към желания таймер, след което натиснете
клавиша за увеличаване или намаляване на силата на звука, за да увеличите или намалите таймера.
- Настройки за изчакване: Натиснете предишния или следващия клавиш, за да преместите курсора
към желания таймер, след което натиснете клавиша за сила на звука + или силата на звука - за да
увеличите или намалите стойността на таймера, натиснете клавиша M, за да потвърдите, след като
направите желаните настройки.
Съхранение на данни:Устройството има TF (Micro SD отделно закупен) четец на карти, както е
показано на фигура D. Натиснете клавиша M, за да влезете в главното меню, или използвайте
клавишите предишен или следващ, за да изберете опцията за съхранение, след което натиснете M
клавиш, за да изберете TF памет и натиснете M клавиш за потвърждение.
d) Опции за персонализиране: Натиснете клавишите 0-9 на клавиатурата, които също ще се появят
на LCD екрана, например натиснете клавиша 9, представляващ 9-та песен, и след това натиснете
клавиша M, за да играете: Ex: 0001 0002 представлява първата и втората песен.
e) Външен високоговорител (Фиг. D), 2-те гнездови жакове позволяват свързването на 2 външни
високоговорителя.
f) Захранването може да се извърши със специална 12V батерия или AAA държач за батерии. Ако не
можете да зареждате батерията, можете да използвате батерии AAA (фиг. B)
g) Натиснете бутона Repeat на клавиатурата на дистанционното управление, за да свържете ново
дистанционно управление.
h) Външно захранване може да се извърши с 12V c.c.
КОПИРАНЕ НА ФАЙЛОВЕ
За да използвате повикването, трябва да поставите трансфлаш карта (microSD, за да бъде закупена
отделно) в специалния слот.
След това свържете обаждащия се с помощта на USB кабел в пакета към компютър / лаптоп.
Стартирайте обаждащия се от специалния бутон и отворете външния модул за съхранение
(обаждащия се) на PC / Laptop.
Копирайте желаните файлове във външното устройство за съхранение (обаждащите се).
Изключете обаждащия се от PC / Laptop и тествайте / възпроизвеждайте копираните файлове.
LCD екран 128 x 64
PC / лаптоп връзка USB 2.0 (citire: 1000KB, scriere 800KB)
Капацитет на картата TF (
MicroSD)
max. 16 Gb
хранене батерия Li-ion 1000 mAh
външен 12 V c.c.
Аудио и функции
Мултимедийни файлове
Изходна мощност
на външен
високоговорител
2 x 10 W
MP3, BPS: 5Kbps – 320 Kbps
WMA, WMV, ASF,
BPS
5 Kbps – 384 Kbps
Честотна
характеристика
20 Hz – 20 KHz
S/N Radio 120 dB
Музикален формат MP3/WMA
температура -26˚C - +60˚C
Меню за език по подразбиране English
Sistem de operare compatibil Windows XP, 7, 9, 10, Mac OS 10, Linux 2.4.2

DE
6
ATENTIONARI SPECIALE
Verwenden Sie das Produkt gemäß den Anweisungen und Verfahren in diesem Handbuch. Eine
unsachgemäße Verwendung kann zu Fehlfunktionen, Fehlfunktionen und zum Verlust der Garantie führen.
Dieses Produkt kann für die Untersuchung von Wildtieren, die Entfernung bestimmter Schädlingsarten
oder sogar während der Jagdsaison verwendet werden. Dank des sehr lauten Hornlautsprechers, der
Fernbedienungen und der geringen Abmessungen kann der gewünschte Klang sehr stark und kräftig
wiedergegeben werden.
PRODUKTBESCHREIBUNG
INBETRIEBNAHME
1. Schalten Sie das Gerät mit der Hervorhebungstaste in Abb. C ein.
2. Der LCD-Bildschirm wird geöffnet und Sie können die Informationen auf dem Bildschirm anzeigen. (Abb.
A)
(Die Bedienelemente von links nach rechts lauten: Wiedergabe / Pause), Zurückkehren zum vorherigen
Menü, Drücken der nächsten Menütaste (Weiter), Erhöhen der Lautstärke, Verringern der Lautstärke.
Die Zifferntasten von links nach rechts lauten: 1,2,3,4,5,6,7,8, 9, Wiederholungstaste, Taste 0, Taste M).
3. Drücken Sie die Taste M im Zifferntastenbereich, nachdem das Gerät eingeschaltet wurde, um das Menü
aufzurufen. Sie haben 4 Untermenüs (Wiedergabe, Sprache, Zeit, Speicher) zur Verfügung. Wählen Sie mit
den Tasten das gewünschte Untermenü aus
Zurück oder Weiter und drücken Sie die M-Taste zur Bestätigung.
a) Spielen (Playback): Drücken Sie die M-Taste in den 4 Modi: normal / alle / gleich / zufällig; Drücken Sie
die “Play” -Taste, um die gewünschte Musikdatei abzuspielen.
b) Sprache (Language):Die Standardsprache ist Englisch. Drücken Sie die Taste M, um das Sprachmenü
aufzurufen, und drücken Sie kurz die Taste Zurück oder Weiter, um die gewünschte Sprache auszuwählen.
Drücken Sie anschließend die Taste M, um die Auswahl zu bestätigen. Sie haben 18 Sprachen (zB Englisch,
vereinfachtes Chinesisch, traditionelles Chinesisch, Französisch, Dänisch).c) Temporizare (Timer): Apăsţi
DE
7
tasta M pentru a intra în meniu.
- Timer-Einstellungen: Drücken Sie die Taste Zurück oder Weiter, um die Timer-Option auszuwählen, und
drücken Sie dann die Taste M, um den Timer-Modus aufzurufen. Drücken Sie die Zurück- oder Weiter-Taste,
um den Cursor auf den gewünschten Timer zu bewegen, und drücken Sie dann die Lauter- oder Leiser-
Taste, um den Timer zu erhöhen oder zu verringern.
- Timer-Einstellung: Drücken Sie die Taste Zurück oder Weiter, um den Cursor auf den gewünschten Timer
zu bewegen, und drücken Sie dann die Lautstärketaste + oder die Lautstärketaste -, um den Timerwert zu
erhöhen oder zu verringern. Drücken Sie die Taste M, um zu bestätigen, nachdem Sie die gewünschten
Einstellungen vorgenommen haben.
Datenspeicherung: Das Gerät verfügt über einen TF-Kartenleser (Micro SD Purchase Card separat), wie in
Abbildung D dargestellt. Drücken Sie die Taste M, um das Hauptmenü aufzurufen, oder verwenden Sie die
Tasten Zurück oder Weiter, um die Speicheroption und auszuwählen Drücken Sie dann die M-Taste, um den
TF-Speicher auszuwählen, und drücken Sie zur Bestätigung die M-Taste.
d) Anpassungsoptionen: Drücken Sie die Tasten 0-9 auf der Tastatur, die auch auf dem LCD-Bildschirm
angezeigt werden. Drücken Sie beispielsweise die Taste 9, die das 9. Lied darstellt, und drücken Sie dann
die Taste M, um Folgendes abzuspielen: Beispiel: 0001 0002 repräsentiert das erste und zweite Lied.
e) Externer Lautsprecher (Abb. D). An den 2 Buchsen können 2 externe Lautsprecher angeschlossen
werden.
f) Die Stromversorgung kann mit einer speziellen 12-V-Batterie oder einem AAA-Batteriehalter erfolgen.
Wenn Sie den Akku nicht auaden können, können Sie AAA-Batterien verwenden (Abb. B).
g) Drücken Sie die Wiederholungstaste auf der Fernbedienungstastatur, um eine neue Fernbedienung zu
koppeln.
h) Externe Stromversorgung kann mit 12 V Gleichstrom erfolgen.
DATEIEN KOPIEREN
Um den Anruf nutzen zu können, müssen Sie eine Transash-Karte (microSD muss separat erworben
werden) in den dafür vorgesehenen Steckplatz einlegen.
Schließen Sie dann den Anrufer mit dem mitgelieferten USB-Kabel an einen PC / Laptop an.
Starten Sie den Anrufer über die entsprechende Taste und öffnen Sie die externe Speichereinheit (den
Anrufer) auf dem PC / Laptop.
Kopieren Sie die gewünschten Dateien auf die externe Speichereinheit (Anrufer).
Trennen Sie den Anrufer vom PC / Laptop und testen / spielen Sie die kopierten Dateien ab.
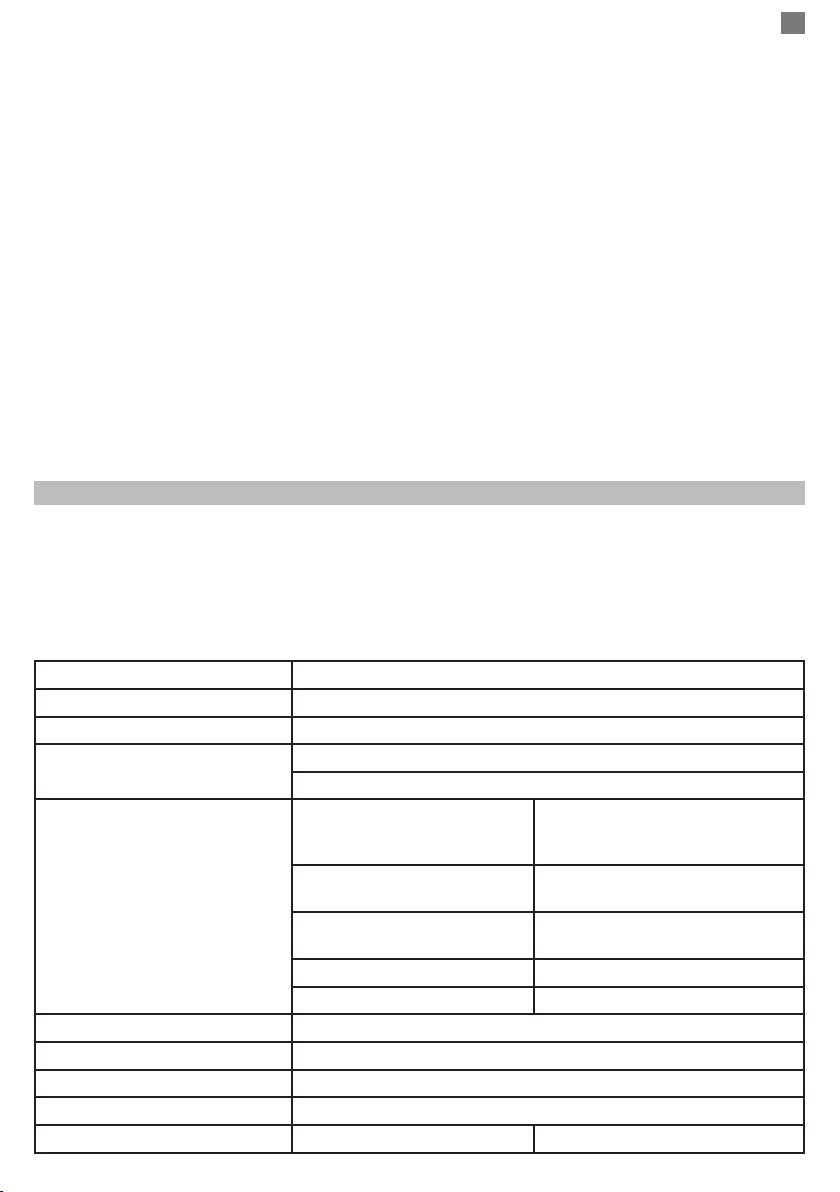
LCD-Bildschirm 128 x 64
PC / Laptop-Verbindung USB 2.0 (lesen: 1000 KB, schreiben 800 KB)
TF-Kartenkapazität (MicroSD) max. 16 GB
Ernährung 1000 mAh Li-Ion Akku
Externe 12 V DC
Audio und Funktionen
Ausgangsleistung des
externen Lautsprechers 2 x
10 W
2 x 10 W
Multimedia-Daten 5 Kbit / s -
320 Kbit / s
5Kbps – 320 Kbps
WMA, WMV, ASF, BPS 5 Kbit /
s - 384 Kbit / s
5 Kbps – 384 Kbps
Frequenzgang 20 Hz - 20 KHz 20 Hz – 20 KHz
S / N Radio 120 dB 120 dB
Musikformat MP3 / WMA
Temperatur -26 ° C - + 60 ° C
Standardsprachmenü Englisch
Kompatibles Betriebssystem Windows XP, 7, 9, 10, Mac OS 10, Linux 2.4.2

ES
8
ADVERTENCIAS ESPECIALES
Use el producto de acuerdo con las instrucciones y procedimientos de este manual. El uso incorrecto puede
provocar un mal funcionamiento, un mal funcionamiento y la pérdida de la garantía.
Este producto se puede utilizar para el estudio de la vida silvestre, la eliminación de ciertas especies de
plagas o incluso durante la temporada de caza, gracias al altavoz de bocina muy fuerte, los controles
remotos y las pequeñas dimensiones, pudiendo reproducir el sonido deseado con mucha fuerza y fuerza.
DESCRIPCIÓN DEL PRODUCTO
PUESTA EN MARCHA
1. Encienda la unidad usando el botón resaltado en la Fig. C.
2. Se abre la pantalla LCD y puede ver la información en la pantalla. (Fig. A)
(Los controles de izquierda a derecha son: Reproducir / Pausa), tecla Volver al menú anterior, tecla Menú
siguiente, tecla Volumen siguiente, tecla Bajar volumen.
Las teclas numéricas de izquierda a derecha son: 1,2,3,4,5,6,7,8, 9, tecla de repetición, tecla 0, tecla M).
3. Presione la tecla M en el área de teclas numéricas después de que la unidad se haya encendido para
ingresar al menú. Tiene 4 submenús (Reproducción, Idioma, Hora, Almacenamiento) disponibles.
Seleccione el submenú deseado usando las teclas Anterior o Siguiente y presione la tecla M para conrmar.
a) Jugar (Playback): Presione la tecla M en los 4 modos: normal / todo / igual / aleatorio; Presione la tecla
“Reproducir” para reproducir el archivo de música deseado.
b) Idioma (Language): El idioma predeterminado es el inglés, presione la tecla M para ingresar al menú de
idiomas y presione brevemente la tecla Anterior o Siguiente para elegir el idioma deseado, y luego presione
la tecla M para conrmar. Tiene 18 idiomas (ej .: inglés, chino simplicado, chino tradicional, francés, danés).
c) Sincronización(Timer): Presione la tecla M para ingresar al menú.
- Conguración del temporizador: presione la tecla Anterior o Siguiente para seleccionar la opción de
temporizador y luego presione la tecla M para ingresar al modo de temporizador. Presione la tecla Anterior

RO
9
ES
9
o Siguiente para mover el cursor al temporizador deseado, y luego presione la tecla para subir o bajar el
volumen para aumentar o disminuir el temporizador.
- Conguración del temporizador: presione la tecla Anterior o Siguiente para mover el cursor al
temporizador deseado, y luego presione la tecla de volumen + o volumen - para aumentar o disminuir el
valor del temporizador, presione la tecla M para conrmar después de haber realizado la conguración
deseada.
Almacenamiento de datos: la unidad tiene un lector de tarjetas TF (tarjeta de compra Micro SD por
separado), como se muestra en la Figura D. Presione la tecla M para ingresar al menú principal o use las
teclas Anterior o Siguiente para seleccionar la opción de almacenamiento y luego presione la tecla M para
seleccionar la memoria TF y presione la tecla M para conrmar.
d) Opciones de personalización: presione las teclas 0-9 en el teclado, que también aparecerán en la
pantalla LCD, por ejemplo, presione la tecla 9 que representa la novena canción y luego presione la tecla M
para reproducir: Ej: 0001 0002 Primera y segunda canción.
e) Altavoz externo (Fig. D), las 2 tomas jack permiten la conexión de 2 altavoces externos.
f) La fuente de alimentación se puede hacer con una batería dedicada de 12V o un soporte de batería AAA.
Si no puede cargar la batería, puede usar baterías AAA (Fig. B)
d) Presione la tecla Repetir en el teclado del control remoto para vincular un nuevo control remoto.
g) La fuente de alimentación externa se puede hacer con 12V c.c.
COPIAR ARCHIVOS
Para utilizar la llamada, debe insertar una tarjeta transash (la tarjeta microSD se debe comprar por
separado) en la ranura dedicada.
Luego conecte la llamada usando el cable USB en el paquete a una PC / Laptop.
Inicie la llamada desde el botón dedicado y abra la unidad de almacenamiento externo (la persona que
llama) en la PC / computadora portátil.
Copie los archivos deseados a la unidad de almacenamiento externo (personas que llaman).
Desconecte la persona que llama de la PC / computadora portátil y pruebe / reproduzca los archivos
copiados.
Pantalla LCD 128 x 64
Conexión PC / Laptop USB 2.0 (lectura: 1000 KB, escribir 800 KB)
Capacidad de la tarjeta TF
(MicroSD)
máx. 16 GB
Alimentación Batería de iones de litio de 1000 mAh
Externo 12 V DC
Audio y características
Potencia de salida de altavoz
externo 2 x 10 W 2 x 10 W
Archivos multimedia de 5
Kbps - 320 Kbps
5Kbps – 320 Kbps
WMA, WMV, ASF, BPS 5 Kbps
- 384 Kbps
5 Kbps – 384 Kbps
Respuesta de frecuencia 20
Hz - 20 KHz
20 Hz – 20 KHz
Radio S / N 120 dB 120 dB
Formato de música MP3 / WMA
Temperatura -26˚C - + 60˚C
Menú de idioma
predeterminado
Inglés
Sistema operativo compatible Windows XP, 7, 9, 10, Mac OS 10, Linux 2.4.2

FR
10
AVERTISSEMENTS SPÉCIAUX
Utilisez le produit conformément aux instructions et aux procédures décrites dans ce manuel. Une utilisation
incorrecte peut entraîner un dysfonctionnement, une perte de garantie.
Ce produit peut être utilisé pour l’étude de la faune, la suppression de certaines espèces de ravageurs ou
même pendant la saison de chasse, grâce au haut-parleur à cor très fort, aux télécommandes et aux petites
dimensions, pouvant jouer le son désiré très fort.
DESCRIPTION DU PRODUIT
MISE EN SERVICE
1. Pdécorer l’unité à l’aide du bouton en surbrillance de la gure C.
2. L’écran LCD s’ouvre et vous pouvez voir les informations à l’écran. (Fig. A)
(Les commandes de gauche à droite sont: Lecture / Pause), Touche de retour au menu précédent, touche de
menu Suivant, touche de volume suivant, touche de diminution du volume.
Les touches numériques de gauche à droite sont les suivantes: 1,2,3,4,5,6,7,8, 9, touche de répétition, 0,
touche M).
3. Appuyez sur la touche M dans la zone des touches numériques une fois l’appareil allumé pour accéder au
menu. Vous avez 4 sous-menus (Lecture, Langue, Heure, Stockage) disponibles. Sélectionnez le sous-
menu souhaité à l’aide des touches Précédent ou Suivant et appuyez sur la touche M pour conrmer.
a) Lecture: appuyez sur la touche M dans les 4 modes: normal / tout / identique / aléatoire; Appuyez sur la
touche “Play” pour lire le chier de musique souhaité.
b) Langue (Language): La langue par défaut est l’anglais, appuyez sur la touche M pour accéder au menu
des langues, appuyez brièvement sur la touche Précédent ou Suivant pour choisir la langue souhaitée,
puis appuyez sur la touche M pour conrmer. Vous avez 18 langues (Ex: anglais, chinois simplié, chinois
traditionnel, français, danois).
c) Minuterie: Appuyez sur la touche M pour accéder au menu.
- Paramètres du minuteur: appuyez sur la touche Précédent ou Suivant pour sélectionner l’option de
Autres manuels pour 380
1
Table des matières
Langues :
Autres manuels PNI Émetteur-récepteur


