pleasant hearth PHC90 Manuel utilisateur

PHC90 Cast Iron Pellet Stove
Please read this entire manual before installation and use of this pellet fuel-burning room heater, and save for future refer-
ence. Failure to follow these instructions could result in property damage, bodily injury or even death. Contact local building or
re ofcials about restrictions and installation inspection requirements in your area.
Note: To obtain a French translation of this manual, please contact your dealer or visit www.ghpgroupinc.com. Pour obtenir
une traduction francaise de ce manuel, s’il vous plait contracter votre revendeur ou visitez www.ghpgroupinc.com
WARNING!
This appliance has been retired.
Service parts pages within have been removed.
For replacement parts, please refer to the individual service parts
list located on the brand websites.

7093-601B • 2/5/18 (877) 447- 47682
Get to Know Your Stove
Vacuum SwitchDigital Control
Ambient Probe
Convection Blower
Outside Air
Connection
Optional External
Thermonstat Connection
Vacuum Switch
Exhaust Blower
Exhaust Probe
Exhaust
Connection
Snap Disc
Drop Tube
Firepot
Igniter
(Behind Firepot)
Baffles (3)
Safety First!
Safety Alert Key: It is important to pay attention to alerts you will see throughout this manual to ensure your safety.
• DANGER! Indicates a hazardous situation which, if not avoided will result in death or serious injury.
•WARNING! Indicates a hazardous situation which, if not avoided could result in death or serious injury.
• CAUTION! Indicates a hazardous situation which, if not avoided, could result in minor or moderate injury.
• Notice: Indicates practices which may cause damage to the Stove or to property.
• Pro Tip: Indicates additional information to help you better understand your stove and optimize its performance.
Notice: Fire Risk
GHP disclaims any responsibility, and the warranty and agency listing will be voided, by the below actions.
DO NOT:
• Install or operate damaged Stove
• Modify Stove
• Install other than as instructed by the manufacturer
• Operate the Stove without fully assembling all components
• Over re (burning at higher temperatures than recommended causing permanent damage to the stove)
• Install any component not approved by the manufacturer
• Install parts or components not listed or approved
• Disable safety switches
Improper installation, adjustment, alteration, service or maintenance can cause injury or property damage. For assistance
or additional information, consult a qualied installer, service agency or your dealer.
DANGER! HOT SURFACES!
Glass and other surfaces are hot during operation AND cool down.
Hot glass will cause burns.
• Do not touch glass until it is cooled
• NEVER allow children to touch glass
• Keep children away; if you expect that children may come into contact with this Stove, we recommend a barrier such
as a decorative screen (see your retailer for suggestions)
• CAREFULLY SUPERVISE children in same room as stove
• Alert children and adults to hazards of high temperatures
High temperatures may ignite clothing or other ammable materials.
• Keep clothing, furniture, draperies and other ammable materials away

Table of Contents
www
Getting Started........................................... 4
• Pallet removal
• What’s included
• What you’ll need
Installing Your Stove ................................. 6
• Getting ready
• Placing your Stove
• Venting your Stove
Using Your Stove..................................... 13
• Starting your Stove
• What to expect
• Comfort settings
• Turning your Stove off
Maintaining Your Stove........................... 18
• What you may need
• Where, when and how
Troubleshooting ...................................... 22
• Power related
• Blockage related
Support..................................................... 27
• Contact information
• Ordering Parts
Listings and Certications ..................... 28
• Mobile home approval
• Glass specication
• Efciencies
• Stove dimensions
• Warranty
Reference Materials................................. 31
• Service Part List
• Maintenance Log

7093-601B • 2/5/18 (877) 447- 47684
Getting Started
WARNING!
Inspect Stove and components for damage.
Damaged parts may impair safe operation.
• Do NOT install damaged components.
• Do NOT install incomplete components.
• Do NOT install substitute components.
Report damaged parts to consumer care.
Getting Started
Pallet Removal
There are bolts holding your stove in place
on the pallet. To remove your stove from the pallet:
What’s Included
1 2
Using a 3/8” wrench,
remove each bolt by
reaching under your
stove. Tip your stove
to opposite side and
push bracket inward;
set stove down and
repeat on other side.
Using a 7/16” wrench,
remove all four bolts
attaching the shipping
bracket to pallet.
Owner’s
manual
Door handleCleaning tool Power cord
Outside air kit
components:
2” Flex hose Termination Cap Hose clamp Screws (4)
CAUTION!
Risk of cuts, abrasions or ying debris. Wear
protective gloves & safety glasses during install.
Metal edges are sharp.

Getting Started
Getting Started
What You’ll Need
Tools & Supplies
• High temperature silicone
(500°F+)
• Level
• Phillips screwdriver
• Plumb line
• Tape measure
• Framing square
• Reciprocating saw
• Electric drill & bits
• Caulking gun
• Stud nder
• Utility knife
• Pliers
• Flashlight
• Hammer
Safety Equipment
Recommended for all installation and maintenance steps.
Pellet Vent Pipe
Must be an approved 3” or 4” diameter Type “L” or “PL” vent. Use 4” diameter vent if ue height
is over 15’ or if installation is over 3,000 ft. above sea level.
Floor Protection
Non-combustible material
(such as a hearth pad) is
required underneath your
stove.
Surge Protector
Protect the electrical
components of your stove
by using a surge protector.
Pellet Fuel
Use only wood pellets
in your stove. For best
performance, use
premium, low-ash pellets
(<1%) less than 1.5” in
length and avoid the dusty
bits and pieces of pellets
in the bottom of the bag.
WARNING!
Fire Risk. NO OTHER vent components may be used. Substitute or damaged vent components may
impair safe operation.
Gloves Safety Glasses Close-toed shoes

7093-601B • 2/5/18 (877) 447- 47686
Installing Your Stove
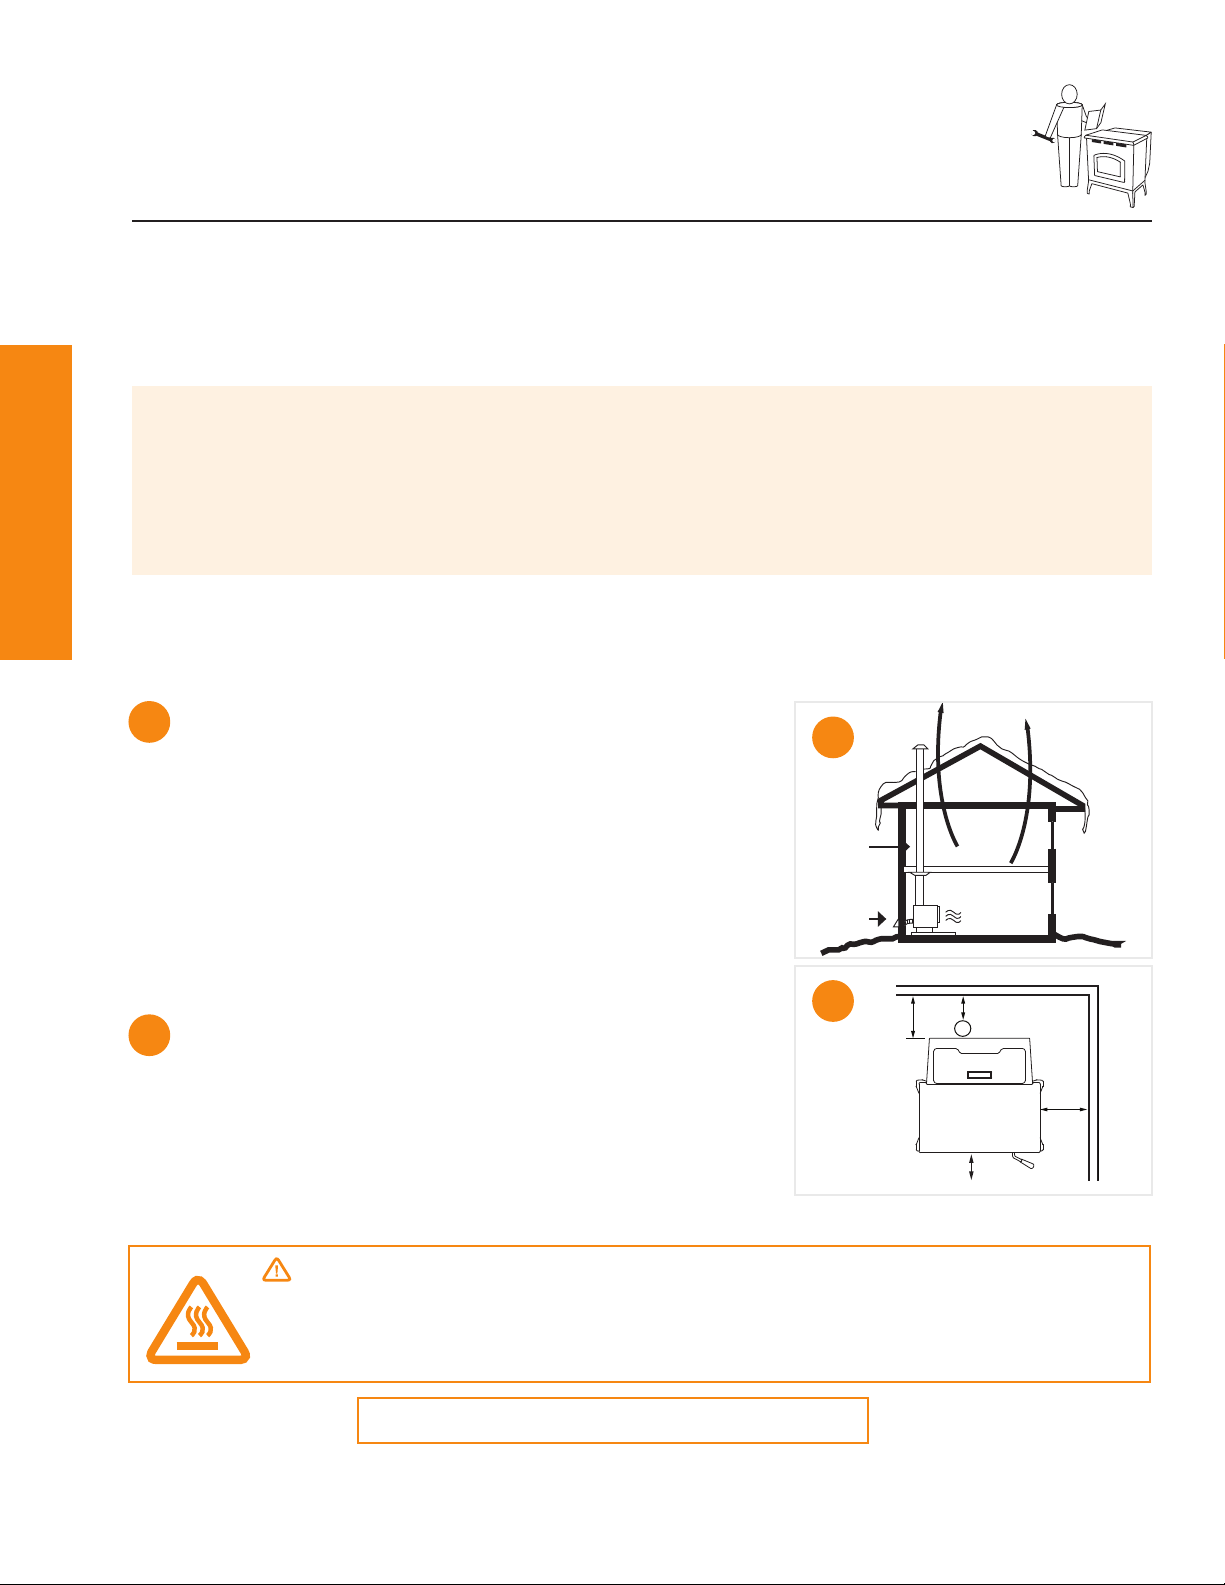
Your Home Acts Like a Chimney
We recommend that you help your home by:
1. Using a minimum of 5 feet of vertical venting
2. Use the supplied outside air kit
3. Install your stove on a main oor location
This will:
• Help your stove breathe
• Minimize smoke leakage in the house
• Enhance performance
Clearance to Combustibles
The space between your stove and the items in
your home that could burn. Materials such as:
• Wood
• Sheet rock (drywall)
• Carpet
A
A
B
B
G
E
D
J
Pro Tip
We highly recommend your stove and pellet vent pipe be installed by a professional installer. Your
retailer can make recommendations for you.
Installation MUST comply with local, regional, state and national codes and regulations.
Consult insurance carrier, local building inspector, re ofcials or authorities having jurisdic-
tion over restrictions, installation inspection and permits.
1
23
WARNING!
Asphyxiation Risk.
DO NOT INSTALL IN A SLEEPING ROOM. Consumes oxygen in the room.
For Canada, the installation must conform to CAN/CSA-B365
Placement
Where you place your stove can signicantly affect its performance and safety.
Getting Ready

Installing Your Stove
REQUIRED:
Use only 3” or 4” type “L” or “PL” pellet pipe.
CAUTION
• Do not connect to any air distribution duct or system
• Do not install a ue damper in the exhaust venting system of this stove
• Do not connect this stove to a chimney ue serving another Stove
• The structural integrity of the manufactured home oor, wall and ceiling/
roof must be maintained
C
C
Pro Tip
This unit can be installed with a 3 to 6 inch (76-152mm) Top Vent Offset Adapter Kit. The 3 to 6
inch (76-152mm) Top Vent Offset Adapter are tested to use 24 gauge single wall ue connector
or Listed double wall ue connector to Class A Listed metal chimneys, or masonry chimneys
meeting International Conference of Building Ofcials (ICBO) standards for solid fuel Stoves.
Getting Ready (Continued)
Pellet Venting
Adding bends in the exhaust path restricts air ow,
reduces performance and provides a collection point
for ash deposits requiring more frequent cleaning.

7093-601B • 2/5/18 (877) 447- 47688
Installing Your Stove
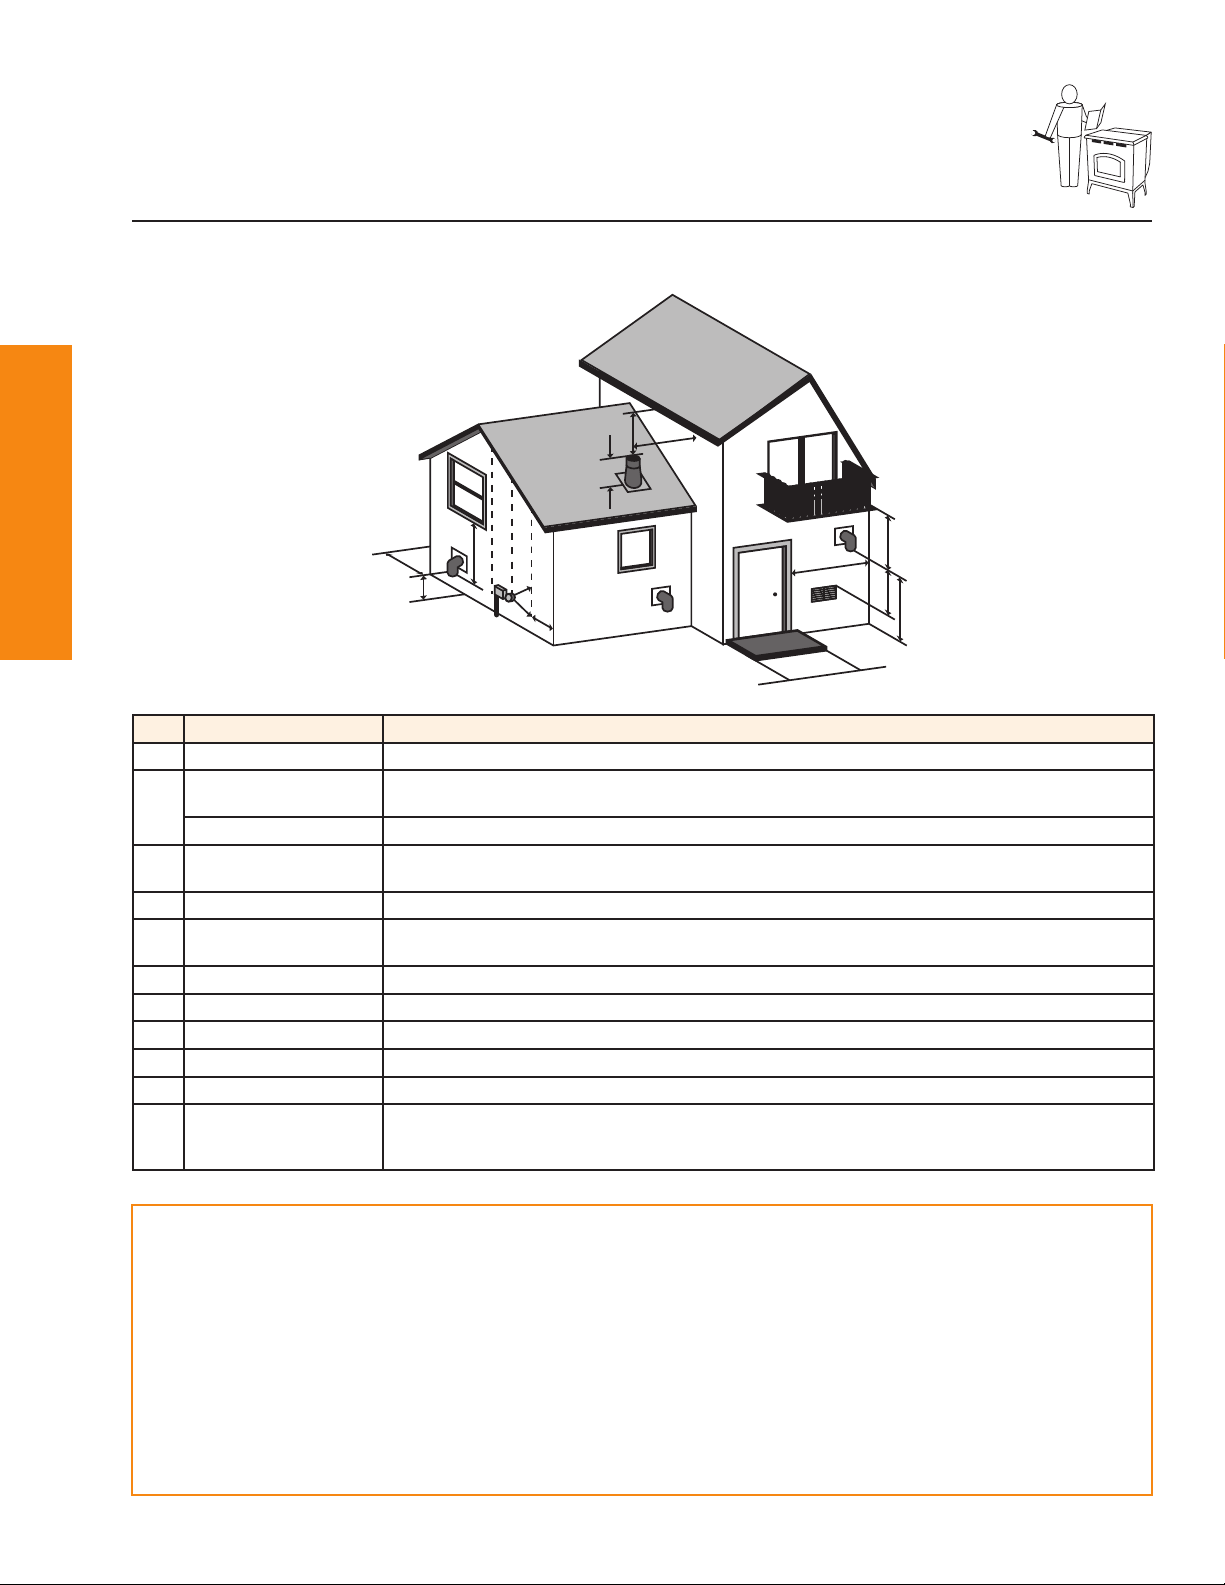
Vent Termination Clearances
Installing Your Stove
A
D
B
L
C
K
J
B
I
H
G
F
Clearances
A 12” Clearance above grade, veranda porch, deck or balcony (Including vegetation and mulch)
B
12” with outside air kit
48” no outside air kit Clearance beside or below any windows or doors that open
12”* Clearance above any window or door that opens
C 18” Vertical clearance to ventilated soft located above the terminal within a horizontal distance of 2 feet from
the center line of the terminal
D 12” Clearance to an outside corner wall
F12” with outside air kit
48” no outside air kit Clearance to a non-mechanical air supply inlet to the building or a combustion air inlet to any other Stove
G 36” Clearance to a mechanical air supply inlet
H 84”** Clearance above a paved sidewalk or paved driveway located on public property
I 12”** Clearance under a veranda, porch, deck or balcony
J 12” Clearance above the roof
K 24” Clearance from an adjacent wall including neighboring buildings
L
36” within a height of 15
feet above the meter /
regulator assembly
Clearance to each side of center line extended above natural gas or propane meter / regulator assembly
or mechanical vent
Notice:
Do NOT terminate vent:
• In any location that will allow ue gases or soot from
entering or staining the building
• In any location which could create a nuisance or hazard
• In any enclosed or semi-enclosed area such as a
carport, garage, attic, crawl space, under a sun deck or
porch or narrow walkway
• Closely fenced area, or any location that can build up
a concentration of fumes such as a stairwell, covered
breezeway, etc.
Notice:
Do NOT terminate below an air inlet.
• It is recommended that at least 60” (1.52m) of vertical
pipe be installed when Stove is vented directly through
a wall—this will create a natural draft, which will help
prevent the possibility of smoke or odor venting into the
home during a power outage
• It will also keep exhaust from causing a nuisance
or hazard by exposing people or shrubs to high
temperatures
• The safest and preferred venting method is to extend
the vent vertically through the roof or above the roof
*Recommended to prevent condensation on windows and thermal breakage. **This is a recommended distance. For additional requirements check local codes.

Installing Your Stove
Notice: Be careful to protect the bottom of the stove
and oor surfaces when moving the stove. Bottom
edges of stove are sharp and can scratch surfaces.
1
1
2
B*
A
C
A
Placing Your Stove
Stove must be installed on a non-combustible oor.
If needed, place oor protection (such as a hearth
pad) beneath the stove. Move stove from pallet onto
your non-combustible surface. Do not operate the
stove while it sits on the pallet.
3
G
E
D
J
F
F
J
H
J
Conrm required clearances to combustibles:
2
3
Vertical Installations (Interior Flue)
Straight back against wall Inches mm
D Back wall to pellet pipe 3 76
E Side wall to stove 13 330
USA Hearth Pad Requirements Inches mm
A Sides 2 51
B Back 2 51
C Front 6 152
Horizontal Installations
Straight back against wall Inches mm
G Back wall to stove 2 51
E Side wall to stove 13 330
H Clearance to top of stove 7 178
J Clearance to front of stove 48 1219
Corner Installation
Straight back against wall Inches mm
F Walls to stove 3 76
Hearth pad minimum requirements:
Notice: Clearances may only be reduced by means
approved by the regulatory authority having jurisdiction.
Non-combustible oor protection extending beneath the ue pipe is required
with horizontal venting or under the top vent adapter with vertical installation.
*Non-combustible oor protection must extend 2 inches (51mm) beneath the
ue pipe when installed horizontal venting or under the top vent adapter with
vertical installation. CANADA REQUIRED, USA RECOMMENDED.
Canada Hearth Pad Requirements Inches mm
A Sides 8 203
B Back 2 51
C Front 6 152

7093-601B • 2/5/18 (877) 447- 476810
Installing Your Stove
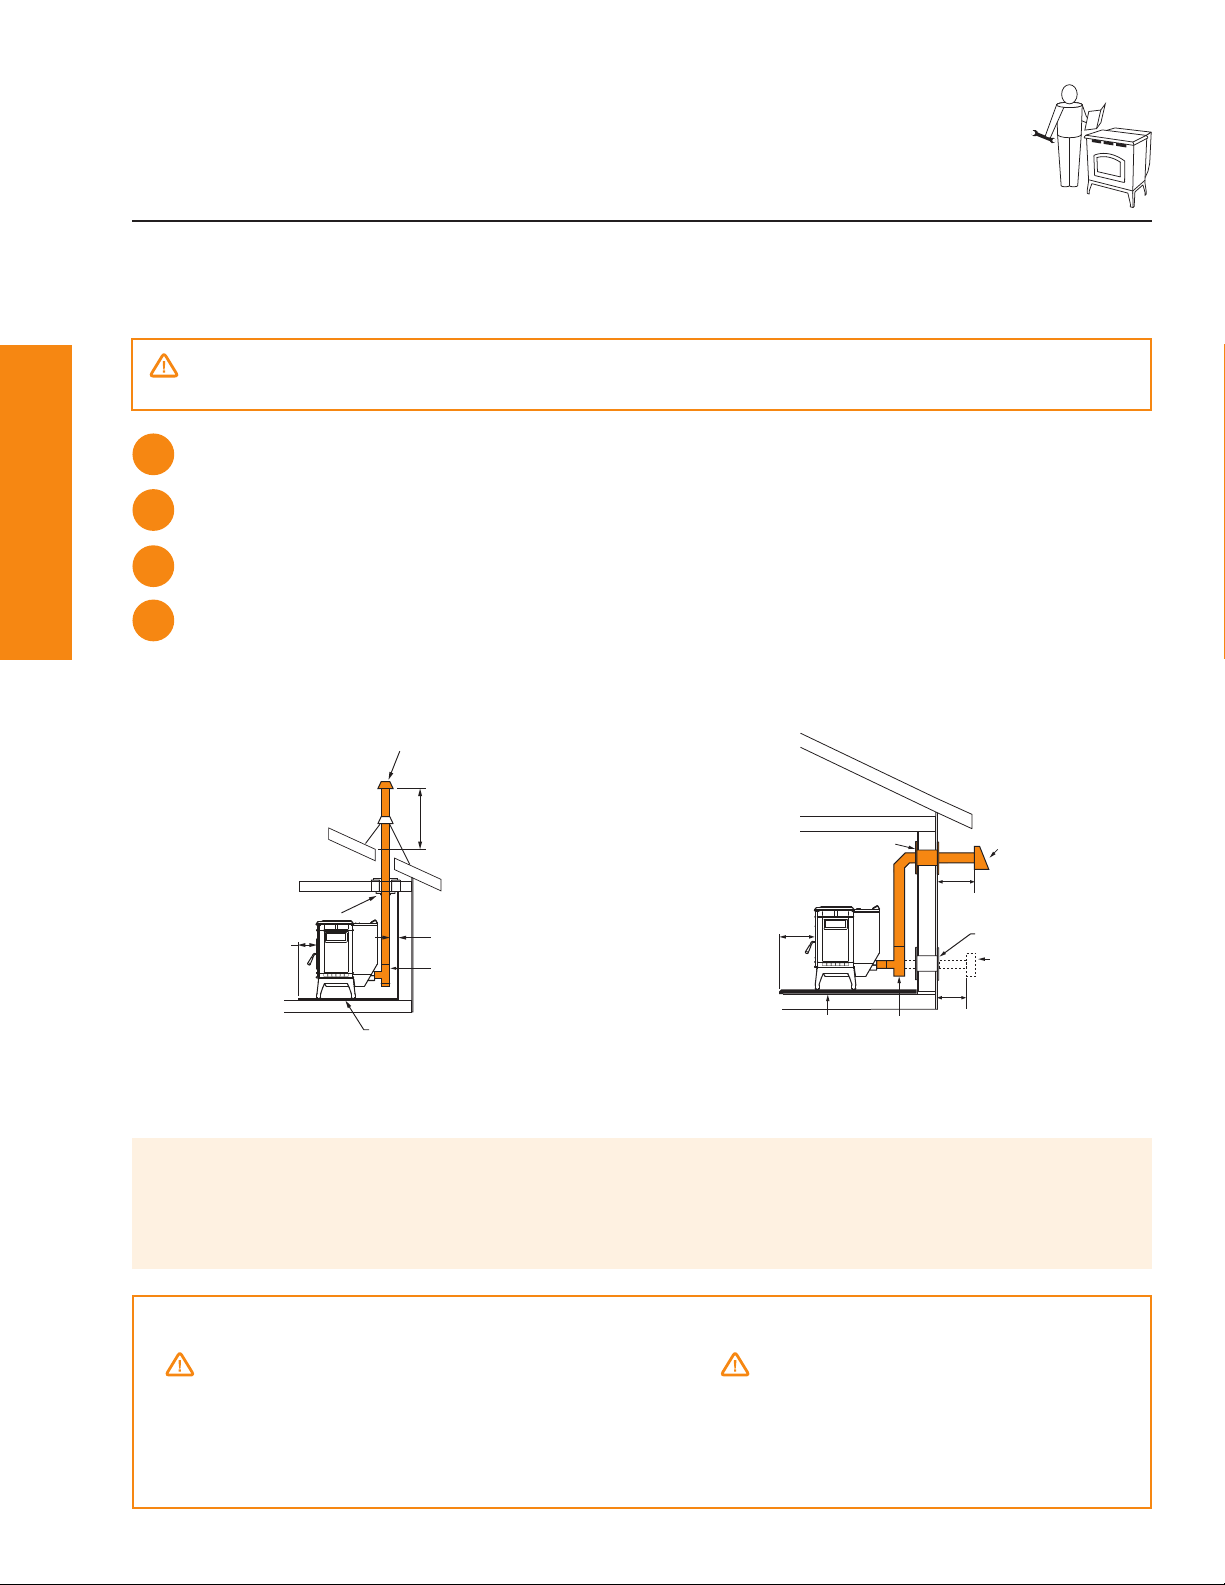
Pro Tips
• See venting manufacturer’s required clearances to combustibles
• For horizontal installations, the minimum clearance from exterior to termination cap is 6”—you
may want to increase to 18” clearance to minimize soot blow back on home exterior.
Install venting.
3
Install wall thimble (sold separately) per manufacturer requirements.
2
Vertical - Interior, Preferred Installation
6 in.
(152mm)
Min.
Clean-out T
Firestop
Flashing
Rain Cap
Non-combustible Hearth Pad
12 in. (305mm) Minimum
Ceiling Support
Follow pipe manufacturer
listed clearance
Exterior - Optional Installations
Non-combustible
Hearth Pad
Wall Thimble
Horizontal
Termination Cap
Termination
Cap
6 in. (152 mm)
Minimum
6 in.
(152 mm)
Minimum
Clean Out T
Wall Thimble
6 in.
(152 mm)
Minimum
Venting Your Stove
CAUTION!
Take appropriate precautions to locate utilities within the wall and avoid contact.
WARNING!
Do not terminate venting in any enclosed or semi-enclosed area
such as: a carport, garage, attic, crawl space, under a sun deck
or porch, narrow walkway or closely fenced area, or any location
that can build up a concentration of fumes such as a stairwell,
covered breezeway, etc.
CAUTION!
Ensure that your stove venting terminates above
your stove. The following may occur:
• Your stove Stove will not draft properly
• Smoke may seep in your house
• Excessive sooting
Install vent at clearances specied by the manufacturer
Use silicone to create an effective vapor barrier at the location where the chimney or
other component penetrates to the exterior of the structure.
4
NOTE: In Canada when using a factory-built chimney it must be safety listed, Type UL103 HT (2100
o
F) CLASS “A” or
conforming to CAN/ULC-S629M, STANDARD FOR 650oC FACTORY-BUILT CHIMNEYS.
Mark and cut wall for venting penetration on exterior wall (if needed).
1
Table des matières
Autres manuels pleasant hearth Poêle

pleasant hearth
pleasant hearth PH35PS Series Manuel utilisateur

pleasant hearth
pleasant hearth EST-330 Manuel utilisateur

pleasant hearth
pleasant hearth ES-321 Manuel utilisateur

pleasant hearth
pleasant hearth PH35PS Series Manuel utilisateur

pleasant hearth
pleasant hearth ES-322T Manuel d'instructions d'installation
Manuels Poêle populaires d'autres marques

Vermont Castings
Vermont Castings Intrepid 2 Manuel utilisateur

Italiana Camini
Italiana Camini CLASSICA Guide de démarrage rapide

Avalon
Avalon Vashon Avanti DVS FS Manuel utilisateur

Spartherm
Spartherm ambiente a1 Manuel utilisateur

Dimplex
Dimplex MCFSTV12AU Manuel utilisateur

Warmlite
Warmlite WL46040 Manuel utilisateur