Philips FC6126/03 Manuel utilisateur

FC6126

2
3
A
CD
F
G
H
I
J
K
V
W
U
X
L
T
S
R
MK N
P
Q
O
B
E
1

4

6
16
27
36
46
55
65
75
85
94
104
114
125
135
144
153
170
178

6
Congratulations on your purchase and welcome to Philips! To fully benet
from the support that Philips offers, register your product at www.philips.
com/welcome.
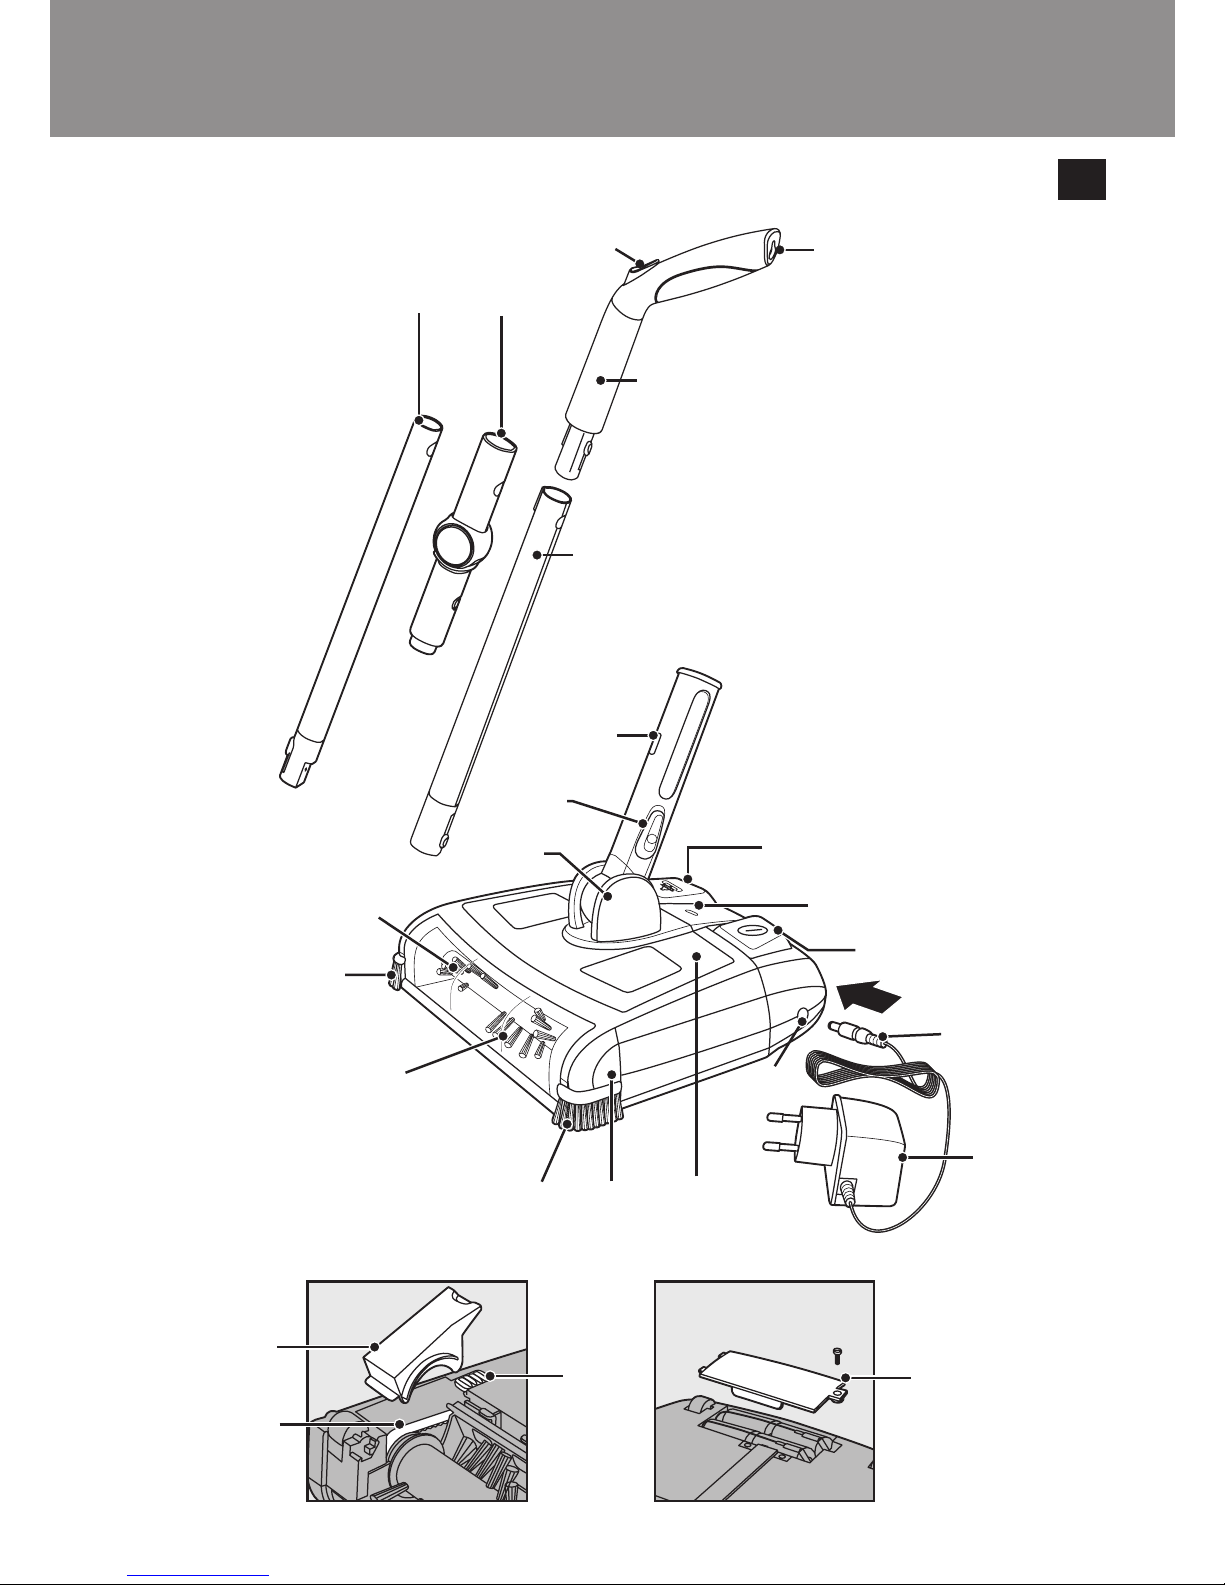
Lower stick part
Joint
Stick bending button
Hanging slot
Handgrip
Upper stick part
Stick release button on lower handle
Dirt tray door slide
Pivoting hinge
Roller brush
Side brush (2x)
Transparent front cover
Sweeper base
Dirt tray
Adapter
Small plug
Socket for small plug
On/off button
Charging light
Dirt tray release button
Retainer
Retainer release slide
Belt
Lid of battery pack compartment
Read this user manual carefully before you use the appliance and save it
for future reference.

- Never immerse the appliance in water or any other liquid, nor rinse it
under the tap.
- Check if the voltage indicated on the appliance corresponds to the
local mains voltage before you connect the appliance.
- Do not use the appliance if the adapter, the mains cord or the
appliance itself is damaged.
- If the adapter is damaged, always have it replaced with one of the
original type in order to avoid a hazard.
- The adapter contains a transformer. Do not cut off the adapter to
replace it with another plug, as this causes a hazardous situation.
- This appliance is not intended for use by persons (including children)
with reduced physical, sensory or mental capabilities, or lack of
experience and knowledge, unless they have been given supervision
or instruction concerning use of the appliance by a person
responsible for their safety.
- Children should be supervised to ensure that they do not play with
the appliance.
- Never pick up water, liquids or wet food substances. Never pick up
ammable substances and do not pick up ashes until they are cold.
- Do not stick your hands/ngers into the rotating roller brush to avoid
injuries.
- Do not move the appliance over a mains cord as this may cause a
hazard.
- Never use the appliance outdoors. Never use the appliance on wet
surfaces.
- Do not use the appliance without the dirt tray or roller brush.
- Always switch off the appliance after use, before you charge it and
before you connect or disconnect parts.
- Unplug the appliance before you clean or maintain it.
- Only charge the appliance with the adapter supplied.
- The adapter feels warm during charging. This is normal.
7

- Always return the appliance to a service centre authorised by Philips
for examination or repair.
- Noise level: Lc= 75 dB(A).
This Philips appliance complies with all standards regarding
electromagnetic elds (EMF). If handled properly and according to the
instructions in this user manual, the appliance is safe to use based on
scientic evidence available today.
1 Charge the appliance for at least 16-18 hours before you use it for
the rst time (see chapter ‘Charging’).
1 Connect the upper stick part to the handgrip (‘click’) (Fig. 2).
- Make sure the ridge on the handgrip aligns with the groove on the
upper stick part.
2 Connect both the upper and lower stick parts to the joint
(‘click’) (Fig. 3).
- If you do not want the stick to be bendable, you can use it without
the joint. Simply connect the upper stick part with handgrip to the
lower stick part directly (‘click’)
3 To bend the stick, press the stick bending button (Fig. 4).
- With a bent stick, you can clean areas under furniture without
bending your back (Fig. 5).
4 To remove the stick, press the stick release button on the lower
handle (1) and pull the stick upwards (2) (Fig. 6).
Charge the appliance when the roller brush does not turn as fast as usual.
Charge the appliance for 16-18 hours.
8

For optimal battery performance, do not charge the appliance after
every use. Only charge the appliance when the battery pack is low (i.e.
when the roller brush does not turn as fast as usual).
1 Switch off the appliance before you charge it.
2 Place the stick in upright position (Fig. 7).
3 Insert the small plug into the socket on the sweeper base (Fig. 8).
4 Insert the adapter into a wall socket.
- The charging light is on continuously during charging and after the
battery pack is fully charged. The charging light goes out when you
disconnect the appliance from the mains
Note: The charging light does not give any information about the charge level
of the battery pack.
1 To unlock the stick from its upright position, put your foot on top
of the sweeper base to prevent it from tilting. Then pull the handle
towards you. (Fig. 9)
Do not put your foot on the on/off button or the dirt tray release
button.
2 Press the on/off button to switch on the appliance (Fig. 10).
To switch off the appliance, press the on/off button again.
3 Use the side brushes to clean the oor along the walls (Fig. 11).
4 To bend the stick, press the stick bending button (Fig. 4).
- With a bent stick, you can clean areas under furniture without
bending your back (Fig. 5).
5 To use the sweeper as a handheld appliance, remove the stick and
hold the sweeper by the lower handle (Fig. 12).
For better grip, push the handle towards the front of the appliance until it
is at a 45-degree angle to the base.
9

Never clean the appliance or any of its parts in water or in the
dishwasher.
1 Disconnect the appliance from the mains before you clean it.
2 Clean the appliance and its parts with a damp cloth.
1 Always empty the dirt tray after use.
2 Place the stick in upright position (Fig. 7).
3 Press the dirt tray release button (1) and lift the dirt tray out of the
sweeper base (2) (Fig. 13).
4 Hold the dirt tray over a dustbin. Then press the slide on the lower
handle downwards to open the dirt tray door and empty the dirt
tray (Fig. 14).
5 Place the dirt tray back into the sweeper base and push it down
into position (Fig. 15).
The dirt tray door closes automatically when you put the dirt tray back
into the sweeper base (‘click’).
1 Switch off the appliance before you clean the roller brush.
2 Rotate the roller brush until the cutting groove faces you. Use a
pair of scissors to cut the hairs, threads etc. that have collected
around the roller brush (Fig. 16).
3 Remove uff, hairs and other dirt from the roller brush.
Note: If you are unable to clean the roller brush properly in this way, you can
remove it for more thorough cleaning. See sections ‘Removing the roller brush’
and ‘Reinserting the roller brush’ below.
10
Ce manuel convient aux modèles suivants
2
Table des matières
Autres manuels Philips Ventilateur


