Philips FC6125/01 Manuel utilisateur

Electric Sweeper
FC6125

2
3
ACD
E
F
G
H
U
T
S
V
I
R
Q
P
L
JKN
MO
B
1

4

ENGLISH 6
BAHASA MELAYU 13
BAHASA INDONESIA 20
TI”NG VI◊T 27
34
40
47
53
67
73
FC6125

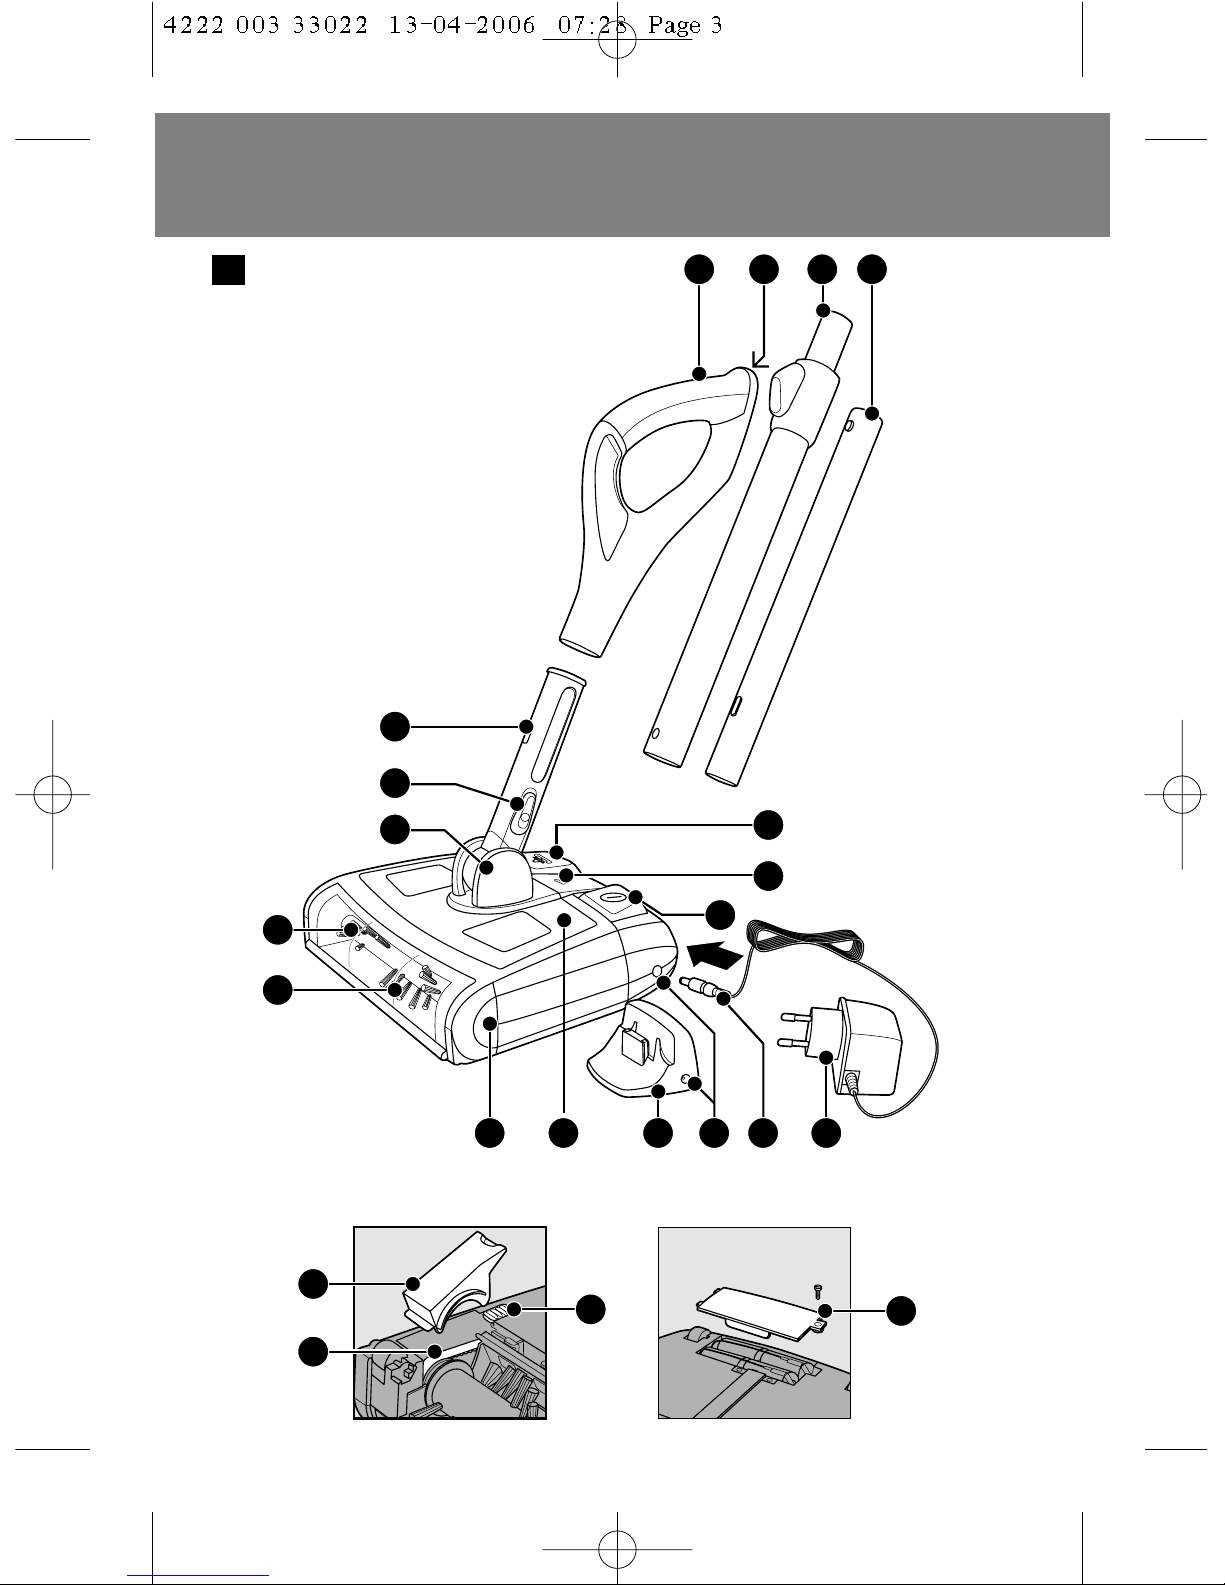
General description (fig.1)
AUpper handle
BHanging slot
CTelescopic part of stick with length adjustment slide
DBottom part of stick
ELower handle
FDirt tray door slide
GPivoting hinge
HRoller brush
ITransparent front cover
JSweeper base
KDirt tray
LCharging base
MSocket for small plug
NSmall plug
OAdapter
POn/off button
QCharging light
RDirt tray release button
SRetainer
TBelt
URetainer release slide
VLid of battery pack compartment
Important
Read these instructions for use carefully before using the appliance and
save them for future reference.
◗Check if the voltage indicated on the adapter corresponds to the
local mains voltage before you connect the appliance.
◗Do not use the appliance if the adapter, the cord or the appliance
itself is damaged. If the adapter or charging base is damaged,
always have it replaced by one of the original type in order to
avoid a hazard.
◗Keep the appliance out of the reach of children.
ENGLISH6

◗Never use the appliance and the charging base outdoors. Never
use the appliance on wet surfaces.
◗Never pick up water, liquids or wet food substances. Never pick
up flammable substances and do not pick up ashes until they are
cold.
◗Never immerse the appliance and the charging base in water or
any other liquid, nor rinse them under the tap.
◗Do not use the appliance without the dirt tray or roller brush.
◗Always switch the appliance off after use, before charging it and
before connecting or disconnecting parts.
◗Unplug the appliance before cleaning or maintaining it.
◗Only charge the appliance with the adapter and/or charging base
supplied.
◗The adapter contains a transformer. Do not cut off the adapter to
replace it with another plug, as this will cause a hazardous
situation.
◗The adapter feels warm during charging.This is normal.
◗Always return the appliance to a service centre authorised by
Philips for examination or repair.
◗Do not stick your hands/fingers into the rotating roller brush in
order to avoid injuries.
Charging
◗Charge the appliance when the charging light blinks rapidly.
Only charge the appliance when the battery pack is low to avoid
overcharging the batteries.
Charge the appliance for at least 16-18 hours before using it for the
first time.
To optimise the lifetime of the rechargeable battery pack, periodically
discharge it completely by letting the appliance run until it stops and
then recharge it fully again.
1Switch the appliance off before charging it.
2Place the stick in upright position ('click') (fig. 2).
ENGLISH 7

3Insert the small plug into the socket on the sweeper base (fig. 3).
◗You can also charge the appliance by inserting the small plug into
the charging base and putting the appliance on the charging base.
4Insert the adapter into a wall socket.
Preparing for use
1Connect the upper handle to the telescopic part of the stick.
2Connect the telescopic part of the stick to the bottom part of
the stick ('click') (fig. 4).
3Connect the stick to the lower handle of the sweeper base
('click') (fig. 5).
◗You can disconnect the stick by pressing the button on the lower
handle (fig. 6).
◗You can also use the sweeper as a handheld appliance by
removing the stick and holding the sweeper by the lower handle
(fig. 7).
For better gripping, push the handle towards the front of the appliance
until it is at a 45-degree angle to the base ('click').
Using the appliance
1To unlock the stick from its storage position, put your foot on
top of the sweeper base to prevent it from tilting and pull the
handle towards you ('click') (fig. 8).
Be careful not to put your foot on the on/off button or the dirt tray
release button.
2Press the on/off button to switch the appliance on (fig. 9).
To switch the appliance off, press the on/off button again.
3To adjust the length of the stick during use, press the slide on the
telescopic part while moving the top or bottom part of the stick
upwards or downwards (fig. 10).
ENGLISH8

Cleaning
Never clean the appliance or any of its parts in water on in the
dishwasher.
Clean the appliance and its parts with a damp cloth.
1Always pull the small plug out of the appliance or remove the
appliance from the charging base before cleaning it.
2Clean the appliance with a damp cloth.
Emptying the dirt tray
1Always empty the dirt tray after use.
2Place the stick in upright position ('click') (fig. 2).
3Slide the telescopic part of the stick to the lowest position
(fig. 11).
4Release the dirt tray from the appliance by pressing on the dirt
tray release button (fig. 12).
5Hold the dirt tray over a dustbin and open the dirt tray door by
pressing the slide on the lower handle downwards to empty the
tray (fig. 13).
6Place the dirt tray back into the sweeper base and push it down
into position.The dirt tray door will close automatically when
you put the dirt tray back into the sweeper base ('click') (fig. 14).
Cleaning the roller brush
1Always switch the appliance off before cleaning the brush.
2Remove the transparent front cover from the sweeper base.
Grab the bottom edge of the cover with both hands, pull it
outwards and upwards firmly until it is released from the slots
(fig. 15).
ENGLISH 9

3Remove fluff, hairs and other dirt from the roller brush.
Removing the roller brush
1Disconnect the stick by pressing the button on the lower handle
(fig. 6).
2Turn the sweeper base upside down, press the release slide and
remove the retainer (fig. 16).
3Slip the belt off the end of the roller brush (1) and lift the brush
out of the base (2) (fig. 17).
Reinserting the roller brush
1Insert the roller brush into the slot opposite the belt (fig. 18).
2Slip the belt over the other end of the roller brush and place the
brush back into the slot (fig. 19).
3Put the retainer back into the slots and press it firmly into
position ('click') (fig. 20).
Storage
The appliance can be stored in three ways:
1Store the appliance in horizontal position by placing it on the
charging base (fig. 21).
Do not connect the charging base to the mains if the battery of the
appliance does not need to be recharged.
2Store the appliance in vertical position by tilting the side of the
sweeper base with the roller brush towards the stick ('click') and
parking the appliance against a wall (fig. 22).
3Hang the appliance from the wall by tilting the side of the
sweeper base with the roller brush towards the stick ('click') and
hanging it on a nail by means of the hanging slot in the back of the
upper handle (fig. 23).
ENGLISH10
Ce manuel convient aux modèles suivants
2
Table des matières
Autres manuels Philips Ventilateur


