Ovlac REPTILL Mode d’emploi

REPTILL
INSTRUCTIONS MANUAL AND SPARE PARTS LIST
REV 2022

CONGRATULATIONS!
You have just acquired Ovlac machinery!
As the country’s largest producer of agricultural machinery for soil tillage, we are
honoured that you have chosen Ovlac as your trusted choice.
After many years of experience in the field, we make sure that you will be proud of your
purchase in the same way that we are proud of the product we have created under the
strictest quality standards.
For the correct use and enjoyment of this equipment, we strongly recommend that the
customer read the instructions contained in this manual and use it as a reference for
any questions that may arise regarding the operation of your Ovlac equipment.
Sincerely yours: Jorge Calvo
CEO of Ovlac
1

CONSIDERATIONS
This instruction manual describes the Operating and
Maintenance Instructions and Spare Parts for the indicated
equipment.
This agricultural equipment, called REPTILL, is designed for
tilling the soil, applied to a Tractor with lifting gear and universal
threepoint linkage.
The proper functioning of the machine depends on its correct
use. It is therefore advisable to read the instructions given in
this manual carefully in order to avoid any inconvenience that
could impair the proper functioning and durability of the
machine.
It is also important to follow the instructions in the manual, as
the Manufacturer declines all responsibility for negligence and
non-observance of these instructions.
The Manufacturer is at your disposal to guarantee immediate
and accurate technical assistance and to provide all that may
be necessary for a better functioning and performance of the
machine.
The Manufacturer reserves the right to modify the Machine
without the need to urgently update this publication.
INDEX
1.- Security Rules
2.- Description and technical data
3.- NON STOP Security System
4.- Turn Up
4.1.- Adaptation to the tractor
4.2.- Alignment
4.3.- Other adjustments
5.- Working Depth
6.- Transport
7.- Arms' working depth
8.- Maintenance
9.- Optional equipement
10.- Spare Parts
2

1.- Security Rules
Read carefully all the instructions for use of the cultivator.
The manufacturer declines all responsibility for any inconvenience caused by NOT observing
the Safety and Accident Prevention Regulations described below.
1.- Pay attention to the danger and warning symbols shown in this manual and indicated on the
equipment.
2.- Repairs and adjustments to the equipment must always be carried out with the engine
stopped and the tractor locked.
3.- It is strictly forbidden to transport people or animals on the equipment.
4.- It is strictly forbidden to entrust the driving of the tractor, with the equipment hooked up, to
people without a driving license, inexperienced, or who are not in good condition.
5.- Scrupulously observe all the accident prevention measures recommended and described in
this manual.
6.- The application of additional equipment to the tractor implies a different weight distribution
on the tractor axles.
7.- Before putting the tractor and the equipment into operation, check that all the safety
elements for transport and use are in perfect condition.
8.- The symbols with warnings displayed on the equipment give the appropriate suggestions for
the use of the same.
9.- To circulate on the road, it is necessary to observe the rules of circulation according to the
country where it’s operated.
10.- Respect the maximum weight foreseen on the tractor, the total mobile weight, the transport
regulations and the road code.
11.- Before starting to work, familiarise yourself with the control devices.
12.- Pay the utmost attention to hitching and unhitching the equipment.
13.- Never leave the driving position when the tractor is in motion.
14.- Remember that road adherence, steering and braking capacity may vary significantly due to
the presence of suspended equipment.
15.- It is strictly forbidden to remain in the area of action of the equipment.
16.- Before leaving the tractor, lower the suspended equipment, stop the engine, apply the
parking brake, and remove the ignition key from the dashboard.
17.- The category of the hitch pins of the equipment must correspond to that of the linkage of
the lift.
18.- Pay maximum attention when working in the area of the arms of the tractor, it is a very
dangerous area.
19.- It is strictly forbidden to stand between the tractor and the equipment to manoeuvre the
external lifting control.
20.- During road transport with the equipment suspended, put the control lever of the hydraulic
lift in the locking position.
21.- The spare parts must correspond to the requirements defined by the Manufacturer. Always
use original spare parts.
22.- The safety instruction decals must always be clearly visible. Clean and replace them if they
are not legible (You can ask your dealer for them).
23.- The instruction manual must be kept for the whole life of the equipment.
3
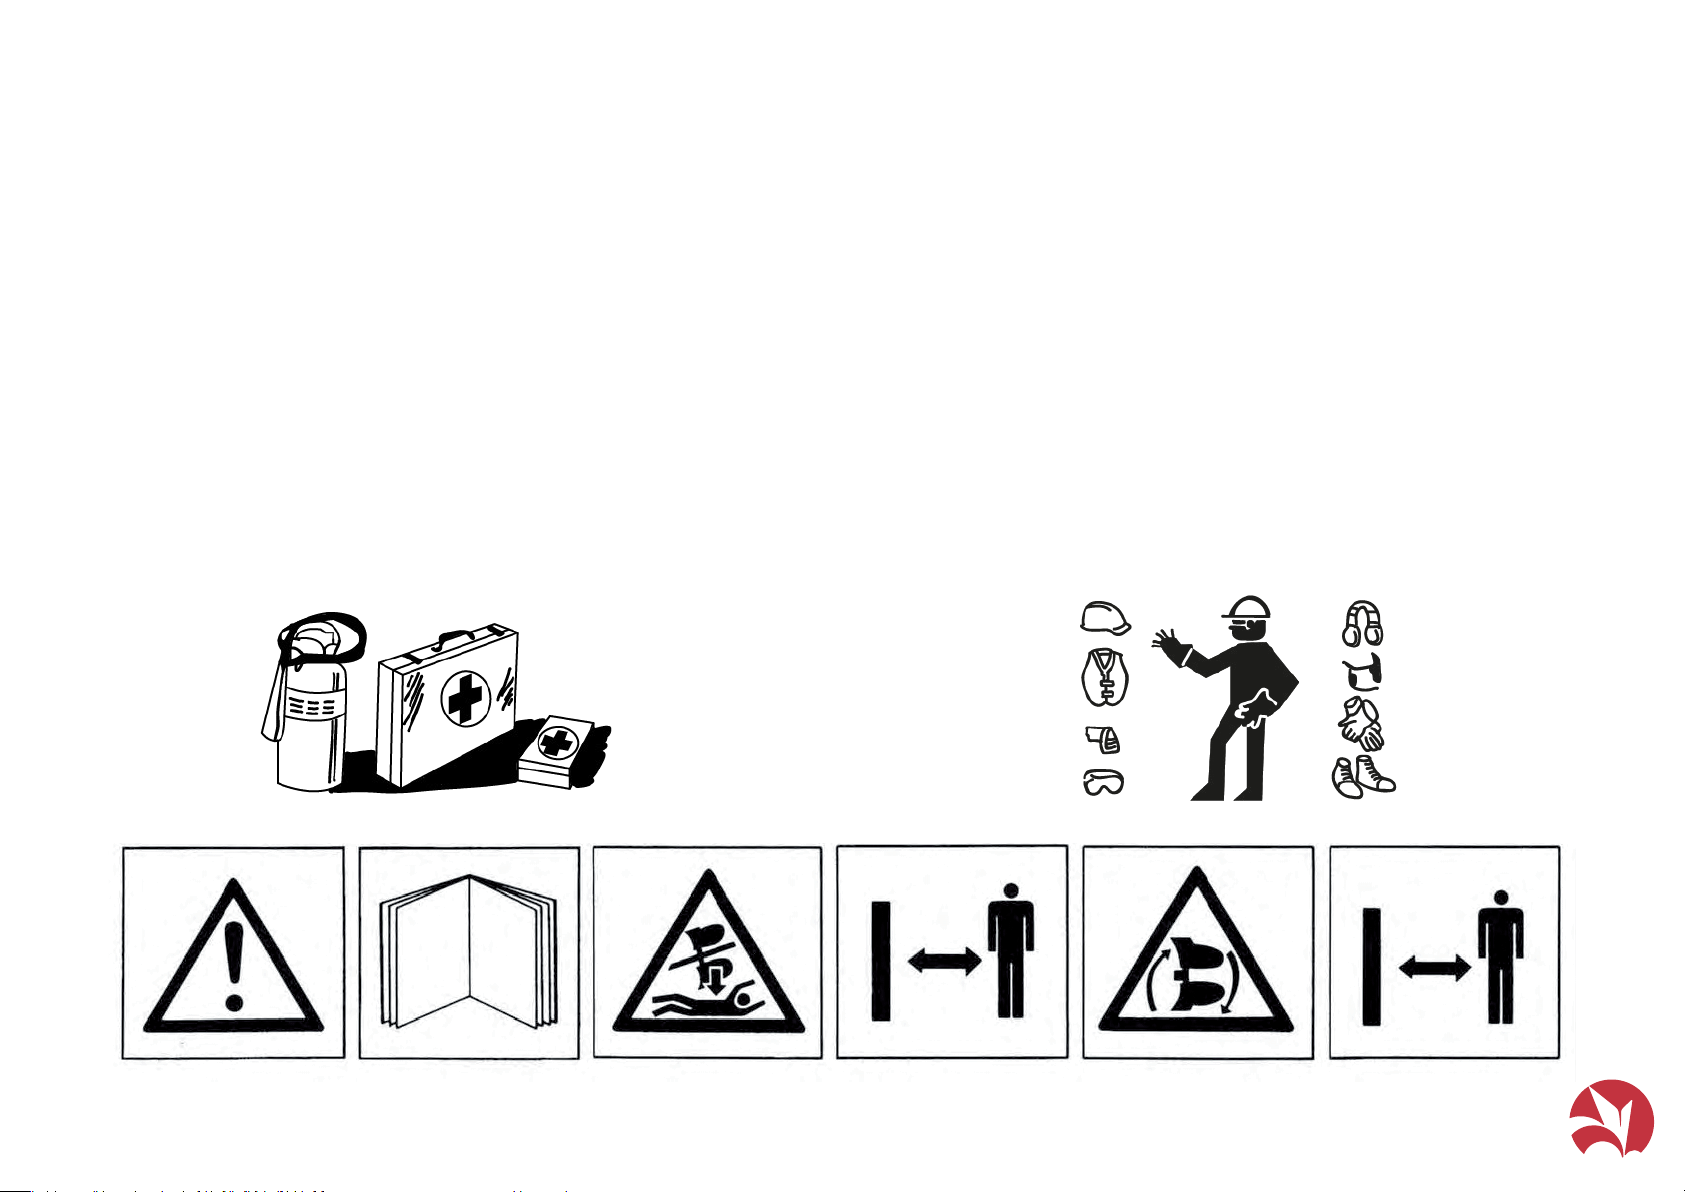
WARNING
Before starting to work, read the instructions in the manual.
DANGER
Do not handle the equipment when it is suspended, danger of
crushing. Maintain the safety distance.
DANGER
Lifting the equipment can cause injuries due to reaching.
Maintain the safety distance.
To be ready in case of an emergency
Keep a first aid kit and fire extinguisher on hand. Write
down the telephone numbers of doctors, ambulance and
fire brigade and keep them near the phone.
Use adequate clothes
Avoid loose clothing and use appropriate safety equipment
depending on the type of work. Safe operation of the
machine requires the full attention of the operator.
Don’t use headphones for listening to the radio while
working with the machine.
4

SPECIFIC INSTRUCTIONS FOR
WELDING REPAIRS
When repair by welding is authorised by the manufacturer, the
following points shall be taken into account generally.
In particular cases, appropriate welding instructions shall be
provided for each application.
1 Repair welding should be carried out by qualified welders and in
accordance with good technical and safety code practice.
2 Before welding repairs, remove paint, rust, dirt or any other
substances harmful to the weld.
3 To avoid damage to mechanical or hydraulic components such
as bearings, shafts, hydraulic actuators, hydraulic systems, etc.,
care should be taken to place the earth connection in an area of
good contact, free of paint and rust.
On machines with hydraulic cylinders, we must ensure that the
welding current does not flow through such elements. For this
purpose, the earth connection shall be placed on the same part
of the machine to be repaired.
4 Our machines are made of high elastic limit (HEL) steels,
which means that special attention must be paid to welding
processes and filler materials. In general, basic coated
electrodes E7016 or E7018 will be used. For the MAG (semi-
automatic) welding process, ER70S6 wire and Ar+20C02 will be
used as shielding gas. In both cases, follow the
recommendations for drying times and temperatures
recommended by the manufacturers of the filler material.
5 When the parts to be welded are thicker than 15 mm, or the
ambient temperature is lower than 15 C, preheating by flame
between 75-100 C is recommended.
6 It is strictly forbidden to cool welding seams with water, air or
any other substance.
In case of questions during repair, please contact the
manufacturer via the usual means of communication.
5
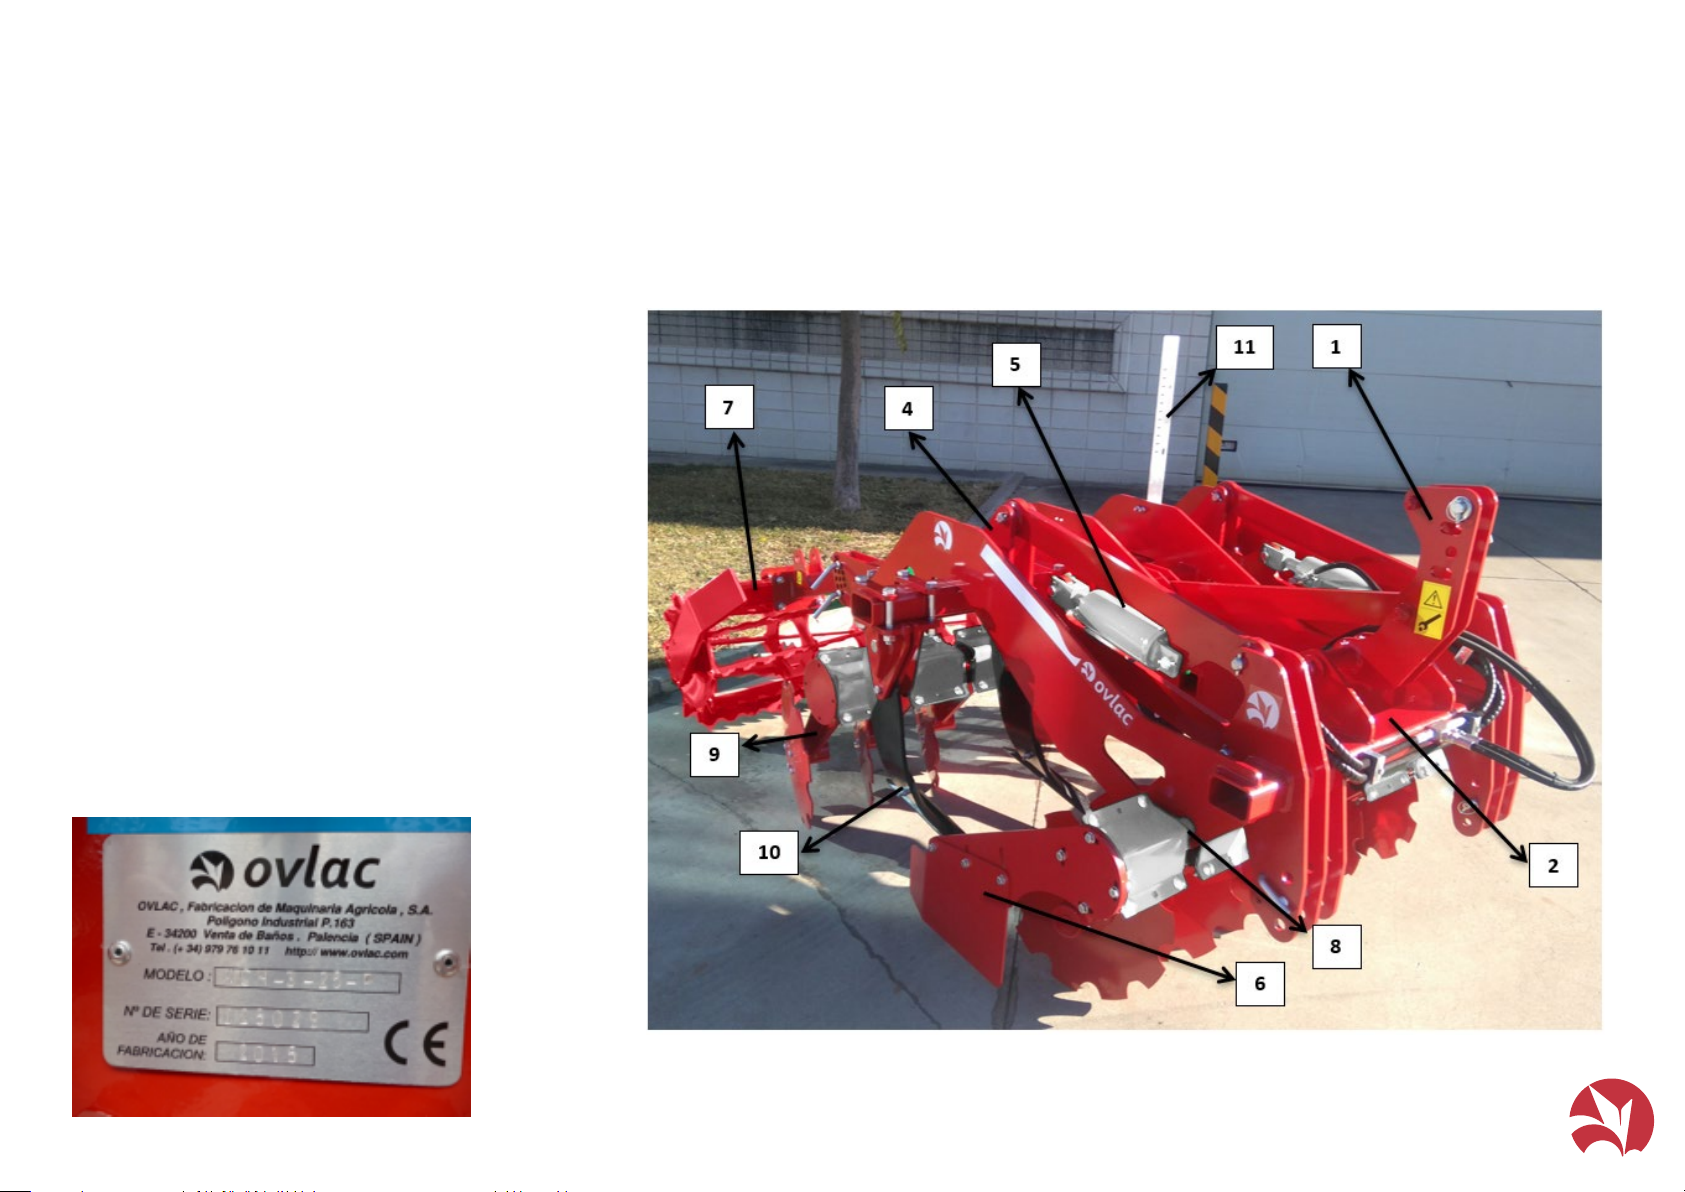
2.- Description and Technical Data
1. HEADSTOCK
2. FRAME
3. IDENTIFICATION PLATE*
4. SET OF CYLINDERS
5. HYDRAULIC SYSTEM CYLINDERS DISPLAY
6. SIDEPLATES
7. SET OF ROLLERS
8. SECURITY SYSTEM
9. MINIVID BODY SET
10. MICHEL BODY SET
11. DEPTH RULE
Note: the number of the plough’s manufacture,
engraved on the nameplate, must match the number
engraved on the headstock’s support.
*2. Identification plate
6

Technical Data
7
MODELS REPTILL-8/2 REPTILL-10/2 REPTILL-12/4 REPTILL-14/4 REPTILL-16/4
Working Width 1,05 1,40 1,65 1,90 2,15
Transport Width 1,11 1,46 1,71 1,96 2,21
Recommended Power (CV) 80/90 90/100 100/110 110/130 120/150
Distancebetween discs (cm) 13 cm
Distancebetween rows (cm) 122 cm
Discs 'Angle 23Oin advance / 5,6Oof inclination
Security 40 mm rubber
Discs 8 10 12 14 16
Weight (with cage roller)980 1.100 1.220 1.280 1.345

3.- Non-Stop Security
Systems
“Non-Stop” rubber security systems act automatically (leafspring/ rubber). When
the share it's facing an obstacle, the systems gives up, allowing the arm to elevate
and dodge, getting back to its original position without stopping the tractor.
This way, every impact caued by uneven terrain will be absorbed by the security
system, which protects the elements of the machine, and therefore, also the
tractor.
For the same reason, "Non-Stop" security systems decrease the traction effort by
avoiding the tractor to face all the obstacles by itself.
Note: OVLAC Non-Stop Security Systems are factory-regulated witn an optimum
pressure for mid-hardness terrains.
8
Rubber-shock absorbers
4.- Turn Up
4.1 - Adaptation to the tractor
OVLAC's Reptill is designed to adapt to the 3universal linking
points of any tractor.
Before linking the Reptill check that:
-The tractor arms are regulated at the same length and height.
-Tractor wheels must have the same pressure and according to
the rules of the manufacturer.
-The tractor arms must be centered with a slight margin for
oscillating.
Fig. 1
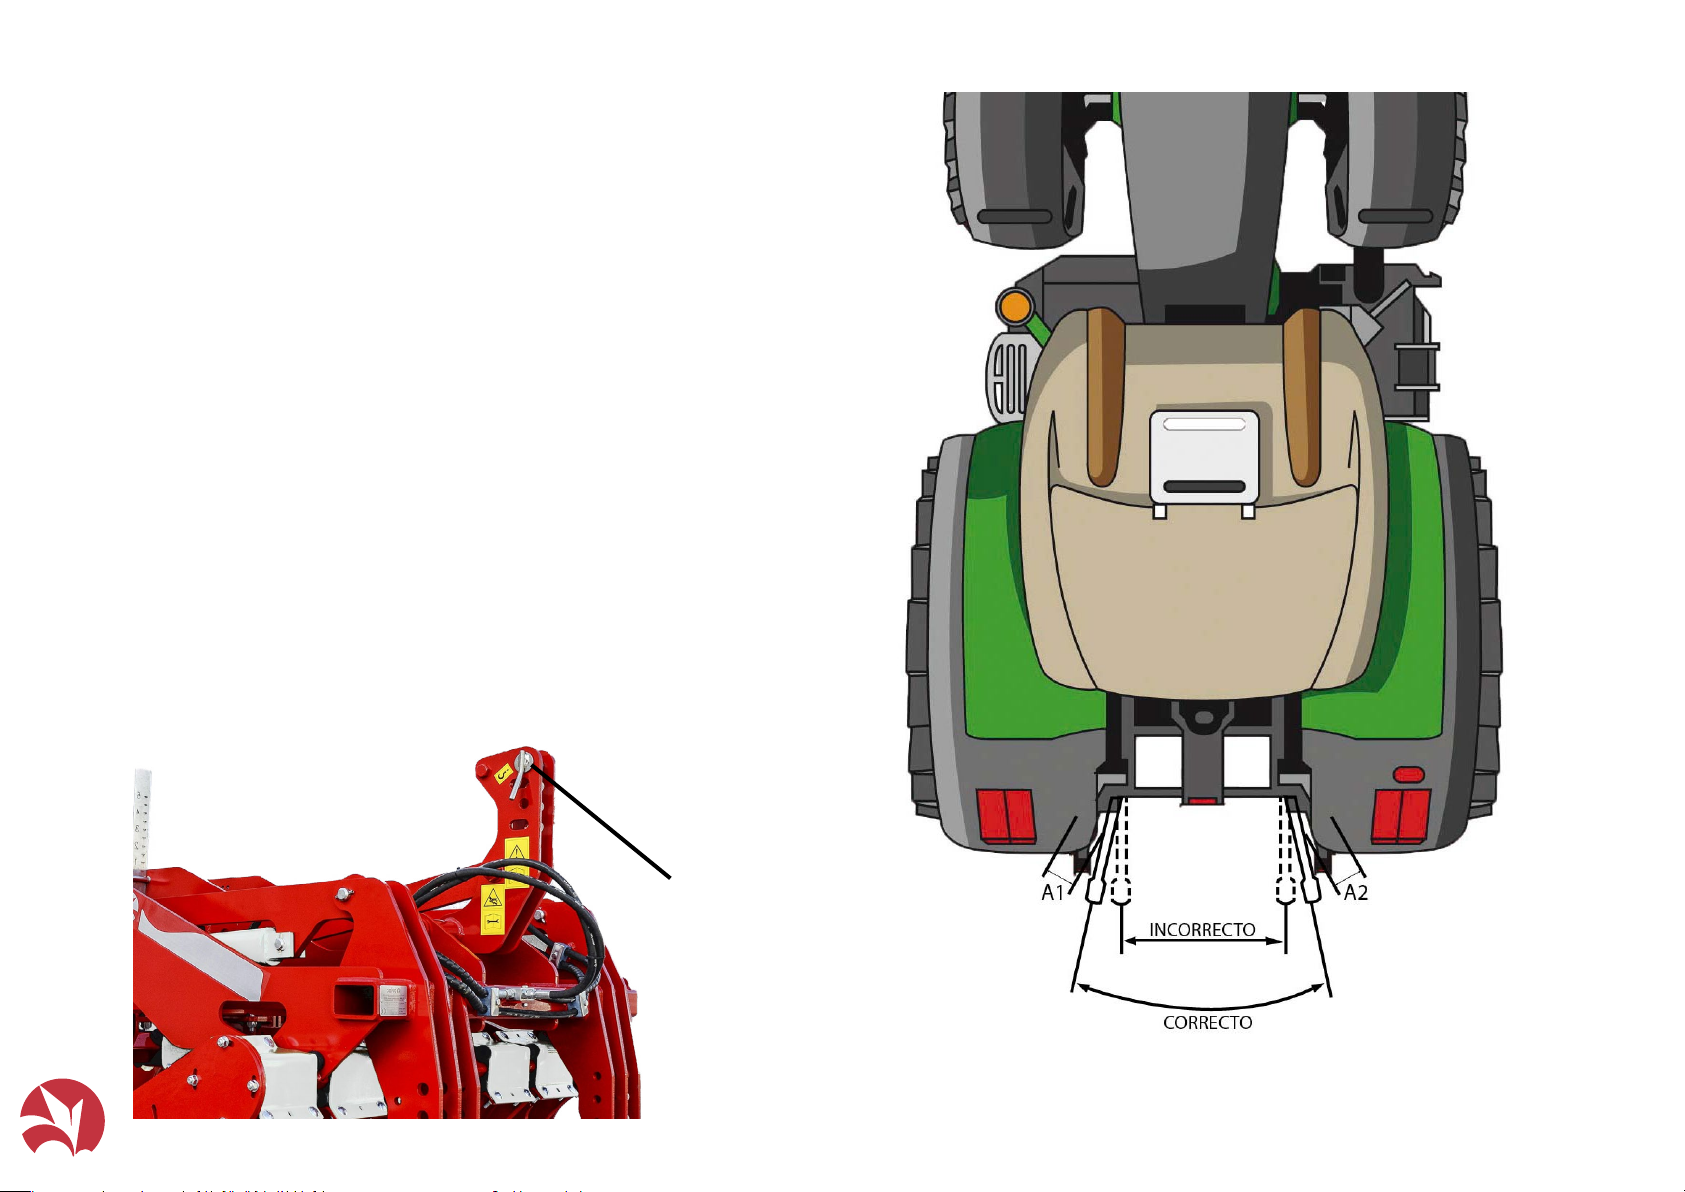
4.2 - Alignment
The cultivator must work aligned with the tractor, if not, the plough will
tend to abandone the working direction. Must check that the distance
A1=A2 (Fig. 2).
The arm of the 3rd point must be coupled in a way that the end that links
over the plough remains slightly higher than the end that links into the
tractor (Fig. 3).
The 3rd point must couple over the torn drill E (Fig.3) when the terrain is
not uniform oruneven, makeing sure its length allow free moves while
working (except in tractors with control on the 3rd point).
E
Fig. 2
Fig. 3
9
Table des matières
Autres manuels Ovlac Matériel agricole

Ovlac
Ovlac MINI MEDIUM H/F Mode d’emploi

Ovlac
Ovlac MINIVID Mode d’emploi

Ovlac
Ovlac Eurodisc Manuel de référence technique

Ovlac
Ovlac MINIDISC Manuel utilisateur

Ovlac
Ovlac XPERIENCE Manuel utilisateur

Ovlac
Ovlac MINI-BF Mode d’emploi

Ovlac
Ovlac CH-7 Manuel utilisateur

Ovlac
Ovlac Mini Mode d’emploi

Ovlac
Ovlac Mini Mode d’emploi

Ovlac
Ovlac MAXIDISC Mode d’emploi


Manuels Matériel agricole populaires d'autres marques

GSi
GSi PNEG-2314 Manuel utilisateur

Checchi & Magli
Checchi & Magli TEXDRIVE Manuel utilisateur

Amazone
Amazone Cenius 4003-2TX Manuel utilisateur

MASSEY FERGUSON
MASSEY FERGUSON MF 9313S Manuel utilisateur

Cima
Cima BLITZ Instructions d'utilisation et d'entretien

Amazone
Amazone CombiDisc 3000 Instructions d'installation


