Overmax Touch go 3.0 Manuel utilisateur

EN
RO
CR
LT

EN Introduction
Dear customer!
Thank you for placing trust in us and choosing Overmax.
We provide you with a product perfect for everyday use thanks to the use
of high-quality materials and modern solutions. We are convinced that
the product will satisfy your requirements as it has been designed with
utmost care. Before you start using the product, please read this manual
carefully.
Should you have any remarks or questions concerning the product, please
do not hesitate to contact us:
Important:
Please read this manual before you start using the device to see all
its functions and use them in accordance with intended use.
A failure to follow the safety instructions and use at variance with
the manual may lead to damage to the device.
Keep this manual for further reference.
1. Do not repair or modify the device. Only an authorized service
technician is allowed to perform these operations.
2. Do not switch the device on if you have noticed any damage.
3. Do not use the device when it starts acting up, overheats
extensively, is discolored, deformed, emits abnormal sounds,

EN
odors or when other atypical circumstances occur. This being
the case, please contact the manufacturer’s authorized service
center immediately.
4. Use the device away from sources of heat, high temperatures,
hot surfaces, direct sunlight, sources of ignition, naked flame, oils
and sharp edges.
5. Do not use the device in the inflammable, explosive or toxic
atmosphere.
6. Do not use chemicals to clean the device.
7. Do not use the device for other purposes than designed.
8. Do not leave the charging device unattended.
9. When the battery is full, unplug the device from the charger.
EN
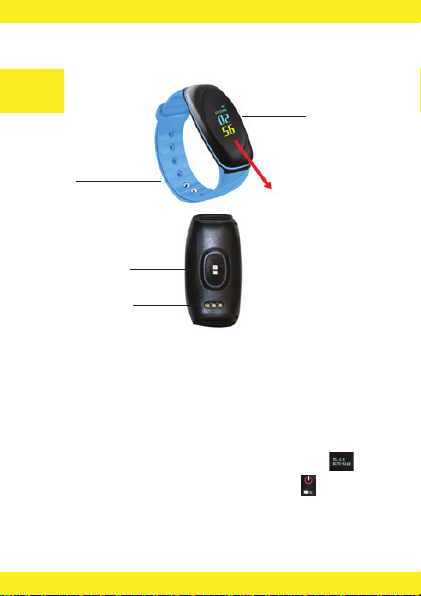
Device outline
How to switch on and off, navigate
To navigate, touch the touch point with your finger.
Press once to switch between interface elements.
To switch the device on, press and hold the touch point for 5 seconds.
To switch the device o, go to the software version screen and hold
the key for 5 seconds. You will see switch-o option .
Confirm to turn o.
NOTE: When you switch the device on for the first time, the battery may
be flat. This is why you should start with fully charging the battery
(see: How to charge the watch).
display
strap
touch point
sensor
charging contact
points
How to use

EN
Interface description
Time and date. In the upper bar you can see a notification bar
and battery status icon.
Pedometer – shows the number of steps.
Distance covered.
Number of calories burnt.
Pulse.
Blood pressure.
Blood oxygen saturation.
EN
1. Install „JYou” application, you can find it in Google Play store (Android)
or App Store (iOS).
2. Registering and pairing the device:
Once you have installed and run for the first time, open the application and
press icon. Enter user name, e-mail address and password to register.
To make sure the watch values are precise, enter the settings „User
information” and enter your current data: sex, age, height and weight.
3. Pairing the device:
Enable Bluetooth in your phone. In the application enter the settings
, „Assigning device” and press device searching icon. To connect with
the watch, select it from the list.
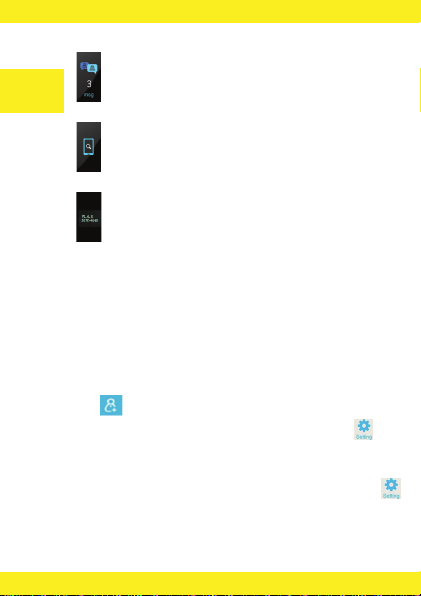
Application
Messages.
Smartphone detector. In this interface, when the watch is paired
with the phone, shake the watch to make the phone ring.
Software version. Hold the touch point to switch the watch o.
NOTE: The blood pressure and blood oxygen saturation is just a rough
measurement. Do not use these values for medical purposes.

EN
4. Interface
My status: displays all values from the watch (steps, distance, pulse,
etc.) from the specific day.
Sleep: interface displays detailed values and diagrams concerning
your sleep. Sleep monitor is active when the watch does not move
(based on the accelerometer). The default sleep time ranges from
9pm to 8am, while naps from 12pm to 2pm. You can also view values
from previous days.
Sport: interface displays detailed information: total number of steps,
distance and number of calories burnt as well as pulse diagram.
You can also display values from previous days.
Data: interface displays weekly and monthly statistics related
to the number of steps and sleep.
Settings:
• Assigning the device: shows a list of connected phones and lets you
search the phone in order to pair it.
• Downloading data: lets you synchronize data with the watch manually.
• Target number of steps: setting the target number of steps.
• Workout reminders: sets the time in minutes after which the watch
must remind you about your workout.
• Alarm: after you have configured the alarm, the relevant reminder
will be sent to the paired device at a specific time.
• Weather forecast: After the device connected with the device, select
the city where you want to know the weather, weather information
will be displayed on the time interface of the device (Please note that
your phone must have a weather application)
• Take a photo: after selecting this option, the watch will display
a camera icon. Shake the watch to take a photo. You can also take
a photo with your phone.

EN
• Automatic pulse detection: after choosing this option, the watch
will take your pulse on an hourly basis.
• Message settings: select notifications which are to be sent to the watch.
• Unit settings: if you activate this feature, the distance value will
be expressed in miles. Kilometers by default.
• Equipment time: lets you synchronize phone time with watch and
enter the 12-hour watch mode.
• Power supply options: setting power and switching notifications
o in the specific time range.
• Software version: shows current software version of the application
and watch.
• Software update: lets you update the watch software.
• Restoring device: restores factory settings and deletes all values
saved in the watch.
• User information: displays and lets you edit data on the currently
logged user.
• Exit: closes the application and logs the user out.
NOTE: Menu option translation may dier inconsiderably, depending
on your application (Android or iOS).

EN
How to charge the watch
To charge the watch, take the USB cable with a charging clip out. Connect
the clip to the watch. Make sure the charging bolts fit the watch contacts.
Connect the USB cable to PC or USB feeder.
If the connection is successful, the watch will vibrate and the display will
show the charging icon. Full charging lasts about 2 hours.
Strap replacement
1. Pull the strap from the guide to the side, as presented in the photo
below.
2. Insert another-color strap in the watch guide.
The pictures are for reference only. The real design of the products may
dier from the pictures presented.

PL
Wprowadzenie
Drogi Kliencie!
Dziękujemy za obdarzenie nas zaufaniem i wybranie marki Overmax.
Oddajemy w Twoje ręce produkt idealny do codziennego użytkowania
dzięki wykorzystaniu wysokiej jakości materiałów i nowoczesnych
rozwiązań technologicznych. Jesteśmy pewni, że dzięki ogromnej
staranności wykonania spełni on Twoje wymagania. Przed użyciem
produktu zapoznaj się dokładnie z poniższą instrukcją obsługi.
Jeśli masz jakiekolwiek uwagi lub pytania do zakupionego produktu,
skontaktuj się z nami:
Ważne informacje:
Prosimy o przeczytanie tej instrukcji przed przystąpieniem do obsługi
urządzenia, aby zapoznać się z jego funkcjami i wykorzystać je zgodnie
z przeznaczeniem.
Niestosowanie się do instrukcji bezpieczeństwa oraz użycie niezgodne
z instrukcją może spowodować uszkodzenie urządzenia.
Zatrzymaj tę instrukcję do przyszłego zastosowania.
1. Nie należy naprawiać oraz dokonywać modyfikacji urządzenia.
Czynności te może dokonać tylko autoryzowany serwis.
2. Nie uruchamiaj urządzenia, jeżeli zauważyłeś jakiekolwiek uszkodzenia.
Table des matières
Langues :
Autres manuels Overmax Montre


