Olimpia GEPIDA Manuel utilisateur

The road is just an option...OWNERS MANUAL BEDIENUNGSANLEITUNG HASZNÁLATI ÚTMUTATÓ

492345671General advice regarding the user guide and warranty booklet051Legislative provisions and information052Personalised bicycle settings General safety advice053Technical inspection procedure 0540530General guidance on assembly and safety56Steering56Adjusting the height of a quill stem56Adjusting the height of an “A-Head” stem57Stems with adjustable angle58Saddle and seatpost58Saddle58Adjusting the height of the saddle59Spring seatpost59Pedals60Drivetrain system60Derailleurs61External derailleur gear systems61Derailleur gear systems: control and readjustment62Checking and adjusting the stopping points on shifters63Front derailleur63Fine-tuning63Hub gear64Chain65Brakes66Cantilevered brake, V-brake66Hydraulic brakes66Disc brakes67Rim brakes67Maintenance and replacement of brake pads68Headset 68Traditional headset68Checking the play and free rotation of the headset 69Adjusting a traditional headset69“A-head” headset69Wheels70Spokes70Rims71Hubs71Rubber tire, inner tube, air pressure72Valve types72Frame and fork73Frame73Fork73Telescopic forks73Setting the telescopic forks74Rear shock7412348ENGLISH52Maintenance overview55

5012345678Technical data83Correct tire pressures by bicycle type83Correct tire pressure: conversion from PSI to bar83Tightening torques for screw bindings84Bolt assemblies important for safety85Tightening torques for Shimano parts86List of wearing parts88Proper use and description of bicycle types89What to do in case of a puncture?75Patching75Quick-release skewers (or clamps) and their use76Quick-release skewer76Lighting77Locating malfunctions of the lighting system78Luggage rack and carrying luggage78Carrying luggage on a full-suspension bicycle78Transporting children on a bicycle78Child trailers for bicycles79Laws relating to child trailers79FenderAccessories and other equipment80The proper cycling helmet 80Cycling gloves and clipless pedals80Proper clothing80Cycling in bad weather81Accessories81The proper bicycle lock81Riding safely on the road81Bicycle care82Cleaning and caring for your bicycle82Storing your bicycle82657Pedelec,What else needs to be considered in connection with a pedelec?90Notes regarding the electrical system91Charging device91Maintenance and care 91Wear and liability 918ENGLISH80Lighting equipment87Special regulations for S-pedelecs92Riding an S-pedelec on cycle paths92Replacing parts of an S-pedelec93Environmental protection tips93
If you see the above symbol in the user guide, please pay particular attention to that section as it contains important information.If you see the above symbol in the user guide, the given section concerns a subject related to your personal safety. If you do not follow the instructions found there, you could be risking your safety, or even your life.Dear Buyer,Congratulations on your purchase of a new bicycle! Thank you for choosing a high-quality product of Olimpia Bicycle Manufacturing Ltd. This user guide and warranty booklet will help you to learn about the technical aspects of today's bicycles and will ease the use and handling of your bicycle. In addition, you will find key information here about the care, maintenance, and safe use of your bicycle.Given the large number of parts used in bicycle manufacturing, the present user guide covers only the most important subassemblies.You will find more detailed information about individual parts in the attached presentations prepared by their manufacturers.Before setting out on your first trip, we recommend that you take time to read the user guide and presentation prepared by the parts' manufacturers carefully.5112345678ENGLISH

Legislative provisions and informationProvisions relating to bicycle lightingAccording to the rules of the international highway code:bicycles must be equipped with a dynamo, and one front and one rear light providing active lighting. Obligatory bicycle accessories prescribed by the relevant decree of the Ministry of Transport, Communications, and Energy of Hungary:1. White or amber front light.2. Red rear light.3. Red rear prism reflector4. Two independent brakes.5. Bell6. Amber prism reflector across the spokes of at least the front wheel.If any of these accessories are missing, the authorities may impose a fine!Recommended bicycle accessories according to the decree of the Ministry of Transport, Communications, and Energy of Hungary:a. Amber prism reflectors on the pedal and between the spokesb. Width indicating prism reflector mounted on an armc. Rear-view mirrord. FenderYou can find the exact text of the regulation below:Technical criteria for operating a bicycleDecree no. 6/1990 (IV. 12.) of the Ministry of Transport, Communications, and EnergyOn the technical criteria of bringing into and maintaining in circulation road transport vehiclesSection 116 (1) The bicycle must be equipped with:a) an easy-to-handle and reliable steering system (handlebar),b) two brake systems that can be operated independently of each other, and one of which acts on the front, the other on the rear wheel,c) an audible warning device, which may only be a bell, d) a front lamp emitting white or cadmium yellow light,e) a rear position lamp emitting red light visible from at least 150 meters in the dark in clear weather,f) one or two red, symmetrically positioned light reflectors that are not triangular in shape,g) one amber lateral reflector prism, reflective on both sides, placed on at least the front wheel (spoke reflector).The light reflector prescribed in item g) must be fitted onto bicycles by December 31, 1991.(2) The bicycle may be equipped with- on its front a white light reflector,- on its sides and on the front and rear of both pedals amber light reflectors, as well as a width indicator positioned on the left side of the bicycle, containing a white light reflector towards the front and a red one towards the rear.(3) The light reflectors mounted on the bicycle must be visible in clear weather in the dark from 150 meters from a vehicle whose main beam is illuminating them.(4) Bicycles with more than two wheels and wider than 0.80 m must be equipped on both sides with the lighting and light reflecting devices listed in items d)-f) of Article 1. These devices may not be more than 0.15 m from the widest point of the vehicle or closer than 0.60 m to each other.(5) A child seat may only be mounted on a bicycle in such as a way that the seat and the child sitting on it do not obstruct the visibility and control of the rider, and do not cover the lighting and light reflecting devices of the bicycle. The seat must also be fitted with hand- and footrests. The seat and its hand- and footrests may not be connected with the steered wheel or the structure that turns with it.(6) A two-track single-axle trailer max. 0.70 m wide and of max. 70 kg total weight may be attached to the bicycle (bicycle trailer).(7) The bicycle trailer must be equipped witha) on its rear a red, triangular light reflector (light reflector prescribed for trailers) positioned on or to the left of the median plane of the trailer, at a height of min. 0.35 m and max. 0.60 m from the road surface,b) a rear position lamp identical to that prescribed for the bicycle. The electric switching of the rear position lamp of the bicycle trailer must ensure that switching it on causes the position lamp of the bicycle to switch off.(8) The electric switching of the bicycle's lighting must ensure that all lights are switched on/off together.(9) The lighting and light reflecting devices of the bicycle must be positioned as follows:a) With regard to Article 1,- the light mentioned in item d),- the rear (red) position light mentioned in item e), and- the rear (red) light reflector(s) mentioned in item f) and the front (white) light reflector mentioned in Article (2) must be positioned on the longitudinal vertical median plane of the bicycle in such a way that: - none of them is closer than 0.35 m to the road surface,- the lights are not farther than 0.90 m from the road surface,- the light reflectors are not farther than 0.60 m from the road surface.b) The (amber) lateral reflector prism (spoke reflector) mentioned in item g) of Article (1) mounted on the wheel must be positioned at a distance of 0.10-0.15 m from the tire.c) The width indicator mentioned in Article (2) must be positioned 0.30-0.40 meters to the left of the longitudinal vertical median plane of the bicycle, at a height of 0.35-0.60 m from the road surface.5212345678ENGLISH
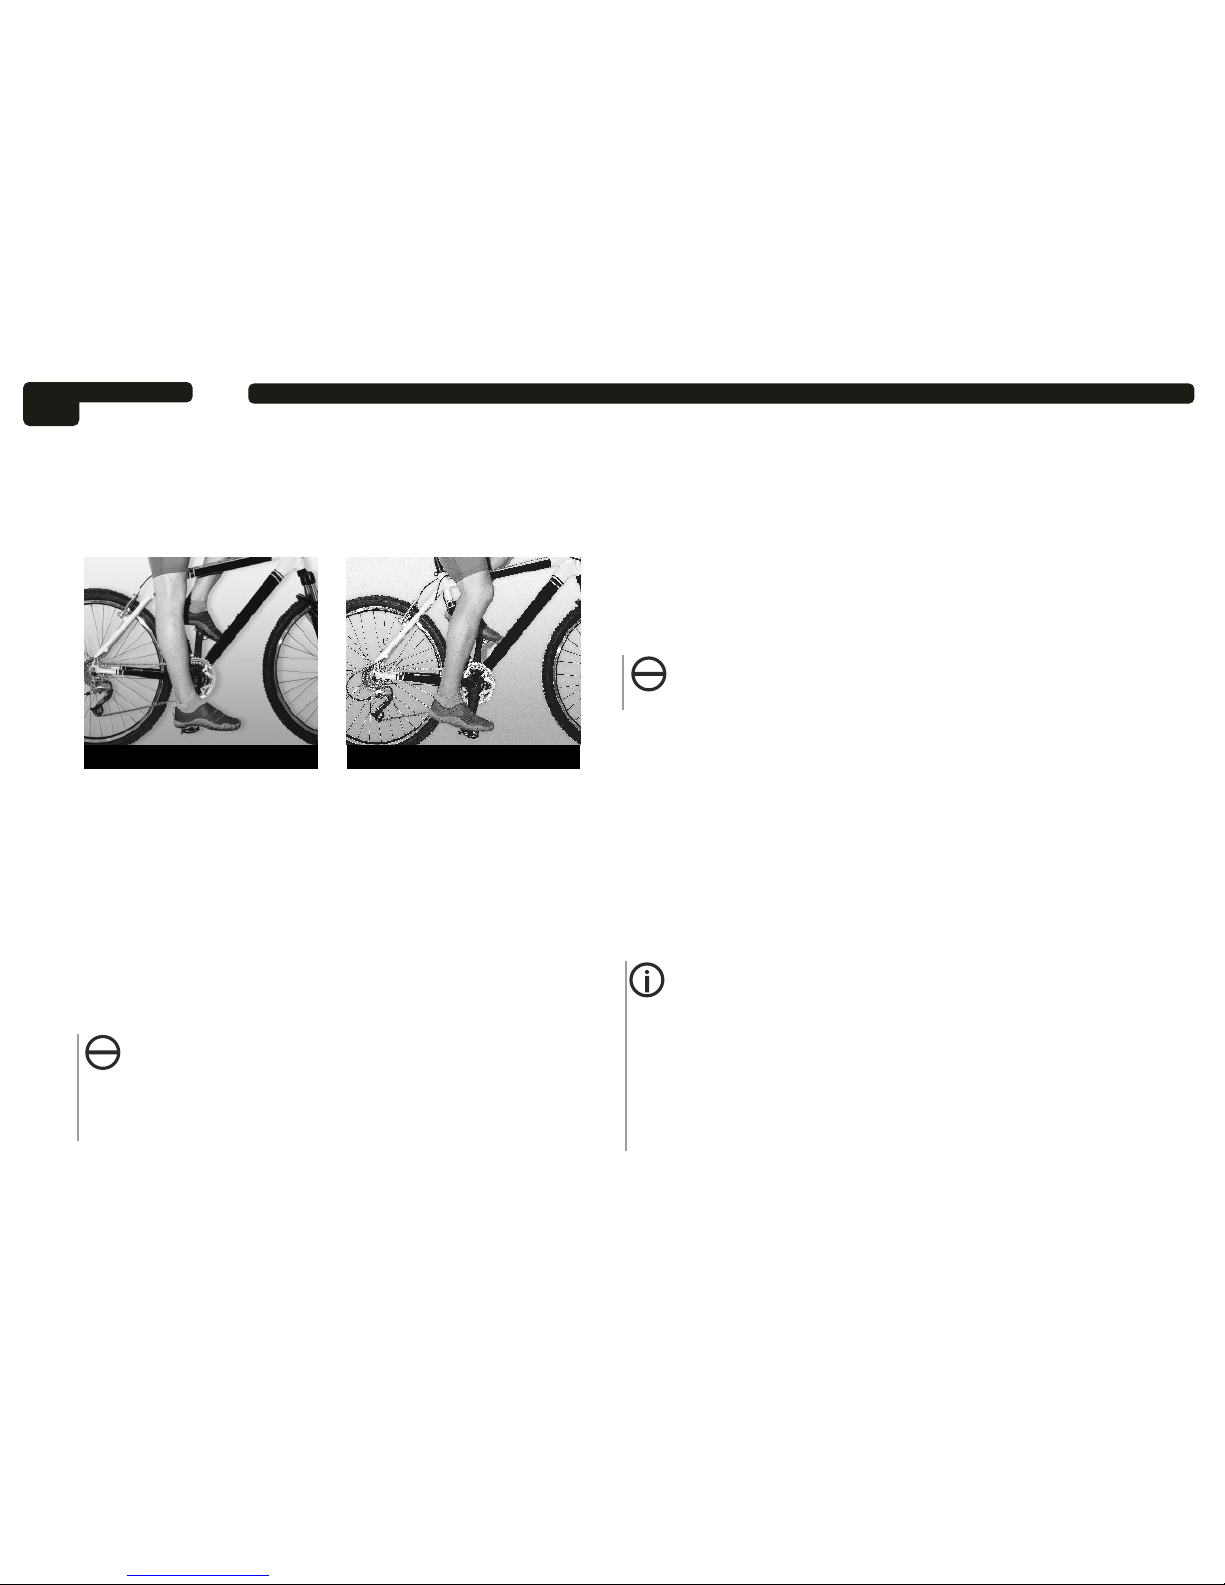
Figure 2Figure 3Personalised bicycle settings In the following we will present the fine-tuning of the saddle and handlebar.Figure 2:The height of the saddle is set correctly if sitting on it with your leg extended you can touch the pedal in its lowest position with your heel. This must be set before adjusting the angle and horizontal position of the saddle.Figure 3:After you have completed all settings and tightened the necessary screws/bolts with the prescribed torque (see: Technical data), check once more that all settings are correct by sitting on the saddle and placing your heel onto the pedal in its lowest position: if your knee is slightly bent, the setting is correct. For any adjustment you perform on your bicycle you will need experience, dexterity, and the correct tools. You will find the tightening torques to be used on bolt assemblies in the “Technical data” section of the user guide or in the descriptions provided by the manufacturers of parts. If you have any doubts, or wish to perform settings on the bicycle that affect safety, turn to your specialist dealer.General safety adviceYour new bicycle is a technical instrument that requires regular maintenance to retain its proper condition and for you to enjoy it. You will find detailed information on the correct maintenance of your bicycle in the “Technical inspection procedure” section, directly after this chapter.You will find the technical specifications of your bicycle, such as its maximum permitted load and/or loadability (the latter is indicated on the luggage rack) in the “Technical details” section. Overloading the bicycle may lead to the breakage of its main parts or other malfunctions, which may endanger both the bicycle and your physical integrity.Please, check your bicycle before each use! (You will find details of this in Article 1 of the “Technical inspection procedure”).Parts that become damaged due to an accident or improper use must be replaced immediately. If you lack the necessary experience and technical instruments for the repair, visit a specialist service centre.Before making any conversion to the bicycle, please consult your specialist dealer or the manufacturer, as otherwise the conversion might lead to the breakage of the frame or fork. In case of unprofessional conversion the warranty becomes void!A child seat and/or trailer cannot be fitted to every bicycle model – for information, please consult your specialist dealer. The following items of advice concern your personal safety!Always cycle according to traffic conditions, ready to brake if necessary!Do not cycle with your hands off the handlebar!Ride particularly carefully on wet roads, as your braking distance could double!For your own safety, always wear light-coloured clothing (with a reflective strip on it, if possible) and a helmet!Switch on the bicycle's lights in bad weather and after twilight!Ride only as fast as your cycling skills allow!5312345678ENGLISH

Technical inspection procedureThe chapter on technical inspection is divided into two parts:1. Parts that must be checked before each ride Braking and brake padsBrake lever (check its play)Stable attachment of the crank arm and pedalsCorrect setting of the telescopic forkAny tears or foreign bodies on the tires?Tire pressureLighting equipment and dynamoAttachment of the fender and rackSecure position of the quick-release skewers/clamps (front and rear wheel, saddle)Minimum height setting of the seatpost and stemFunctioning of acoustic devices (e.g. bell) 2. Parts that need to be checked periodicallyEach bolt assembly must be re-tightened with the correct torqueSecure position and unobstructed motion of the bottom bracket Attachment of the chainring(s) Attachment of the pedalsGear shifting settings, front and rear derailleur gears for models with external shifters Wear of the chain and cassettePower Modulator for V-brakesAny wear or rusting of Bowden cablesPlay and free movement of the headsetSetting of the rear shock Play of the spring-action seatpostSpokes are tight and in true5412345678ENGLISH

At home or on the road After 100-150 km When? What? Where?Maintenance overviewChain maintenance with suitable lubricant (your specialist dealer can advise you)After 150 – 200 km, and depending on mileage at least once a year Tightening all screws/bolts on the bicycle with the correct torque, re-adjusting derailleur gears/shifters and brakes, checking the lighting equipment, checking the tightness of spokes and truing them, shocks, crank arm, headset, handlebar, stemAfter 500 – 1000 kmChecking the wear of the chain and cassette. Checking the telescopic fork and the rear In a specialist service centre In a specialist service centreAfter approx. 1500 kmDismantling, cleaning, and lubricating the hubs. Checking the wear of the hub gear, chain, and cassette. Checking the rear shock (and its air pressure, if applicable), dismantling and lubricating the telescopic fork, replacing faulty partsIn a specialist service centre After approx. 3000 kmMajor overhaul, dismantling, cleaning, lubricating all bearings and if necessary, replacing them, replacing the chain and cassette (with hub gear, as well). Re-tightening all screws/bolts.Before each rideSee Article 1In a specialist service centreAt home or on the roadAfter any off-road rideRemoving the dirt from the bicycle with lukewarm water, cleaning and lubricating the chain. Never use a high-pressure water jet to clean your bicycle, as it would wash out the lubricant from the bearings.At home or on the road5512345678ENGLISH
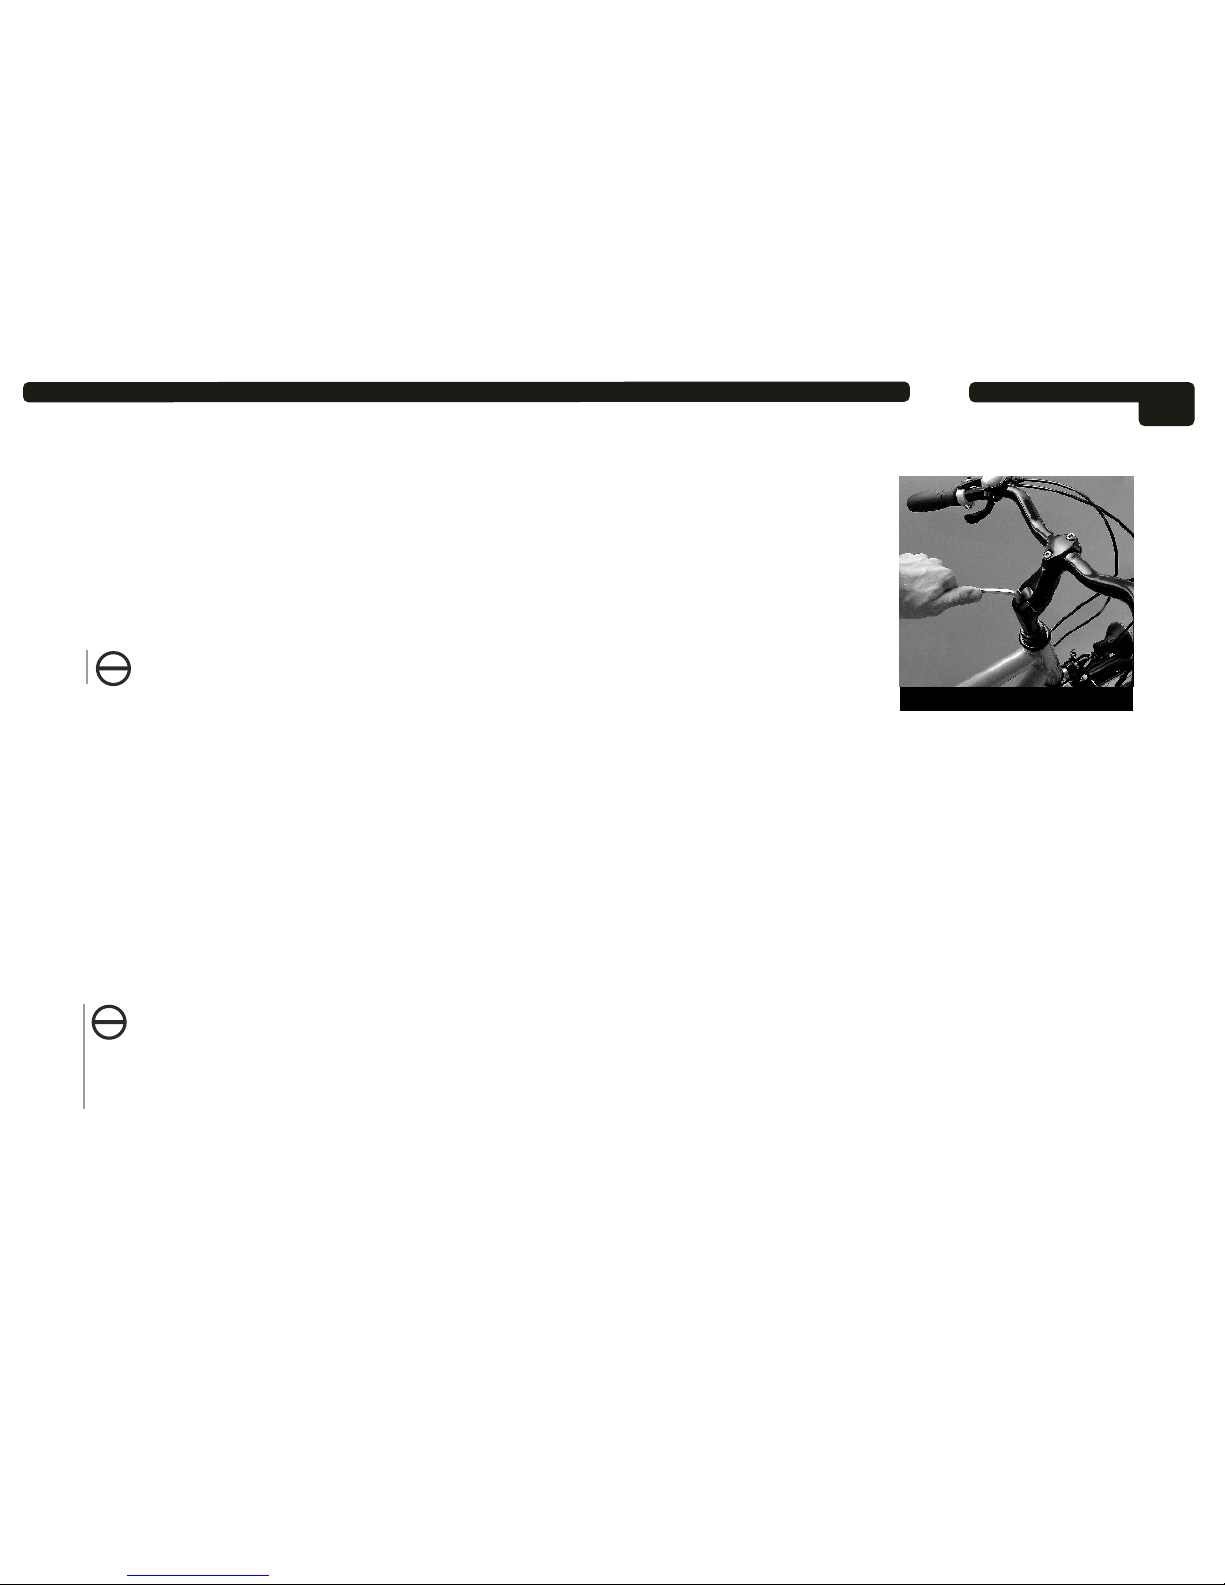
General guidance on assembly and safetySteeringThe steering assembly consists of the following: handlebar, stem, headset, grips, brake lever, shifters, and bell. Stems are available in the most diverse shapes, diameters, and materials. The type of handlebar we fit on our bicycles is essentially the one most suited to their intended use. Never replace the handlebar without asking advice from your specialist dealer.We can distinguish two different stem types: 1: Quill stems with adjustable height and 2: “A-Head” threadless stems, which form part of the headset, and are attached directly to the fork tube with two Allen screws. With “A-head” stems, the tightness of the headset can be set through the stem. The height of “A-Head” stems can only be adjusted minimally, and they are used mainly on MBT-, trekking-, and nowadays increasingly on racing bicycles. This stem type allows the rider to take up a sporty and aerodynamic sitting position, moving the centre of gravity onto the front axle. However, this sporty position places increased stress on the wrists and reduces comfort. Traditional quill stems are of adjustable height: a “STOP” mark can be found on every quill stem, indicating the maximum height to which they can be pulled out.The minimum insertion depth of the stem is 65 mm. If you are replacing the stem with a longer one, make sure that the brake- and shift cables are of sufficient length and do not obstruct the free movement of the handlebar; otherwise there is a risk of accident during quick manoeuvres to avoid objects. If necessary, replace the Bowden cables (or get them replaced) with longer ones.Adjusting the height of a quill stemThe height of a quill stem can be adjusted by loosening its bolt.Insert an appropriate tool (at least 6 mm Allen key) into the bolt socket and give it about threefull anticlockwise turns. If the stemstill does not move freely, loosen it by lightly tapping it with a rubber or plastic mallet. Set the loosened stem to the required height. Please take care not to pull out the stem beyond the maximum allowed height and that the brake and shift Bowden cables do not obstruct the free movement of the handlebar. Align the stem with the front wheel and secure it by tightening the bolt. Check that the stem is secured correctly by applying slight force to the handlebar to try and turn it with respect to the front wheel (do not use excessive force!).Figure 45612345678ENGLISH
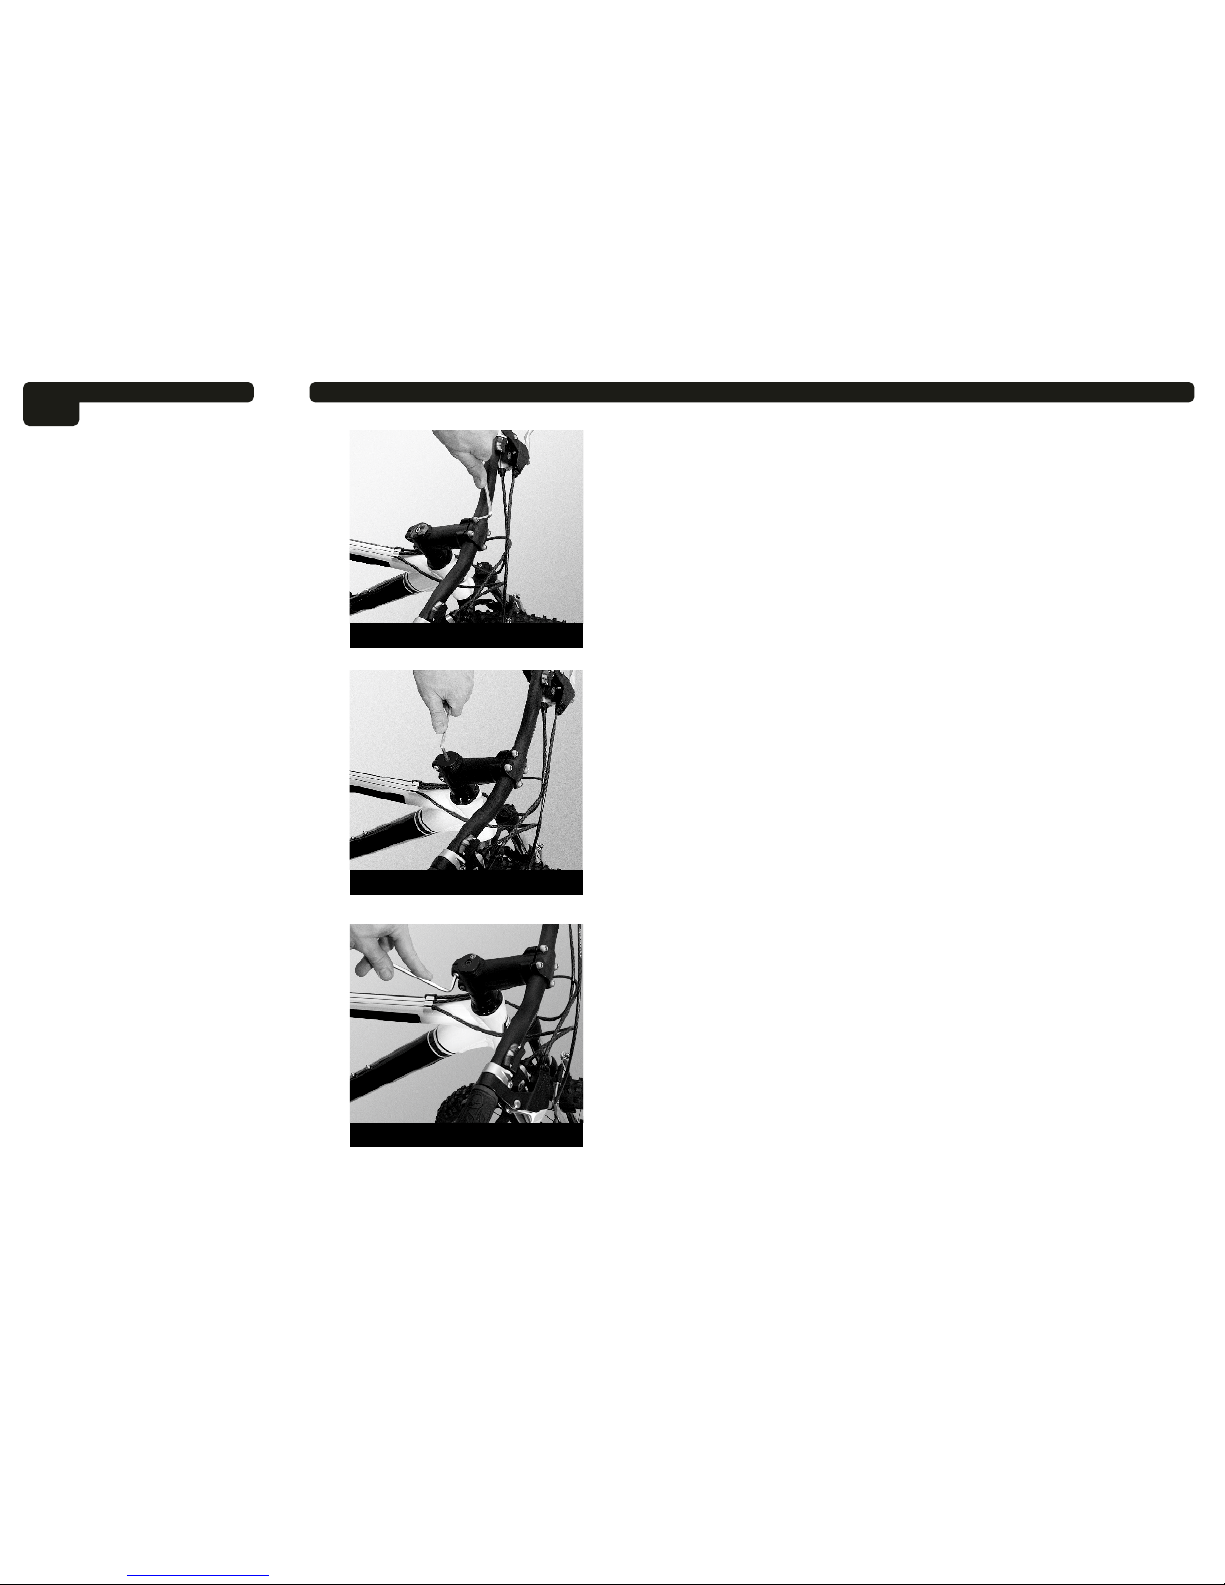
Figure 6Figure 7Figure 5Adjusting the height of an “A-Head” stemDue to their design, the height of “A-Head” stems can only be adjusted slightly. One possibility is to replace the adjusting rings. In most cases this only enables a height adjustment of max. 5 mm, since to safely secure the stem a surface of sufficient size is necessary on the fork tube. A more sensible solution is to replace the “A-head” stem. “A-head” stems are available in different lengths and angles, so that everyone can find the sitting position most suitable for them.Stems for which the handlebars can be replaced using a clamp, without having to remove the grips and the shifter offer a particularly practical solution.The angle of stems offered to cross-country cyclists is usually between 0 - 5°, their maximum length is 135 mm; however, in exceptional cases even longer stems can be available. This, however, reduces the steerability of the bicycle, and it will tend to run in a straight line. The shorter the stem, the easier it is to turn the bicycle; on the other hand, the bicycle will be more “restless” when ridden downhill fast.A sportos Cross-country kerékpárosok részére elérhetők kormányszárak általában 0 és 5 fokos szög közöttiek, maximális hosszúságuk 135 mm. Those who take frequent bike trips usually choose a shorter stem with a greater angle (over 10°) which allows a straight-backed riding position. Downhill riders prefer extremely short (approx. 80 mm) and steeply angled (approx. 30°) stems. With general use, the handlebar should be higher than the saddle, as this affords maximum control on steep downhill stretches, as well.To replace the stem, undo the bolts on its top and remove the handlebar (Figure 5). Next, undo completely the bolt of the stem cap fixer. Remove the stem cap fixer (Figure 6), then undo the bolts on the side to remove the stem.Take the new stem and temporarily secure the handlebar with the clamp. Next, place the stem onto the fork tube. Place the “A-Head” stem cap fixer over the socket of the stem, and insert the socket bolt. Tighten the bolt to set the tightness of the headset. If the headset has no play, and can be easily rotated, the stem must be secured with one or two bolts. Ensure that the stem is aligned with the front wheel when it is facing forward. Finally, adjust the handlebar so that your hand and lower arm are aligned, then tighten the bolts on the front of the stem. Check that the stem is secured correctly by applying slight force to the handlebar to try and turn it with respect to the front wheel (do not use excessive force!).5712345678ENGLISH
Autres manuels pour GEPIDA
1
Table des matières
Autres manuels Olimpia Vélo


