Nuvo Koolspace 110 Supplément
ASSEMBLY & OPERATION MANUAL
110/220
CELLAR nuvo
k o o l s pac e TM

~ 2 ~
~ 3 ~
1. LOCATING YOUR WINE CELLAR - Remember, it is not an appliance, it is a piece of furniture
2. AREA FOR ASSEMBLING YOUR WINE CELLAR
Choose a clear 12’ by 12’ area with a level oor and carpeting to help reduce scratching of surfaces.
3. TOOLS
* Hex wrench (included)
* Phillips screwdriver
* Carpenter’s level
* Helper or two is strongly recommended
4. TEST THE COOLING UNIT
Plug it in for a few minutes on a table top, to verify that controls and display are functional, and that
the unit is producing cool air after a few minutes of operation.
Note that the electronic controller has a one-minute cautionary delay between initial plug-in and
start-up of the compressor.
BEFORE YOU START !
NOTE: Fill out the WARRANTY REGISTRATION FORM with the serial number located on the LEFT
SIDE of unit.
A. Provide 4” minimum clearance for both sides and back, keep the top completely clear.
Under no circumstances should the unit be “built-in” in any way.
B. Never locate your wine cellar outdoors or in an area with extremes of temperature and
humidity.
Garages, attics, unnished basements, laundry rooms, breezeways, closets, bedrooms or
any unventilated room. In other words these units must be installed in air-conditioned
environments which do not “trap” the warm air being exhausted.
C. Temperatures in surrounding area must not exceed 80 °F (25 °C) with humidity levels not
to exceed 70% R.H. (Relative Humidity). Never set your temperatures below default (57ºF)
whenever ambient conditions are warm (above 75ºF) or humid (above 50%R.H.).
D. Outlet power must be a DEDICATED separately fused, grounded, 15 Amp 110 - 120 V line or
7.5 Amp - 240 V line rated for your unit (CHECK BOX OR SERIAL NUMBER LABEL ON UNIT
FOR YOUR LINE VOLTAGE REQUIREMENTS).
E. You must monitor your unit DAILY. If unit is in “Alarm”, unplug the unit inmediately. Always
check for any water (condensate) leaks.
Vintage Keeper will not be liable or responsible for incidental or consequential damages.
(See Warranty).
F. Place unit in a clean area and allow access to the exterior surfaces for periodic vacuuming
of the condensor coil. (See troubleshooting for details.)
G. Always remove all bottles before relocating your wine cellar.
READ BEFORE YOU START

~ 2 ~
~ 3 ~
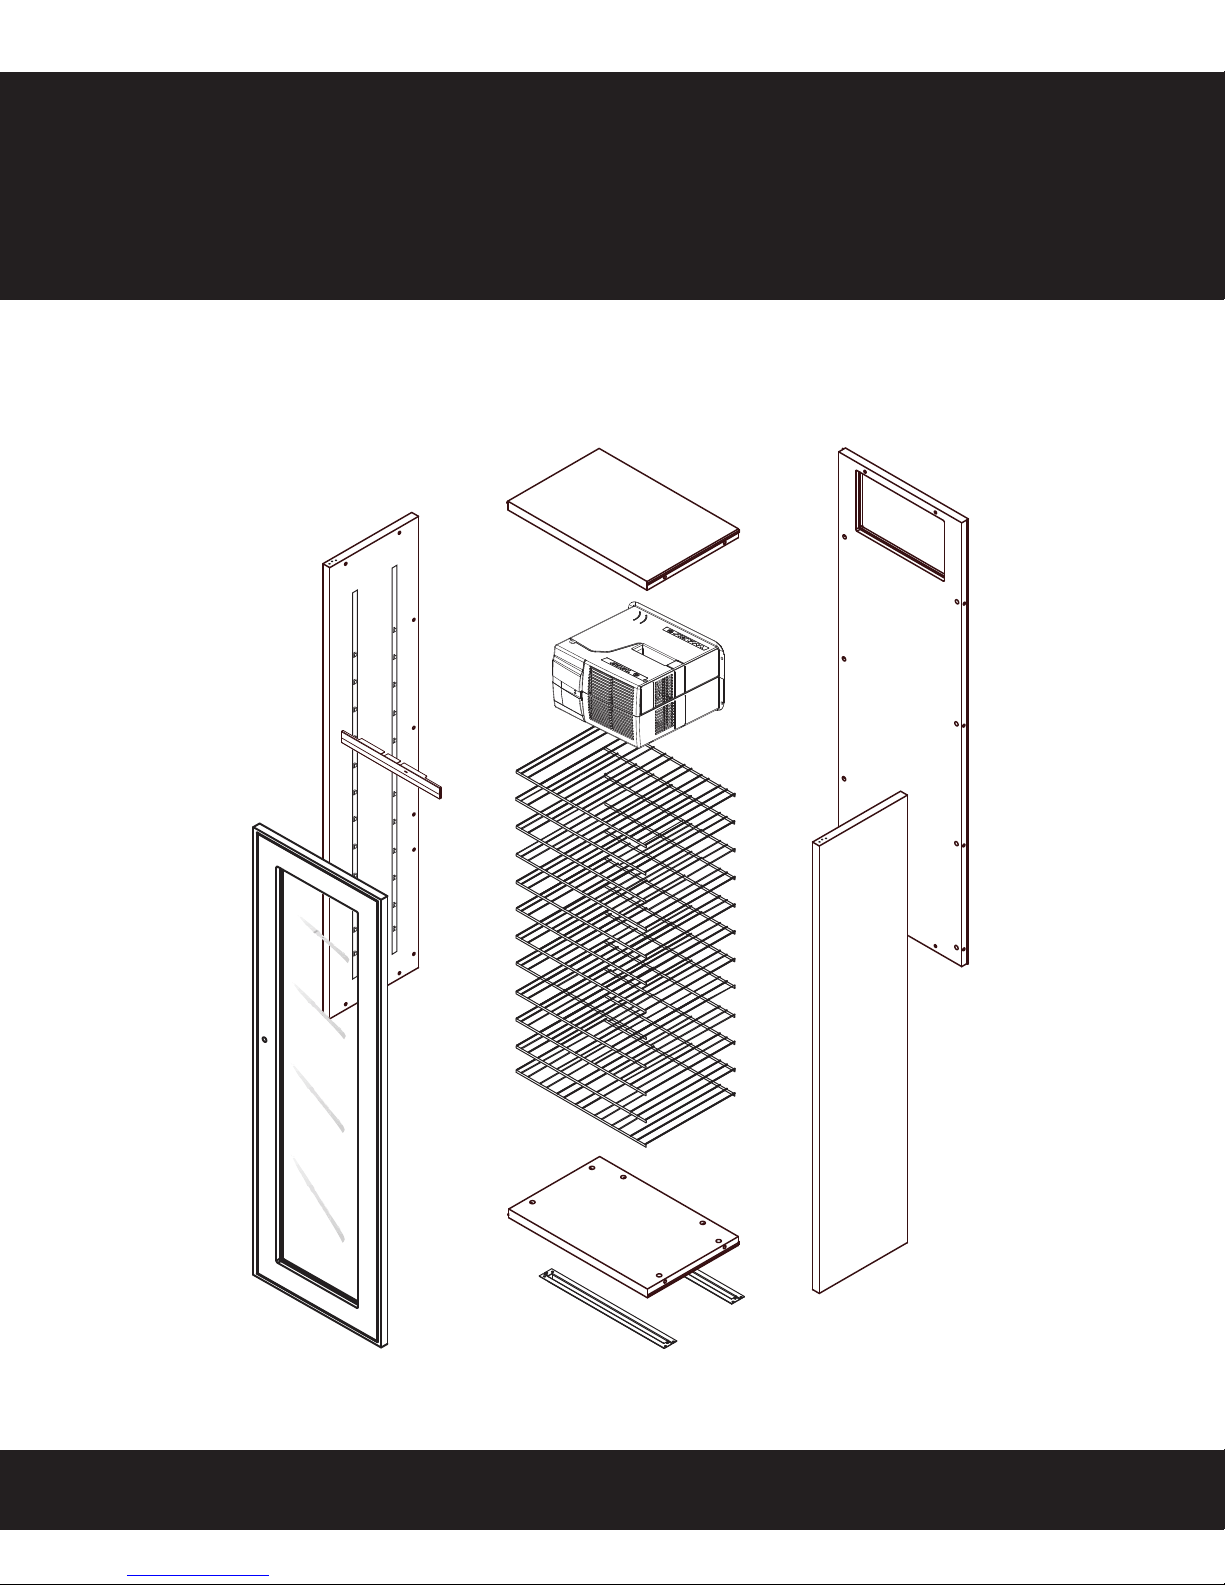
HARDWARE KIT
C
B
A
F
E
G
D
H
*NOTE : Hardware quantities for Model 220 are indicated in parenthesis.
Cam Cap
x 20 (x24)*
Hex Bolt
x 14
Hex Wrench
x 1
Cam
x 20 (x24)*
Cam Pin
x 20 (x24)*
Leg
x 4
In Cooling Unit Box
Hex Bolt (Flange)
x 2
Panel Insulation Strip
x 1

~ 4 ~
~ 5 ~
STEP 1 : PANEL PREPARATION
1
PANEL EDGE
H
CAUTION :
1. Watch for sharp staples on boxes.
2. DO NOT STEP ON PANELS
3. The manual will give a recommended
order to open boxes, it saves space and time.
2
H
!
Open Box VP1.
Install INSULATION STRIP (H) to Back,
Top, and Bottom Panels. PUSH IN
FULLY!
Insert Cam Pins (E) by hand in BACK
PANEL’S predrilled holes down to
TAB.(May require some force)
CAUTION : DO NOT BREAK CAM PIN TABS!
DO NOT HAMMER!
TAB
TAB
BACK PANEL
1
H
H
E

~ 4 ~
~ 5 ~
STEP 2 : CABINET ASSEMBLY
Attach Top and Bottom to Back by CAREFULLY aligning edge holes
over Cam Pins and gently push together to avoid damaging cam
pins. DO NOT BANG OR SLAP PANELS TOGETHER!!!
Insert Cam, push all the way in under panel level (may require
some force) and make sure Arrow points to outside edge, use
allen key provided or #3 phillips screwdriver.
Cam Arrow faces away from outside edge when tightened
1
CAM in LOCKED
POSITION
2
PANEL EDGE
2
2
1
BOTTOM
PANEL
METAL
METAL

~ 6 ~
~ 7 ~
STEP 2 : CABINET ASSEMBLY CONTINUED
CHECK PANEL ORIENTATION !!!
Open Box VP5 or VP2.
Insert Cam Pins (E) into SIDE PANEL’S predrilled holes both sides
down to TAB. (May require some force)
Attach SIDES to Back/Bottom/Top by Carefully aligning edge
holes over Cam Pins and gently push together to avoid damaging
cam pins. CHECK PANEL ORIENTATION !!!
Insert Cam and make sure Arrow points to outside edge, use
allen key provided or #3 phillips screwdriver. Start locking one
cam at each end rst. Lock all Cams.
Cam Arrow faces away from outside edge when tightened.
1
2
Insert Cam Cap (A) in all Cam Holes.
3
3
2
1
TOP !!!
BOTTOM
PANEL
Place cabinet against a
wall to push sides in place.A
E
2 HOLES FOR MODEL 110
3 HOLES FOR MODEL 220

~ 6 ~
~ 7 ~
Fasten BASE with HEX BOLTS (B)
4
CABINET
BOTTOM
FRONT BASE
13
4
STEP 3 : HINGE,BASE AND LEGS INSTALLATION
Raise cabinet and check for potential air
leaks at panel joints from inside.
2Install four LEGS (F)
into BASES fully in.
3
Open Box VP3.
Fasten one HINGE (found in
door box) to the SIDE of the
cabinet with Hexbolts (B).
NOTE :
Fasten BASE to the BOTTOM
of the cabinet (FRONT BASE
has to be set with Base Tabs
Hinge can be on either
side of the cabinet.
1F
C
B
NOTE: Fasten base with base tab away from the
front edge, then fasten and adjust the hinge
before fully tightening HEX BOLTS (B)
3
F
5
5
B

~ 8 ~
~ 9 ~
2
1
1
CABINET
BOTTOM
STEP 4 : SHELVES
BOTTOM
TOP
PRESS
Open box VP4
Hook SHELVES into hangers starting
from the bottom of cabinet
HINT :
CENTER SHELVES ON HANGERS
1
2
Snap SHELVES into hangers
on one side
Push the SHELVES down to
snap into opposite side hangers
1

~ 8 ~
~ 9 ~
LEVEL TO
OPENING
STEP 5 : COOLING UNIT INSTALLATION
GET HELP BEFORE INSTALLING AND KEEP CHILDREN CLEAR OF CELLAR CONSTRUCTION AREA.
Get helper to help guide unit, keep light cord clear of edge inside cellar and to prevent tipping of cellar. MAKE
SURE INSULATION STRIP IS IN CORRECT ORIENTATION. Run light cord through Cut-out. Slide unit into the back
opening by angling unit A to allow light cord to clear and straighten to push in B . Screw allen bolts (G) through
bottom ange holes. Make sure unit is level!
1
G
C
NOTE: If unit is operated according to speci cations over ows will not occur. Excess
condensation is only caused by extreme conditions. Unit will shut off at 72 °F and will
restart when temperature drops or unit is repluged. (In this case insert 3/8” O.D. hose
to drain hole, cut to appropriate length.)
Container
Optional (not required)
except as emergency drain.
(G) x2 Flange
bolts in
cooling unit
box.
CORD MUST
CLEAR OPENING
A
B
SIDE VIEW
DO NOT!!!
STRAIGHTEN AND
PUSH THROUGH
GET HELPER TO
LIFT UNIT LEVEL
AND PULL FROM
INSIDE
KEEP UNIT LEVEL
INSIDE CELLAR
INSULATION
STRIP
CHECK
SHELF
DO NOT OVER
TIGHTEN

~ 10 ~
~ 11 ~
3Insert LIGHT COVER
to holes pre drilled on
front edge of TOP panel.
STEP 6 : LIGHT AND LIGHT COVER INSTALLATION
1Plug cord to LIGHT
2Insert LIGHT to LIGHT COVER
Ce manuel convient aux modèles suivants
1
Table des matières
Autres manuels Nuvo Refroidisseur de vin


