MJM E-TR20 Manuel utilisateur

1
USER’S MANUAL

2
NOTICE!
Before using your new E-bike the first time,
Charge 6 hours for Li-ion batteries
Always recharge the battery before the power indicator shows no power.
Failure to follow these instructions voids any warranty, whether stated or implied.
Before operating your E-bike
Warning!
This product does not conform to Federal Motor Vehicles Standards and
Is not intended for operation on public streets, roads or highways. Serious injury can result
from the unsafe operations of this vehicle.
This product is not designed to be jumped. If jumped, even from the curb,
The E-bike Frame could break causing serious injury or death.
If jumped, the warranty is void.
Do not operate this product in traffic, on wet, frozen, oily or
Unpaved surfaces or under the influence of drugs and/or alcohol.
Avoid uneven surfaces, potholes, surface cracks and obstacles.
It is recommended that the rider wear leather gloves, kneepads
And leather boots. Always wear a CSA approved helmet.
Never carry passengers on your E-bike.
Check your state and local laws governing the use
of motorized vehicles in your area.
MJM WHEELS LTD. is not responsible for your
Failure to comply with state and local ordinances
Relating to the use of the E-bike.
Failure to follow these operation instructions
can result in serious injury or death.
Congratulations on your new purchase! Our service department is dedicated to your
satisfaction with mjmwheels.com.
U

3
Quick Start:
1. Charging:
You can charge your battery installed in bike or uninstalled. If you want to uninstall
the battery, push the key and twist anticlockwise until hear “Click”. Before taking out
the battery, you may need to take out the seat post firstly, with quick release.
Move the cover on battery:
Before plug in charger, please make sure that the charger’s plug can be properly
used in your area.
Charging: Charging Finished:
Install the battery: please make sure that the lead rail on frame get into the slot in
battery. And make sure the battery is placed completely upon the conductive
contact on the bottom.

4
LCD Display:
Display Interface
Press SET to switch the displaying information. The order is: ODO →Riding Distance
→Riding Time →Max Speed.

5
BUTTON DEFINITION
C300S has three buttons, including MODE、UP and DOWN.
“MODE” names to “M”, “UP” names to “+” and “DOWN” names to “-”.
NORMAL OPERATION
1、MODE
Hold MODE and start the display. The display will provide power for the controller.
Hold MODE again can open the backlight. With display on, press MODE for 1.5
seconds to turn off the power. With the display off, there is no battery consumption.
The leakage current is no more than 2 µA.
※ The panel will go to sleep when speed is less than 2 km/h for 5 minutes.
2
、
CURRENT DISPLAY
That represents the discharging current of the controller currently, each segment is 2A,
six segments are >=12A.

6
3
、
SPEED DISPLAY
It displays the current riding speed of e-bike. The speed display is as below.
4
、
KM/H & MPH
Select KM/H or MPH for the speed and mileage, display will be the currently selected
units display.
5
、
BACKLIGHT INDICATOR
With the power on, hold UP for 1.5 seconds and turn on the backlight. Click it again
and turn off the backlight.
6
、
6 KM/H WORK
Hold DOWN for 1.5 seconds and enter the mode of power assist walk. The e-bike is
traveling at 6Km/h. Display as shown below.

7
7
、
ASSIST LEVEL SELECTION
Click UP or DOWN to change the stages and output power ratio, the output power
ranges from level 1 to level 6 for the default (the levels can be customized by user),
the default value is level 1.
Front wheel installation
Read the instructions carefully to identify and understand the components of the electric bicycle
such as pedal, seat post etc. and the name of relevant spare parts. When specialized servicing of bike
is required, please go to an authorized MJMWHEELS repair shop or store or another trusted bike
professional.
1. Assembly of the front wheel unit:
Identify the nuts and the lock washers (Fig A) necessary for the front axle assembly.
Assemble the front wheel unit onto the front fork, pass the lock washers thru the axle and lock the
tab into the groove of the front fork (fig. B). Tighten the nuts on both sides of the hub with a torque
wrench to 35 Nm (fig C). Attention: when assembling, make sure the disc brake and the brake caliper
are on the same side (left side), the disc brake must slide into the gap between the two brake pads
of the disc brake caliper, make sure the wheel turns freely and does not rub against the brake pads
when the front brake is not been pressed.
8
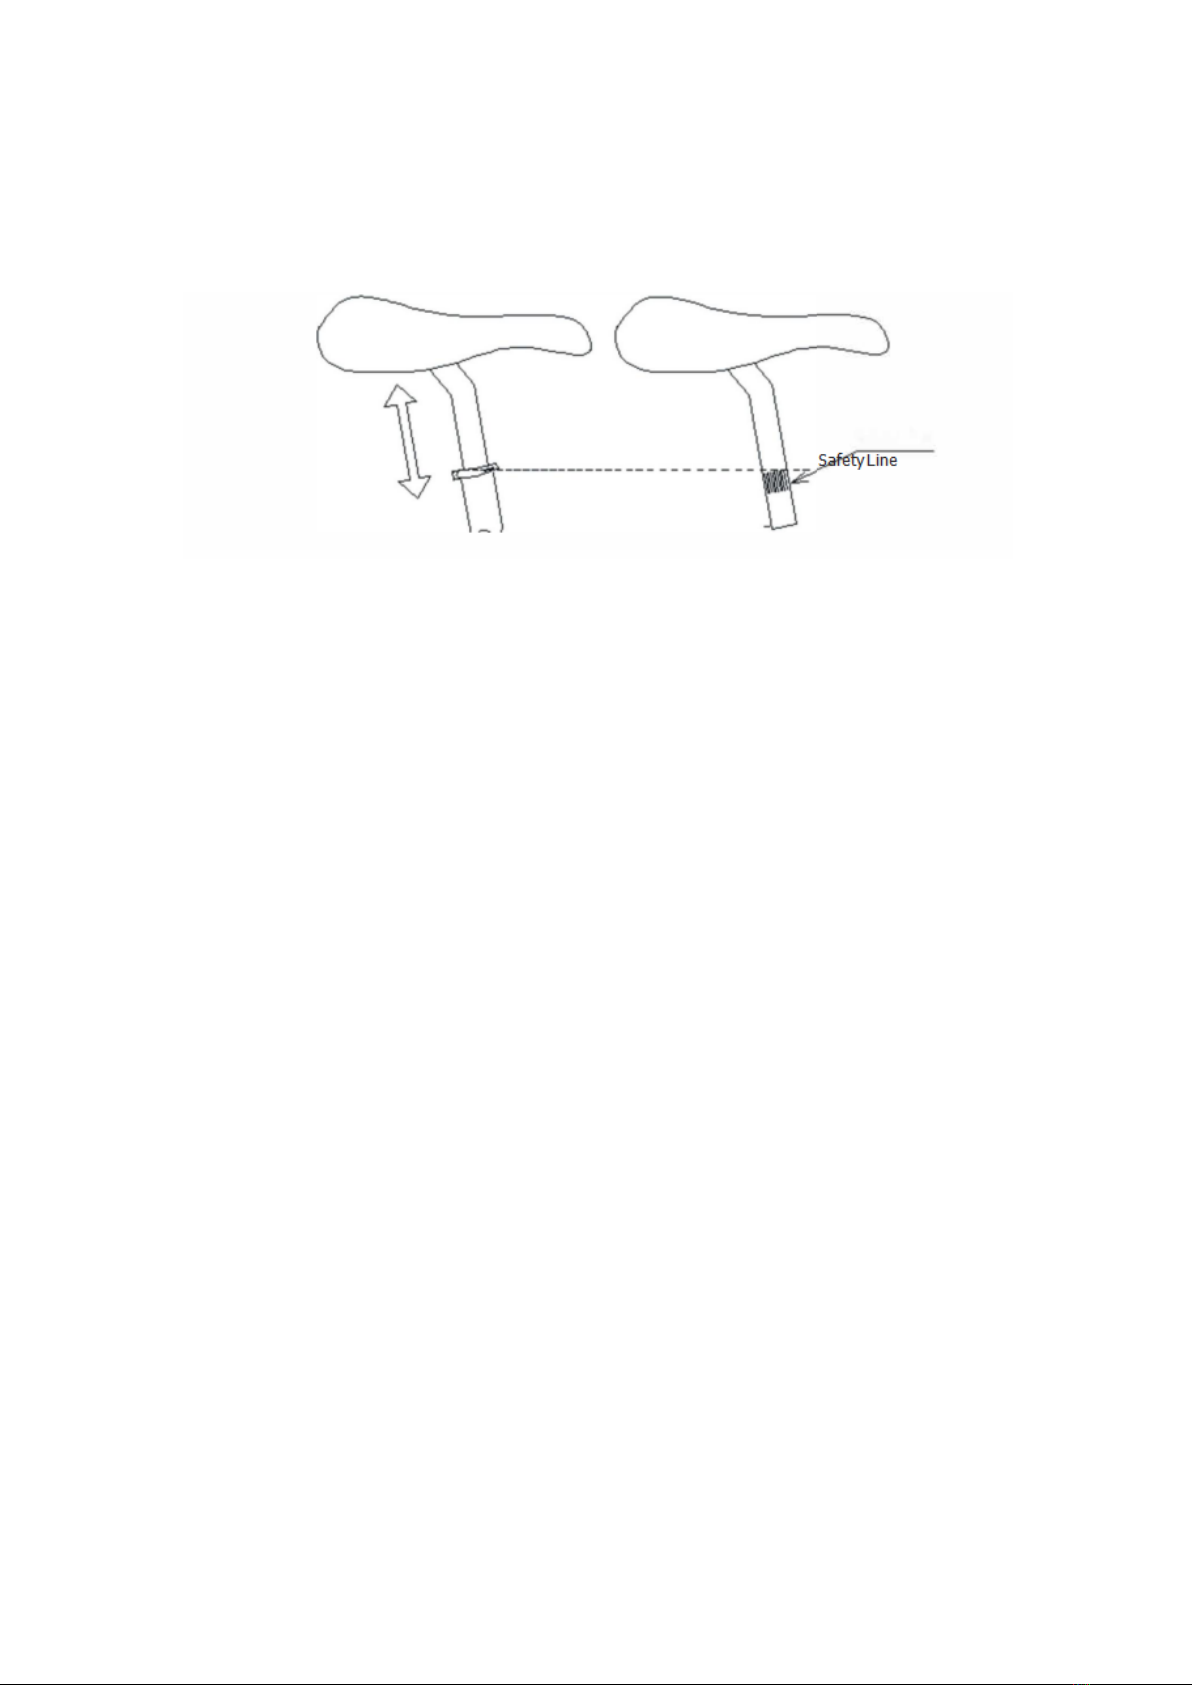
Adjustment of Saddle:
Adjust the saddle to the proper height. Using the socket hand wrench, lock the fixed screws
on the seat post and clamp tightly. Please note that when adjusting the height of the standpipe and
seat post, it has to keep the inserting depth above the safety line
.
Taking Care of Your Batteries
Proper maintenance of the batteries will maximize their lifespan and available ride
time.
·We use Li-Ion (Lithium Ion) batteries in all our electric bicycles. These are very user-
friendly types of batteries when cared for properly.
·Batteries should be fully charged immediately when they are received for the
recommended charger times. FULLY CHARGE BATTERIES BEFORE FIRST USE.
Below are the recommended charge times for each type of the batteries.
·Li-Ion (Lithium Ion) batteries 4-6 hours
·Charge batteries at least every 90 days for Li-ion.
·Always store bicycle with fully charged batteries.
·Never charge the batteries for more than 24 hours
·Always disconnect the charger form the wall outlet and bicycle when charging is
complete (as indicated by the status on the charger) before storing the bicycle.
·Do not store the batteries below 50°Fahrenheit and never allow batteries to
freeze (Below 32°Fahrenheit)
·Li Bikes are equipped with a 5 seconds sleep mode .If do not use the battery for a
long time we suggest you to keep the button above the battery for 5 seconds till
the light flash then it will go into “Sleep Mode” and if you want the Li battery
working then do same before.

9
·Always be sure to turn the bike “OFF” after each use via the ON/OFF power switch.
If you have left the power switch on or your product have not been charged for a
long period of time, the batteries may reach a stage at which it will no longer hold
charge.
·Be friendly to the environment! Be sure to recycle your old batteries at a local
battery recycling center. Do not throw them in the garbage.
·Frequent “stops and starts” will drain a battery more quickly than sustained. long
term use.
·Even with proper care, rechargeable batteries do not last forever. Average battery
life depends on use and conditions.
Charger
The electric bike comes with its own “Smart Charger” that connects with an easy-
access charger port for recharging the batteries. This charger has lights which show
the battery charge status.
Batteries work best when they have a full charge, so always be sure to recharge
them fully after each ride. If you leave then in a run-down condition, without
recharging them, it will shorten their life expectancy.
Li-Ion (Lithium ion) batteries –charge for 4-6 hours
The charger may get warm to the touch, so make sure you charge they are in an
open area and do not lay anything on the charger unit while charging. Although
you cannot over-charge the batteries using the “Smart Charger”,
We recommend that you do not leave the charger plugged in for more the 24
hours.
If your charger shows a solid green light after charging for a short period of time,
your battery may have been only partially discharged (Short ride), or this may be
the sign of a partially worn out battery reduced charge capacity. Continue
charging for the full time, to cover all the bases. If the battery still has not charged,
you may need to replace it.
Even with Proper care, a rechargeable battery dose not last forever. Average
battery life depends of use and conditions.
The charger and charger port should be regularly inspected for damage (Cord, plug,
enclosure, etc.). If damage is found stop using until the damage part can be
repaired or replaced.

10
1. Red light means charging
2. Green light means charge-full
3. Input: AC100-240V~, 1.6A (Max) 50/60Hz
4. Output: 42.00V—2.0A
5. Plug the charger into the outlet and turn the charger “ON” via the switch on the
black side. The red power light on the front of the charger will illuminate when the
charger is working properly.
6. Insert the XLR plug into the charger port on the bike being sure the charger plug is
fully seated in the charger port. The second light will start to flash orange for several
seconds while the charger is “seeking” the battery.
7. Once the charger has “found” the battery the blinking orange light will stop
flashing and turn solid orange and cooling fan will start. At this point the charger
process has begun.
8. Once the battery reaches full charger, the orange light will turn solid green.
9. When charging is complete, unplug the charger from the wall before removing it
from the charger port.
CAUTION
RISK OF ELECTRIC SHOCK, DRY LOCATION USE ONLY. SEE INSTRUCTION
MANUAL FOR USE.
Ce manuel convient aux modèles suivants
1
Table des matières
Autres manuels MJM Scooter


Manuels Scooter populaires d'autres marques


First Choice Mobility
First Choice Mobility Roma Medical Corella S741 Manuel utilisateur

Carrera
Carrera impel Manuel utilisateur

Afikim
Afikim Superlight SL-3 Manuel utilisateur

CareCo
CareCo ZOOM Manuel utilisateur

Douglas
Douglas Vespa G.S. Manuel utilisateur

Gazelle
Gazelle with BOSCH System Manuel utilisateur