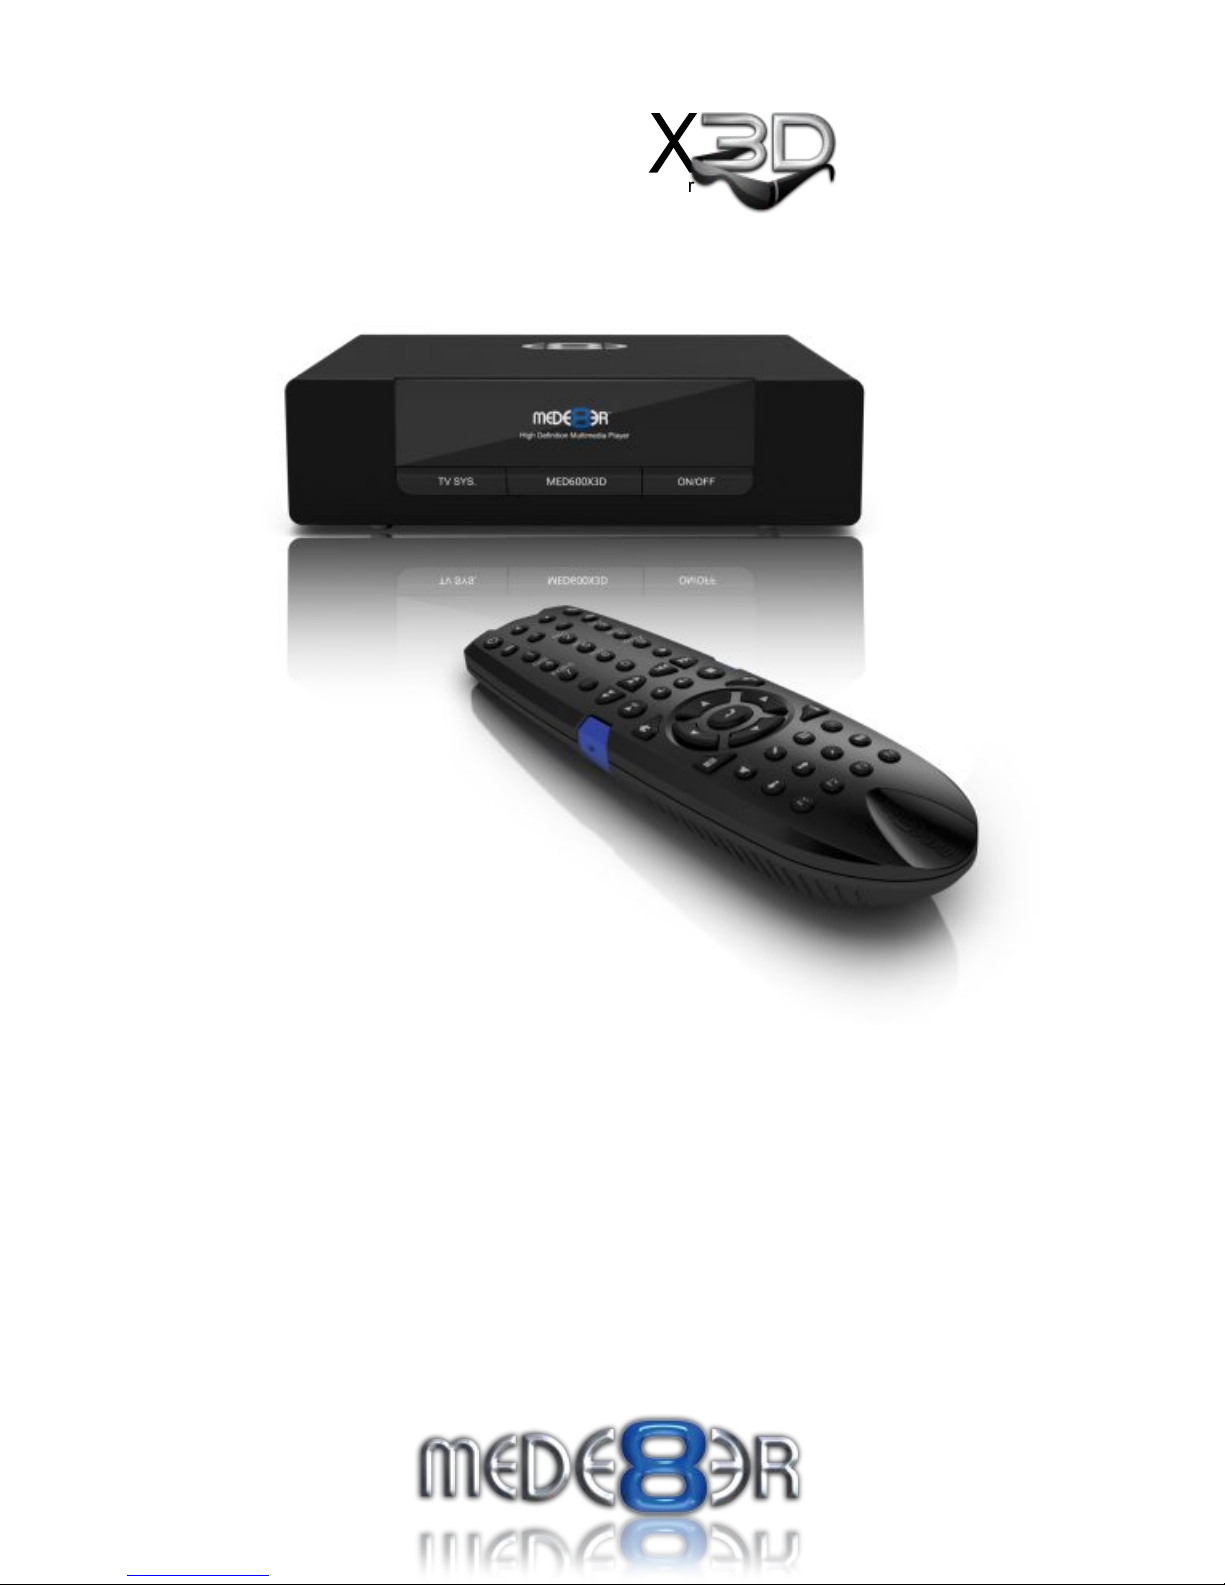
Mede8er MED600X3D Manuel utilisateur
High Definition Multimedia Player
TM
High Definition 3D Multimedia Player
600
E
MD
User Manual
V3

Page1
INDEX
page 1
page 2
page 3
page 4
page 5
page 6
page 7
page 8
page 9
page10
page11
page12
page13
page14
page15
page16
page17
page18
page19
page20
page21
page22
page23
page24
page25
page26
page27
page28
page29
page30
page31
page32
page33
page34
page35
page36
page37
page38
page39
page40
page41
page42
page43
page44
page45
page46
page47
Index
Introduction
General Overview
Unpacking / Contents - Connections
Connections continued
Power Up & Standby / Screen Calibration
TV Output / Audio Settings
Remote Functionality
USB Keyboard / Wired Network
My Shortcuts (Password protected shares)
USB WiFi Dongle / PCIE WiFi
Wireless Setup
Firmware Update Procedure / Web Remote / DNLA DMR
Home Network Samba Server
Home Page
Media Library
Media Library Continued
Media Library Metadata
Adding Custom Backdrops and Skins
Movie JukeBox - XML Search
Movie Scraper
Edit Scraped Movies
TV Series Scraper
TV Series Scanning / Edit
Using Movie JukeBox - XML Search
Music Jukebox
Music Jukebox Continued
Music Jukebox Continued
Music Jukebox Continued
Music Jukebox Continued
Cover Art Preview in Media Library
Play Folder / Play Video From Cover Art / Watched Indicator
Lock Facility / Pin Code / Folder Protection / Safely Remove USB
Favourites Manager
Adding Genre Art to Favourites / Locking - Unlocking Favourites - Scan XML
JUKEBOX + (Aggregated JukeBox)
Video Info - GOTO Search / Alpha Jump
3D Menus / Toggle BD Manu / Video Zoom
Subtitles / Custom Fonts
Music Playlists / File Manager
File Manager Multiple Files
Pictures
Plasma Mode / Autoplay / Internet Media
NFS
NET API / Transmission BT
IP Streaming
Setup Menu

Thank you for purchasing the Mede8er Multimedia Player.
The MED600X3D is a very affordable 3D High Definition 3D Multimedia Player that is based on the same
firmware as the Award Winning MED1000X3D.
The Mede8er has some very unique features so we suggest you read this guide and visit the Mede8er forum
for additional help and information. The firmware is always “work in progress” so we suggest you regularly
check the Mede8er forum for updated firmware releases and updated User Manuals.
Please check the Mede8er forum for the latest user guide. www.mede8erforum.com
Warranty International
Mede8er products carry a 12 month from date of purchase warranty. In the event of warranty service please
provide proof of purchase. Return your product to the store that it was purchased from or return it directly to
Sanji Electronics (Pty) Ltd 12, Saddle Drive Woodmead Office Park, Woodmead, Gauteng, South Africa.
Warranty & Support Europe
Mede8er products carry a 60* month from date of purchase limited warranty. In the event of warranty service
or support, please contact one of the Mede8er Service Centers; www.mede8er.eu/support,
support@mede8er.eu or call +31(0)10-7142861 during business hours (CET). In order to obtain the
extended warranty service of in total 60* months after purchase, you need to register your product on
www.mede8er.eu/register within 1 month after purchase. * On accessories 24 months applies.
Warranty does not cover damage by
a) Lightning or over voltage b) Water damage or liquid spill c) Misuse or abuse d) User tampering
e) Using non Mede8er approved Firmware
Sanji Electronics (Pty) Ltd is not responsible for any loss of data irrespective of the cause.
Important Safety Instructions
Read these instructions for all components before using this product.
During electrostatic discharge and the strong electromagnetic field, the product may malfunction. In such a
case, unplug the power cable to power off your player and the player will return to normal performance next
time it is powered on.
· Do not use this apparatus near water or moisture. Do not use this product near a bathtub, washbowl,
kitchen sink, laundry tub, in a wet basement, near a swimming pool, or anywhere else that water or
moisture are present.
· Clean only with a soft dry cloth and as directed by the manufacturer. Unplug this product from the wall
outlet before cleaning.
· Do not block any ventilation openings. Install in accordance with the manufacturer instructions. To
ensure reliable operation of the product and to protect it from overheating, put the product in a position
and location that will not interfere with its proper ventilation. For example, do not place the product on
a bed, sofa, or similar surface that may block the ventilation openings. Do not put it in a built-in system,
such as a bookcase or a cabinet that may keep air from flowing through its ventilation openings.
· Do not install near any heat sources, such as radiators, heat registers, stoves or other apparatus that
produce heat.
· Protect the power cord from being walked on or pinched, particularly at plugs, convenience
receptacles, and the point where they exit from the apparatus.
· Only use attachments or accessories specified by the manufacturer.
· Unplug this apparatus during lightning storms or when unused for long periods of time to prevent
damage to this product.
Refer all servicing to qualified service personnel
Page2
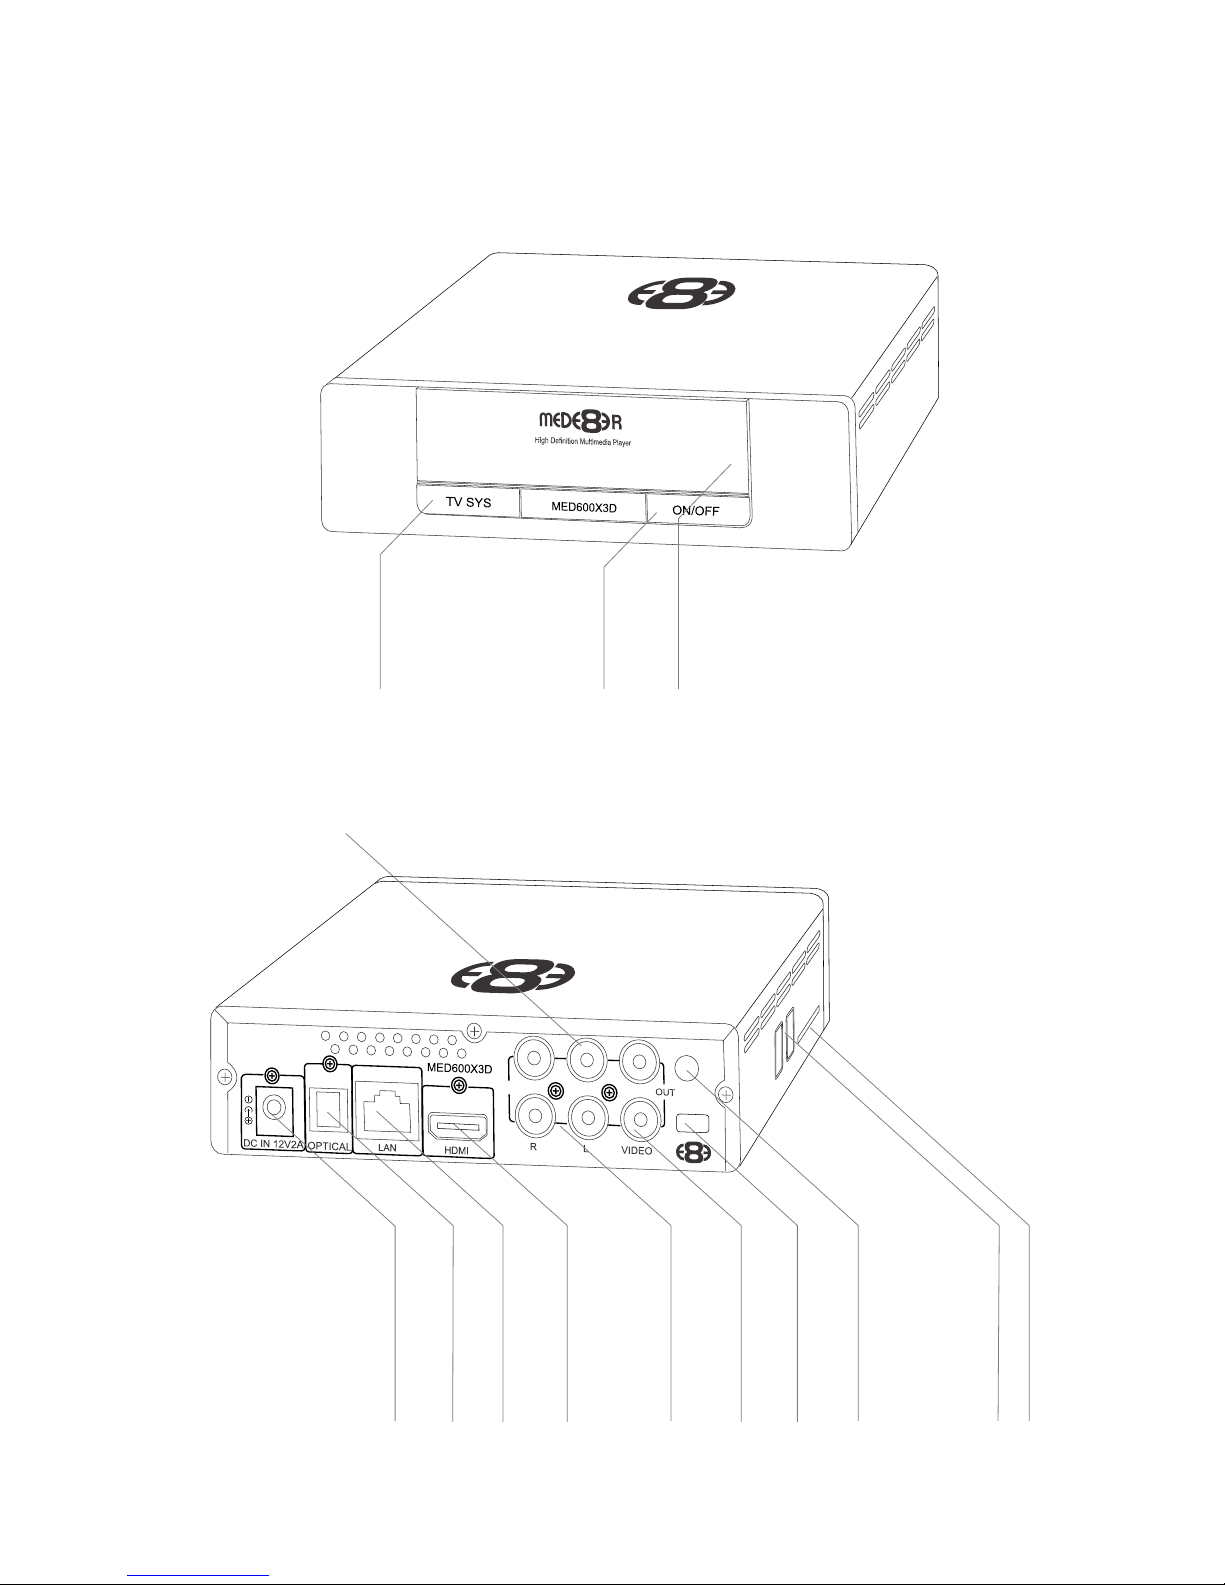
GENERAL OVERVIEW
Page3
TV Out
On/Off
Status Led
Y Pb Pr
OUT
Composite Video Out
HDMI Connector
RJ45 - Lan connector
Optical Audio Out
DC - 12Volt 2 Amp input
Analogue Audio Out
2 x USB Host Ports
Component Video Output
SD Card Slot
Lock Slot
PCIe WiFi Antenna Hole
CONNECTIONS
Page4
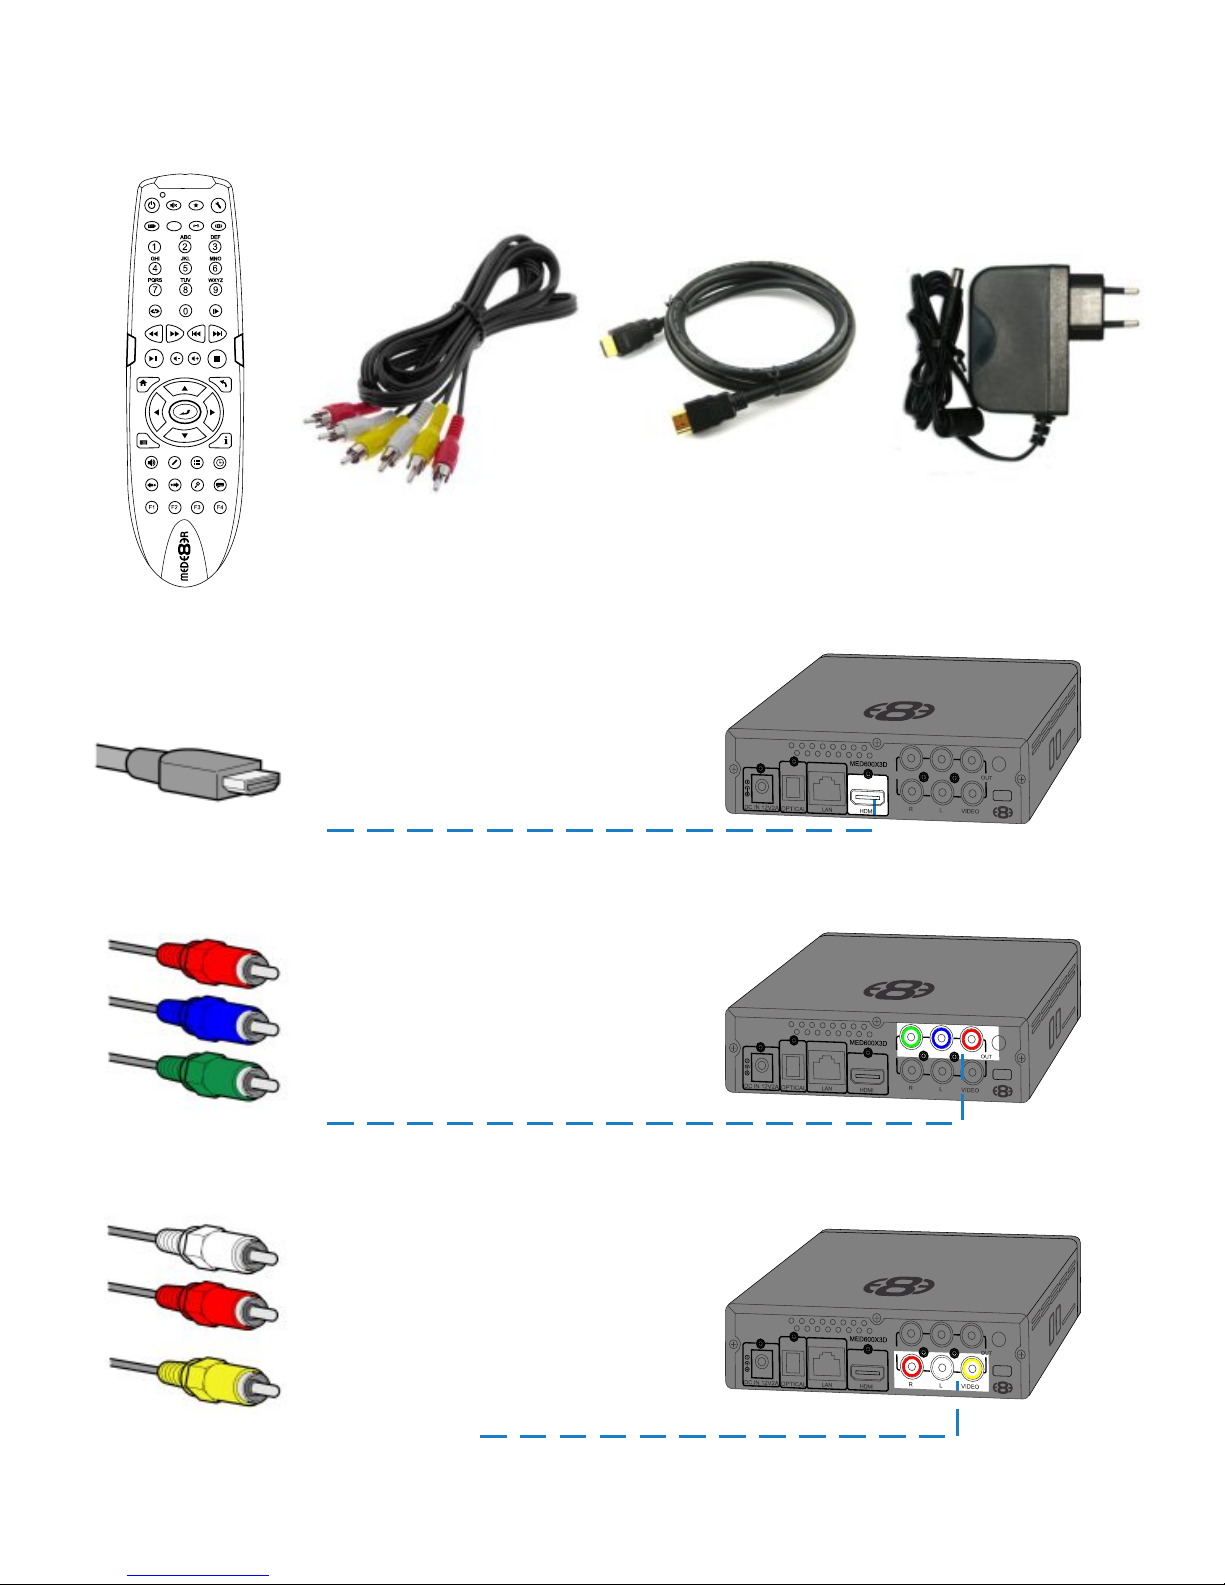
HDMI 1.4 Cable
Y Pb Pr
OUT
Component YUV
Composite Video / Analogue Audio
Component Video offers the next best picture quality to HDMI so if your system does not have a HDMI input
we suggest you use the Component Video Connection.
HDMI offers the best picture quality and should be used in preference of any other connection. Use the
supplied HDMI 1.4 Cable for use with the MED600X3D. The HDMI can be connected to a AV Amplifier or
directly to a TV.
Composite Video offers the most basic picture quality connection and should only be used if your TV does not
have a HDMI or Component Video input. Use RCA analogue audio outputs in the absence of HDMI or Digital
Audio inputs on your TV or Home Theatre system. RCA analogue outputs will downmix all content from mutli-
channel to stereo.
Y Pb Pr
OUT
Y Pb Pr
OUT
UNPACKING / CONTENTS
Contents: - MED600X3D, Remote, AC/ DC Adapter 2 Pin Euro, HDMI 1.4 Cable, AV Cable, Spare remote
side buttons.
HDMI 1.4 CableAV Cable AC/DC Adapter
θ
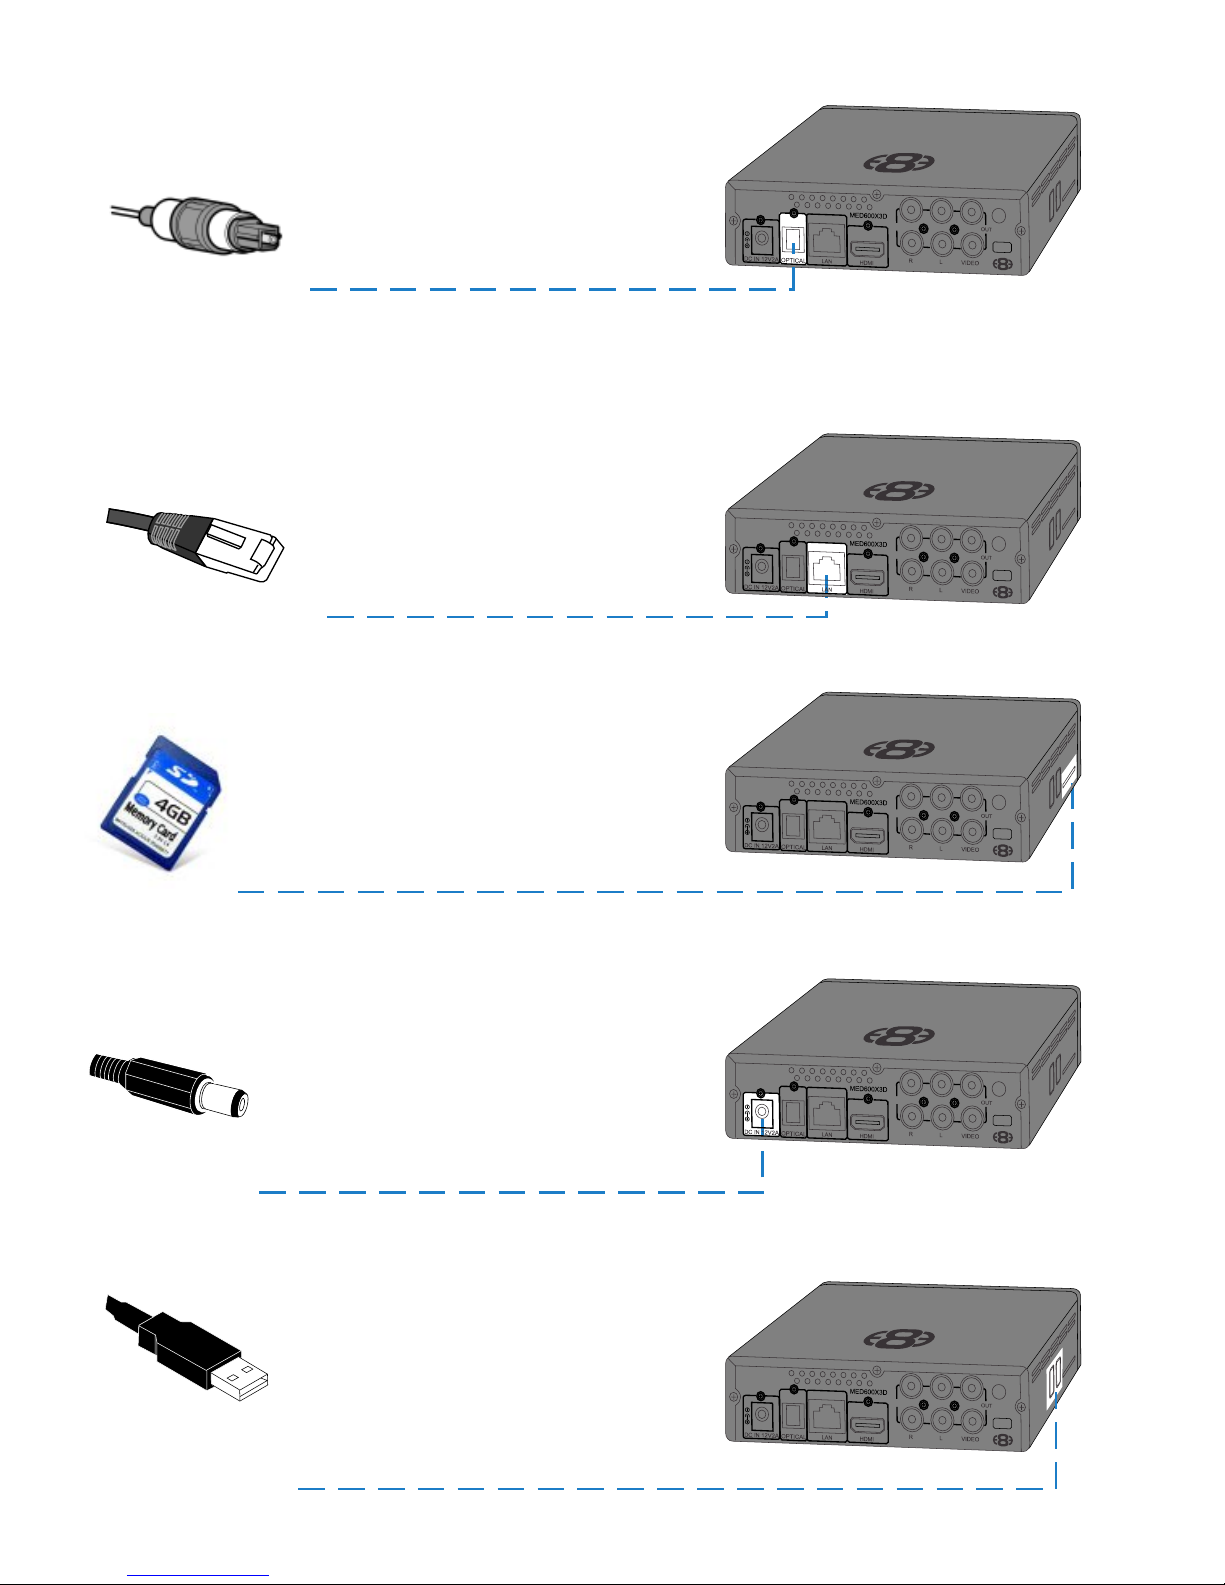
CONNECTIONS CONTINUED
Page5
SD Card Slot
DC Power Jack
2 X USB Host Ports
DC input is specified at 12 Volt 2 Amp DC. Important-- Only use the supplied AC DC Adapter.
SD / SDHC / Sony Pro Due Memory Cards supported.
Host up to two external ‘Type A’ connector USB Devices. Note - Many USB External drives require an
independent power source and must be supplied power from there own power supplies.
Y Pb Pr
OUT
Y Pb Pr
OUT
Y Pb Pr
OUT
Y Pb Pr
OUT
SPDIF Optical Audio
For digital audio connection to your Home Theatre System you can use the TOSLINK Optical output. The
MED600X3D supports both Passthrough and Downmix for both Dolby Digital and DTS signals. If you want your
Home Theatre Amplifier to decode the surround sound Bit Stream you can use SPDIF Optical and set the Audio
Output to SPDIF Passthrough in the Setup menu.
Rj45 Ethernet Network
The MED600X3D is equipped with Rj45 connector for connection to a wired network.
Y Pb Pr
OUT
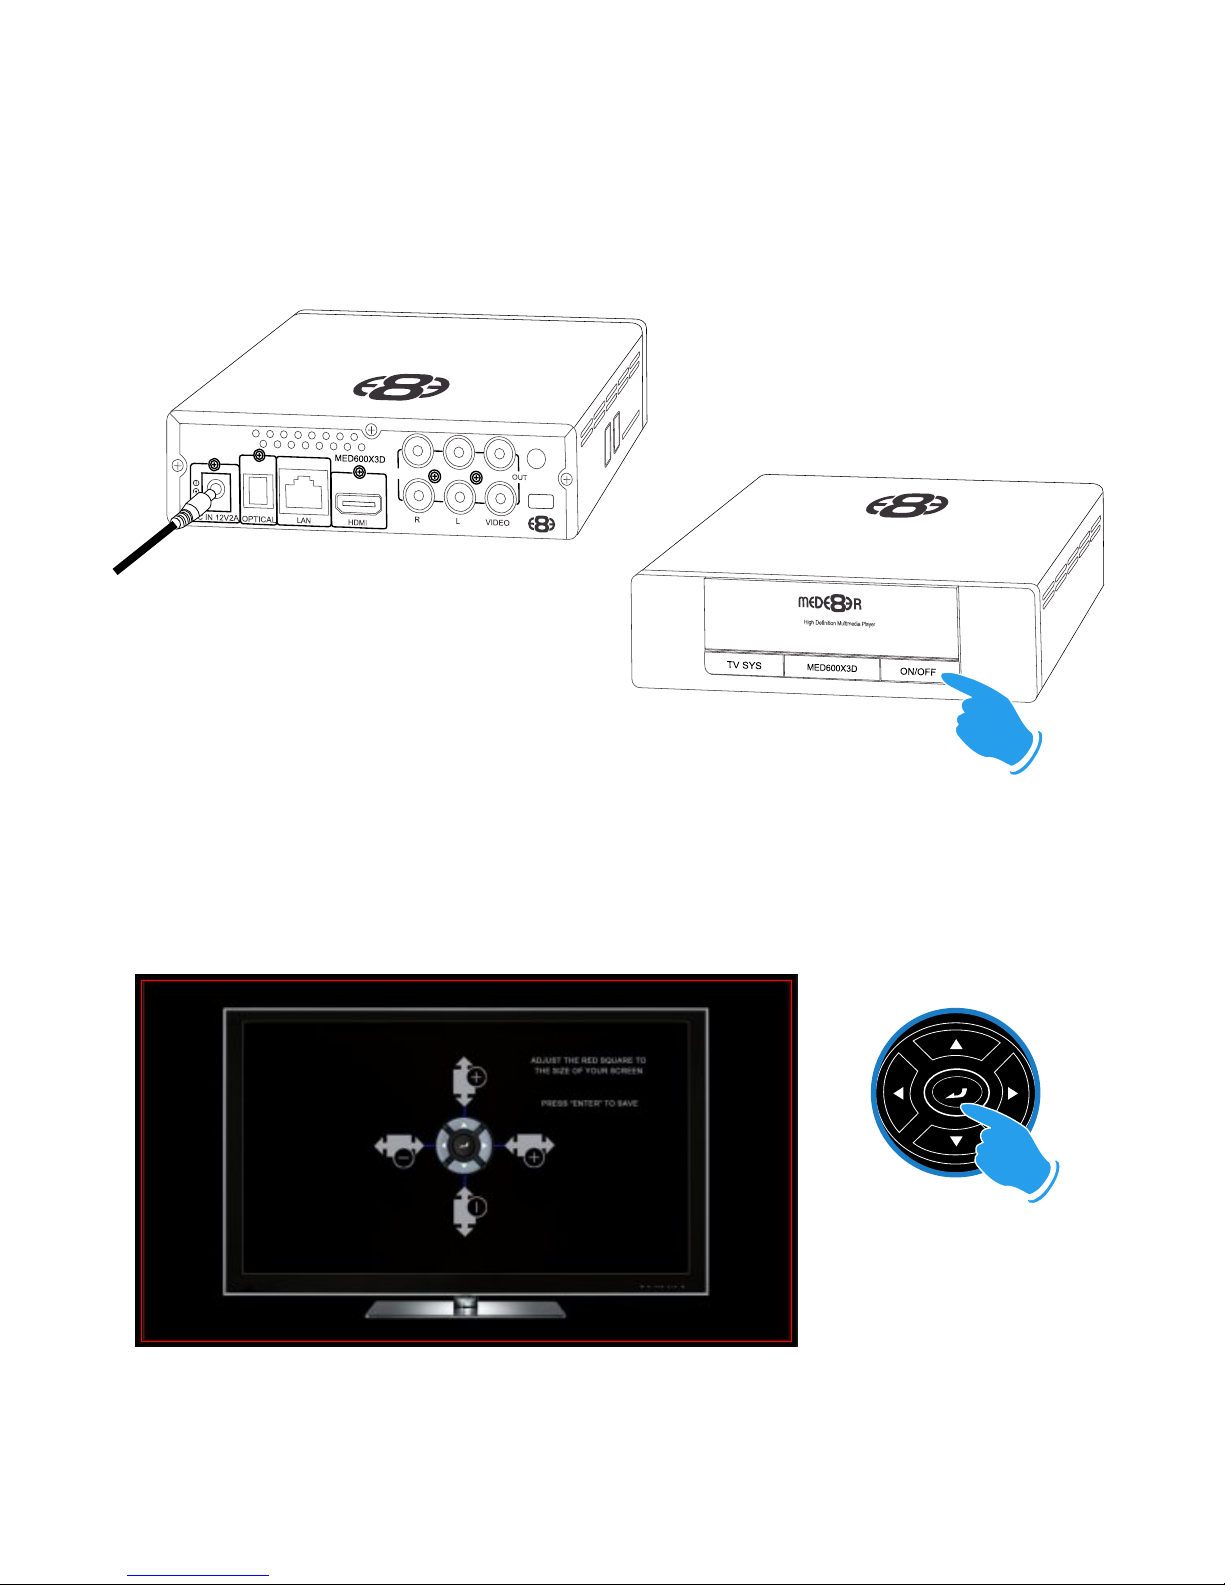
Plug the AC/DC adapter into the mains outlet and plug the DC Jack into the DC IN at the rear of the
MED600X3D.
DO NOT USE ANY AC/DC ADAPTER AND ONLY USE THE ONE SUPPLIED otherwise you may cause
damage to the unit. The Navigation Pad LED will light up ‘RED’. Press the On/Off button on the MED600X3D
front panel and Navigation Pad will LED will turn to Blue. You can switch the MED600X3D ‘Off’ by pressing the
‘On/Off’ button on the remote or by pressing the ‘On/Off’ button on the unit. When in standby the Top Navigation
LED will turn Red.
Multi Voltage AC/DC Power Adapter
On/Off Button
POWER UP AND STANDBY
SCREEN CALIBRATION
For better accuracy in Video Play and Image Zoom we suggest you calibrate your TV screen. Go to System
Setup then Video and select Screen Size.
Using the left, right, up and down navigation buttons you can adjust the red rectangle to fit the outer frame
of your TV screen. Note - Do not oversize the screen size as this could result in image artifacts when
viewing still images on certain brands of TV’s.
Press Enter to save
Page6
Y Pb Pr
OUT
Page7
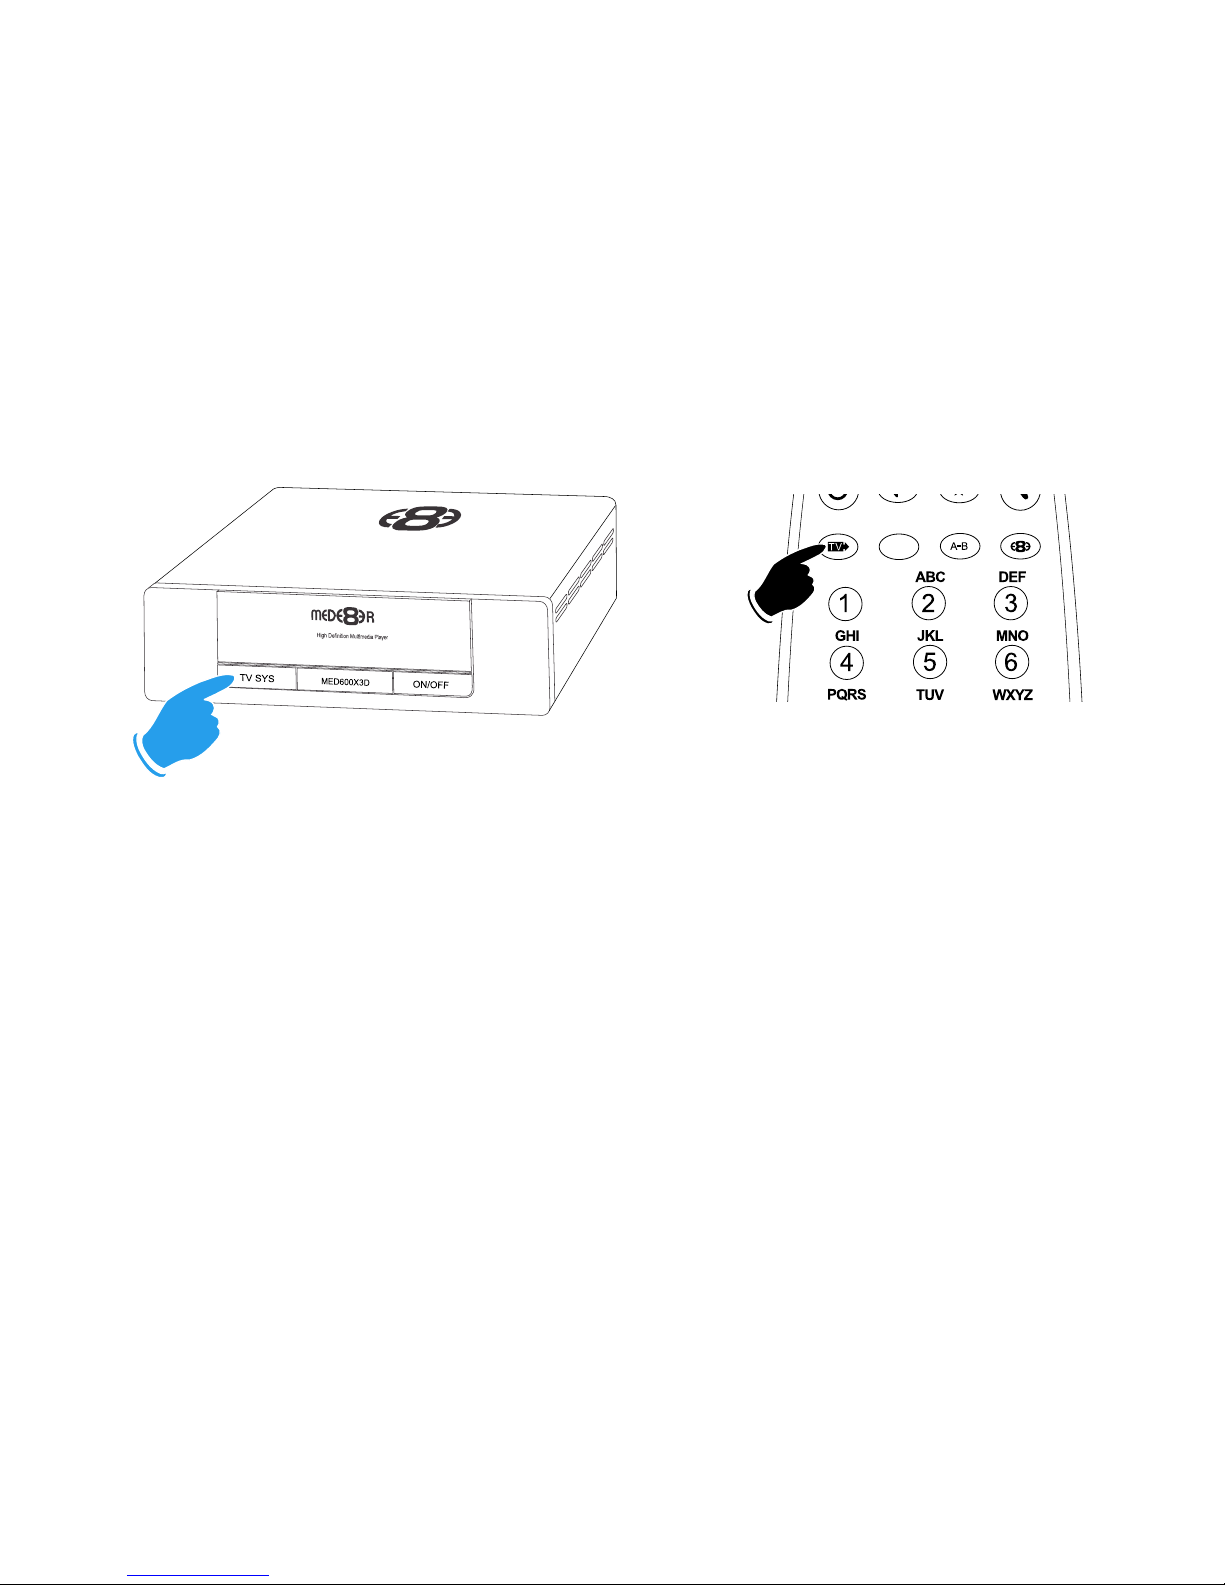
TV OUTPUT SETTINGS
If you do not get to see the MED600X3D GUI on your TV you will need to toggle the MED600X3D TV output
until you get a picture.
TV SYS Toggle Procedure
The MED600X3D has three video output options ie Composite Video (yellow RCA connector, Component
Video (Red - Green- Blue connectors) and HDMI. Each output option offers different screen resolution
settings and these will need to be adjusted to match the type of TV used.
It is suggested to use the Setup Menu to change the TV Out resolution. If you do not get a picture in the first
place then you can try to change the TV Out Resolution via the TV Sys button. To change the Video Output
on the MED600X3D press the TV SYS button on the remote and it will change the Video Output to the next
available output option. If after pressing the TV SYS button you still do not get a picture then press the TV
SYS again until you see the MED600X3D GUI on your TV. Keep repeating this procedure until you see a
picture on your TV.
AUDIO SETTINGS
Surround Sound
Select “Don’t Care” if you are using 2 CH stereo. If you are using SPDIF or Co-Axial Digital then
select “AC3". If you are using HDMI Audio to amplifier then select “True HD”
HDMI Auto
HDMI Auto is the suggested setting for HDMI Audio. All audio will automatically passed through to the
amplifier - Dolby / DTS Bitstream - Dolby True HD / DTSMA - PCM / Multi-Channel LPCM.
It is suggested to always use HDMI Auto in preference to HDMI Passthrough or LPCM Multi CH
SPDIF Passthrough
Use this setting to connect to an amplifier via Toslink optical cable or Co-Axial Digital RCA cable. The sound
will be passed through as Bitstream or PCM and the amplifier. Dolby True HD and DTSMA HD Audio and
Multi-Channel LPCM will not work on either SPDIF option.
SPDIF Downmix (2 channel)
Use this setting to connect to a Amplifier via Toslink optical cable or Co-Axial Digital RCA cable. The sound
will be downmixed to 2 channel stereo.
FORCE DECODE AAC/MP3
Use this setting if you do not get AAC/MP3 Audio with HDMI ‘Auto’ or Passthrough setting.
Once you see the MED600X3D GUI on your TV then you must enter the
Video Setup mode and adjust the Video settings to match the screen size
resolution of your TV.
OR
θ
Page8
REMOTE SIDE BUTTON REPLACEMENT
Should the remote TPE side buttons get worn or damaged you
can install the spare set of button that are supplied standard with
the X3. Remove the side TPE side buttons. Place the correct
side solid button into position and push it firmly and the button
will self lock into position.
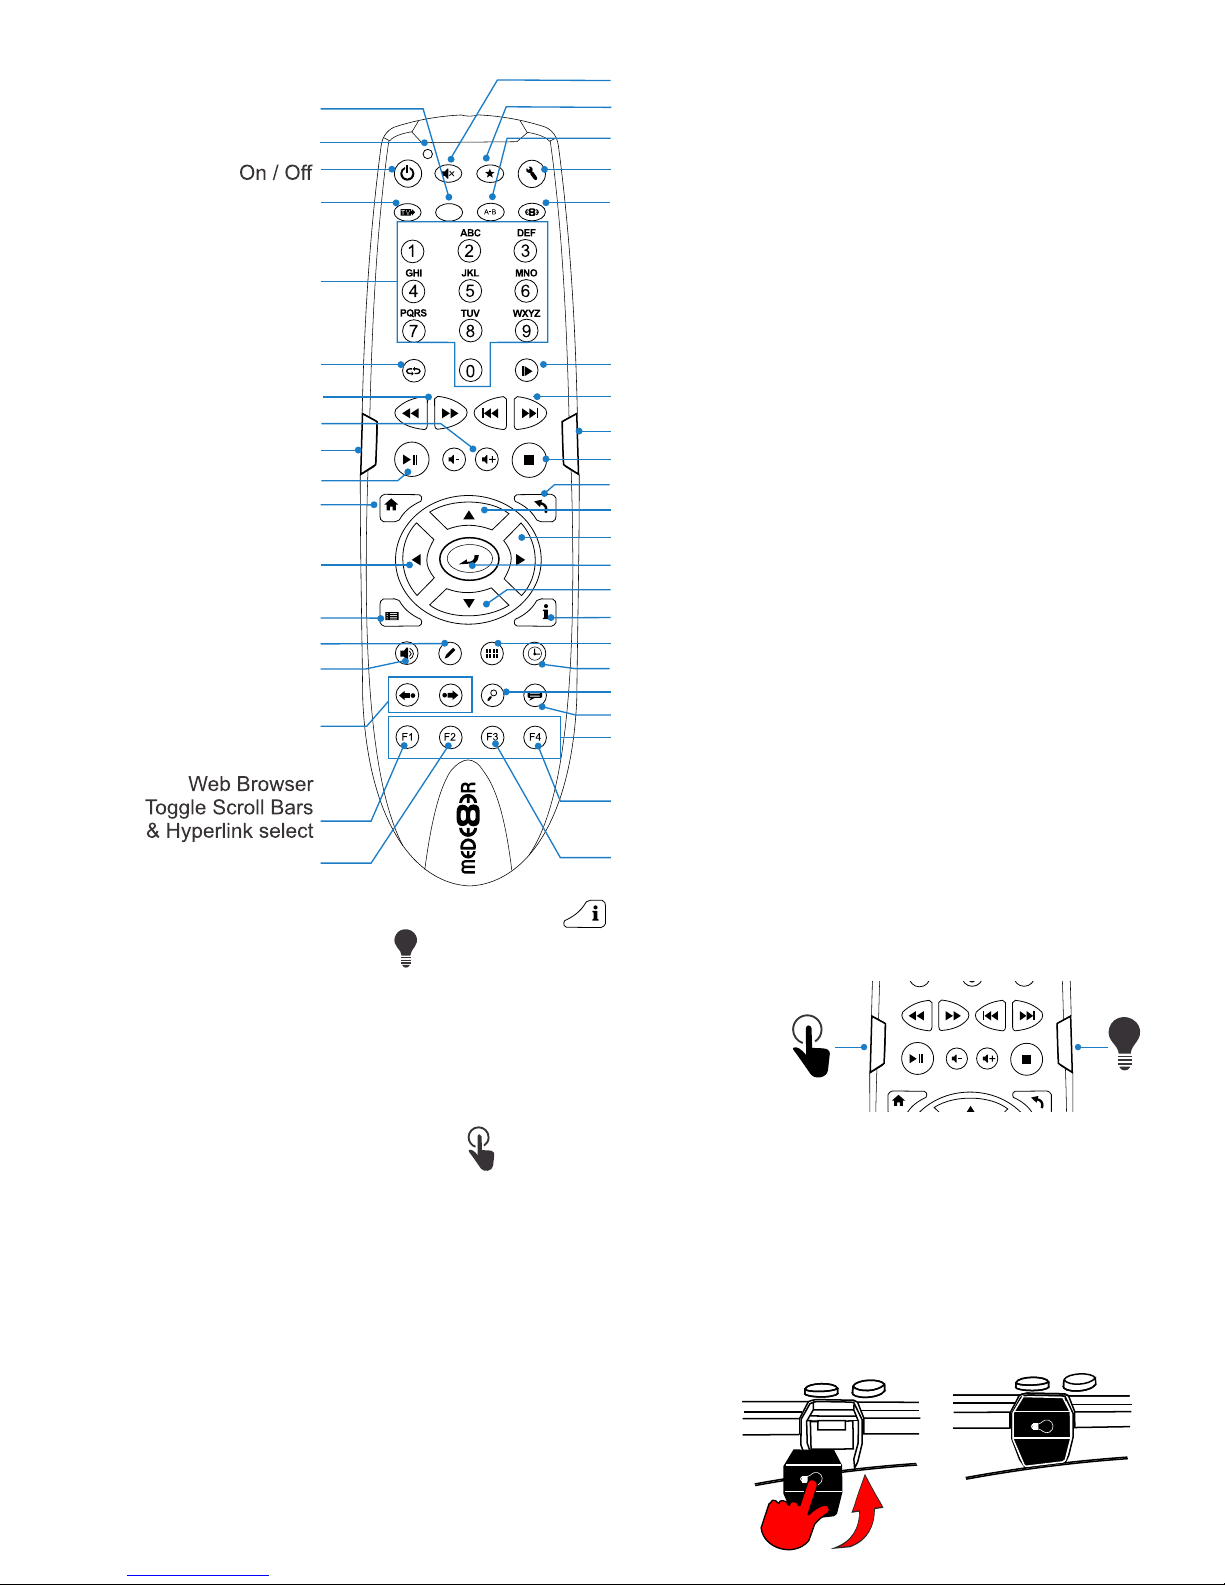
REMOTE FUNCTIONALITY
θ
Audio Selection /
Audio Currently Playing
Subtitle
Numbers
Info Screen / Movie Sheet (about.jpg) Zoom
Audio Mute
TV System
Fast Forward / Rewind
Home Page
DVD Angle
Play / Pause
Skip Forward/Back
Navigation Left
Search Bar - Video File
Next / Previous
Volume Up/Down
Navigation Right - Search Bar - Video File
Navigation Up
Navigation Down
Navigation Enter
View - Change the layout view in Media Library
Setup Functions / Browser Functions / Edit Functions
Menu
Favourites Shortcut button
Safely Remove USB
Active Backlight
Learn Function Button
Favourites Shortcut button
Setup
Return
Video Goto
Zoom
Video Slow
Stop - Exit Internet Browser
Edit
A-B
LED
Media Library ‘Devices Page’ Shortcut
Repeat Shuffle
Edit Text - Internet Browser - Toggle BD Menu ‘on’ ‘off’
Internet Browser - Zoom Video Play full screen
Remote Back Light
The X3 remote uses active Back Light technology. The activation button
is conveniently located on the right side of the remote for easy access in
the dark. Press the Back Light button and the remote buttons will light
up. The backlighting will auto switch ‘off’ after 15 seconds of no activity.
Press the Back Light button to manually switch ‘off’ the Back Lighting.
Remote Function Button
You can assign any button on the remote to the ‘Function’ button. This is designed to be used as a shortcut
button for a function that is used a lot.
To assign a button -- press the ‘Function Button’ for 3 seconds and the Remote will enter
‘Learn Mode’ and the LED will turn on solid. Now press the button you want to assign and it
will be learned and the LED will flash and then turn off. You can change the function button
assignment at any time by repeating this procedure.
Page9
DHCP IP Auto Fixed IP Manual
WIRED NETWORK CONNECTION AND SETUP
The X3 can be connected to your local network by means of a RJ45 CAT5 cable. The X3 is supplied
standard with a UPnP facility, Samba Client and NFS that allows connection to your local area network via a
router or switch. You can share media files from your PC or NAS and stream media content to the X3 and
you can use the X3 as a Media Server to stream media content to other devises on your network.
Press the “Setup” button on the X3 Remote or “Setup” on the Home Page then select “Network” option in
the Setup window then select ‘Wired Lan Setup’.
Network configuration allows for either automatic or manual IP setup.
DHCP IP (AUTO)
Choose this option if you want your router to assign a dynamic IP address to the X3. This option is easy to
use and recommended for normal users.
FIX IP (MANUAL)
This option allows you to assign a static IP address to the X3. This option requires modifying network
settings of the X3 and is recommended for advanced users. To set a Static IP for your X3, enter the
IP Address, Subnet Mast, Gateway and DNS Server Address as relevant to your router.
USB Keyboard Function Keys (based on MEDX2KEY) Optional Extra
ESC: RETURN SPACE: PLAY
ENTER: SELECT(ENTER)
'0': 0 '1': 1 '2': 2 '3': 3 '4': 4 '5': 5 '6': 6 '7': 7 '8': 8 '9': 9
'-': VOL_DOWN '+': VOL_UP
'P' + 'SHIFT' : POWER OFF
'R(r)': REPEAT 'T(t)': SUBTITLE
'I(i)': INFO 'A(a)': AUDIO
'G(g)': GOTO 'H(h)': HOME
'Z(z)': ZOOM '/(?)': Info / About
‘’Ctrl’ (z) : ZOOM YouTube, Internet Browser
‘’Ctrl’ (i) : ZOOM VIDEO FULL SCREEN Internet Browser
‘’Ctrl’ (quotation marks) : EXIT BROWSER - Stop Icon
',(<)': FRWD '.(>)': FFWD
'F(f)': Favourite 'E(e)': EDIT
'M(m)': MENU 'S(s)': Setup
'V(v)': View 'L(l)': AB
'\(|)': SLOW '’ (”)': STOP
'/(?)': Info / About '[({)': Back Skip
'](})': Forward Skip 'W(w)': Launch Web Browser
'B(b)': Browser - Devices
'Alt': Mute 'FI': Red button
'F2': Green button 'F3': Yellow button
'F4': Blue button 'F5': TV Sys
'F6': Previous Chapter 'F7': Next Chapter
'F8': Menu - Internet Browser
Autres manuels pour MED600X3D
1
Table des matières
Autres manuels Mede8er Lecteur multimédia

Mede8er
Mede8er MED400X2 Manuel utilisateur

Mede8er
Mede8er MED500X Manuel utilisateur

Mede8er
Mede8er Med1000X3D Manuel utilisateur

Mede8er
Mede8er MED600X3D Manuel utilisateur

Mede8er
Mede8er Med1000X3D Manuel utilisateur

Mede8er
Mede8er V3 Manuel utilisateur

Mede8er
Mede8er MED500X2 Manuel utilisateur

Mede8er
Mede8er MED250X Manuel utilisateur

Mede8er
Mede8er MED500X Manuel utilisateur

Mede8er
Mede8er V4 VIDEO WALL Manuel utilisateur


