MasterCraft 068-7306-2 Manuel utilisateur

continuation tabs
IMPORTANT:
Please read this manual carefully before assembling
and using this cabinet and save it for reference.
INSTRUCTION
MANUAL
EXTRA-WIDE WALL CABINET
Model no. 068-7306-2
headline bars
continuation tabs
notes
warnings
headline bars
continuation tabs
notes
warnings
model no. 062-3582-8 | contact us 1-800-689-9928
1
TABLE OF CONTENTS
headline bars
continuation tabs
notes
warnings
headline bars
continuation tabs
notes
warnings
model no. 068-7306-2 | contact us 1-800-689-9928
If any parts are missing or damaged, or if you have any questions,
please call our toll-free helpline at 1-800-689-9928.
SAVE THESE INSTRUCTIONS
This manual contains important safety and operating instructions.
Read all instructions and follow them with use of this product.
NOTE:
TABLE OF CONTENTS
2
3
4
6
9
10
Safety
Exploded View
Parts List
Assembly Instructions
Mounting Instructions
Warranty

2
SAFETY
• To reduce the risk of serious injury, read the following safety
instructions before assembling and using the cabinet.
• This cabinet is intended for domestic, indoor use only.
• The cabinet should be positioned on a level surface.
• Any assembly or maintenance of the cabinet must be carried
out by adults only.
• Arrange for necessary manpower when assembling and moving
the cabinet.
• Check all the nuts and bolts periodically for tightness.
When required, tighten them again.
• Use a slightly damp, soft cloth to clean the cabinet.
• Do not stand on the cabinet and do not use it as a scaffold.
• Do not exceed the weight limit specified for this cabinet.
Maximum Load: 280 lb (127 kg).
SAVE THESE INSTRUCTIONS
This manual contains important safety and operating instructions.
Read all instructions and follow them with use of this product.
3
headline bars
continuation tabs
notes
warnings
headline bars
continuation tabs
notes
warnings
model no. 068-7306-2 | contact us 1-800-689-9928
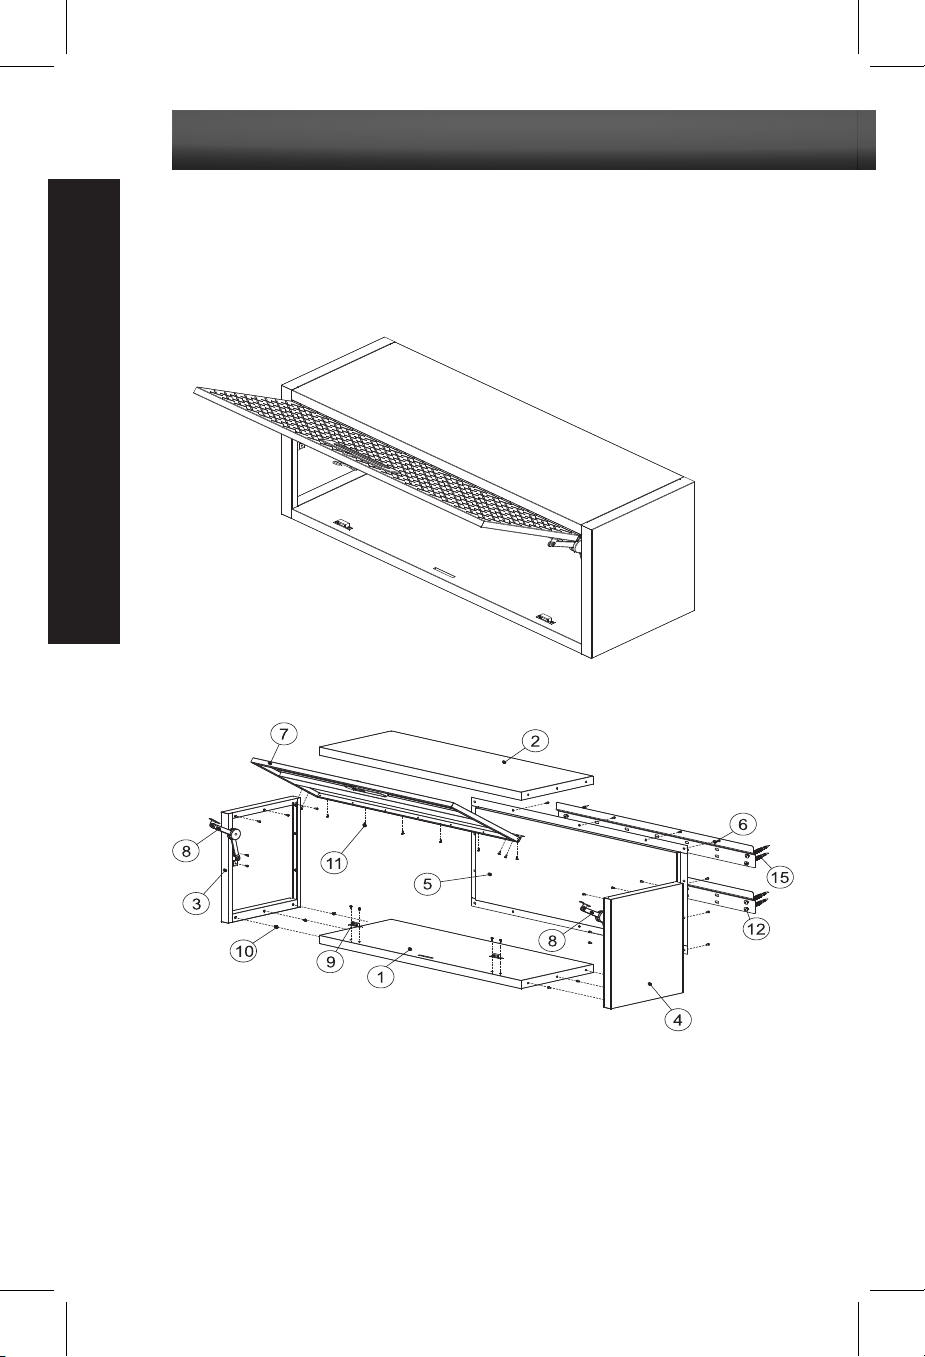
EXPLODED VIEW
headline bars
continuation tabs
notes
warnings
headline bars
continuation tabs
notes
warnings
model no. 062-3582-8 | contact us 1-800-689-9928
Overview
4
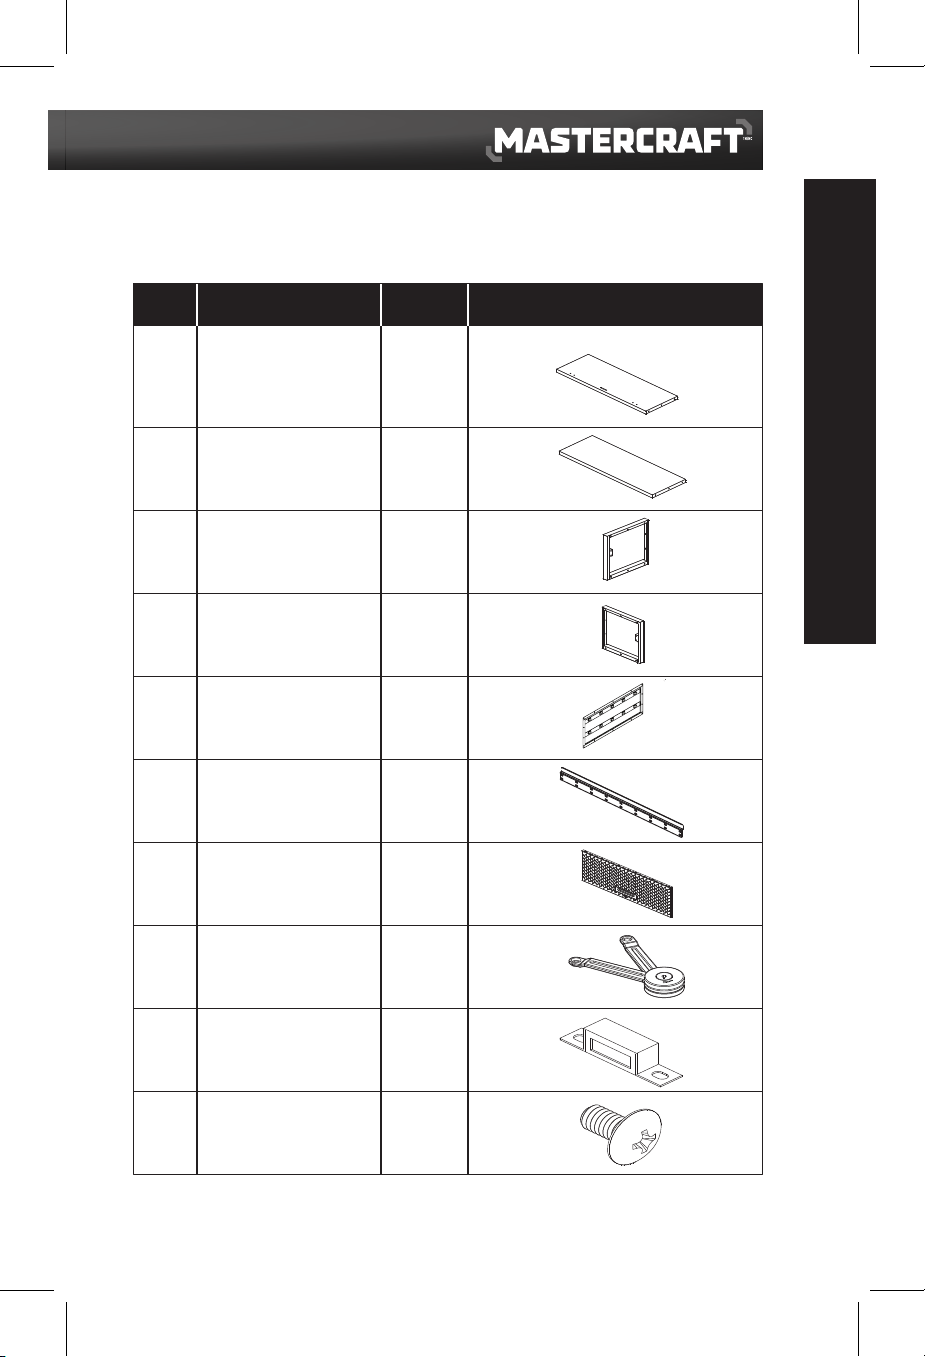
PARTS LIST
PARTS LIST
No.
1
2
3
4
5
6
7
8
9
10
Description
Bottom panel
Front panel
Left panel
Right panel
Back panel
Hanging bracket
Door panel
Door hinge
Magnet
Screw (M4 x 8L)
Qty.
1
1
1
1
1
2
1
2
2
38
Illustration

5
headline bars
continuation tabs
notes
warnings
headline bars
continuation tabs
notes
warnings
model no. 068-7306-2 | contact us 1-800-689-9928
headline bars
continuation tabs
notes
warnings
headline bars
continuation tabs
notes
warnings
model no. 062-3582-8 | contact us 1-800-689-9928
PARTS LIST
PARTS LIST
No.
11
12
13
14
15
16
17
18
19
Description
Screw (M4 x 8L)
Screw (M6 x 50L)
Screwdriver
Key
Wall Anchor
Washer
Door hinge fixture A
Door hinge fixture B
Screw (M5 x 10L)
Qty.
6
8
1
2
8
1
2
2
4
Illustration

6
ASSEMBLY INSTRUCTIONS
ASSEMBLY PREPARATION
• Assemble the storage cabinet on a clean, level surface.
• Remove all items from the packaging box and ensure that all parts listed on
pages 4 and 5 are included.
• When installing parts that have more than one screw, tighten all screws by hand
before tightening them with the screwdriver provided.
ASSEMBLY INSTRUCTIONS
1. Install Left Panel (3) to Top
Panel (2)
Attach the Left Panel (3) to the Top
Panel (2). Line up screw holes, and
secure with three Screws (10) using
Screwdriver (13).
Note: Make sure the panels are flush
before fastening (Fig. A).
2. Install Right Panel (4) to Top
Panel (2)
Attach the Right Panel (4) to the Top
Panel (2). Line up screw holes, and
secure with three Screws (10) using
Screwdriver (13).
Note: Make sure the panels are flush
before fastening (Fig. B).
3. Install Bottom Panel (1)
Attach Bottom Panel (1) to the Left
Panel (3) and Right Panel (4) as
shown in Figure. Line up screw holes
and and secure with six Screws (10)
using Screwdriver (13) (Fig. C)
Fig. A
Fig. B
Fig. C

7
headline bars
continuation tabs
notes
warnings
headline bars
continuation tabs
notes
warnings
model no. 068-7306-2 | contact us 1-800-689-9928
headline bars
continuation tabs
notes
warnings
headline bars
continuation tabs
notes
warnings
model no. 062-3582-8 | contact us 1-800-689-9928
ASSEMBLY INSTRUCTIONS
4. Install Back Panel (5)
First, line up the screw holes on the
Back Panel (5) with Left Panel (3),
Right Panel (4) and Bottom Panel (1).
Then, attach the Back Panel (5) with
14 Screws (10) using Screwdriver (13)
(Fig. D).
5. Install Magnet (9)
Attach the Magnets (9) to the Bottom
Panel (1) and secure with four Screws
(10) using Screwdriver (13) (Fig. E).
Note: The black plate of the Magnets
(9) should be facing the front.
6. Install Door Hinge Fixture B (18)
Attach the Door Hinge Fixtures B (18)
to the Door Panel (7). Line up screw
holes, and secure with four Screws
(10) using Screwdriver (13) (Fig. F).
Fig. D
Fig. D
Fig. F

8
ASSEMBLY INSTRUCTIONS
7. Install Door Hinge Fixture A (17)
First, attach Door Hinge Fixture A (17)
to the Left Panel (3) with two Screws
(10), then attach the Door Hinge (8)
onto the Fixture A (17) with one Screw
(19). Line up screw holes and use
Screwdriver (13) during assembly.
Attach the other Door Hinge Fixture A
(17) and Door Hinge (8) to the Right
Panel (4) in the same way (Fig. G).
8. Install Door Panel (7)
Attach the Door Panel (7) to the Top
Panel (2). Line up screw holes, and
secure with six Screws (11) using
Screwdriver (13) (Fig. H).
9. Attach Door Hinge (8) to Door
Panel (7)
Attach the Door Hinge (8) to Door
Hinge Fixture B (18) on the Door Panel
(7) with one Screw (19). Line up screw
holes and use Screwdriver (13) to
tighten. Make sure to attach the hinge
in correct direction. Attach the other
Door Hinge (8) to the Door Panel (7) in
the same way (Fig. I).
Adjust by Wrench (16) clockwise to
tighten and reverse to loosen.
10. Finish Assembly
Now your cabinet is ready to be
mounted on the wall (Fig. J).
Fig. G
Fig. H
Fig. I
Fig. J

9
headline bars
continuation tabs
notes
warnings
headline bars
continuation tabs
notes
warnings
model no. 068-7306-2 | contact us 1-800-689-9928
headline bars
continuation tabs
notes
warnings
headline bars
continuation tabs
notes
warnings
model no. 062-3582-8 | contact us 1-800-689-9928
MOUNTING INSTRUCTIONS
MOUNTING INSTRUCTIONS
1. Choose a location for the wall
cabinet. The recommended height
from the floor to the bottom of the
cabinet is 63" (160 cm) (Fig. K).
2. Use the provided shop drawing as
guidance to drill holes (Φ8 mm) on
the wall (Fig. L).
3. Insert eight Wall Anchors (15) into
the pre-drilled holes on the wall. Then
use eight Screws (12) to fix the two
Hanging Brackets (6) on the wall.
Make sure all screws are fastened
tightly (Fig. M).
4. Finally, hang the cabinet on the
hanging brackets (6). Now, your
cabinet is ready for use. Use the keys
(14) to lock the cabinet doors, if
desired (Fig. N).
Fig. K
Fig. L
Fig. M
Fig. N
63" (160 cm)
Table des matières
Langues :
Autres manuels MasterCraft Stockage

Manuels Stockage populaires d'autres marques


Spectra Logic
Spectra Logic T-Series Spectra T50e Manuel utilisateur

Panasonic
Panasonic LKM-F931-1 Manuel utilisateur

Tabernus
Tabernus Enterprise Erase E2400 Manuel utilisateur

Rocstor
Rocstor COMMANDER 3F series Manuel utilisateur

HP
HP P9000 Manuel utilisateur

Western Digital
Western Digital Ultrastar Data60 Manuel utilisateur