Maestro MR792 Manuel utilisateur

Модель: MR792
Model: MR792
Виріб сертифіковано в Україні
091
Owners manual. Multi-cooker
Bedienungsanleitung. Multikocher
Instrukcji obsługi. Multicooker
Manualul proprietarului. Oală de gătit multifuncţională
Руководство по эксплуатации. Мультиварка
Керівництво з експлуатації. Mультиварка
EN
DE
RU
UA
RO
PL

2
Dear customer, we thank you for purchase of goods
Functionality, design and conformity to the quality standards guarantee to you reliability
and convenience in use of this device.
Please read and comply with these original instructions prior to the initial operation of your
appliance and store them for later use of subsequent owners.
Multicooker is designed for cooking in domestic (household) conditions.
Under condition of observance of user regulations and a specialpurpose designation, a
parts of appliance do not contain unhealthy substances.
Multicooker is a multifunctional appliance for cooking at home.
The cooking in multicooker is extremely simple, because during the cooking the
microprocessor assumes the functions of temperature and time control according to
selected program.
The 3D system controls the cooking temperature at all points and supports the optimum
mode. The appliance allows you to save your time with the function “Delayed start”. You
can put the food in the evening, run the required program and get a freshly prepared
breakfast in the morning.
Technical specications
Model: MR792;
Electrical supply:
Alternating current- AC;
Rated voltage 220-240V;
Rated frequency 50Hz;
Power consumption 700W
Protective class I
Protection class IPX0
Bowl: aluminum, with ceramic coating, capacity 5L;
Type of control: electronic FUZZY LOGIC;
Display: digital LED
Delayed start of the program: up to 24 hours;
Number of programs: 17

3
Programs: Milk porridge, Rice / Rise stew, Braising, Dessert, Yogurt, Porridge, Fast
cooking, Vegetables, Frying , Soup, Baking, Multichef, Pasta, Meat, Cupcake, Steamer,
Heating.
3D heating and temperature maintenance
1The appliance with the installed bowl 1 PC
2 Power cable 1 PC
3 Beaker 1 PC
4 Turner 1 PC
5 Spoon 1 PC
6Container-steamer 1 PC
7 Manual 1 PC
8Warranty card 1 PC
9 Recipe book 1 PC
Note: The characteristics, specications and physical conguration of the appliance could
be slightly modied by the manufacturer, without impairing the basic consumer qualities of
the appliance.
Safety instructions
When using your appliance, basic safety precautions should always be followed,
including the following:
SPECIAL INSTRUCTIONS
WARNING!
- NEVER immerse the appliance, cable or plug in any liquid.
- DO NOT allow water and moisture on the electrical parts of the device.
- NEVER touch the appliance with wet or damp hands.
Otherwise, there is a risk to get an electric shock!
- DO NOT leave the appliance unnecessarily plugged in. Disconnect the plug from the
mains when the appliance is not being used.
- Always turn o the switch (time controller) and take electrical connector out of socket
before cleaning and storage.
- DO NOT use the power cord or the appliance in order to pull the plug out of the socket.
- Only plug the appliance into an outlet with an earthed (ground) contact.
- In the interest of safety, regular periodic close checks should be carried out on the supply
cord to ensure no damage is evident.
Should there be any signs that the cord is damaged in the slightest degree, the entire
appliance should be returned be authorized service engineer.
-If your device was brought from cold to warm room, do not switch it on within 2 hours to
prevent damage due to condensation on internal parts.
- This appliance is not intended for use by persons (including children) with reduced
physical, sensory or mental capabilities, or lack of experience and knowledge, unless they
have been given supervision or instruction concerning use of the appliance by a person
responsible for their safety.
EN

4
- Do not operate the appliance if damaged, after an appliance malfunctions or it has been
damaged in any manner, return to at authorized service engineer for repair.
- DO NOT let children or untrained persons use the appliance without supervision.
- Keep the power cord away from the hot and sharp surfaces. The power cord should not
touch the top part and the back wall of the oven during its operation.
- Do not let the cord hang over the edge of a table or counter or touch hot surfaces.
- Не бросайте прибор.
- DO NOT leave the appliance exposed to the weather (rain, sun, etc. ).
ATTENTION!
- Internal and some external parts of the appliance become very hot while working. Be
careful as you can burn touching the heated surfaces.
- Install the multicooker only on a dry, stable, at, non-slip surface.
-Use potholders or kitchen mitts to remove a bowl or container.
During of non-compliance with the aforementioned rules arises the risk of burns!
- It is prohibited to turn on the multicooker without putting food inside, as it can lead to
serious damage.
-Do not exceed specied maximum volumes of ingredients.
-Do not lid the ventilating inlets in the lid for steam, do not lid up the multicooker during
working, and make sure that there is a sucient distance for ventilation around the
multicooker during its working (at least 20 cm to walls and furniture from all sides).
-Do not use the appliance close to ammable objects (for example, near or under the
curtains).
-THIS APPLIANCE IS FOR HOUSEHOLD USE ONLY. DO NOT USE THE APPLIANCE
FOR ANYTHING OTHER THAN INTENDED USE.
Do not use it for commercial purpose.
Actions in extreme situations:
- If a device tumbled into water, immediately, unplug the device, not touching to the device
or water.
- In case of appearance from appliance of smoke, sparkling, strong smell of a burn
isolation, immediately stop use the device, unplug the device, appeal to the nearest service
center.

5
Description of the appliance
1. Lid opening button
2. Lid
3. Housing
4. Control Panel
5. Moisture collector
6. Steam valve
1 – “Preset time/Delayed start” button
2 – “Start “ button
3 – “Warm / Cancel” switching-o or on the mode
“Heating”
4 – Button of timing “Time”
5 – Indicator of the selected program
6 – Button “Menu” button
7 – Button “On / O”
8 – Time indicator
1
4
2
5
6
7
3
1
2
3 4
5
6
7
8
Picture 1
Picture 2
EN

6
Preparation for work
- Remove all wrap materials and stickers
- Make sure that all the parts of appliance don’t have damages.
- Check the assembly of the multicooker.
- Inspect all parts of the multicooker, power cord and plug. Ensure in lack of any damages
incurred in the transportation, such as:
•damages of the frame or lid, dents or cracks;
• damages of the non-stick coating of the bowl;
• damages of power cord and plug.
ATTENTION! If any of the above mentioned damages are present, do not install the
multicooker and immediately provide the information about damages to your Seller.
- Wipe the frame of the appliance with a damp cloth. Wash the bowl, container, spoon and
ladle in warm soapy water, rinse and wipe dry.
In choosing a place for installing a multicooker, it must be not exposed to direct sunlight,
near heated appliances, or in a draft. All this can aect to the temperature inside the
multicooker and reduce the quality of the prepared dishes.
-Install the multicooker on a at, non-slip surface, giving the free space on all sides, at least
20 cm , for sucient air circulation.
For surfaces that can be damaged by heat, it is recommended to use heat-insulating, non-
ammable supports.
- Before plugging the multicooker in, make sure that the power parameters, indicated in
the table of technical characteristics, coincide with power supply of your network. The high
voltage using may cause the damage of the appliance and even make the re. The low
voltage using leads to unsatised quality cooking.
Attention!
At the time of the rst switching on the device, a specic smell or smoke may appear for a
short time. These are normal phenomena due to the presence of preservation materials on
the electric drive motor. They shall disappear after several minutes of the device operation.
Rules of using of multiccoker’s parts and accessories
Rules of bowl using
The inner bowl with non-stick coating is designed for this model of the multicooker and
should not be used with any other appliance. Please, make sure that the bowl is rmly in
contact with the heating plate by turning it slightly in a counterclockwise direction.
Wash the bowl after each use. In bowl cleaning, please do not use alkaline solutions,
caustic or abrasive cleaners, or hard, sharp objects, in order to prevent the damage of
coating; no excessive force in bowl cleaning.
To prevent burns, remove the bowl from the appliance by wearing on kitchen gloves or
allow the bowl to cool before removing it from the appliance. Do not wash it immediately
after use, let it cool down a little.

7
Do not wash the bowl in the dishwasher.
Do not whip or wash food in the bowl, for avoiding the damage of coating.
Do not place it on an open re.
Over time, the lid of the bowl will be gradually erased, it is necessary to use it carefully. Do
not drop or hit the bowl.
Do not leave undesired objects (except food) in the bowl.
Do not use the appliance with a bowl / pan which is not included to the set.
Do not use the appliance without a bowl or with an empty bowl, as this can lead to
breakage.
Grease the bowl with oil before baking.
Before baking, spread the dough on the bottom of the bowl so that the bottom is completely
lided and the dough touches the sides of the bowl.
Do not ll the bowl above the top mark “MAX”.
The using of heating element
The heating element of the appliance (located at the bottom of the camera) and the bowl’s
outside should always be clean and dry for damage avoiding of the appliance.
Do not wash or wet the heating plate. Wipe it gently with a cloth / sponge, and then wipe it
dry.
Do not insert any objects between the bowl and the heating plate. This can lead to electric
shock or appliance damage.
The heating plate is very hot during the process of cooking. Do not touch it!
The using of the multicooker’s lid
To open the lid, press the opening button located on the lid, to close, press the lid until it
clicks.
During cooking, close the lid tightly, except the “FRYING” function, or when you need to
open it.
Watch your face and hands from burns when opening the lid. Do not lean over the unit to
avoid burns.
Do not immerse the appliance’s lid in water.
For cleaning the appliance’s lid, use only a damp soft cloth / sponge.
The using of steamer container
Do not use the container without the bowl of the multicooker.
Do not use the container on open res!
Do not use the container with other appliances, or use the appliance with a container which
is not included to the set.
Before steamed cooking, lubricate the container with oil, then the food will not stick to it.
To prevent burns, remove the container from the appliance using kitchen gloves or allow to
cool the appliance.
Terms of accessories using
The multicooker set includes the following accessories: a spatula, a spoon and a
EN

8
measuring cup, it is recommended to use only these accessories for this appliance.
Do not use metal kitchen appliances, as they can damage the coating of the pan.
Do not leave accessories in a saucepan while using the appliance.
Multicooker Transportation
It is recommended to carry the appliance empty and completely cooled. When carrying,
hold the multicooker with both hands.
Be careful if the appliance is hot use kitchen gloves;
Programs
№Program Pre - set
time
Time range
Time / step
Delayed
start hour:
min
1Milk porridge 25 min 95
From 5 minutes to 4
hours /
step 1 min
00:30-
24:00
2 Rice / Rise stew 1 hour 110
From 5 min to 2
hours /
step 5 min
00:30-
24:00
3 Braising 1 hour 100
From 10 min to 4
hours /
step 5 min
00:30-
24:00
4 Dessert 40 min 95
From 5 min to 2
hours /
step 5 min
00:30-
24:00
5 Yogurt 8 hours 40
From 10 min to 12
hours /
step 5 min
00:30-
24:00
6Porridge 25 min 95
From 5 min to 4
hours /
step 1 min
00:30-
24:00
7 Fast cooking 35 min 110
From 10 min to 4
hours /
step 5 min
00:30-
24:00
8Vegetables 30 min 105
From 5 min to 2
hours /
step 5 min
00:30-
24:00
9 Frying 20 min 180 From 5 min to 1 hour/
step 5 min
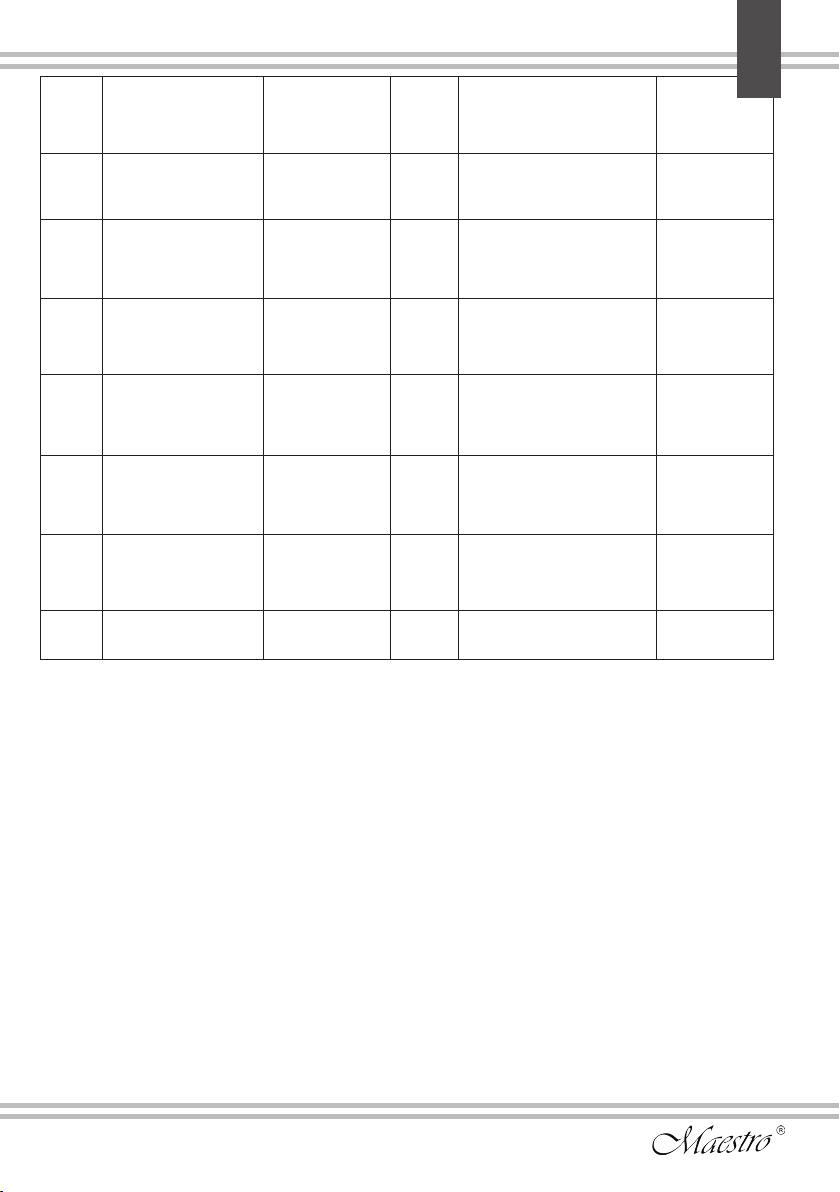
9
10 Soup 1 hour 100
From 10 min to 8
hours /
step 5 min
00:30-
24:00
11 Baking 55 min 140
From 10 min to 2
hours /
step 5 min
00:30-
24:00
12 Multichef 30 min 100
From 2 min to 15
hours /
step 1 min
00:30-
24:00
13 Pasta 8 min 115
From 2 min to 1
hours/
step 1 min
14 Meat 1 hour 30
min 100
From 10 min to 8
hours /
step 5 min
00:30-
24:00
15 Cupcake 50 min 130
From 10 min to 8
hours /
step 5 min
00:30-
24:00
16 Steamer 30 min 115
From 5 min to 2
hours /
step min
17 Heating 90
Standard operations, program selection.
Before starting any one of the programs, inspect the multicooker and the bowl.
Make sure that the bottom of the bowl and the surface of the heating element in the
multicooker camera are clean, without undesired objects.
Put the products into the bowl.
Set the bowl into the multicooker camera, slightly rotate it counterclockwise to ensure a
tight touch of the bottom of the bowl and the heating element.
Close the lid until the latch snaps into place.
Connect the multicooker to an electrical outlet.
Turn on the multicooker by pressing the buttons “Power on / o” pos.7 Fig. 2.
The multicooker has 17 basic programs installed. For selecting and running the required
program, please take the following steps:
1) Press the “Menu” button until the indicator light of the needed program is highlighted.
The cooking time of this program will be indicated on the display and applied by default.
2) Press the button “Start” to conrm and start the selected program. On the display will
start the time count backwards; the multicooker will carry out a programme.
3) At the end of the selected program will sound the signal and the multicooker will
automatically pass to mode “Heating” (Heating mode is not available for the Yogurt
program). This will be indicated by the bb indicator on the display.
EN

10
Pasta Program
Fill the bowl with water, pressing the button “Menu” select the Pasta program, press the
button “Start / Heating” button. The multicooker will start heating the water.
The display will show 00:00. When the water boils, the multicooker will sound the signal,
open the lid, put the spaghetti in the water, and press the button Start. On the display
shows the time and temperature of the program, start the time count backwards.
At the end of the program, the multicooker will beep and will automatically pass to the
heating mode. The display will show bb.
Note: after water boiling the sound signal will spread every 30 seconds (ve-fold “beep”),
if you do not put spaghetti in water during the last 5 minutes, the multicooker will
automatically stop the program.
The cooking time change
All multicooker’s programs have pre-factory settings of cooking time, however you can
change the cooking time at your discretion before cooking.
1) After putting the products into multicooker, close the lid and turn on the appliance.
2) Press the button “Menu” to select the desired program, on the display shows the preset
time of the selected program.
3) Press the button “Time” to set the desired time.
4) Press the button “Start” to conrm the set value and start cooking. The program starts its
execution.
The function «Delayed Start»
The multicooker allows to program the start delay of the cooking. All programs except the
program “Grilling» have the option of a 24 hour start delay period.
1) After putting the products into the multicooker, close the lid and turn on the appliance.
2) Press the button “Menu” to select the desired program, on the display shows the preset
time of the selected program.
3) Press the button “Delayed Start”, on the display shows a ashing time in hours and
minutes 00:00. Press the button “Delayed Start” to set the desired delay time. Each button
pressing adds 30 minutes, the display will show 00:30, 01:00, 01: 30 ... 24: 00. The range
of settings is represented in the program table.
For example, currently at 12:00 you want to start the cooking at 16:00. Set the delay time
to 04:00.
4) Press the button “Start” to conrm. Two indicators will ash on the display, the delay time
starts counting down, when the selected program of cooking will start.
The cooking time change and setting the program “delayed start”
To change both parameters, proceed as follows:
1) After putting the products into the multicooker, close the lid and turn on the appliance.
By pressing the button “Menu”, select the desired program, on the display shows the
preset time of the selected program.
2) Press the button “Time” to select the desired program.
3) Press the button “Delayed Start”, on the display shows a ashing time in hours and
Table des matières
Langues :
Autres manuels Maestro Appareils de cuisine

Maestro
Maestro MR082 Manuel utilisateur

Maestro
Maestro MR710 Manuel utilisateur

Maestro
Maestro MR-767 Manuel utilisateur

Maestro
Maestro MR852 Manuel utilisateur

Maestro
Maestro MR 766 Manuel utilisateur

Maestro
Maestro MR080 Manuel utilisateur

Maestro
Maestro MR795 Manuel utilisateur

Maestro
Maestro MR794 Manuel utilisateur

Maestro
Maestro MR-713 Manuel utilisateur

Maestro
Maestro MR 765 Manuel utilisateur


