MadBoy U-REMIX 3 Manuel utilisateur

OWNER’S MANUAL
BLUETOOTH KARAOKE MIXER WITH
WIRELESS MICROPHONES
U-REMIX 3
WWW.MADBOY-AUDIO.COM
ENGLISH
ECHO MIC 1 VOL MIC 2 VOL TONE VOLUME
U-REMIX 3
POWER
RF1 AF1 RF2 AF2
BASS TREBLE
MICROPHONES MUSIC

Table of Contents
Safety Instructions .......................................................................................................................
Getting Started
Features ...................................................................................................................................
Connectors ..............................................................................................................................
What’s in the box .....................................................................................................................
Receiver
Front panel ..............................................................................................................................
Back panel ...............................................................................................................................
Wireless Microphone ...................................................................................................................
Connecting the Receiver
Basic connecting instructions .................................................................................................
Connecting the audio source
Connecting the Bluetooth device ..........................................................................................
Connecting the audio to the analog RCA input .....................................................................
Connecting the audio system ..................................................................................................
Adjusting the system ...............................................................................................................
Connecting as a wireless receiver .........................................................................................
Connection Example
Connecting the audio from a computer through the television ................................................
Connecting the audio directly from a computer .......................................................................
Connecting the audio from a SMART-TV using Bluetooth ......................................................
Technical Specifications ..............................................................................................................
3
4
4
5
6
6
7
8
8
8
8
8
9
10
11
12
13
WWW.MADBOY-AUDIO.COM
2

WWW.MADBOY-AUDIO.COM
Safety Instructions
3
1. Read instructions: All safety and operating instructions should be read before installation.
2. Keep instructions: Safety and operating instruction should be retained for future reference.
3. Heed warnings: Warnings on the apparatus and in the operating instruction should be adhered to.
4. Follow instructions: All operating instructions should be followed.
5. Accessories: Only use accessories specified by the manufacturer.
6. Water and moisture: Do not use this apparatus near water.
7. Ventilation: Do not block any ventilation openings.
8. Heat: Do not install near heat sources such as radiators or other apparatus that produces heat.
9. Protect power cord: Power cord should be placed so that it is not likely to be walked on or pinched
by items placed upon it. Do not use the apparatus if power cord is damaged.
10. Cleaning: Unplug power cord before cleaning. Do not use liquid cleaners or aerosol cleaners. Use
a damp cloth for cleaning.
11. Nonuse periods: Unplug the power cord if apparatus is left unused for a long period of time.
12. Objects and liquids: Care should be taken so that object do not fall and liquids are not spilled into
the enclosure through the openings.
13. Damage requiring service: The apparatus should be serviced by qualified service personnel
when:
A. Objects has fallen inside enclosure.
B. The apparatus has exposed to rain or moisture.
C. The apparatus has been dropped or enclosure is damaged.
D. The apparatus do not operate normally.
14. Servicing: Refer all servicing to the qualified service personnel.
15. Warranty: Warranty service should be done by qualified service personnel authorized by Madboy
Audio International Oy. Warranty is invalidated if a warranty seal has been altered, removed or
defaced or inadequate repair work performed by end user or any non-authorized repair center.
Warning!
To reduce the risk of fire or electric shock, do not expose this apparatus to rain or moisture.

Getting Started
Features:
ŸBluetooth karaoke mixer with wireless microphones
ŸTwo wireless microphones with 16 selectable frequencies
ŸBluetooth 4.2 audio interface for streaming music from a mobile device
ŸExternal antennas for extended wireless range
ŸAnalog RCA input for connecting an audio source
ŸAnalog RCA output for connecting the amplifier or active speakers
ŸDigital optical output for connecting the amplifier or soundbar
ŸVolume control and 2-band equalizer for music
ŸIndividual volume controls for microphones
ŸTone and echo level controls for microphones
ŸSupport for 12V automotive power outlet to use mixer in busses/campers/boats with adapter*
Connectors:
ŸInputs:
§Bluetooth audio input (music)
§RCA stereo input (music)
ŸOutputs:
§Mono 1/4" TS jack output (music + microphones)
§Digital optical output (music + microphones)
§RCA stereo output (music + microphones)
WWW.MADBOY-AUDIO.COM
4
*DC jack (5.5/2.1 mm) to automotive power outlet adapter sold separately

WWW.MADBOY-AUDIO.COM
5
Getting Started
What’s in the box:
U-REMIX 3 (1) WIRELESS MICROPHONES (2)
RCA CABLE (2)
UNBALANCED
1/4" TS PLUG CABLE (1)
1/8" TRS PLUG - RCA CABLE (1)
’AA’ BATTERIES (4)
POWER ADAPTER (1)
OWNER’S MANUAL (1)
EC HO MI C 1 VOL MI C 2 VOL T ON E VO LUM E
U-RE MI X 3
PO WER
RF 1 AF1 RF 2 AF2
BA SS TR EB LE
MI CRO PH ONE S MU SIC
OWNER’S MANUAL
BLUETOOT H KARAOKE M IXER WIT H
WIREL ESS MIC ROPHONE S
U-REMIX 3
WWW.MADBOY-AUDIO.COM
ENGLISH
ECHO MIC 1 VOL MIC 2 VOL TON E V OLU ME
U-REMI X 3
POWER
RF1 AF1 RF2 AF2
BASS TR EBLE
MICRO PHONES MU SIC
POWE R SELEC T POWE R SELEC T

Front panel
Receiver
1 32
1. POWER: Press this switch to turn the power ON or OFF.
2. ECHO: For adjusting echo level for microphones.
3. MIC 1: For adjusting volume of the microphone 1.
4. MIC 2: For adjusting volume of the microphone 2.
5. TONE: For adjusting tone for microphones. Turn clockwise to increase treble and decrease bass
frequencies. Turn counterclockwise to increase bass and decrease treble frequencies. Set to
center position for neutral tone.
6. STATUS LIGHTS: RF1 light turns on when wireless microphone 1 is connected to the receiver.
AF1 light turns on when audio signal is detected on wireless microphone 1.
7. POWER LIGHT: Indicates that the system is turned on.
8. STATUS LIGHTS: RF2 light turns on when wireless microphone 2 is connected to the receiver.
AF2 light turns on when audio signal is detected on wireless microphone 2.
9. MUSIC: For adjusting volume, bass and treble of the music.
6 7 8
459
WWW.MADBOY-AUDIO.COM
6
1 2 3 56
1. ANT. 2: Antenna for bluetooth and wireless microphone 2.
2. IN / OUT: IN for connecting the audio source using RCA cable. OUT for connecting amplifier or
active speakers using RCA cable.
3. OPTICAL OUT: For connecting an amplifier or a soundbar with Toslink cable. 2-channel 48 kHz
PCM audio must be supported by the amplifier or soundbar.
4. MONO OUT: Unbalanced 1/4 TS jack output for audio (music + microphones).
5. POWER INPUT: Connect power adapter here. Can be also powered by 12V automotive power
outlet (cigarette lighter) in busses/boats/campers. DC jack (5.5/2.1 mm) to automotive power
outlet adapter sold separately.
6. ANT. 1: Antenna for wireless microphone 1.
Back panel
ECHO MIC 1 VOL MIC 2 VOL TONE VOLUME
U-REMIX 3
POWER
RF1 AF1 RF2 AF2
BASS TREBLE
MICROPHONES MUSIC
LR
IN
OUT
MONO OUT DC 18 V,
500 mA ANT. 1ANT. 2
MODEL: U-REMIX 3
WWW.MADBOY-AUDIO.COM
SERIAL NO.: POWER
INPUT
OPTICAL OUT
4

WWW.MADBOY-AUDIO.COM
7
1
2
4
5
Functions
1. GRILL: Removable metal grill protects a cartridge from damage and an inner foam filter reduces wind, breath and
pop noises.
2. CARTRIDGE: Replaceable microphone cartridge.
3. POWER INDICATOR: Lights up when power is turned on.
4. LED DISPLAY:
Battery level indicator: Indicates the current battery level. If the indicator blinks, the battery level is low and
batteries must be replaced immediately. Low battery level may cause signal degration or a complete signal loss.
Signal level indicator: Indicates the RF signal level of the microphone.
Frequency: Indicates selected frequency of the microphone.
5. POWER: Press the power switch shortly to turn on the microphone.
6. SELECT: Press the select switch shortly to select the frequency. Each microphone has 8 selectable frequencies.
7. BATTERY COVER: Battery compartment for two 1.5 V ´AA´ batteries. Remove batteries if the microphone is not
used for long time to prevent battery leakage.
Operation
ŸOpen the battery cover. Install two ’AA’ batteries and
close the cover. Pay attention to the correct polarity.
ŸTurn on the microphone by shortly pressing the power
switch. The power indicator and the display will light up.
ŸReceiver’s RF indicator should turn on now to indicate
connection between the wireless microphone and
receiver.
ŸIf the battery level indicator in the microphone starts to
blink during operation, battery level is low. Please replace
with new batteries immediately.
ŸTurn off the microphone by long pressing the power
switch.
Wireless Microphone
U-REMIX 3
6
3
PO WE R SE LE CT
FREQUENCY
BATTERY
LEVEL
INDICATOR
SIGNAL
LEVEL
INDICATOR
Pairing
Each microphone has a unique ID code. Receiver must be paired with the microphones to be able to make a
wireless connection. In each set the receiver has been pre-paired with the microphones by default. In case you need
to replace the microphone, please pair the receiver with new microphone.
1. Turn off the receiver and microphones.
2. Press and hold both POWER and SELECT buttons on the microphone until the display starts to blink.
3. Turn on the receiver. RF indicator on the receiver will blink three times and then turns blue. Now the receiver is
paired with new microphone.
4. Press SELECT button on the microphone to finish pairing.
Please handle the microphone with care. Warranty
does not cover damage caused by accidental
misuse of the product.
7

AUDIO SOURCE
ACTIVE SPEAKERS
R
L
R
L
SOUNDBAR /
AMPLIFIER
Connecting the Receiver
WWW.MADBOY-AUDIO.COM
8
Basic connecting instructions
1. Connect the power adapter to the DC INPUT on the receiver.
2. Connect antennas to the receiver.
3. Connect the receiver to the audio source and audio system (active speakers, amplifier, soundbar).
Connecting the audio source
You can play music either from RCA input or using Bluetooth mobile device. Audio from RCA input and Bluetooth
audio is mixed together. Stop the playback from analog audio source while you are using bluetooth audio interface.
Connecting the Bluetooth device
1. Turn on Bluetooth on your mobile device and search for bluetooth devices.
2. Select ”U-REMIX 3" on the bluetooth device list. No password required.
3. Once connected, you can play music on your mobile device.
Connecting the audio source to the analog RCA input
You can connect audio source to the RCA input connectors on the back panel using RCA cable if your audio source
has RCA output. In case your audio source (Smart-TV, computer, phone) has 1/8" headphone output, use 1/8" TRS
plug - RCA cable to connect the audio source.
Connecting the audio system
You can connect your audio system (amplifier, soundbar, home theater, active speakers) digitally using Toslink output
or analogically using RCA output.
Adjusting the system
1. Adjust the music volume and microphone volumes to minimum level in U-REMIX 3.
2. Adjust the volume of your audio system to 80-100%.
3. Speak to the microphone and adjust the microphone volume until your voice can be heard clearly.
4. Adjust the music volume in U-REMIX 3. If the music is too load, decrease the volume from audio source.
LR
IN
OUT
MONO OUT DC 18 V,
500 mA ANT 1ANT. 2
MODEL: U-REMIX 3
WWW.MADBOY-AUDIO.COM
SERIAL NO.: POWER
INPUT
OPTICAL OUT

WWW.MADBOY-AUDIO.COM
10
Connecting the Receiver
Connecting as a wireless receiver
You can also connect U-REMIX 3 to the microphone input of your mixer or mixing amplifier and use U-
REMIX 3 only as a wireless microphone receiver. Follow the instructions below.
Instructions:
1. Turn the power off to the U-REMIX 3 and your mixer or mixing amplifier.
2. Unpair Bluetooth device with your U-REMIX 3 and remove RCA audio cables from the input of U-
REMIX 3.
3. Adjust ECHO and MUSIC to minimum position and TONE to center position on the front panel of U-
REMIX 3. Check the correct positions on the picture below.
4. Set microphone volumes (MIC 1 / MIC 2) to 1/4 position from the maximum level on the front panel of
U-REMIX 3. Do not set volume over the 1/4 position. Too high signal level makes microphone sound
to clip in the input of the mixer or mixing amplifier. Check the correct positions on the picture below.
5. Connect unbalanced 1/4" plug cable from the mono output of U-REMIX 3 to microphone input of your
mixer or mixing amplifier.
6. Turn the power on to the U-REMIX 3 and your mixer or mixing amplifier.
7. Turn on a wireless microphone and adjust microphone volume, equalizator and effect to desired level
from your mixer or mixing amplifier. If microphone sound is distorted, decrease microphone volume
on the front panel of U-REMIX 3.
MIXER / MIXING AMPLIFIER
MIC 1 MIC 2
ECHO MIC 1 VOL MIC 2 VOL TONE VOLUME
U-REMIX 3
POWER
RF1 AF1 RF2 AF2
BASS TREBLE
MICROPHONES MUSIC
U-R EMI X 3
POWE R SELEC T
LR
IN
OUT
MONO OUT DC 18 V,
500 mA ANT. 1ANT. 2
MODEL: U-REMIX 3
WWW.MADBOY-AUDIO.COM
SERIAL NO.: POWER
INPUT
OPTICAL OUT
U-R EMI X 3
POWE R SELEC T
LR
IN
OUT
MONO OUT DC 18 V,
500 mA ANT. 1ANT. 2
MODEL: U-REMIX 3
WWW.MADBOY-AUDIO.COM
SERIAL NO.: POWER
INPUT
OPTICAL OUT
WWW.MADBOY-AUDIO.COM
9
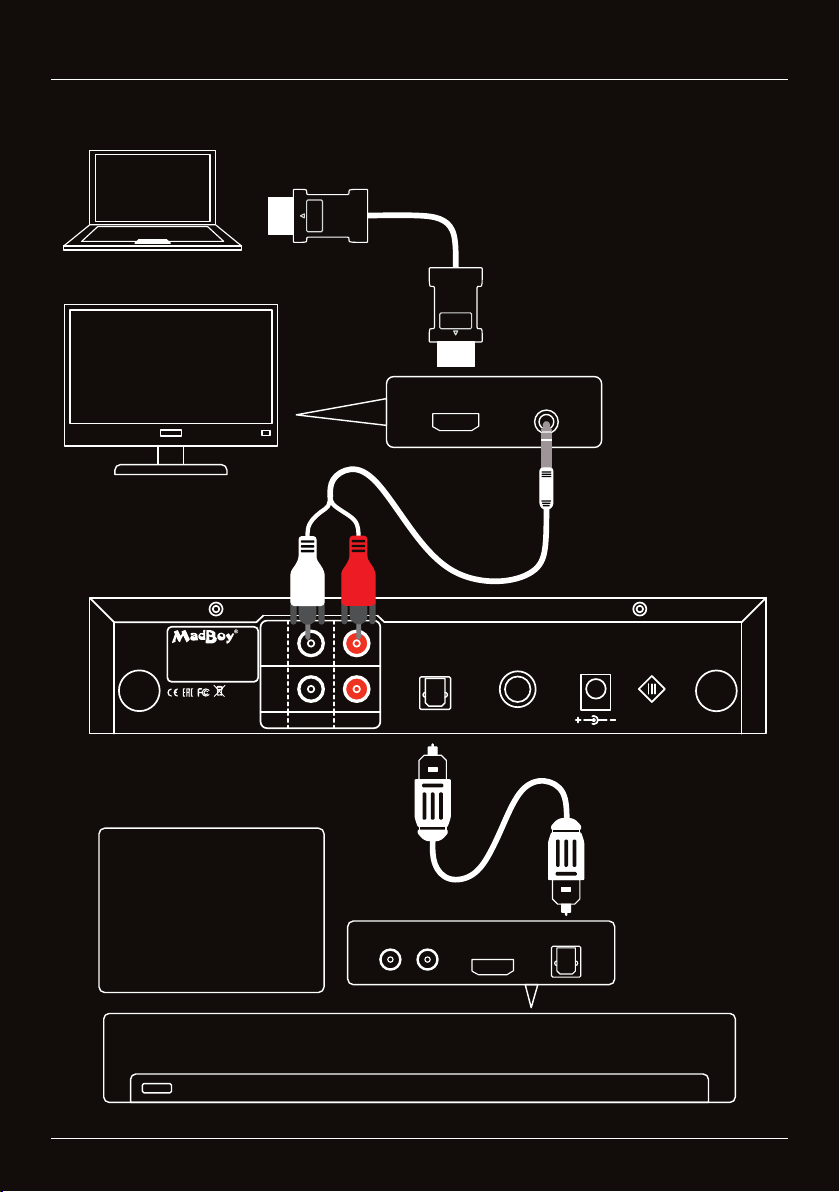
Connection Examples
HDMI
HDMI
HDMI cable
(picture + music to TV)
HEADPHONES
L
HDMI
R
1/8" stereo plug -
RCA cable
(music from TV to U-REMIX 3)
HDMI
OPTICAL
SOUNDBAR
R
L
U-REMIX 3
Toslink cable
(music + microphones)
Connecting the audio from a computer through the television
ŸNote! Soundbar volume
must be typically set
around 80-100% to make
the microphone sound loud
enough.
ŸSoundbar must support 2-
channel PCM audio (48
kHz).
Table des matières
Langues :
Autres manuels MadBoy Système de karaoké

MadBoy
MadBoy MFP-1500 Manuel utilisateur

MadBoy
MadBoy Thunder Manuel utilisateur

MadBoy
MadBoy REMIX-31 Manuel utilisateur

MadBoy
MadBoy TOTAL Manuel utilisateur

MadBoy
MadBoy U-REMIX 2 Manuel utilisateur

MadBoy
MadBoy Boost-202 Manuel utilisateur

MadBoy
MadBoy Boomer Manuel utilisateur

MadBoy
MadBoy MFP-1000X Manuel utilisateur

MadBoy
MadBoy MFP-1500 Manuel utilisateur
Manuels Système de karaoké populaires d'autres marques


Karaoke Warehouse
Karaoke Warehouse Player 2000 Manuel utilisateur

VocoPro
VocoPro DVG-888K II Manuel utilisateur

ION
ION DISCOVER KEYBOARD USB Manuel utilisateur

The Singing Machine
The Singing Machine SMVG-620 Manuel utilisateur

Singsation
Singsation CENTER STAGE FREESTYLE Manuel utilisateur

RSQ
RSQ NEO K-2 Manuel utilisateur


